Proven Methods: Essential Gem Setting In Wood
Putting gems into wood without glue requires creating a precise socket using drill bits and rotary tools, then setting the stone using friction, slight pressure, or minimal epoxy for security. This technique works best with stable woods and correctly sized gemstones, offering a professional, durable finish for jewelry or decorative wood art.
Have you ever admired beautiful wood crafts with sparkling stones but thought it was too tricky for a DIY project? Many beginner woodworkers worry about stones popping out or needing messy glue that ruins the natural look of the wood. Setting small gemstones, cabochons, or even colorful glass chips into wood doesn’t have to be hard!
I’m Md Meraj, and I’ve learned that the secret is preparation—making the wood cradle the gem perfectly. Forget the frustration; we will walk through the simplest, most proven methods to achieve a professional, secure, and glue-free (or nearly glue-free) setting. By the end of this guide, you’ll feel confident using your basic tools to transform your woodworking pieces.
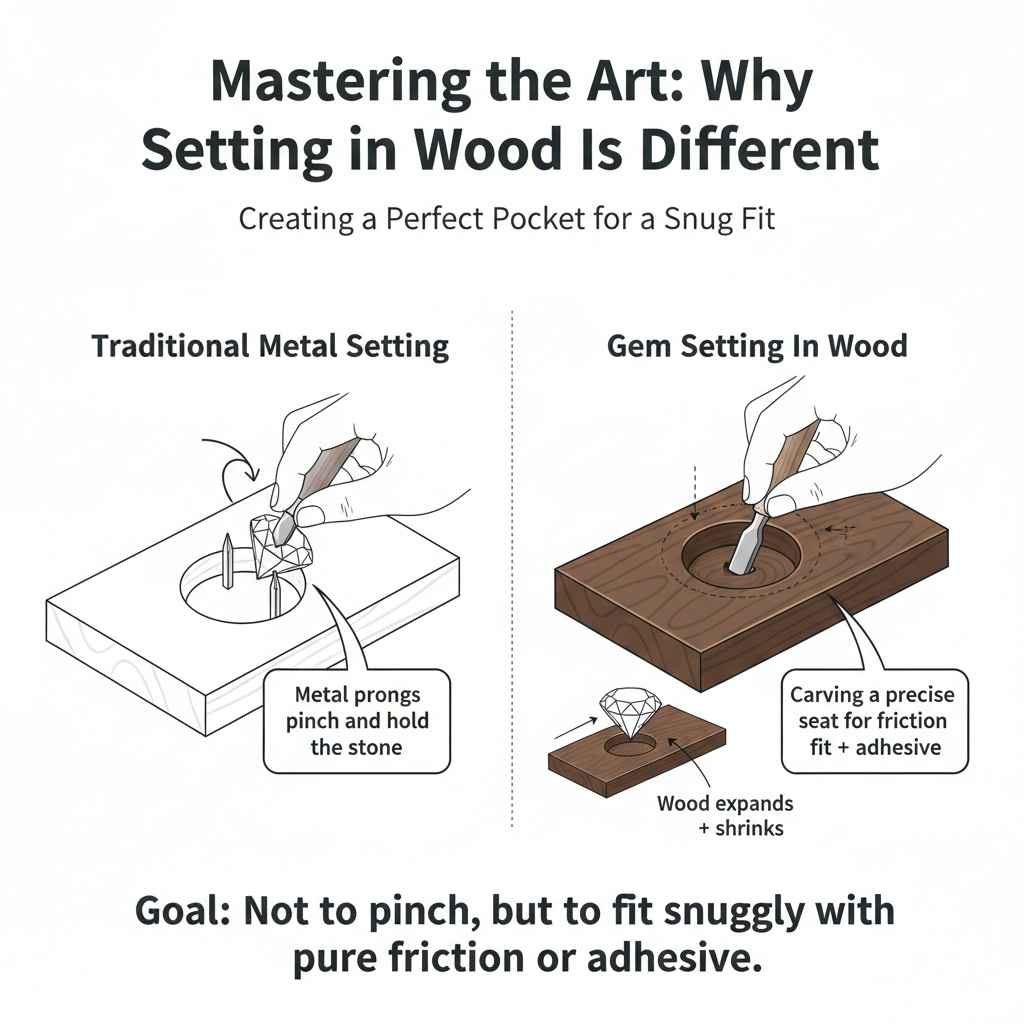
Mastering the Art: Why Setting Gems in Wood Is Different
When jewelers set stones in metal, they use metal prongs or bezels that bend over the stone. Wood doesn’t behave that way. It expands, shrinks, and can split if stressed too much. Because of this, our goal in wood setting is not to pinch the gem, but to create a perfectly sized “pocket” or “seat” so the gem fits snugly using pure friction, or with just a tiny dab of help.
The Right Materials: Selecting Your Wood and “Gems”
Before we start drilling, the success of your setting depends entirely on what you are setting and what you are setting it into. A bad choice here will cause problems no matter how perfect your drilling is!
Choosing the Right Wood for Setting
Hardwoods are almost always better than softwoods for gem setting. Hardwoods offer better resistance against the friction and slight pressure used to hold the stone in place. They also tend to have a finer, more stable grain structure.
Excellent Choices: Maple, Cherry, Walnut, and exotic woods like Bocote. These are dense and hold detail well.
Woods to Be Cautious With: Pine or Poplar. These softwoods are prone to crushing under pressure and can compress unevenly, leading to loose settings over time.
Understanding Your “Gems” (Stones and Inlays)
When setting in wood, you usually have two main choices for what goes into the hole. Your setting method will depend heavily on the shape you choose.
| Gem Type/Shape | Ideal Setting Method | Notes for Beginners |
|---|---|---|
| Cabochons (Flat Bottom, Rounded Top) | Friction/Pressure Fit or Shallow Epoxy Set | Easiest. The flat bottom provides maximum contact area for friction. |
| Faceted Stones (e.g., small rhinestones) | Minimal Epoxy/Jeweler’s Cement | Harder. Requires creating a tiny, precise seating cone. |
| Flat-Backed Material (e.g., polished glass chips) | Adhesive Only (Technically an inlay) | Requires careful surface preparation for the adhesive to stick well. |
Essential Tools for Precise Wood Gem Setting
You don’t need a jeweler’s workbench, but precision is key. This project relies heavily on drilling accurately. If your tools wobble, your holes will be wrong, and your gem won’t fit!
Tool Checklist for Beginners
Drill Press (Highly Recommended): A hand drill often wanders, leading to angled holes. A drill press ensures the hole is perfectly vertical (perpendicular to the wood surface). This is crucial for a good fit.
Sharp Brad-Point Drill Bits: These bits have sharp points that prevent “walking” (skipping across the wood surface) and create clean entry points.
Forstner Bits (Optional but Useful): For creating very flat-bottomed holes, especially for cabochons, a Forstner bit can leave a cleaner base than standard twist bits.
Digital Calipers: You must measure the gem’s diameter accurately to select the correct drill bit size. Precision is everything here!
Rotary Tool (like a Dremel): Essential for smoothing interiors, creating relief cuts, or shaping the wood surface around the stone.
Push Stick or Clamp: Always secure your wood workpiece to prevent movement. Safety first!
Very Fine Sandpaper (400 grit and higher): For final smoothing of the seat.
Method 1: The Friction Fit (The “Glue-Free” Standard)
This method relies purely on dimensional accuracy. The hole must be just slightly smaller than the widest part of your gemstone. This is often called a “press fit.” This works best for cabochons or objects with a uniform thickness.
Step 1: Accurate Measurement is Non-Negotiable
Using your digital calipers, measure the widest part of the stone—usually the girdle (the widest part between the crown and the pavilion, or the widest point on a cabochon).
Pro Tip on Sizing: Do not measure the stone and immediately pick a drill bit of the exact same size. Wood has “spring back.” A hole drilled exactly to size might be too tight or crack the wood. You need to step down slightly.
Step 2: Selecting the Right Drill Bit Size
For a successful friction fit, you generally want the drill bit size to be about 0.002 to 0.004 inches smaller than the measured stone diameter for dense hardwoods. If you are working with softer wood, reduce that difference even more.
Since wood resists precise measurement on a micro-scale, we use a technique called “test drilling.”
Take a scrap piece of the exact same wood you plan to use.
Use a bit that seems slightly too small. Drill a test hole.
Test fit your stone.
If it’s too tight, move up one drill size. If it’s too loose, stick with the current size, or try the next size down, remembering that the friction fit relies on the wood fibers gripping the stone’s sides.
Step 3: Drilling the Socket Precisely
Set up your drill press. Ensure the wood is firmly clamped. You must drill the hole straight down. A slightly angled hole will cause the gem to sit unevenly, catching the light poorly or rocking in the setting.
Start slow to allow the brad point to score the surface.
Increase speed moderately. Too slow generates heat; too fast crushes the wood fibers.
Drill to the depth required. For a cabochon, the depth should be slightly less than the stone’s height, leaving room for the stone to settle firmly.
Step 4: Creating the Seat and Finalizing the Fit
If you used a twist bit, the bottom of the hole might be conical (pointy). Gems need a flat surface to rest on.
Use a small, round rotary tool burr or a sanding drum attached to your rotary tool.
Gently clean the bottom of the hole to make it flat. This flat area is called the “seat.”
Test the fit. The gem should sit snugly, requiring slight pressure to push it in, and it should stay put when held upside down.
If the fit is perfect, you are done! The friction from the wood fibers gripping the sides and the support from the flat seat should hold it securely.
Method 2: The Relief Cut and Expansion Method (For Fragile Gems)
If your gem is slightly larger than what the wood can safely hold via friction alone, or if you are worried about cracking the surrounding wood, we introduce tiny relief cuts inside the hole. This technique is inspired by how jewelers make seats for stones with girdles.
Understanding Relief Cuts
Relief cuts are tiny notches made inside the drilled hole near the top surface. These allow the wood fibers just below the surface to flex slightly outwards, accommodating the stone without putting undue pressure on the surrounding wood.
The Process Using a Rotary Tool
Drill your initial socket hole (as per Method 1), making it slightly deeper than necessary.
Using the smallest, sharpest burr or a specialized pointed grinding bit in your rotary tool, carefully widen the very bottom of the hole just slightly. This widens the base, ensuring the main body of the stone sets deeper.
Now, move to the upper section—about 1/16th of an inch from the top surface. Use a thin, angled burr to scrape away tiny slivers of wood from the sides. These are your relief cuts. They shouldn’t look like big grooves; they are tiny points of slight clearance.
Test the stone. You are aiming for the stone to be held primarily by the center, with the relief cuts preventing the top edge of the wood from cracking under the gentle insertion pressure.
This method mimics the function of a jeweler’s bezel by creating a slight undercutting that provides extra grip once the stone is pressed in.
Method 3: Hybrid Setting with Minimal Adhesive (For Maximum Security)
While the goal is often glue-free, for pieces that will be handled frequently (like decorative pulls or small jewelry components), a tiny drop of adhesive offers peace of mind. We are not gluing the stone into the wood, but ensuring the stone stays against the perfectly cut seat.
When to Use Adhesive
The wood is slightly soft (e.g., maple burl or softer grades of walnut).
The setting depth is shallow, and you need extra assurance against upward pull.
The final piece will experience vibration or significant handling.
The Invisible Adhesive Technique
The key here is using a clear, low-viscosity (thin) glue that wicks into the tiny gaps, rather than a thick gel that sits visibly on top.
Prepare the Seat: Ensure the wood seat (Method 1, Step 4) is perfectly clean. Use compressed air or a small brush to remove all dust. Any dust will stop the glue from bonding.
Apply Sparingly: Place only a tiny pinprick amount of clear, high-strength adhesive (like a quality clear epoxy or specialized gem-setting cement—not standard wood glue) onto a piece of scrap plastic.
The Transfer: Dip the very bottom edge (the girdle area) of the stone into the glue, picking up only a microscopic film.
Set and Cure: Quickly place the stone into the perfectly prepared socket. Press it down gently and evenly until it seats fully. Wipe away any visible squeeze-out immediately with a clean, dry swab.
The goal is for the adhesive to only coat the microscopic gaps between the stone and the wood walls, creating a bond that is entirely invisible from the top surface. For more information on finishes that complement your wood and stone work, organizations like the U.S. Food & Drug Administration provide guidelines on materials used near consumables, which is a good starting point for ensuring material safety in your projects.
Advanced Consideration: Setting Irregular Shapes
If you are setting natural, uncut stones, river rocks, or irregularly shaped pieces of glass, you cannot rely on standard drilling. This moves the project into the realm of mosaic or sculptural inlay, but it can still be managed with DIY tools.
Creating a Custom Molded Seat
Instead of drilling one hole, you create a shallow depression.
Outline: Trace the exact outline of the irregular object onto the wood surface.
Shaping the Depression: Use a narrow, pointed rotary tool bit (like a ball-end burr) to slowly grind away wood within the traced outline. Go slowly and check the depth frequently against the stone’s height.
Creating Undercuts: For maximum grip on an odd shape, use an angled bit to create tiny undercuts around the edges of your traced area. These act like small locking shelves.
Finishing: Once the shape fits perfectly, you may need to rely on a thin application of clear, strong epoxy (Method 3) because achieving enough pure friction grip on an irregular shape is often impossible.
This artistic approach requires patience, but the resulting look is truly unique, resembling found objects beautifully integrated into the wood.
Troubleshooting Common Setting Issues
Even with careful planning, things can go wrong. Here are fixes for the most common beginner headaches:
| Problem | Likely Cause | Solution |
|---|---|---|
| Stone is loose or falls out easily. | Hole was drilled too large, or wood is too soft (no grip). | If a small gap exists, try the Hybrid Setting (Method 3) with clear epoxy. If the hole is huge, fill it with wood filler dust mixture, let it cure, and re-drill a slightly smaller hole. |
| Wood cracks when inserting the stone. | The hole was drilled too tightly, or the insertion pressure was uneven. | If the crack is small, you can stabilize it by drilling a tiny pilot hole perpendicular to the crack and inserting a sliver of wood glue, then clamping lightly. For major cracks, start over on a new piece. |
| The stone sits too deep/too high. | Incorrect seating depth or a non-flat bottom in the hole. | If too deep, you need to add material underneath (a tiny shim or clear epoxy base). If too high, use your rotary tool to carefully deepen the seat evenly. |
| Rotary tool dust is obscuring my view. | Dust accumulation during shaping. | Regularly use a puff of compressed air or a vacuum attachment right next to the work area to keep the seat visible as you refine it. |
Tips for Long-Term Security and Aesthetics
Once your gems are set, you want them to last for years. The finishing process is just as important as the setting process itself.
Finishing Over the Setting
If you are applying a finish (like oil, wax, or lacquer) to the entire piece, ensure your setting method is compatible with that finish.
Oil/Wax Finishes: These penetrate the wood pores and the microscopic gaps around the stone, actually enhancing the friction fit slightly over time. They are very safe for friction settings.
Lacquer/Varnish: When applying a film finish, ensure you use thin coats. A thick coat pooled around the edge of the stone might obscure the look or, in extreme cases, crack the wood when the finish cures and shrinks.
Buffing: If you use a friction fit, you can often buff the entire piece lightly after oiling. The slight buffing action can help polish the exposed top of the stone and the surrounding wood edge together, blending them seamlessly.
Addressing Wood Movement
Remember that wood is an organic material that naturally expands in humidity and contracts in dry air. A friction fit that is perfect in your workshop might become slightly loose in a dry winter or tight in a humid summer.
For heirloom pieces, understand that this movement is inevitable. When setting precious or large stones, using a minimal amount of specialized flexible adhesive (one designed for dissimilar materials) offers the best defense against seasonal shifts, as it provides a little bit of give.

FAQ: Getting Started with Gem Setting in Wood
Q: Can I use regular super glue (cyanoacrylate) for setting gems in wood?
A: While it sets fast, super glue can turn hazy (bloom) when it cures and often bonds too rigidly, which can lead to the wood cracking later. It’s better to use clear epoxy or specialized gem cement for stability.
Q: What is the most crucial tool for beginners?
A: The drill press. It guarantees vertical drilling. If your holes are angled even slightly, the stone will never seat properly, leading to instability.
Q: How do I know what drill bit size to use if my gem is 5.5mm?
A: You need a bit slightly smaller than 5.5mm, perhaps 5.4mm or 5.3mm, depending on your wood hardness. Always drill a test hole in scrap wood first, as micro-measurements are tricky with wood.
Q: Is it safe to use a hammer to tap the stone into place?
A: No, never use a hammer directly on a stone inserted into wood. Use a dowel rod or a block of scrap wood placed on top of the stone, and tap the dowel gently with a small mallet. This distributes the force evenly.
Q: Do I have to flatten the bottom of the hole?
A: Yes, if you used a standard twist bit. A flat bottom (the seat) ensures the stone is supported evenly. If the base is pointed, the stone will rock and eventually loosen.
Q: Can I use this technique on thin veneers or plywood?
A: It is extremely risky. Thin veneers can easily tear out, and plywood layers separate under pressure. This method is best suited for solid blocks of hardwood.
You now have the blueprint for successfully setting gems into your woodworking projects, whether you choose the pure friction fit, the secure hybrid method, or the artistic shaping technique. Remember that woodworking is a tactile skill; your first few attempts should be on scrap pieces until you gain confidence in measuring and drilling to your desired tolerance.
The secret is always in the preparation—making the wood perfectly ready to embrace the sparkle of the stone. Start small, measure twice, and enjoy the satisfying feeling when that beautiful gem locks perfectly into your handcrafted wooden piece. Happy crafting!