How Far to Space Recessed Lights: Genius Spacing
Quick Summary: Spacing recessed lights evenly ensures consistent, beautiful illumination. For general lighting, place them 3-5 feet apart and 4-6 feet from walls. For task lighting, space them closer, about 2-3 feet apart, centered over the work area. We’ll break down the simple math and smart placement for your perfect lighting.
Ever look up at your ceiling and feel like the lights are just… wrong? Maybe one corner is too dark, or there’s a bright spot in the middle of the room. Getting recessed lighting spaced just right can feel like a puzzle, but it doesn’t have to be! I’m Md Meraj, and I love helping folks like you tackle home projects with confidence. We’ll walk through exactly how to figure out the perfect distance for your recessed lights, making your rooms feel welcoming and look fantastic. No complicated formulas, just smart, simple steps anyone can follow.
We’ll cover everything from understanding the basics of light spread to figuring out the best placement for different rooms and purposes. Ready to banish those dark corners and create a beautifully lit space? Let’s get started!
Why Smart Spacing Matters for Recessed Lights
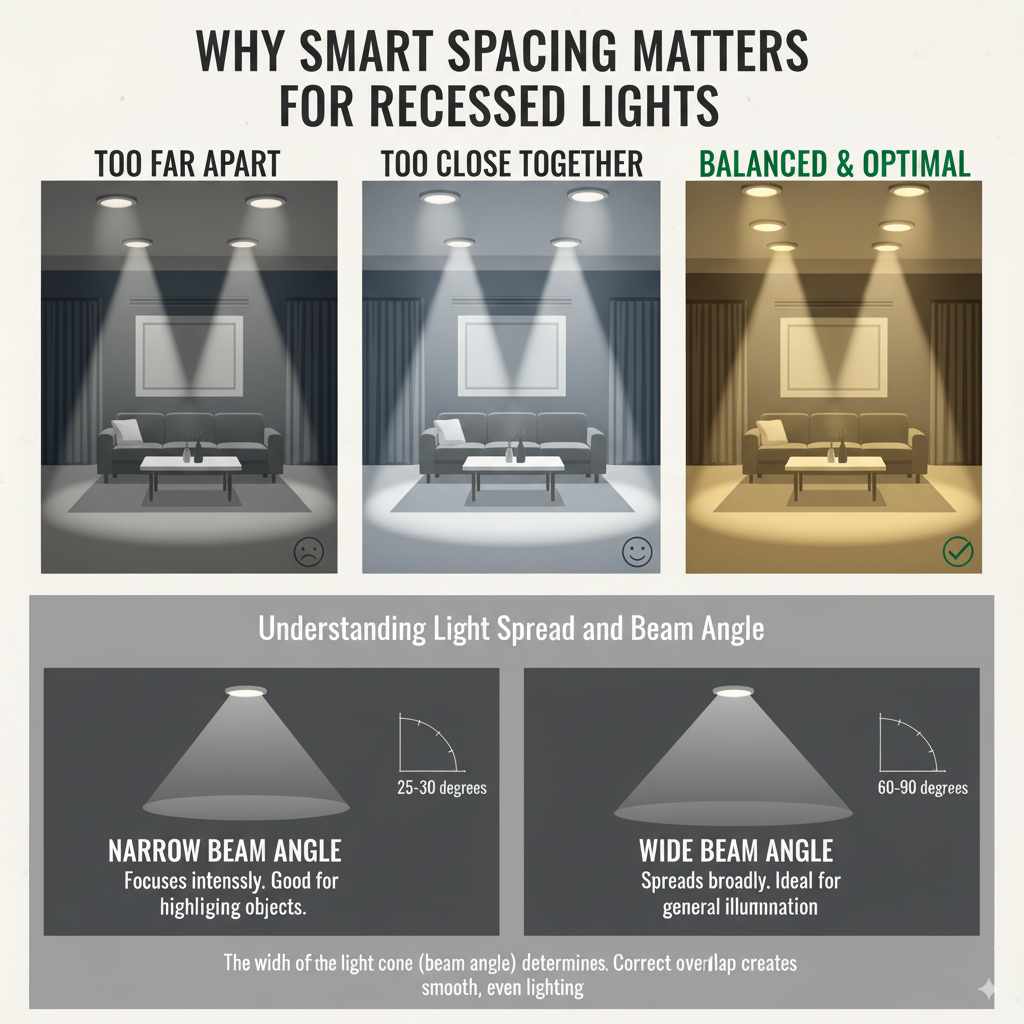
Recessed lights, also known as can lights or pot lights, are fantastic for creating a clean, modern look and providing excellent general illumination. But their magic really shines when they’re spaced correctly. Too far apart, and you’ll have dark shadows and uneven light. Too close, and you might end up with a “runway” effect that feels less cozy and more like a runway. The goal is to achieve balanced, comfortable lighting that enhances your room’s atmosphere and functionality.
Think about it: good lighting can make a small room feel bigger, a dark hallway feel safer, and a kitchen workspace more efficient. The spacing of your recessed lights is the key to unlocking these benefits. It’s not just about aesthetics; it’s about creating a space that feels good to be in.
Understanding Light Spread and Beam Angle
Before we get into spacing, let’s quickly talk about how light travels from your recessed fixtures. Each recessed light has a bulb (or integrated LED) that emits light. This light isn’t a pinpoint; it spreads out in a cone shape. The width of this cone is called the “beam angle.”
- Narrow Beam Angle (e.g., 25-30 degrees): This focuses light more intensely in a smaller area, good for highlighting specific objects or artwork.
- Wide Beam Angle (e.g., 60-90 degrees): This spreads light out more broadly, ideal for general room illumination.
Most recessed lights used for general room lighting have a wide beam angle. The farther the light travels, the wider the cone of light becomes. This is crucial because it determines how much overlap there will be between the light cones of adjacent fixtures, which is what creates smooth, even lighting.
The Golden Rules: Simple Formulas for Spacing
Now, let’s get to the good stuff – how to actually figure out the spacing. Don’t worry, we’ll keep it simple! There are a couple of easy-to-remember rules of thumb that work for most situations.
Rule of Thumb #1: The “Room Dimension” Method
This is a fantastic starting point for general room lighting. It’s easy to calculate and gives you a great baseline.
How it works:
- Measure your room: Determine the length and width of the room in feet.
- Divide by two: Take the shorter dimension of your room and divide it by two. This number will be your approximate spacing distance between lights.
Example: If your room is 12 feet wide and 15 feet long, the shorter dimension is 12 feet. Divide 12 by 2, and you get 6 feet. This suggests spacing your lights about 6 feet apart. You’d then adjust this based on the other dimension and wall distance.
Important Note: This calculation often gives you the spacing between the lights. You’ll also need to consider how far the lights are from the walls.
Rule of Thumb #2: The “Distance from Wall” Guideline
This rule helps ensure you don’t have harsh shadows at the edges of your room or lights too close to the walls, which can look awkward.
How it works:
- General Rule: For most general lighting applications, aim to place your first and last lights about 4 to 6 feet away from the walls.
- Adjusting for Room Size: In smaller rooms, you might need to bring them a bit closer (e.g., 3 feet). In very large rooms, you might keep them at 6 feet or even slightly more.
Putting it Together: If you calculated a spacing of 6 feet between lights using Rule of Thumb #1, and you have a 12-foot wide room, you’d place your first light about 3-4 feet from one wall, then another light about 6 feet from that one, and then your last light about 3-4 feet from the opposite wall. This creates a balanced look.
Spacing for Different Room Types and Purposes
The “perfect” spacing isn’t one-size-fits-all. It depends on what you’re using the room for and the specific layout.
Living Rooms and Bedrooms: Creating Ambiance
In living rooms and bedrooms, the goal is often a comfortable, inviting atmosphere. You want even light that doesn’t feel harsh, with enough brightness for reading or activities but soft enough for relaxation.
- General Spacing: Use the “Room Dimension” method (shorter dimension / 2) for spacing between lights.
- Wall Distance: Aim for 4-6 feet from the walls.
- Number of Lights: For a typical 12×15 foot room, you might use 4-6 lights. For example, two rows of two or three lights, spaced about 5-6 feet apart, and positioned 4-5 feet from the walls.
- Consideration: If you have a large sectional sofa or a specific seating area, you might adjust spacing slightly to ensure that area is well-lit without being overly bright.
Kitchens: Task Lighting is Key
Kitchens are all about function. You need bright, even light, especially over countertops and work surfaces. Shadows can be a real problem when chopping vegetables or reading recipes.
- Over Countertops: The most important rule here is to place lights so they illuminate your work surfaces. This usually means spacing them so they are centered over the edge of your cabinets or counters.
- Spacing: A common spacing is 2-3 feet apart, running parallel to the countertops.
- Distance from Wall: Typically, 1-2 feet from the wall where the cabinets are located.
- General Kitchen Lighting: In the center of the kitchen, you might use a wider spacing (e.g., 5-7 feet apart) for overall ambient light, but prioritize the task lighting along the counters.
- Tip: Consider using adjustable or gimbal-style recessed lights over kitchen islands or specific work zones to direct light exactly where you need it.
A good resource for understanding kitchen lighting, including recessed lights, can be found on the U.S. Department of Energy’s Energy Saver website, which offers insights into efficient lighting choices.
Hallways and entryways need to be well-lit for safety and to make a good first impression.
- Spacing: For hallways, a good rule is to space lights roughly every 5-8 feet, depending on the width.
- Wall Distance: Place them about 2-3 feet from the walls to avoid glare on the floor or walls.
- Consideration: In longer hallways, ensure there are no dark spots between fixtures. You might need to add an extra light or adjust spacing slightly.
Bathrooms: Avoiding Shadows at the Mirror
Bathroom lighting needs to be bright and flattering, especially around the vanity mirror.
- Vanity Area: Avoid placing recessed lights directly over your head when standing at the mirror, as this can cast unflattering shadows on your face. Instead, place them slightly in front of the vanity, perhaps 2-3 feet away from the mirror, and spaced about 2-3 feet apart.
- General Bathroom Lighting: For the rest of the bathroom, use the general room spacing rules (e.g., 4-6 feet apart, 3-4 feet from walls).
- Moisture Rating: Ensure any lights used in a bathroom are rated for damp or wet locations, as specified by electrical codes. You can find more on this in resources like the NFPA Electrical Safety Blog.
Calculating the Number of Lights Needed
Once you have your spacing figured out, you can calculate how many lights you’ll need. This is where a simple drawing of your room can be a lifesaver!
Steps:
- Draw a Plan: Sketch a simple rectangle representing your room.
- Mark Walls: Mark your desired distance from the walls (e.g., 4 feet).
- Mark Spacing: Using your calculated spacing (e.g., 5 feet), mark where the center of each light will go, working from one wall towards the other.
- Count: Count the marks. You’ll want to end up with a light a similar distance from the opposite wall as you started with.
Example Layout for a 12ft x 15ft Room (using 5ft spacing and 4ft from walls):
Across the 12ft Width:
- Start 4ft from Wall A.
- First light at 4ft.
- Second light at 4ft + 5ft = 9ft.
- Third light at 9ft + 5ft = 14ft. This is too far for a 12ft room if you want to end 4ft from Wall B (4ft + 4ft = 8ft total distance covered by walls). Let’s adjust.
Revised Approach for 12ft Width:
- If you want 2 lights across the width: Place them at 3ft and 9ft (12ft total – 3ft wall spacing = 9ft). This gives 6ft between lights.
- If you want 3 lights across the width: You need to fit 3 lights and 2 spaces. Total span is 12ft. Let’s say you want 3ft from each wall. That leaves 6ft for the lights and spaces. Divide 6ft by 2 spaces = 3ft per space. Lights would be at 3ft, 6ft, 9ft. This works well!
Across the 15ft Length (assuming you’ve decided on 3 lights across the width):
- You’ll likely want 3 or 4 lights down the length. Let’s aim for 4 lights with 4ft from walls.
- Start 4ft from Wall C.
- First light at 4ft.
- Second light at 4ft + 5ft = 9ft.
- Third light at 9ft + 5ft = 14ft.
- Fourth light at 14ft + 5ft = 19ft. Too far for a 15ft room if ending 4ft from Wall D (4ft + 4ft = 8ft total wall space).
Revised Approach for 15ft Length:
- If you want 3 lights down the length: Place them at 3.75ft, 7.5ft, 11.25ft (This spacing is 15ft / 4 = 3.75ft from wall, 3.75ft between lights. This is often a good visual balance).
- If you want 4 lights down the length: You need to fit 4 lights and 3 spaces. Total span is 15ft. Let’s say you want 3ft from each wall. That leaves 9ft for lights and spaces. Divide 9ft by 3 spaces = 3ft per space. Lights would be at 3ft, 6ft, 9ft, 12ft. This is a good layout for 4 lights.
So, for a 12×15 room, a layout of 3 lights across the width and 4 lights down the length (total of 12 lights) spaced approximately 3ft apart and 3ft from the walls would provide excellent, even coverage.
Factors That Influence Spacing
While the rules of thumb are great, a few other things can tweak your spacing decisions.
Ceiling Height
Higher Ceilings: If you have very high ceilings (9 feet or more), the light has to travel further. You might need to space lights slightly closer together or use bulbs with a narrower beam angle to ensure the light reaches the floor effectively without becoming too dim. Or, consider larger aperture fixtures.
Lower Ceilings: For lower ceilings (8 feet or less), lights can feel very close. You might get away with spacing them slightly further apart, but be careful not to create large dark areas. Wide beam angles are usually best here.
Fixture Size (Aperture)
Recessed lights come in different sizes, commonly referred to by their aperture (the diameter of the visible opening). Common sizes are 4-inch, 5-inch, and 6-inch.
- Larger Fixtures (6-inch): These generally have a wider light spread and can sometimes be spaced slightly further apart than smaller fixtures, but still follow the general spacing rules.
- Smaller Fixtures (4-inch): These can be great for smaller rooms or tighter spacing needs, like in kitchens or hallways. They might need to be spaced a bit closer to achieve the same overall light level as larger fixtures.
Bulb Type and Lumens
The brightness of your bulbs, measured in lumens, and their beam angle (as discussed earlier) are critical. A brighter bulb (higher lumens) will illuminate a larger area, potentially allowing for wider spacing. Conversely, dimmer bulbs will require closer spacing.
Lumens vs. Watts: Remember, lumens measure brightness, while watts measure energy consumption. Look for lumen ratings on your bulb packaging.
Room Function and Personal Preference
Always consider how you use the room. A home theater room might need dimmable lights with wider spacing and fewer fixtures, while a craft room will demand bright, even light with closer spacing.
Don’t be afraid to adjust slightly based on your own comfort and aesthetic preferences. What looks good to one person might be different for another.
Tools and Materials You Might Need
Gathering the right tools before you start can make the job much smoother and safer.
- Tape Measure: Essential for all your measurements.
- Pencil: For marking ceiling joists and fixture locations.
- Stud Finder: To locate ceiling joists and avoid cutting into them.
- Level: To ensure your markings are straight.
- Safety Glasses: Always protect your eyes, especially when working overhead.
- Ladder or Step Stool: A stable one is crucial for safety.
- Utility Knife or Drywall Saw: For cutting holes in the drywall for the fixtures.
- Wire Strippers/Cutters: If you’re doing the electrical connections yourself (ensure you are comfortable and knowledgeable, or hire an electrician).
- Recessed Light Fixtures and Bulbs: Make sure you have the correct type for your ceiling and room (e.g., IC-rated for direct contact with insulation).
- Electrical Box (if not integrated): For housing connections.
Safety First: Always turn off the power to the circuit you’ll be working on at the breaker box before starting any electrical work. If you’re unsure about any part of the electrical installation, it’s always best to consult a qualified electrician.
Step-by-Step: Installing and Spacing Recessed Lights (Beginner Focus)
This is a simplified overview. Always follow manufacturer instructions and local building codes. If you’re uncomfortable with any electrical steps, hire a professional.
1. Plan Your Layout
This is the most critical step! Use the methods we discussed (room dimension, wall distance, and considering room function) to mark your ideal fixture locations on the ceiling. Draw it out on paper first, then transfer marks to the ceiling.
2. Locate Ceiling Joists
Use a stud finder to locate ceiling joists. You generally want to place your lights between joists, not cut into them. Mark the joist locations.
3. Mark Fixture Cutouts
Once you’ve confirmed your desired locations are between joists, use the template that comes with your recessed light fixture (or measure the can size) to trace the cutout circle onto the ceiling. Double-check your measurements!
4. Cut the Holes
Carefully cut along your traced lines using a drywall saw or utility knife. Start with a small pilot hole to ensure you’re in the right spot and not hitting a joist or obstruction. Clear away any loose drywall debris.
5. Run Wiring (If Applicable)
This is where it gets more complex. If you’re adding new circuits or extending existing ones, you’ll need to run electrical cable (e.g., Romex) from your power source to each fixture location. This often involves fishing wires through walls and ceilings. Again, if this is beyond your comfort level, hire an electrician.
6. Connect the Wiring
IMPORTANT: Power must be OFF at the breaker.
- Pull the wire through the hole into the ceiling space.
- Connect the fixture’s wires to the house wiring: black to black (hot), white to white (neutral), and green or bare copper to green or bare copper (ground). Use wire nuts for secure connections.
- If your fixture uses a separate junction box, make those connections inside the box according to its instructions.
For more detailed wiring guidance, resources like The Family Handyman offer excellent visual guides.
7. Install the Fixture
Gently push the connected fixture up into the hole. Most modern recessed lights have spring clips or tabs that secure them to the drywall.
8. Install the Bulb and Trim
Screw in your chosen LED bulb. Then, attach the decorative trim piece to the fixture. This often just snaps or twists into place.
9. Test Your Lights
Once all fixtures are installed and wired, go to the breaker box and turn the power back on. Test each light to ensure it works correctly.
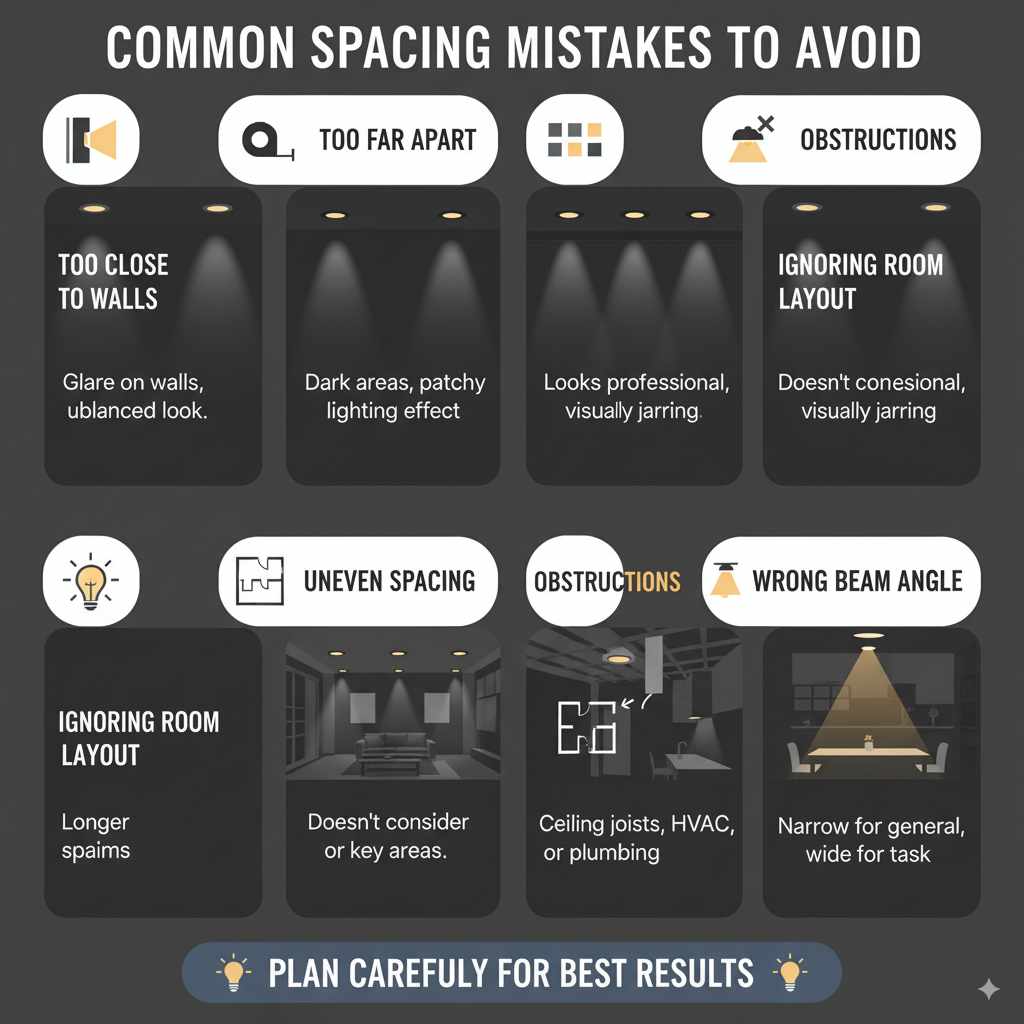
Common Spacing Mistakes to Avoid
Even with the best intentions, it’s easy to make a few missteps. Here are some common ones:
- Too Close to Walls: Lights too near the edge can create glare on the walls or feel unbalanced.
- Too Far Apart: This results in dark areas and a patchy lighting effect.
- Uneven Spacing: Lights that aren’t consistently spaced look unprofessional and can be visually jarring.
- Ignoring Room Layout: Placing lights without considering furniture placement or key functional areas.
- Not Accounting for Obstructions: Failing to check for ceiling joists, HVAC ducts, or plumbing before cutting holes.
- Wrong Beam Angle: Using a narrow beam for general lighting or a wide beam for task lighting where focus is needed.
FAQ: Your Recessed Lighting Questions Answered
Q1: How do I know if I have the right beam angle for my recessed lights?
A1: For general room lighting, a wide beam angle (60-90 degrees) is usually best to provide broad, even coverage. For specific task areas or highlighting art, a narrower beam (25-30 degrees) might be more suitable.
Q2: Can I mix different types of recessed lights in one room?
A2: While you can, it’s generally best to stick to the same type and size of fixture for consistent light quality and appearance. If you must mix, ensure they have similar color temperatures (e.g., all warm white) and that the spacing is adjusted to compensate for different light spreads.
Q3: What’s the difference between IC-rated and non-IC-rated recessed lights?
A3: IC-rated (Insulation Contact) fixtures are designed to be safely installed directly against ceiling insulation. Non-IC-rated fixtures require a gap between the fixture and insulation, usually needing a separate metal box around them. Always use the appropriate rating for your situation.
Q4: How far apart should recessed lights be in a very small room, like a closet or small bathroom?
A4: In very small spaces, you might only need one or two lights. For a closet, a single light in the center is often sufficient. For a small bathroom, follow the vanity lighting rules (2-3 feet from the mirror) and general room spacing for the rest, but you may need fewer fixtures overall. Consider using smaller aperture (4-inch) lights.
Q5: Do I need an electrician to install recessed lights?
A5: If you are comfortable and knowledgeable about electrical wiring, local codes, and safety procedures, you might be able to do it yourself. However, if you have any doubts or are uncomfortable with any part of the process, it is always safest and recommended to hire a licensed electrician.
Q6: What is “color temperature” for LED bulbs, and why does it matter?
A6: Color temperature, measured in Kelvin (K), describes the hue of the light. Lower numbers (around 2700K-3000K) are warm, yellowish light, similar to incandescent bulbs, good for living areas. Higher numbers (4000K-5000K) are cooler, bluer light, better for task areas like kitchens or garages. Consistency is key – use the same color temperature for all bulbs in a room.
Q7: How close can recessed lights be to a ceiling fan?
A7: There isn’t a strict code for this, but generally, keep recessed lights at least 2-3 feet away from a ceiling fan’s blades to avoid light flicker or interference with airflow patterns. The goal is to not have the light beams directly hit the fan blades in a distracting way.
Conclusion
Figuring out how far to space your recessed lights doesn’t have to be a daunting task. By understanding the basics of light spread, using simple rules of thumb for spacing, and considering the specific needs of each room, you can achieve beautiful, functional lighting throughout your home. Remember to measure twice, cut once, prioritize safety, and don’t hesitate to consult professionals when needed.
With the right planning and a little effort, you’ll transform your living spaces, creating an ambiance that is both welcoming and perfectly suited to your lifestyle. You’ve got this!