
How Long Does It Take to Sand Floors?
So you’re thinking about making your old hardwood floors look like new again! That’s a great idea. Lots of folks wonder, How Long Does It Take to Sand Hardwood Floors? It can seem like a big job, and beginners often feel a little lost about the timing.
But don’t worry! We’ll break it down simply, step by step. This guide will help you get a clear picture of the time involved, from start to finish, so you can plan your project with confidence.
Understanding Hardwood Floor Sanding Time
Sanding hardwood floors is a key step in refinishing them. It removes old finishes, scratches, and imperfections. The time it takes can really vary.
Things like the size of your room, the type of wood, and how much damage there is all play a part. It’s not just about a quick once-over; it’s about getting the surface smooth and ready for a new finish. This section will help you grasp the main factors that influence the overall duration of your sanding project.
We’ll look at what makes it quicker and what can make it take longer.
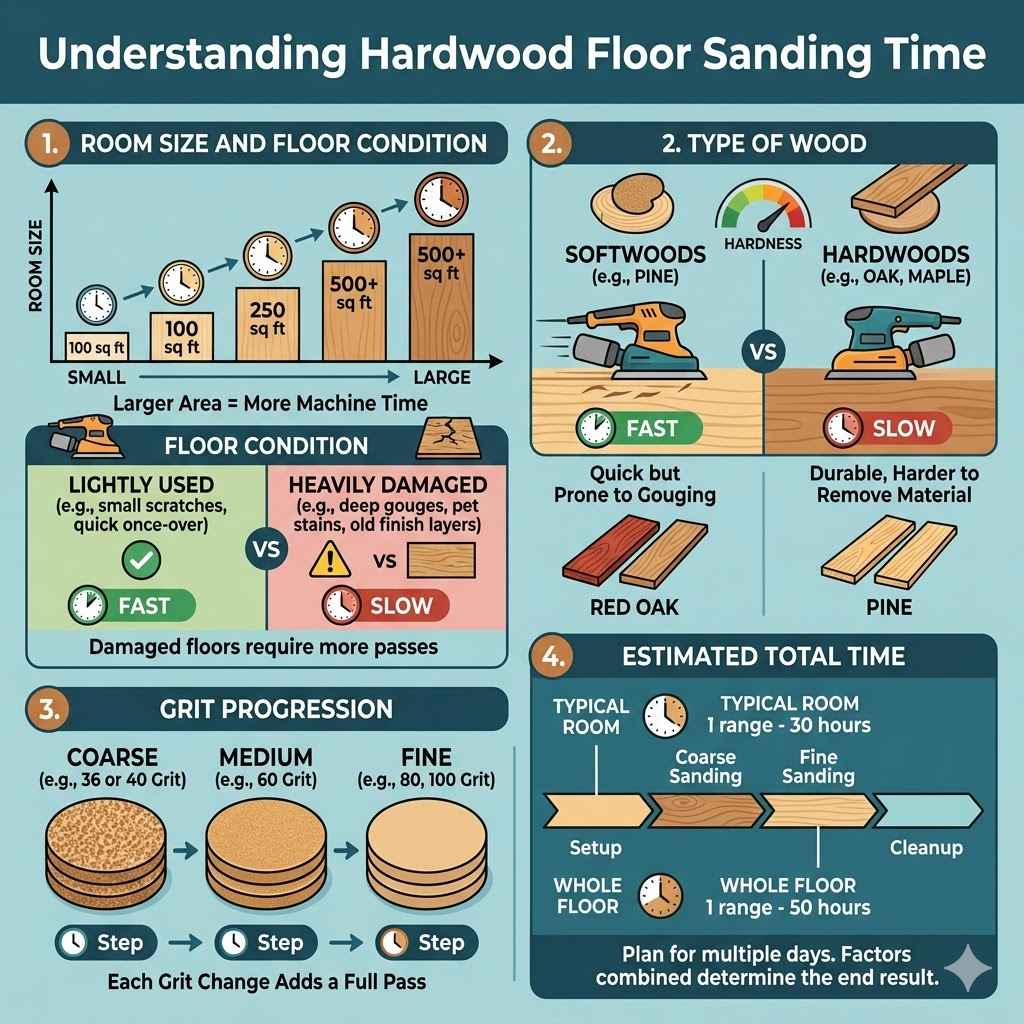
Room Size and Floor Condition
The most obvious factor affecting how long it takes to sand hardwood floors is the size of the area you need to cover. A small bedroom will obviously take much less time than a large living room or an entire house. Beyond just square footage, the condition of your floors is also a major player.
Floors with deep scratches, stubborn old finishes, or significant wear and tear will require more passes with the sander. This means more time spent on each section.
Room Size: A typical 12×12 foot room might take 2-4 hours for basic sanding. Larger rooms can easily double or triple this time.
When we talk about room size, we mean the actual floor space that needs sanding. This includes hallways and landings too. So, if you’re tackling a whole floor with multiple rooms, you need to add up the time for each area.
Think of it like painting a house – a small studio apartment is a different project than a multi-story family home. The more feet of flooring you have, the more machine time and physical effort will be required.
Floor Condition: Heavily damaged floors might need extra sanding.
If your floors have been neglected for years, you might find gouges, pet stains that have soaked into the wood, or multiple layers of old varnish or paint. Removing these deep imperfections is not a quick job. It requires careful work with coarser grit sandpaper and potentially multiple passes.
This is where the “extra time” really adds up. A floor that’s already pretty smooth and just needs a light refresh will be significantly faster to sand.
Type of Wood and Grit Progression
Different types of hardwood have different densities and hardness. This affects how easily they sand. Softwoods like pine can sand quickly but can also be prone to gouging if you’re not careful.
Hardwoods like oak or maple are more durable and can handle more aggressive sanding, but they also take a bit more effort to remove material. The progression of sandpaper grits is also crucial. You start with a coarse grit to remove the old finish and level the floor, then move to finer grits to smooth the wood.
Wood Hardness: Harder woods take longer to sand down.
Imagine trying to sand a block of soft balsa wood versus a piece of granite. The principle is similar with wood floors. Woods like red oak, maple, or hickory are considered hard woods.
They have tighter grain structures and are denser. This means the sandpaper has to work harder and for longer to abrade the surface. You’ll need to ensure your equipment is up to the task and be prepared for the sandpaper to wear down a bit faster.
Sandpaper Grits: Moving through grits adds time.
The process involves using a series of sandpaper grits. You’ll typically start with something like 36 or 40 grit to remove the bulk of the old finish and any major imperfections. Then you’ll move to 60 grit, then 80 grit, and maybe even 100 or 120 grit for a super smooth finish.
Each grit change requires emptying the sander, loading new paper, and doing another full pass over the entire floor. This repetition is a significant part of the overall sanding time.
The Sanding Process Step-by-Step
To really understand how long it takes, it’s important to know what actually happens during sanding. It’s not just one single sanding action. It’s a series of stages, each with its own purpose and time commitment.
This section will walk you through the typical steps involved in sanding hardwood floors, from the initial preparation to the final passes. Knowing these stages will help you estimate the time needed more accurately and prepare for each phase of the project.
Preparation and Edging
Before you even touch the drum sander, there’s prep work. You need to clear the room entirely. Furniture, rugs, and anything else on the floor must be removed.
Then, you have to address the edges and corners. These areas can’t be reached by the large drum sander. You’ll use an edger for this, which is a different type of machine.
This part of the process can be time-consuming and requires a careful hand.
Clearing the Room: Emptying the space is the first step.
This might sound obvious, but it’s a crucial time factor. If you have a lot of large furniture, it will take significant time to move it all out. You might need help from friends or family.
Some people choose to move furniture to one half of the room, sand the other half, and then switch. This can extend the project timeline as it requires careful planning and execution to avoid damaging the freshly sanded area.
Edge Sanding: This is done with a separate machine.
An edge sander is a smaller, more powerful tool than a drum sander. It’s used to sand the perimeter of the room, near walls, baseboards, and in closets. This is often a slower, more tedious process than drum sanding because you’re working in tight spaces.
It requires skill to avoid leaving swirl marks or damaging the baseboards. Depending on the complexity of your room’s layout, edge sanding can add several hours to your total project time.
Drum Sanding
The drum sander is the main workhorse for sanding hardwood floors. You’ll make multiple passes, starting with a coarse grit sandpaper and progressively moving to finer grits. Each pass requires careful control of the machine to ensure an even sanding job.
You’ll typically overlap your passes to avoid leaving lines. This is where the bulk of the sanding time is spent.
First Pass (Coarse Grit): Removing old finishes and damage.
This initial pass is the most aggressive. You’re essentially stripping away the old polyurethane, wax, paint, or whatever finish was on the floor, along with any significant scratches or dents. Using a 36 or 40 grit paper is common here.
You’ll make slow, steady passes across the room. For a 500-square-foot area, this first pass might take around 2-3 hours, depending on the sander’s power and your familiarity with operating it.
Subsequent Passes (Finer Grits): Smoothing the surface.
After the first pass, you’ll switch to finer grits like 60, 80, and 100. Each grit requires another full pass over the entire floor. The purpose here is to remove the sanding marks left by the previous, coarser grit and to create a smoother surface.
Each of these passes will take less time than the first because you’re removing less material, but the cumulative time is significant. For a 500-square-foot space, each of these subsequent passes might take 1.5-2.5 hours.
Detail Sanding and Final Touches
Even after drum and edge sanding, there might be areas that need extra attention. This includes corners, areas around vents, and any spots missed by the machines. A hand scraper or an orbital floor sander can be used for this.
This is often called detail sanding. The final passes with very fine grits are important for a smooth finish that will accept stain and topcoat well.
Hand Scraping and Small Sanders: For hard-to-reach spots.
Some areas just can’t be perfectly reached by the big drum sander or the edge sander. This might include tight corners, intricate molding areas, or around floor vents. For these, you’ll use smaller tools like a pole sander with sandpaper, a block sander, or a small orbital sander.
This kind of detailed work is time-consuming. It requires patience and a steady hand to ensure consistency with the rest of the floor. This phase can easily add another 1-3 hours depending on the complexity of the room.
Final Fine Grit Pass: Ensuring smoothness.
Before you apply any finish, you want the floor to be as smooth as possible. This might involve a final pass with a very fine grit sandpaper, sometimes as high as 120 or 150 grit. This step helps to open the wood grain slightly, preparing it to absorb stain or finish more evenly.
While this pass is relatively quick, it’s essential for a professional-looking result. For a 500-square-foot area, this final pass might take about 1 hour.
Factors Affecting The Total Time
We’ve broken down the sanding process, but now let’s zoom out and look at all the different things that can speed up or slow down your project. Understanding these variables is key to setting realistic expectations for How Long Does It Take to Sand Hardwood Floors? It’s a bit like predicting travel time; you know the distance, but traffic, road work, and weather can all change things.
Your Experience Level
If you’ve never sanded a floor before, you’re going to take longer than someone who does it for a living. This is because you need to learn how to operate the equipment safely and effectively. You’ll also be more cautious, taking extra time to ensure you’re not making mistakes.
This learning curve is perfectly normal and is a significant factor in project duration.
First-Time DIYers: Expect a longer timeline.
For your first go at sanding hardwood floors, it’s wise to add a buffer to your time estimates. You’ll be reading manuals, watching tutorials, and being very deliberate with each step. This caution is good for preventing mistakes but means the job will take longer.
A project that a pro might do in a weekend could take a first-timer a full long weekend or even longer, spread out over a week or two if time permits.
Experienced DIYers or Professionals: Faster and more efficient.
Someone who has sanded floors before will be much faster. They know the machines, the techniques, and common pitfalls. They can move more quickly and efficiently because they’re not figuring things out as they go.
A professional contractor or a very experienced DIYer might be able to sand and finish a moderate-sized home in just a few days, whereas a beginner might take a week or more.
Equipment Used
The type of sander you use can also impact the time. While most DIYers rent drum sanders and edgers, there are different models and power levels. Rental equipment might not be as new or powerful as professional-grade tools, potentially slowing things down.
Also, using the right sandpaper and ensuring it’s in good condition is important for efficiency.
Sander Power and Condition: Newer, more powerful machines work faster.
The horsepower and overall condition of the rental sanders you use can make a difference. A worn-out motor or dull sandpaper will mean you have to make more passes or spend more time in each pass. This is why it’s worth asking the rental company about the power and age of their machines.
If you’re doing a very large area, investing in slightly better equipment or ensuring your chosen equipment is well-maintained is a smart move to save time.
Sandpaper Quality: Good sandpaper cuts faster and lasts longer.
Using high-quality sandpaper is essential for efficient sanding. Cheap or low-quality sandpaper can clog quickly or tear easily, meaning you’ll need to replace it more often. This adds time and frustration to the project.
Ensure you buy sandpaper from a reputable supplier and that it’s the correct type for floor sanding. For instance, specific sanding belts for drum sanders are designed for durability and performance.
Other Considerations
Beyond the direct sanding work, other factors can add to the overall time commitment. This includes the drying time between coats of finish if you’re staining and finishing, and the general logistics of managing the project.
Dust Containment: Essential but adds to setup.
Most modern floor sanders have dust collection systems, but it’s never 100% dust-free. Setting up proper dust containment, like sealing off doorways with plastic sheeting and tape, takes time but is crucial for keeping dust out of the rest of your house. Cleaning up the dust between sanding stages also adds time to the overall project.
Drying Times for Finishes: This adds days, not hours.
If your project includes staining and sealing, you must account for drying times. Most stains need a few hours to dry before you can apply a protective finish like polyurethane. Each coat of polyurethane also needs drying time, often 4-6 hours between coats, and a full cure can take several days or even weeks.
So, while the sanding itself might take a few days, the entire refinishing process can easily span a week or more due to these drying periods.
Estimating Your Project Timeline
Now that we’ve explored all the contributing factors, let’s try to put some numbers to it. This is where we tie everything together to help you answer, How Long Does It Take to Sand Hardwood Floors? Remember, these are estimates, and your specific situation might differ.
Typical Timeframes for Different Room Sizes
Here are some rough estimates for how long the actual sanding process might take, not including drying times for finishes.
| Room Size | Sanding Time (Hours) | Notes |
|---|---|---|
| Small Bedroom (10×10 ft) | 4-8 | Basic sanding, minimal repairs. |
| Medium Living Room (15×20 ft) | 8-16 | Standard wear and tear. |
| Large Open Plan Area (25×30 ft) | 16-24 | Significant area, may need multiple passes. |
| Entire Home (approx. 1500 sq ft) | 40-80+ | Includes multiple rooms, hallways, stairs (stairs add significant time). |
These times are for the active sanding process – the movement of the machines, changing paper, and doing edge work. They don’t include prep time for clearing the room or cleanup time after sanding. For a typical 15×20 foot living room, if you’re working alone and it’s your first time, you might spread the sanding over two full days.
This would include setup, sanding each grit pass, edge sanding, and some initial cleanup. If you have help, you might be able to get the sanding done in one very long day.
Factors That Can Significantly Add Time
There are some situations that can drastically increase the time it takes. Be prepared for these possibilities.
Deep Gouges or Unevenness: Requires more aggressive sanding.
If your floors have deep scratches, nail pops that weren’t hammered down, or significant cupping (where boards warp), you’ll need to use coarser grits for longer. This means more passes with the drum sander to level the floor properly. You might even need to go back to a coarser grit if the initial sanding doesn’t remove all the imperfections.
This can easily add several hours to the project.
Previous Finishes: Stubborn finishes take longer to remove.
Some older finishes, like thick oil-based varnishes or multiple layers of wax, can be very tough to remove with sanding alone. You might need to use a chemical stripper in certain areas before sanding, or use a much coarser grit sandpaper for longer. This increases the difficulty and the time.
Complex Room Shapes: Lots of corners and angles take more time.
Rooms with bay windows, built-in shelving, or many angles and corners will require more detailed edge sanding and hand work. This is where the time adds up quickly. Staircases are a completely different beast and can add days to a project if you are sanding them by hand or with specialized tools.
DIY Learning Curve: Patience is key.
As mentioned, if this is your first time, expect to take more time to learn and execute each step correctly. Rushing can lead to mistakes that are harder and more time-consuming to fix later. It’s better to take it slow and do it right.
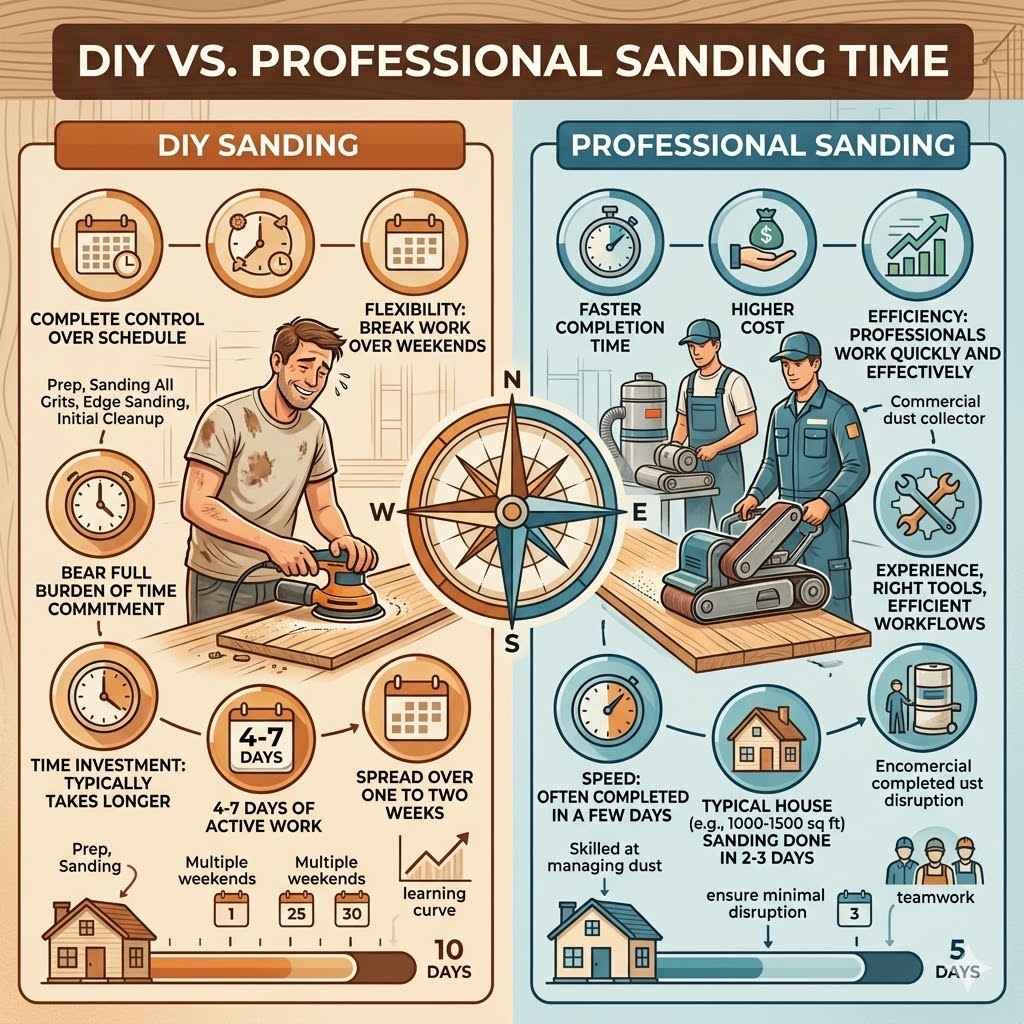
DIY vs. Professional Sanding Time
The decision between tackling this yourself or hiring a professional often comes down to time and cost. Understanding the time differences can help you make that choice.
DIY Sanding
When you do it yourself, you have complete control over the schedule, but you also bear the full burden of the time commitment.
Flexibility: You can work when you have time.
The biggest advantage of DIY sanding is flexibility. You can break up the work over several weekends or take a week off if your schedule allows. This means you can fit it in around work and other life commitments.
However, this also means the project might be spread out over a longer calendar period.
Time Investment: Typically takes longer.
As discussed, a DIYer usually takes longer due to inexperience, learning curve, and potentially less powerful equipment. A common DIY timeline for sanding a medium-sized house (around 1000-1500 sq ft) might be 4-7 days of active work, spread over one to two weeks. This includes prep, sanding all grits, edge sanding, and initial cleanup.
Professional Sanding
Hiring professionals means a faster completion time but at a higher cost.
Efficiency: Professionals work quickly and effectively.
Professionals have the experience, the right tools, and efficient workflows. They know how to get the job done quickly without sacrificing quality. They often work in teams, which further speeds up the process.
Speed: Often completed in a few days.
For a typical house, a professional crew can often complete the sanding process in just 2-3 days. This doesn’t include the drying time for finishes, but the actual sanding work is done much faster. They are also skilled at managing dust and ensuring minimal disruption to your home.
Frequently Asked Questions
Question: How long does it take to sand a single room?
Answer: For a typical 12×12 foot room, the actual sanding process (including prep, multiple grit passes, and edge sanding) can take anywhere from 4 to 8 hours for a beginner. Experienced individuals might complete it in 2-4 hours.
Question: Does the type of wood affect sanding time?
Answer: Yes, softer woods like pine can be quicker to sand but also easier to damage. Harder woods like oak or maple take more effort to abrade but are more forgiving of aggressive sanding. Overall, harder woods generally take slightly longer to sand down.
Question: How much longer does sanding stairs take?
Answer: Sanding stairs is significantly more time-consuming than sanding flat floors. It requires specialized tools or meticulous hand sanding and can add several days to a project, depending on the number of stairs and their condition.
Question: Is it better to rent or buy floor sanders?
Answer: For a one-time project, renting is almost always more cost-effective than buying. Floor sanders are expensive and require maintenance. Rental companies also provide the different grit sandpaper you’ll need.
Question: How much dust is created during floor sanding?
Answer: While modern sanders have dust collection systems, some dust is unavoidable. Proper preparation with dust containment (sealing rooms) is essential. Expect to do a thorough cleanup after sanding.
Wrap Up
So, How Long Does It Take to Sand Hardwood Floors? It really depends on your room size, its condition, your experience, and the wood type. Expect anywhere from 4-8 hours for a small room for a beginner, to many days for an entire house. Plan for extra time if your floors are damaged or if it’s your first time.
With careful preparation and patience, you can achieve beautiful results.