How Long Does Liquid Nails Take to Dry on Wood
Figuring out glue dry times can be tricky when you’re starting out with home projects. Many people wonder, “How Long Does Liquid Nails Take to Dry on Wood?” This is a super common question because you want your project to be strong and stable quickly. Don’t worry, it’s not as complicated as it sounds!
We’ll walk through it step-by-step so you know exactly what to expect. Let’s get your project moving forward with confidence.
Understanding Liquid Nails Drying Times on Wood
Knowing how long Liquid Nails takes to dry on wood is key for any DIYer or builder. This adhesive, known for its strength, requires specific curing periods to achieve its full bonding power. Factors like temperature, humidity, and the type of wood can affect how quickly it sets.
Understanding these elements helps ensure your project is not only secure but also completed efficiently.
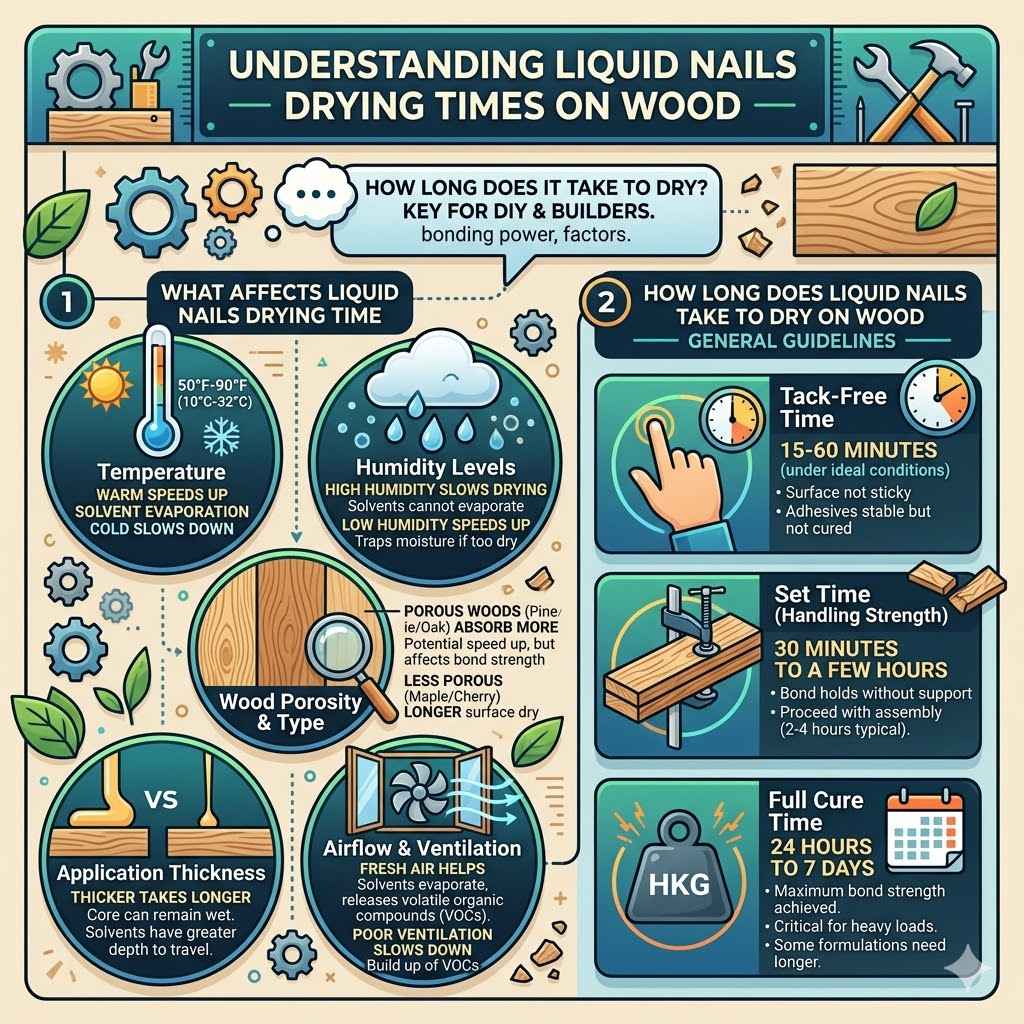
What Affects Liquid Nails Drying Time
Several environmental and application factors influence how long Liquid Nails needs to dry on wood. These elements are critical to consider for successful project completion.
Temperature
Temperature plays a significant role in the drying process of any adhesive, including Liquid Nails. Warmer temperatures generally speed up the curing process. This is because heat helps the solvents in the adhesive evaporate faster, allowing the bonding agents to set and harden.
Conversely, cold temperatures can significantly slow down drying. When it’s cold, the chemical reactions within the adhesive proceed at a much slower rate. For optimal results, it’s best to apply Liquid Nails in a temperature range recommended by the manufacturer, typically between 50°F and 90°F (10°C and 32°C).
Humidity Levels
Humidity, the amount of water vapor in the air, also impacts drying times. High humidity means there’s more moisture in the air, which can slow down the evaporation of solvents from the Liquid Nails. The adhesive relies on this evaporation to harden and form a strong bond.
In very humid conditions, it might take longer for the adhesive to become tack-free and then fully cure. Low humidity, on the other hand, can lead to faster drying. However, extremely dry conditions can sometimes cause the surface of the adhesive to skin over too quickly, potentially trapping moisture underneath and weakening the bond.
Wood Porosity and Type
The type of wood you are bonding can also affect drying times. Porous woods, like pine or oak, tend to absorb more of the liquid adhesive into their grain. This absorption can draw out some of the moisture and solvents, potentially speeding up the surface drying time.
However, it might also affect the overall bond strength if too much adhesive is absorbed. Less porous woods, such as maple or cherry, will hold the adhesive more on the surface. This can sometimes lead to a longer surface drying time but can also create a stronger visible bond if applied correctly.
Different wood species have varying densities and moisture content, both influencing how they interact with adhesives.
Application Thickness
The thickness of the Liquid Nails bead you apply is a crucial factor. Thicker applications will naturally take longer to dry than thinner ones. This is because the solvents have a greater depth to travel through to reach the air and evaporate.
A thick bead might become tack-free on the surface relatively quickly, but the core can remain wet for an extended period. This is why it’s important to follow the product’s recommendations for bead size. Applying too much adhesive not only increases drying time but also wastes product and can lead to a messy application that’s harder to clean up.
Airflow and Ventilation
Good airflow is essential for adhesives to dry properly. When Liquid Nails is applied, it releases volatile organic compounds (VOCs) as it cures. These VOCs are carried away by moving air, allowing fresh air to come into contact with the adhesive.
This process helps the solvents evaporate more efficiently. In a poorly ventilated area, these VOCs can build up, slowing down the drying process. Ensuring adequate ventilation, especially in enclosed spaces, will help your Liquid Nails cure faster and more completely, leading to a stronger, more reliable bond.
How Long Does Liquid Nails Take to Dry on Wood General Guidelines
When you ask, “How Long Does Liquid Nails Take to Dry on Wood?”, there isn’t a single number that fits every situation. However, we can provide some useful estimates based on typical conditions and product types. These are general guidelines to help you plan your projects.
Tack-Free Time
The first stage of drying is when the adhesive becomes “tack-free.” This means you can touch the surface lightly without the adhesive sticking to your finger. For many Liquid Nails products, this tack-free time can range from 15 to 60 minutes under ideal conditions. Ideal conditions typically mean a temperature of around 70°F (21°C) and about 50% humidity, with good airflow.
This is the point where the adhesive is stable enough to handle without smudging but is not yet fully cured.
Set Time (Handling Strength)
After becoming tack-free, the adhesive continues to cure and gain strength. The “set time” refers to when the bond is strong enough to hold the pieces together without additional support, like clamps or nails, though it’s not yet at its maximum strength. This can take anywhere from 30 minutes to a few hours, depending on the specific product and the environmental factors mentioned earlier.
For many common applications, you can often proceed with further assembly or minor handling after about 2 to 4 hours.
Full Cure Time
The “full cure” is when Liquid Nails reaches its maximum bond strength. This is critical for applications that will experience significant stress or weight. Full cure times for Liquid Nails can vary widely, from 24 hours to 7 days.
Some heavy-duty formulations might even require longer. It’s crucial to allow the adhesive to cure fully before subjecting the bonded materials to heavy loads or extreme conditions. Always refer to the product packaging for the specific full cure time of the Liquid Nails product you are using.
Specific Product Variations
It’s important to remember that “Liquid Nails” is a brand with many different product lines. Some are formulated for faster curing, while others prioritize extreme strength or flexibility. For example, a construction adhesive designed for framing might have a different drying profile than an adhesive for trim or molding.
Always check the label of your specific Liquid Nails product. The manufacturer provides the most accurate drying and curing information for that particular formulation.
Factors Influencing Liquid Nails Strength Development
Beyond just drying time, how strong the Liquid Nails bond becomes is influenced by several factors. Ensuring these aspects are managed correctly leads to a durable and reliable connection between wood pieces.
Surface Preparation for Optimal Adhesion
The strength of any adhesive bond starts with the surfaces being joined. Proper preparation ensures that the Liquid Nails can form a direct, strong connection with the wood. Poorly prepared surfaces can lead to weak spots, even if the adhesive dries completely.
It is essential to clean, dry, and sometimes roughen the surfaces for the best results.
Cleaning the Wood Surfaces
Before applying Liquid Nails, both wood surfaces must be thoroughly cleaned. This means removing any dust, dirt, grease, oil, or old adhesive residues. These contaminants can act as a barrier, preventing the Liquid Nails from making direct contact with the wood fibers.
A clean surface allows the adhesive to wet out properly, meaning it spreads and adheres evenly. For general cleaning, a damp cloth is often sufficient. For greasy or oily residues, a mild solvent cleaner, like mineral spirits or denatured alcohol, might be necessary, followed by a thorough wipe-down.
Ensuring Surfaces Are Dry
It goes without saying that wood surfaces must be completely dry before applying Liquid Nails. Moisture in the wood can interfere with the curing process of the adhesive. Water molecules can disrupt the chemical reactions needed for the bond to form properly, leading to a weaker connection.
Even if the wood feels dry to the touch, if it has been exposed to rain or high humidity, it might retain internal moisture. Allowing ample time for the wood to air dry, or even using a fan, can help ensure it’s ready for adhesive application.
Sanding for Better Grip
For some wood types or when dealing with smooth surfaces, a light sanding can significantly improve the bond strength. Sanding creates a slightly rougher texture, often called a “tooth,” which gives the Liquid Nails more microscopic areas to grip onto. This is particularly useful for hardwoods or finished wood surfaces that might be too smooth for the adhesive to adhere to effectively.
After sanding, be sure to wipe away all dust generated from the sanding process, as dust particles can compromise the bond just like any other contaminant.
Removing Loose or Damaged Fibers
If the wood surface is splintered, peeling, or has loose fibers, these areas should be removed. Loose wood fibers will not provide a stable base for the adhesive. They can break away from the main piece of wood under stress, taking the adhesive bond with them.
Carefully trim or scrape away any such loose material until you reach a solid, stable wood surface. This ensures that the bond is made to the structural integrity of the wood itself, not to weak, detached fibers.
Clamping and Support During Curing
Once Liquid Nails is applied, it’s crucial to hold the pieces together firmly while the adhesive cures. This is where clamping and support come into play to achieve the strongest possible bond.
The Importance of Pressure
Liquid Nails, like most adhesives, requires consistent pressure to form a strong bond. When you apply pressure, you ensure that the adhesive spreads evenly between the two surfaces, maximizing contact. This pressure also forces out any trapped air bubbles, which can be weak points in the bond.
Without adequate pressure, the adhesive might not fully wet out the surfaces, leading to a weaker overall connection. Clamps, weights, or even screws (in some applications) can provide this necessary pressure.
Types of Clamps and Supports
Various tools can be used to apply pressure. For smaller projects or delicate pieces, spring clamps or C-clamps are often sufficient. For larger or heavier items, bar clamps or pipe clamps might be necessary.
In some structural applications, temporary screws or nails can be used to hold pieces in place while the adhesive cures, provided these fasteners are removed later if they are not meant to be permanent. The key is to choose a method that applies firm, even pressure across the entire joint without crushing the wood.
Duration of Clamping
The length of time you need to clamp the pieces together depends on the Liquid Nails product and the type of joint. While the adhesive might be tack-free relatively quickly, it needs time to develop sufficient handling strength. It’s often recommended to leave clamps in place until the adhesive has reached its set time, which is typically a few hours.
For joints that will bear significant weight or stress, it is even better to leave clamps on for longer, or at least until the full cure time has approached, to ensure maximum bond strength is achieved.
Avoiding Movement During Curing
Even after initial clamping, it’s vital to ensure the pieces do not move or shift while the adhesive is curing. Any movement can disrupt the chemical bonds that are forming, weakening the final joint. This is especially important in environments with vibrations or where the project might be accidentally bumped.
Positioning the project in a stable location where it won’t be disturbed during the recommended curing period is a simple yet effective way to guarantee a strong bond.
Maximizing Bond Strength and Durability
To ensure your projects last and remain structurally sound, understanding how to maximize the strength and durability of Liquid Nails bonds is crucial. This involves not only proper application but also considering the long-term performance of the adhesive.
Choosing the Right Liquid Nails Product
Liquid Nails is a brand name that covers a wide range of adhesive products, each designed for specific applications and materials. Selecting the correct product is the first and most important step in achieving a strong, durable bond on wood.
Product Categories and Uses
Liquid Nails offers products for various needs. For general construction and wood-to-wood bonding, you’ll find products like the Heavy Duty Construction Adhesive (LN-900 series). These are designed to handle structural loads and offer excellent gap-filling capabilities.
For interior trim, molding, and paneling, there are products that offer a faster grab and are paintable, such as the Interior Trim and Molding Adhesive (LN-700 series). Some products are formulated for specific wood types or for applications that require flexibility or resistance to moisture, like exterior siding or subfloor installations.
Matching Product to Wood Type and Environment
The type of wood and the environment where the bond will exist are critical considerations. For dense hardwoods, an adhesive with superior wetting properties might be needed. For outdoor projects or areas prone to moisture, a waterproof or water-resistant formulation is essential.
Always check the product’s specifications on the packaging or the manufacturer’s website to ensure it is suitable for your specific wood and environmental conditions. Using the wrong product can lead to bond failure, regardless of how well it is applied.
Reading Product Labels and Specifications
Every Liquid Nails product comes with detailed instructions and specifications. These include recommended applications, surface preparation, application techniques, temperature and humidity ranges, and, importantly, the expected drying and curing times. Take the time to read these labels thoroughly before you begin your project.
They contain the precise information needed for successful application and will help answer your question about “How Long Does Liquid Nails Take to Dry on Wood?” for that specific product.
Dealing with Different Wood Types and Conditions
Wood is a natural material, and its properties can vary significantly, influencing how adhesives perform. Understanding these variations helps in achieving optimal bonding results.
Softwoods versus Hardwoods
Softwoods, like pine or fir, are generally more porous and have a lower density. This means they can absorb more liquid adhesive, which can sometimes lead to a faster initial grab as the adhesive penetrates the wood. However, excessive absorption might mean less adhesive remains on the surface to form the primary bond.
Hardwoods, such as oak, maple, or cherry, are denser and less porous. They hold adhesives more on the surface. This can mean slower initial drying but often results in a very strong surface bond if the adhesive can wet out the dense surface properly.
For hardwoods, light sanding is often recommended to create a better surface for adhesion.
Engineered Wood Products
Engineered wood products like plywood, MDF (Medium-Density Fiberboard), and particleboard can also be bonded with Liquid Nails. However, their composition can affect drying times and bond strength. Plywood, with its layers, can have varying porosity.
MDF and particleboard are made from wood fibers or particles bonded with resins. These materials can sometimes be less stable and more prone to swelling or damage from excessive moisture in the adhesive. It’s always best to test the adhesive on a scrap piece of the engineered wood product if possible.
Moisture Content of Wood
As mentioned earlier, the moisture content of wood is critical. Wood that is too wet will slow down adhesive drying and can weaken the bond. Wood that is excessively dry might be brittle and could be damaged by strong clamping pressure.
Standard building codes and woodworking best practices recommend a moisture content for wood used in construction or cabinetry typically between 6% and 12%. Using wood within this range is ideal for adhesive applications.
Treated or Coated Wood
Pressure-treated wood contains chemicals that can affect adhesive performance. While most modern adhesives are formulated to be compatible with treated lumber, it’s always wise to check the product specifications. Some older treatments might leave a residue that needs to be cleaned off.
Similarly, if wood has been sealed, painted, or varnished, the adhesive will bond to the coating, not the wood itself. If the coating fails, the adhesive bond will fail with it. For the strongest bond, it’s often best to remove any finishes from the bonding surfaces.
Real-Life Example Case Study
A homeowner was building a custom bookshelf. They used pine for the shelves and oak for the decorative trim. For attaching the trim to the pine shelves, they used a general-purpose Liquid Nails product.
The pine’s porosity caused the adhesive to dry quickly on the surface, but the bond, while initially strong, was not as robust as needed for supporting heavy books. For the oak trim, they used a faster-grab, interior trim adhesive. This product, designed for smoother surfaces, provided a very secure bond to the oak.
The lesson learned was that different wood types require specific adhesive considerations, and a single product doesn’t always work best for all wood-to-wood applications within the same project.
Common Mistakes to Avoid When Using Liquid Nails
Many common errors can lead to a weak bond or prolonged drying times when using Liquid Nails. Avoiding these pitfalls ensures your projects are built to last.
Applying Adhesive in Extreme Temperatures
Trying to use Liquid Nails when it’s too cold or too hot outside or in your workshop is a frequent mistake. Cold temperatures drastically slow down curing, leaving your project vulnerable for longer. Excessive heat can cause the adhesive to dry too quickly on the surface, trapping moisture underneath and creating a weak bond.
Always check the manufacturer’s recommended temperature range for application.
Not Applying Enough Adhesive
It might seem like using less adhesive saves money or makes cleanup easier, but it often results in a weak bond. Liquid Nails is designed to provide a strong connection when applied in a continuous bead or to cover the entire surface area. Insufficient application means less contact between the wood surfaces, leading to potential failure under stress.
Aim for a consistent bead, approximately 1/4 inch in diameter, for most wood-to-wood applications.
Over-Applying Adhesive
On the flip side, applying too much Liquid Nails can also cause problems. A very thick bead will take significantly longer to dry and cure. It can also squeeze out excessively, creating a messy appearance that is difficult to clean and might interfere with the fit of the pieces.
While some squeeze-out is normal and even desirable as it indicates good coverage, it should be manageable. Trim excess squeeze-out after a few hours of curing, once it has set to a gel-like consistency.
Failing to Clamp or Support Joints
This is a critical mistake. Liquid Nails needs continuous pressure to set properly. If you apply the adhesive and then don’t clamp or support the pieces, they can shift or pull apart as the adhesive dries.
This movement breaks the newly formed adhesive bonds, resulting in a much weaker connection. Always use clamps, weights, or temporary fasteners to hold the pieces securely in place until the adhesive has reached its set time.
Rushing the Curing Process
Patience is key with any adhesive. Trying to handle the project, move it, or put weight on the joint before the Liquid Nails has fully cured is a recipe for failure. While it might feel solid to the touch, the internal structure of the adhesive is still developing strength.
Always wait for the full cure time specified by the manufacturer, especially for applications that will be under significant load or stress. This might mean waiting 24 hours, or even several days, depending on the product.
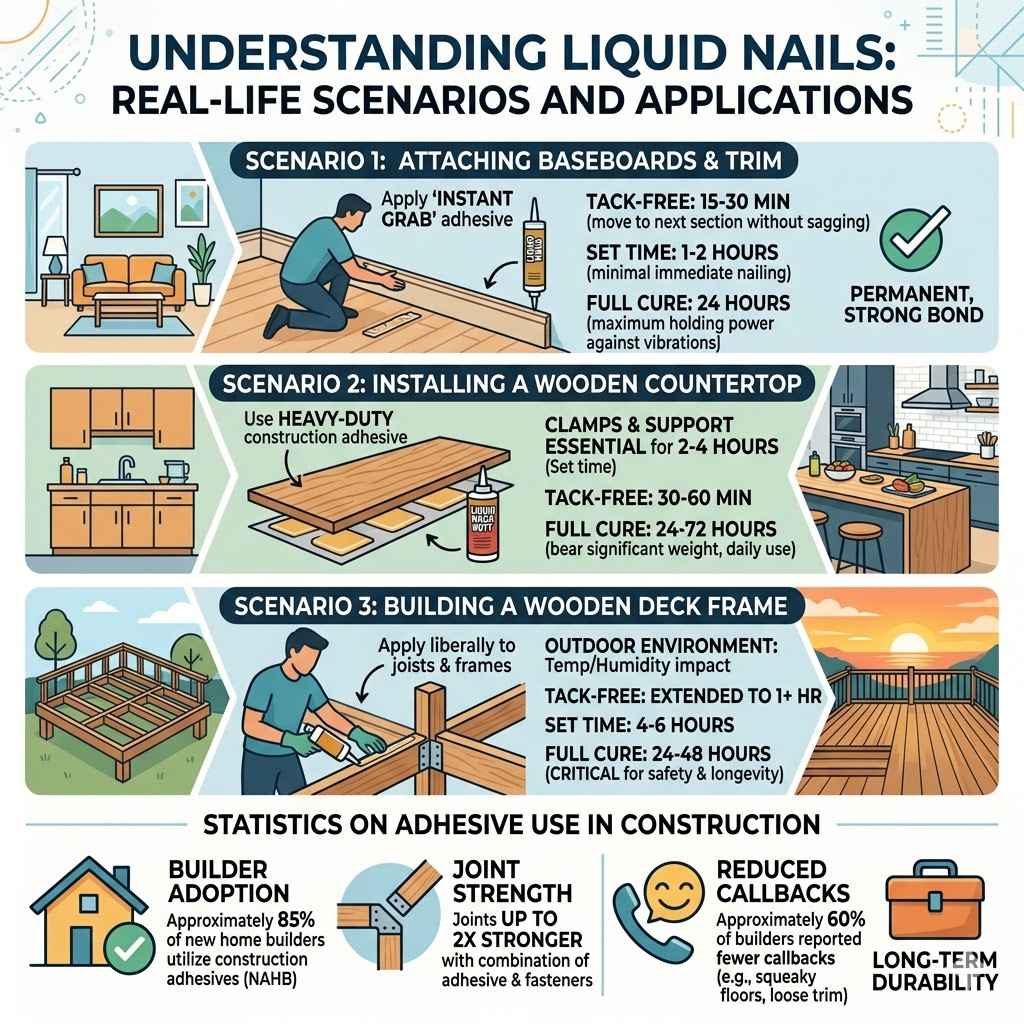
Real-Life Scenarios and Applications
Understanding the practical application of Liquid Nails for “How Long Does Liquid Nails Take to Dry on Wood?” helps in visualizing its use in everyday projects and professional settings.
Scenario 1 Attaching Baseboards and Trim
Imagine you are installing new baseboards in your living room. After cutting the baseboard to size, you apply a bead of Liquid Nails Interior Trim and Molding Adhesive to the back of the board. This product is known for its “instant grab” feature, meaning it holds the board in place with minimal need for immediate nailing.
You press the baseboard firmly against the wall. Even though it feels secure right away, the adhesive will continue to cure. For this application, the tack-free time might be around 15-30 minutes, allowing you to move to the next section without the trim sagging.
The set time, where it’s strong enough not to need temporary nails, could be around 1-2 hours. Full cure, providing maximum holding power against vibrations or minor bumps, will take about 24 hours. This allows you to complete the entire room relatively quickly while ensuring a permanent, strong bond for your trim.
Scenario 2 Installing a Wooden Countertop
For a more demanding project, like installing a solid wood butcher block countertop, you’d use a heavy-duty construction adhesive. You’ll apply Liquid Nails Heavy Duty Construction Adhesive to the top of your kitchen cabinets where the countertop will rest. You will then carefully place the wooden countertop onto the adhesive.
This is where clamping and support become essential. You would likely use bar clamps or weights to apply steady pressure across the entire surface for at least 2-4 hours, during the set time. The tack-free time might be around 30-60 minutes.
However, because this countertop will bear significant weight and be exposed to daily kitchen use, you must wait for the full cure. This could mean waiting 24-72 hours before using the countertop normally. This extended cure ensures the bond can withstand the stresses of food preparation, cleaning, and the weight of appliances without failing.
Scenario 3 Building a Wooden Deck Frame
When constructing the frame of an outdoor deck, structural integrity is paramount. For attaching joist hangers or securing ledger boards to wood framing, a robust construction adhesive is a must. You would apply Liquid Nails Heavy Duty Construction Adhesive liberally to the surfaces being joined.
Due to the outdoor environment, temperature and humidity will play a larger role. If the temperature is cooler (e.g., 50°F) and humidity is higher, the tack-free time might extend to an hour or more, and the set time could be 4-6 hours. Full cure, which is critical for a deck frame that will support weight and endure weather, typically takes 24-48 hours.
It’s crucial that the frame is not subjected to significant loads until this full cure is achieved, ensuring safety and longevity of the deck.
Statistics on Adhesive Use in Construction
The use of construction adhesives has become increasingly common in modern building practices. A survey by the National Association of Home Builders (NAHB) indicated that approximately 85% of new home builders utilize construction adhesives in their projects, often in conjunction with mechanical fasteners like nails and screws. This is because adhesives can significantly improve the strength and rigidity of structures.
Studies have shown that using a combination of adhesive and fasteners can result in joints that are up to 2 times stronger than those using fasteners alone. Furthermore, approximately 60% of builders reported that using construction adhesives helped reduce callbacks for issues like squeaky floors or loose trim, highlighting the role of adhesives in long-term durability.
Frequently Asked Questions
Question: How long does it take for Liquid Nails to be completely dry to the touch?
Answer: Liquid Nails typically becomes tack-free, meaning it’s dry to the touch without sticking to your finger, in about 15 to 60 minutes under ideal conditions (around 70°F and 50% humidity). However, this varies based on the specific product and environmental factors.
Question: Can I paint over Liquid Nails once it’s dry?
Answer: Many Liquid Nails products are paintable once they have achieved their set time or are fully cured. It’s always best to check the product label for specific painting instructions and recommendations.
Question: What happens if I apply Liquid Nails in very cold weather?
Answer: Applying Liquid Nails in cold weather (below 40°F or 10°C) will significantly slow down the drying and curing process. The adhesive may not achieve its full strength, and the bond could be compromised. It’s best to wait for warmer temperatures or bring the materials into a heated space.
Question: Is Liquid Nails waterproof after it dries?
Answer: Some Liquid Nails products are formulated to be waterproof or water-resistant, making them suitable for exterior applications or areas exposed to moisture. However, not all products have this capability, so it’s essential to check the product label for its water resistance properties.
Question: How long should I wait before putting weight on a joint glued with Liquid Nails?
Answer: You should wait until the Liquid Nails has reached its full cure time before applying significant weight or stress to the joint. This can range from 24 hours to 7 days, depending on the specific product and application. For handling strength, a few hours is often sufficient, but full strength takes longer.
Summary
Knowing how long Liquid Nails takes to dry on wood depends on many things. Temperature, humidity, and the specific product matter a lot. Generally, it’s touch-dry in under an hour, ready for handling in a few hours, but needs 24 hours to 7 days for full strength.
Always check the label for your exact product and conditions.