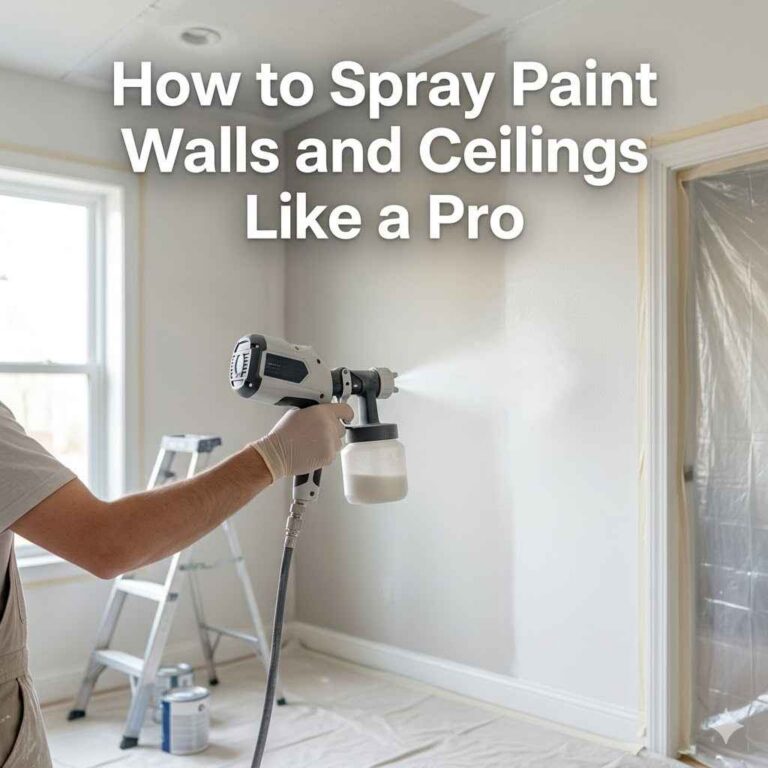
How Long Does Spray Paint Take to Dry on Metal?
Figuring out paint drying times can be a bit tricky, especially for beginners. Many people wonder, How Long Does Spray Paint Take to Dry on Metal? This question pops up because metal can act differently than other surfaces. You want your project to look great, but waiting too long or not long enough can cause problems.
Don’t worry, we’ll make this super simple. We’ll walk through everything you need to know, step by step, so you can get that perfect finish on your metal items. Let’s find out the best way to get your paint dry and ready.
Understanding Spray Paint Drying Times on Metal
Getting spray paint to dry properly on metal is a key part of any project. It’s not just about how long you wait; it’s about understanding the factors that influence drying. When you’re painting metal, you want a finish that’s tough and looks smooth.
This section will explore what makes metal surfaces unique and how that affects the paint. We’ll cover the basic science behind drying and why it’s often more complex than people think. You’ll learn about the different stages of drying and what to expect.
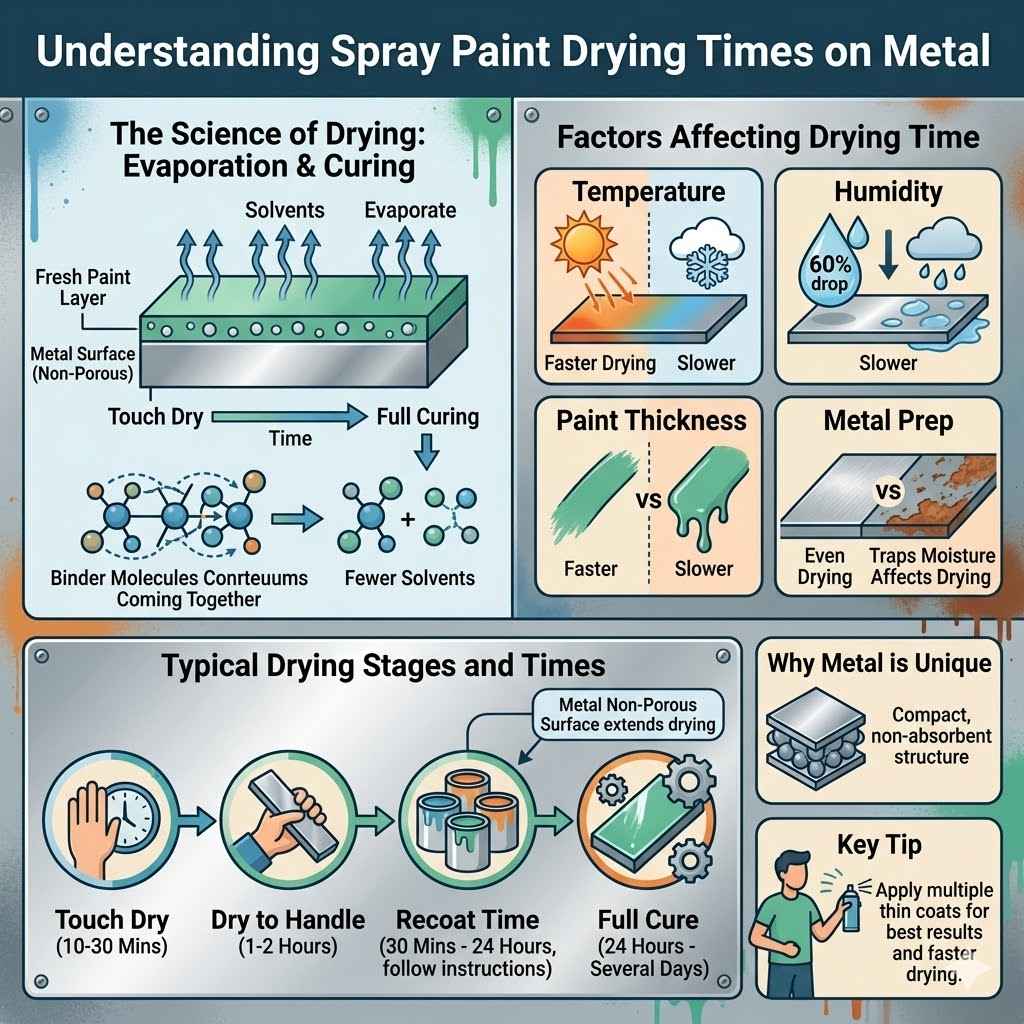
Paint doesn’t just magically disappear. It goes through a process. For spray paint on metal, this process involves solvent evaporation and film formation.
The metal surface itself plays a big role. Metals are usually non-porous, meaning they don’t absorb the paint as much as wood or plastic. This can make the paint sit on top longer.
The type of metal and how it’s prepared also matter a lot. We will explain these details so you can be confident in your painting.
The Science of Drying: Evaporation and Curing
Spray paint contains solvents, binders, and pigments. When you spray it, the solvents start to escape into the air. This process is called evaporation.
As the solvents leave, the binder molecules get closer together. They form a solid film. This film is what makes up the painted surface.
There are two main stages of drying. The first is the “touch dry” stage. This is when the surface feels dry to the touch.
However, the paint is not fully hardened yet. The second stage is full curing. This is when the paint has completely dried and hardened.
It has reached its maximum durability.
For metal, this process can take a bit longer. Metal doesn’t absorb moisture or solvents easily. This means the solvents have to evaporate entirely from the surface.
This can be slowed down by many things. We will look at these factors next.
Factors Affecting Drying Time on Metal
Several things can speed up or slow down how fast your spray paint dries on metal. Temperature is a big one. Warmer temperatures help solvents evaporate faster.
So, painting on a cool, damp day will take longer than on a warm, dry day.
Humidity also plays a part. High humidity means there’s a lot of water vapor in the air. This can slow down the evaporation of solvents from the paint.
It’s like the air is already full of liquid, so it can’t take much more.
The thickness of the paint layer is another important factor. Applying thin coats is better. Thick coats take much longer to dry.
They can also lead to drips and uneven finishes. Good preparation of the metal surface is also key. A clean, smooth surface helps paint adhere better and dry more evenly.
Rust or old paint can trap moisture and chemicals, affecting drying.
Typical Drying Stages and Times
When you spray paint metal, you’ll notice different stages.
- Touch Dry: This usually happens within 10 to 30 minutes. At this point, the surface feels dry. You can lightly touch it without getting paint on your finger. However, it’s still soft underneath.
- Dry to Handle: This might take 1 to 2 hours. The paint is firmer. You can handle the object more carefully, but it’s still not fully cured.
- Recoat Time: This is the time you should wait before applying another coat. It can range from 30 minutes to 24 hours, depending on the paint. It’s important to follow the can’s instructions.
- Full Cure: This is when the paint is completely hardened. This can take anywhere from 24 hours to several days, or even weeks. The paint is now at its toughest.
These times are estimates. They can change based on the environment and paint type. Always check the specific product’s label for the best guidance.
Optimizing Drying Conditions for Metal Spray Paint
Getting the best results from spray paint on metal means creating the right environment for drying. It’s not just about spraying the paint and hoping for the best. You need to think about where and when you are painting.
Simple adjustments can make a big difference in how quickly and thoroughly your paint dries. This section will guide you through setting up ideal conditions. We’ll talk about temperature, air movement, and how to avoid common mistakes that can slow things down.
Think of it like baking. You need the right temperature and time for your cake to turn out perfectly. Paint drying is similar.
By controlling the environment, you help the paint’s solvents evaporate smoothly. This leads to a strong, durable finish. We will explore practical tips that you can use right away.
Ideal Temperature and Humidity Levels
The best temperature for spray painting metal is usually between 50°F and 80°F (10°C and 27°C). Warmer temperatures help the solvents evaporate more quickly. This speeds up the drying process.
Humidity is also very important. The ideal humidity level is generally between 40% and 60%. High humidity can trap moisture.
This slows down evaporation and can sometimes cause the paint to form a dull or cloudy finish.
Avoid painting in direct sunlight, especially on hot days. The surface can get too hot. This can cause the paint to dry too fast on the outside.
This traps solvents underneath, leading to problems like blistering or poor adhesion.
Ventilation and Airflow Importance
Good ventilation is crucial for spray painting. It helps the solvents escape from the paint film. This is how the paint dries and hardens.
When you paint in a poorly ventilated area, the solvents can build up. This not only slows drying but can also be harmful to breathe.
You can improve airflow by opening windows and doors. Using fans can also help. Position fans so they blow air across the painted surface.
This helps to carry away the evaporating solvents. Make sure the fans are not blowing dust or debris onto the wet paint.
A gentle breeze outdoors is often ideal. However, be mindful of dust and insects. Indoors, a garage with an open door or a well-ventilated workshop is a good choice.
The goal is to create a steady flow of fresh air.
Preparing the Metal Surface for Optimal Drying
How you prepare the metal surface has a huge impact on drying. A clean surface is essential. Grease, oil, dirt, and old, flaking paint can all interfere with the paint’s ability to dry and bond properly.
Start by cleaning the metal thoroughly. Use a degreaser or a mild detergent. Make sure to rinse and dry the surface completely.
If the metal has rust, it needs to be removed. Sanding or using a rust remover will prepare the surface for better adhesion.
For smooth, shiny metal, a light sanding can create a rougher texture. This gives the paint something to grip onto. This helps the paint adhere better.
A primer specifically designed for metal can also improve adhesion and promote even drying.
A common mistake is not allowing enough drying time between steps. If you rush preparation or priming, it can affect the final paint coat’s drying. Always ensure each layer is dry before moving on.
Troubleshooting Common Drying Issues on Metal
Even with careful preparation and ideal conditions, sometimes spray paint on metal doesn’t dry as expected. You might notice it staying tacky for too long, developing bubbles, or having an uneven finish. This section is dedicated to helping you solve these common problems.
We will identify the likely causes of these issues and provide clear, actionable solutions. Understanding why these problems occur will help you avoid them in the future and achieve a flawless look.
Dealing with paint that won’t dry or looks wrong can be frustrating. But often, the solutions are quite straightforward. We will break down the most frequent complaints.
For example, why does paint stay sticky? Or what causes those annoying bubbles? By addressing these issues directly, you can save your project and learn valuable painting techniques.
Paint Remains Tacky or Sticky
If your spray paint stays tacky for much longer than the can suggests, there are a few common reasons. One is inadequate ventilation. If the solvents can’t escape the paint film, it will stay soft.
Another cause is applying the paint too thickly. Thick layers hold onto solvents longer. They trap them inside, preventing the surface from drying.
High humidity can also contribute to tackiness. The air can only absorb so much solvent vapor.
A specific type of paint might also be the culprit. Some paints are formulated for a longer “open time,” meaning they stay workable for longer. However, this can sometimes translate to extended drying times.
To fix tackiness, try improving ventilation. Move the item to a warmer, drier spot. You might need to wait longer.
In some cases, you may need to lightly sand the surface and reapply a thin coat of paint.
Bubbles, Runs, and Drips on Metal Surfaces
Bubbles, runs, and drips are frustrating but fixable. Bubbles often happen when there’s moisture or trapped air under the paint. This can occur if the metal surface wasn’t cleaned properly or if the paint was applied too heavily in one go.
Runs and drips are usually a result of applying too much paint. The paint is liquid and gravity pulls it downward. This creates uneven lines or pooling.
This is especially common on vertical surfaces.
To avoid these, ensure the metal is completely dry before painting. Apply paint in thin, even coats. Allow each coat to dry for the recommended time before applying the next.
If you get a run, you can sometimes fix it while it’s still wet by gently feathering it out with a brush. If it’s dry, you’ll likely need to sand it down and repaint.
Poor Adhesion and Peeling Issues
Poor adhesion means the paint isn’t sticking well to the metal. This can lead to peeling or chipping later on. The primary reason for this is improper surface preparation.
If the metal is dirty, oily, or rusty, the paint will have a weak bond. It might stick initially, but it won’t last. Also, painting over a surface that has a waxy or silicone coating can cause adhesion problems.
Not using a primer designed for metal can also lead to adhesion issues. Primers create a good base layer for the paint to stick to. If the paint isn’t compatible with the metal type, it can also fail to adhere.
The solution is always to go back to basics: clean the metal thoroughly. Remove any contaminants. Sand the surface to create a slight profile.
Use a suitable metal primer. Then, apply thin coats of paint.
Real-World Examples and Case Studies
Seeing how spray paint dries on metal in real situations can be very helpful. It shows the theories in action. We will look at a couple of examples to illustrate the points made earlier.
These stories highlight the importance of following guidelines and what can happen when things go wrong or right. They offer practical lessons for your own projects.
Understanding the drying process isn’t just about numbers on a can. It’s about how different factors interact in the real world. From a small garden gnome to a large metal gate, the principles remain the same.
These examples will give you a clearer picture of what to expect.
Case Study 1 Painting an Outdoor Metal Chair
Sarah wanted to repaint a rusty old metal garden chair. She cleaned it well, removing the rust with a wire brush and sandpaper. Then, she applied a rust-inhibiting primer.
She painted the chair on a sunny afternoon with a light breeze. The temperature was about 70°F (21°C) and humidity was moderate. She applied thin coats of a durable metal spray paint.
The first coat was touch dry in about 20 minutes. She waited an hour before applying the second coat. The chair was dry to handle after about 2 hours.
A week later, it was fully cured and felt very hard. Sarah’s careful prep and good weather led to a successful, long-lasting finish.
Case Study 2 Painting a Metal Shelf Indoors
Mark was painting a metal shelf inside his garage. He cleaned it and applied a primer. The garage was a bit cool, around 55°F (13°C), and the humidity was on the higher side.
He used a quick-drying enamel spray paint.
He applied the first coat, expecting it to dry quickly. However, after an hour, it was still slightly tacky. The lower temperature and higher humidity slowed down the solvent evaporation.
He decided to wait longer.
He waited until the next morning, about 12 hours later. The surface was now dry to the touch. He applied a second coat.
By the end of the day, the shelf was dry enough to place items on it. This showed how environmental factors significantly change drying times.
Best Practices for Spray Painting Metal
To ensure your spray-painted metal projects look great and last long, following a few best practices is essential. These tips go beyond just applying paint; they cover the entire process from start to finish. By adopting these habits, you can significantly improve the quality of your results and avoid common pitfalls.
This section offers a clear guide to help you achieve professional-looking finishes every time.
Think of these as your go-to checklist for successful spray painting. They are simple, effective, and designed to work with the unique properties of metal surfaces. We will cover everything from picking the right paint to how to apply it for the best outcome.
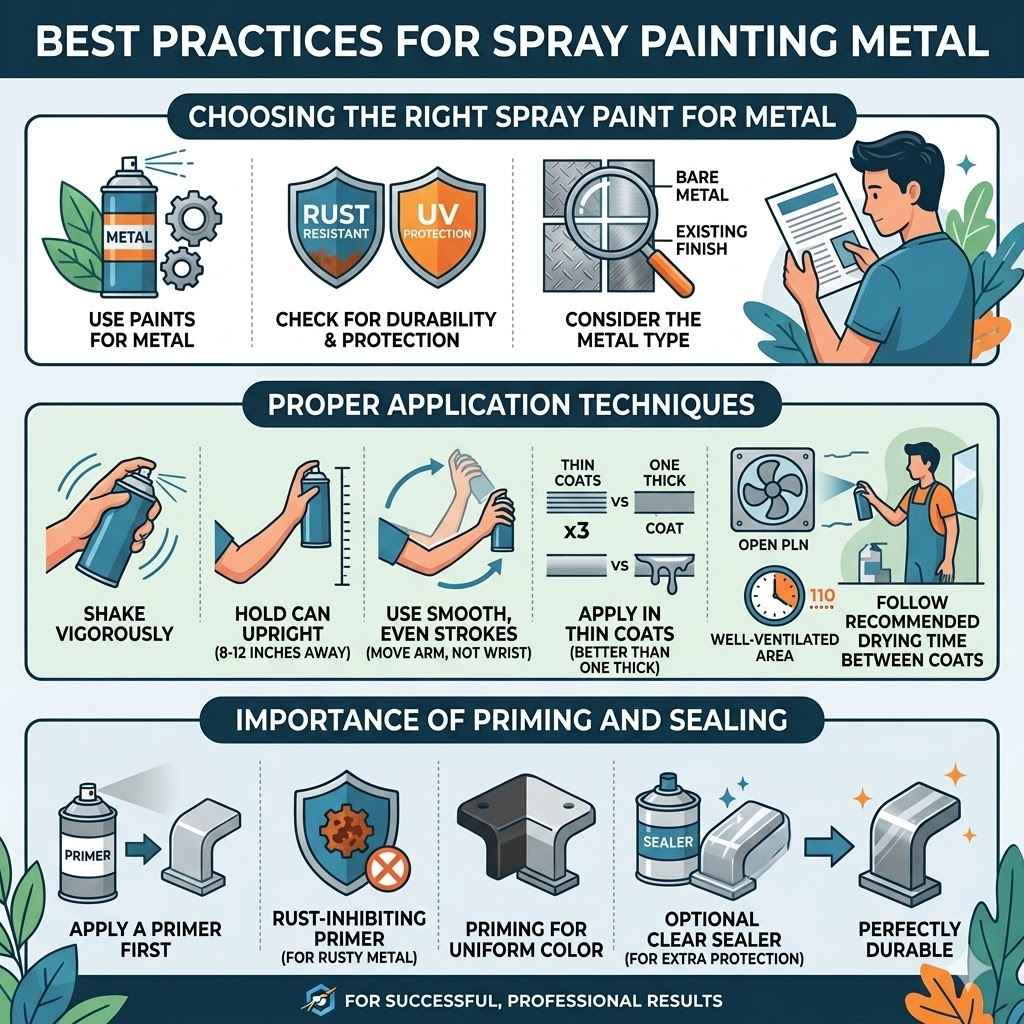
Choosing the Right Spray Paint for Metal
Not all spray paints are created equal, especially when it comes to metal. For best results, use paints specifically labeled for use on metal. These paints are formulated to adhere well to metal surfaces and resist chipping or peeling.
Look for paints that offer durability and protection. Some paints are designed for outdoor use and will resist rust and UV rays. Others are for indoor use and might offer a specific finish, like gloss or matte.
Consider the type of metal you are painting. Some paints work better on bare metal, while others can be applied over existing finishes. Always read the product label carefully.
It will tell you what surfaces the paint is suitable for and any special preparation needed.
Proper Application Techniques
Applying spray paint correctly is key to a smooth, even finish. Always shake the can vigorously for at least one minute before you start. Hold the can upright, about 8-12 inches away from the surface.
Use smooth, even strokes. Move your arm, not just your wrist. Overlap each stroke by about 30-50% to avoid gaps and streaks.
Apply paint in thin coats. It is always better to apply multiple thin coats than one thick one.
Work in a well-ventilated area. If painting outdoors, choose a day with mild temperatures and low humidity. Avoid windy conditions that can cause dust to land on your paint.
After each coat, wait for the recommended drying time before applying the next. This allows the solvents to evaporate properly.
The Importance of Priming and Sealing
Priming is a critical step when spray painting metal. A good primer will help the paint adhere better to the metal surface. It also helps to cover any imperfections or stains on the metal.
For rusty metal, a rust-inhibiting primer is essential to prevent further corrosion.
Priming also helps to ensure a uniform color. If you are painting a dark metal with a light color, a primer can help. It creates a consistent base.
This means you might need fewer coats of your top color.
While not always necessary, a clear sealer can add an extra layer of protection. It can enhance the shine and protect the paint from scratches and the elements. If your paint is designed for outdoor use, a sealer can add extra durability.
Always allow the primer to dry completely according to the manufacturer’s instructions before applying the top coat of spray paint. This ensures the best bond and finish.
Frequently Asked Questions
Question: How long does spray paint typically take to dry to the touch on metal?
Answer: Spray paint usually takes between 10 to 30 minutes to dry to the touch on metal. This means you can lightly touch the surface without getting paint on your fingers, but it’s not fully hardened.
Question: When can I safely handle a metal object after spray painting it?
Answer: You can generally handle a spray-painted metal object with care after about 1 to 2 hours. At this stage, it’s dry to handle but still not fully cured.
Question: How long should I wait to apply a second coat of spray paint to metal?
Answer: The recoat time varies by paint. For many spray paints on metal, you can apply a second coat between 30 minutes and 24 hours after the previous coat, but always check the product label.
Question: Does temperature affect how long spray paint takes to dry on metal?
Answer: Yes, temperature significantly affects drying time. Warmer temperatures help solvents evaporate faster, leading to quicker drying. Cooler temperatures slow down the drying process.
Question: What is the full curing time for spray paint on metal?
Answer: Full curing for spray paint on metal can take anywhere from 24 hours to several weeks. This is when the paint reaches its maximum hardness and durability.
Summary
The time it takes for spray paint to dry on metal depends on many factors. You can expect it to be touch dry in about 10-30 minutes. It usually takes 1-2 hours to be dry enough to handle.
Full curing can take days or weeks. Always prepare your metal surface well and paint in ideal conditions with good ventilation. Following these steps will help you achieve a lasting, beautiful finish on your metal projects.