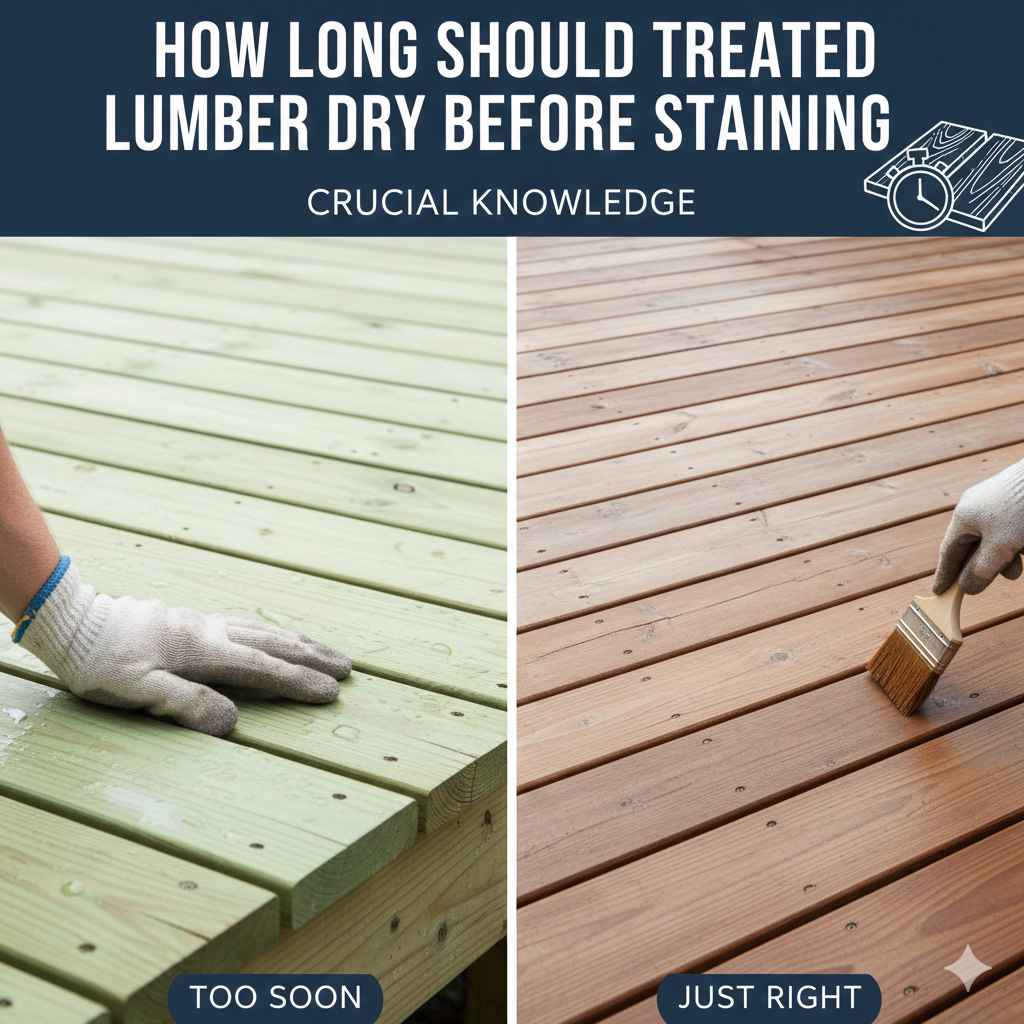
How Long Should Treated Lumber Dry Before Staining: Crucial
Before staining, new pressure-treated lumber must dry until its moisture content is below 15%. This can take anywhere from a few weeks to several months, depending on your climate and the wood’s exposure to sun and air. The best way to check is with the “sprinkle test”: if water beads up, it’s too wet; if it soaks in, it’s ready to stain.
So, you’ve built a beautiful new deck, a sturdy fence, or a lovely garden bed. You picked pressure-treated lumber for its durability, and now you’re eager to apply that gorgeous stain you picked out. I get it! You want to see the finished project. But hold on for just a moment. Staining treated wood isn’t a race. In fact, one of the biggest mistakes DIYers make is staining it too soon, and that simple error can cause a lot of headaches down the road.
Don’t worry, though. Getting the timing right is easy once you know what to look for. Think of me as your friendly guide. In this post, I’ll walk you through everything you need to know, from understanding why treated wood is wet to simple tests that tell you exactly when it’s ready. Together, we’ll make sure your project gets a beautiful, long-lasting finish you can be proud of.
What Exactly Is Pressure-Treated Lumber?
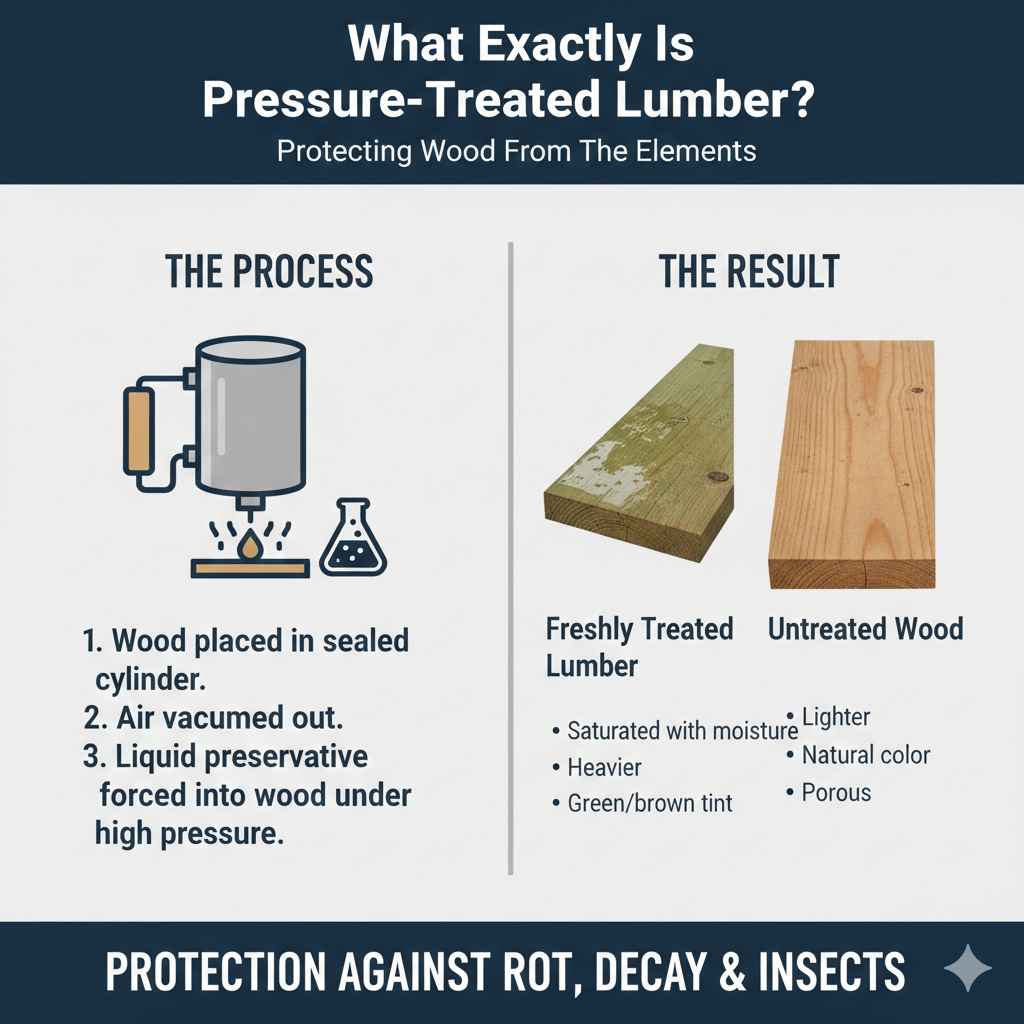
Before we talk about drying, let’s quickly cover what pressure-treated lumber is. It’s a fantastic material for outdoor projects because it’s specially designed to resist rot, decay, and insects. How does it get these superpowers? Through a process called pressure treatment.
Imagine regular pine or fir boards being placed inside a giant, sealed cylinder. All the air is vacuumed out, and then a liquid wood preservative is forced deep into the wood fibers under high pressure. This process is what makes the wood so tough against the elements.
However, this process leaves the lumber saturated with moisture. When you buy treated lumber from the store, it’s often still damp, or even wet, from the treatment. That’s why it feels heavier than untreated wood and sometimes has a greenish or brownish tint. This initial wetness is the whole reason we need to be patient before staining.
Why Waiting for Treated Wood to Dry is Non-Negotiable
I know waiting is the hardest part, but staining damp wood is a recipe for disaster. The moisture trapped inside the wood needs a way to escape. If you seal it in with a layer of stain, you’re creating several big problems.
- Poor Stain Adhesion: Think of the wood like a sponge that’s already full of water. If you try to add more liquid (the stain), it has nowhere to go. The stain won’t be able to penetrate the wood fibers properly. Instead, it will just sit on the surface.
- Peeling and Flaking: As the trapped moisture eventually tries to escape (which it will when the sun heats it up), it will push the stain right off the surface. Within a few months, your beautiful new stain job will start to peel, flake, and bubble. It’s a frustrating sight, and the only fix is to strip it all off and start over.
- Blotchy, Uneven Finish: If some parts of the wood are drier than others, the stain will soak in unevenly. This leads to a blotchy, inconsistent finish that looks unprofessional and unappealing.
- Mold and Mildew Growth: Sealing moisture inside the wood creates a dark, damp environment—the perfect breeding ground for mold and mildew. These can grow underneath the stain, causing discoloration and potentially harming the wood over time.
Taking the time to let the wood dry properly ensures your stain goes on smoothly, penetrates deeply, and protects your project for years to come. A little patience now saves you a ton of work and money later.
So, How Long Should Treated Lumber Dry Before Staining?
This is the million-dollar question, and the honest answer is: it depends. There is no magic number of days or weeks. The “wait two to three months” rule of thumb is a decent starting point, but the real drying time depends on several key factors:
- Your Climate and Weather: This is the biggest factor. A deck in hot, dry Arizona will be ready much faster than one in a humid, rainy part of Florida. Lots of sunshine and low humidity will speed up drying, while cool temperatures and frequent rain will slow it down significantly.
- Sunlight Exposure: A deck that gets direct sunlight all day long will dry much faster than a fence that’s shaded by trees for most of the day.
- Airflow: Good air circulation around all sides of the lumber is crucial. Wood that is stacked tightly or installed without proper spacing (like in a privacy fence with no gaps) will take longer to dry.
- Type of Lumber: Not all treated lumber is the same. Lumber rated for “Ground Contact” is often treated with more preservatives and may be wetter than “Above Ground” lumber. You can find this information on the tag at the end of each board. According to the U.S. Environmental Protection Agency, these preservatives are key to the wood’s longevity.
Because of these variables, you should never rely on the calendar alone. Instead, you need to let the wood itself tell you when it’s ready.
Estimated Drying Times By Climate
To give you a general idea, here is a table of estimated drying times. Remember, these are just estimates! Always perform a water test before you start staining.
| Climate / Condition | Estimated Drying Time | Key Factors to Consider |
|---|---|---|
| Hot & Dry (e.g., Southwest US) | 2 to 4 weeks | Low humidity and intense sun accelerate drying. Check the wood frequently after the first couple of weeks. |
| Warm & Moderate (e.g., Midwest, Northeast Summer) | 4 to 8 weeks | Average humidity and rainfall mean a longer wait. A string of sunny days can make a big difference. |
| Cool & Humid (e.g., Pacific Northwest, Southeast) | 2 to 6 months | High humidity and frequent rain are your biggest enemies here. Patience is essential. It may take a full season to dry properly. |
| Shaded or Poor Airflow Area | Add 2-4+ weeks to your estimate | Areas under large trees or with tightly spaced boards will trap moisture and dry much slower. |
The Best Ways to Tell if Your Treated Wood is Ready for Staining
Forget guesswork. There are two simple and reliable methods to determine if your wood is dry enough to stain. I recommend using both for the best results.
Method 1: The Sprinkle Test (Also Known as the Water Test)
This is the easiest and most popular method for any DIYer. It costs nothing and takes only a few minutes.
Here’s how to do it:
- Choose a few different spots on your deck or fence—some in the sun, some in the shade.
- Sprinkle a small amount of water onto the surface of the wood.
- Watch what happens over the next 10 minutes.
- If the water beads up and sits on the surface, the wood is still too wet. The pores are saturated with moisture and cannot absorb any more liquid. You need to wait longer.
- If the water soaks in quickly and darkens the wood, congratulations! The wood is dry enough to absorb stain. It’s ready for the next step.
It’s that simple! This test mimics how stain will behave. If water can get in, so can stain.
Method 2: Use a Moisture Meter
For those who want to be absolutely certain, a moisture meter is a fantastic tool. It gives you a precise reading of the moisture content inside the wood. While it’s an extra purchase, a good moisture meter is a great investment for any serious woodworker or DIY homeowner.
How to use a moisture meter:
- Turn on the meter and set it to the correct wood species (usually pine or fir for treated lumber).
- Gently press the pins of the meter into the wood, parallel to the grain.
- Take readings in several different spots across your project, just like with the sprinkle test.
You are looking for a moisture content reading of 15% or less. Most stain manufacturers recommend a reading below this threshold for proper application. Some professionals even wait for it to drop to 12%. If your readings are consistently below 15% across the entire project, you are good to go.
A Quicker Alternative: Kiln-Dried After Treatment (KDAT) Wood
If you’re in a hurry and haven’t built your project yet, there’s an option called Kiln-Dried After Treatment (KDAT) lumber. After the pressure-treatment process, this wood is placed in a kiln to professionally dry it to a consistent moisture level. The biggest advantage? KDAT wood is ready to be stained or painted immediately—no waiting required! It is more expensive and might not be available at all lumberyards, but it’s a great option if your project is on a tight timeline.
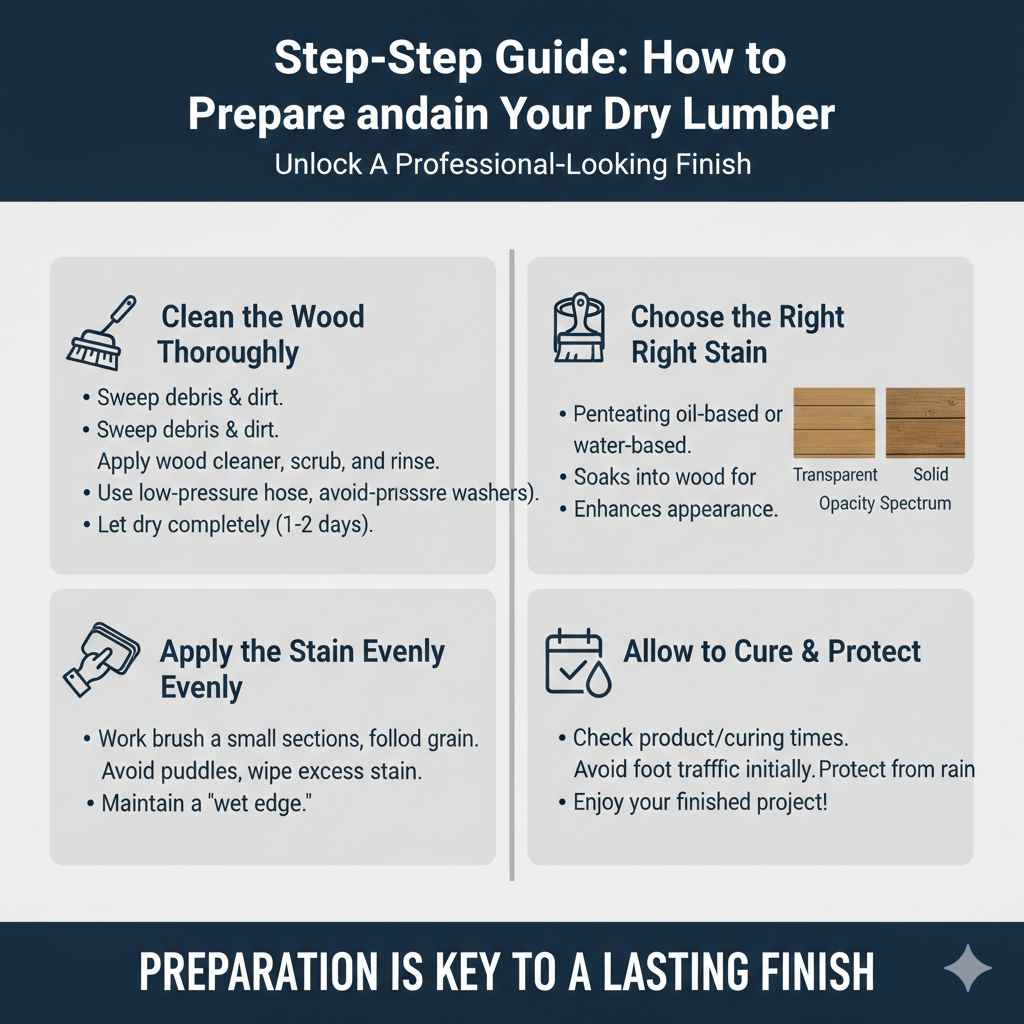
Step-by-Step Guide: How to Prepare and Stain Your Dry Lumber
Once you’ve confirmed your wood is dry using the tests above, it’s time for the fun part. But don’t just jump straight to staining. Proper preparation is the key to a professional-looking finish.
Step 1: Clean the Wood Thoroughly
Even new lumber can have dirt, pollen, and “mill scale” on its surface. Mill scale is a crusty film that can form during the milling process and block stain penetration.
- First, sweep the surface to remove any loose debris like leaves or dirt.
- Next, use a wood cleaner or deck wash specifically designed for new wood. Follow the product’s instructions carefully. You’ll usually apply it, let it sit for a few minutes, and then lightly scrub the surface with a stiff-bristled brush.
- Rinse the cleaner off completely with a garden hose. Avoid using a pressure washer on high-pressure settings, as it can damage the wood fibers and cause a fuzzy texture. If you must use one, use a low-pressure tip (40 degrees or wider) and keep it moving.
- Let the wood dry completely after cleaning. This usually takes 1-2 sunny days. Yes, another short wait! But it’s worth it.
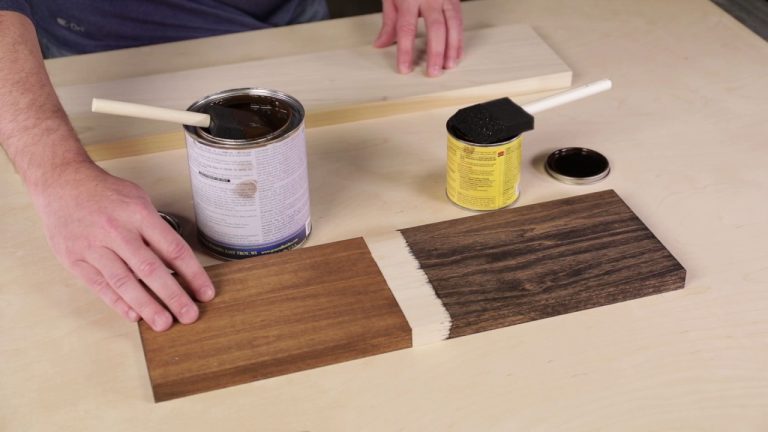
Step 2: Choose the Right Stain
The type of stain you choose affects both the look and the level of protection. For treated lumber, a penetrating oil-based or water-based stain is usually best. These soak into the wood rather than forming a film on top. As a helpful guide from the University of Massachusetts Amherst explains, proper finishing protects wood and enhances its appearance.
| Stain Type | Pros | Cons | Best For |
|---|---|---|---|
| Oil-Based Semi-Transparent | Excellent penetration, rich color, conditions the wood. | Slower drying time, stronger odor, requires mineral spirits for cleanup. | Achieving a rich, classic wood look while allowing the grain to show through. |
| Water-Based Semi-Transparent | Easy soap-and-water cleanup, faster drying, low odor, better mildew resistance. | May not penetrate as deeply as oil-based stains on the first coat. | DIYers looking for an easy-to-use product with great color retention and simple cleanup. |
| Solid Color Stain | Provides maximum UV protection, hides imperfections, looks like paint but allows wood to breathe. | Completely covers the natural wood grain. Can peel if not applied correctly. | Older decks with imperfections or for homeowners who want a solid, painted look. |
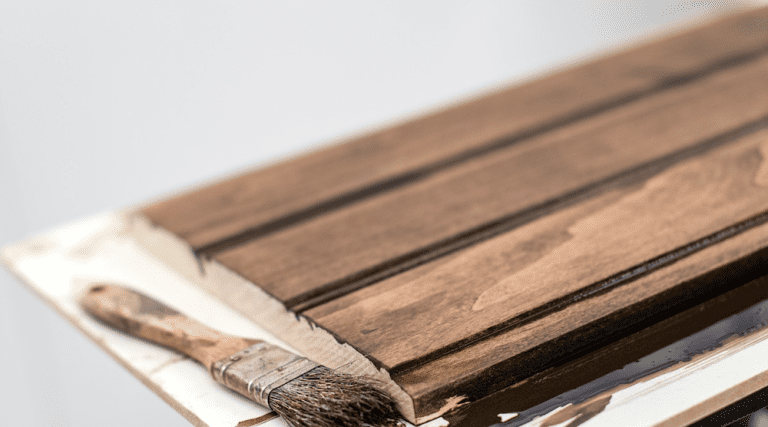
Step 3: Apply the Stain
Always check the weather forecast! You need a few days of clear, dry weather with moderate temperatures (ideally between 50°F and 90°F or 10°C and 32°C). Avoid staining in direct, hot sunlight, as it can cause the stain to dry too quickly and create lap marks.
- Stir, Don’t Shake: Stir your can of stain thoroughly with a paint stick. Shaking can create air bubbles that will show up on your finish.
- Test in a Small Spot: Apply the stain to a small, inconspicuous area first to make sure you like the color and it’s absorbing properly.
- Use the Right Tools: A high-quality stain pad, a brush, or a roller with a 3/8-inch nap are all great choices. For fences or railings with lots of spindles, a paint sprayer can be a huge time-saver.
- Work in Sections: Apply the stain in long, even strokes, following the grain of the wood. To avoid lap marks, maintain a “wet edge” by staining a few boards at a time from end to end before moving to the next section.
- Back-Brush if Needed: If you are spraying or rolling, it’s a good idea to go over the section immediately with a brush. This works the stain into the wood pores for better penetration and a more even finish.
- Don’t Over-Apply: Apply a thin, even coat. Wiping off any excess stain that hasn’t soaked in after 15-20 minutes (check the can for specific times) is crucial. If you let it dry on the surface, it will become a sticky, shiny mess. Most semi-transparent stains only require one coat.
Let the stain dry completely according to the manufacturer’s instructions before walking on it or placing furniture. This can take anywhere from 24 to 72 hours.
Frequently Asked Questions (FAQ)
Here are answers to some common questions I get from homeowners just like you.
What happens if I stain treated wood too soon?
If you stain treated wood while it’s still wet, the stain won’t be able to soak into the wood fibers. As the trapped moisture evaporates, it will push the stain off, causing it to peel, bubble, and flake within a few months. You’ll end up with a blotchy, failed finish that needs to be completely stripped before you can try again.
Can I use a fan or a heater to speed up the drying process?
While a fan can help improve air circulation, it’s best to let the wood dry naturally. Using heaters or other artificial drying methods can cause the wood to dry too quickly and unevenly, which may lead to cracking, warping, and splitting. Patience and nature are your best tools here.
Is there a difference between green and brown treated lumber?
The color is just a dye added during the treatment process and doesn’t significantly impact the drying time. Green-tinted lumber (often treated with CCA or ACQ) is very common, while brown-tinted lumber (like that from YellaWood using micronized copper) is designed to look more like cedar from the start. Both types need to be fully dry before staining.
What is the best time of year to build and stain a deck?
Late spring or early fall are often ideal. These seasons typically offer moderate temperatures and lower humidity, which is perfect for both building and allowing the wood to dry. Building in the spring gives the wood the whole summer to dry out, making it ready for staining in the fall. Building in the fall lets it dry over the winter for spring staining.
Do I need to sand treated lumber before staining?
Sanding is generally not necessary for new treated lumber unless the surface is very rough or has splinters. If you do sand, use 80-grit sandpaper and be careful not to oversand, which can close off the wood pores and prevent stain from absorbing. Always clean the wood after sanding to remove all dust.
How can I tell if my wood is KDAT?
Kiln-Dried After Treatment (KDAT) lumber will be clearly marked as such on the end tag of the board or on the purchase receipt. It will also feel significantly lighter and drier to the touch compared to standard, wet pressure-treated lumber.
How often should I restain my deck or fence?
This depends on the stain you used and your climate. Generally, a semi-transparent stain will need to be reapplied every 2-3 years. A solid color stain can last longer, around 3-5 years. The best indicator is when the wood starts to look faded or when water no longer beads on the surface.
Your Project Deserves a Great Finish
There you have it! The secret to a beautiful, long-lasting stain job on your pressure-treated wood project isn’t about rushing—it’s about patience and preparation. By understanding why the wood needs to dry and by using simple tests to know when it’s ready, you’re setting yourself up for success.
You’ve already put in the hard work of building your deck or fence; don’t let a little impatience at the finish line undermine your efforts. Let the wood dry properly, clean it well, and apply your stain on a nice day. When you’re done, you’ll have a professional-quality finish that not only looks incredible but also protects your investment for many seasons to come. Now you can sit back, relax, and enjoy the amazing space you’ve created.