How Much Wood Could A Woodchuck Chuck: Essential Twister
While the actual amount a woodchuck (groundhog) could chuck is scientifically debated, the classic tongue twister is a fun linguistic challenge. For DIYers, focusing on woodworking volume is much more practical! We’ll explore the science behind the rhyme and give you tips for practical, real-world chucking (moving wood).
Have you ever tried to say that classic phrase out loud ten times fast? “How much wood could a woodchuck chuck if a woodchuck could chuck wood?” It trips up almost everyone! This silly question is one of the most famous tongue twisters around, and it usually comes up when we’re talking about confusing instructions or things that seem impossible to measure.
Don’t worry if your tongue feels tied in knots just thinking about it. In the world of home projects and woodworking, we deal with real materials, not riddles. If you’re staring at a pile of lumber and wondering how to handle it, you’ve come to the right place. I’m Md Meraj, and I’ll guide you through breaking down this confusing concept into simple, practical steps. Let’s move past the rhyme and tackle real wood handling!
The Mystery of the Woodchuck: Breaking Down the Tongue Twister
Before we dive into using your tools, let’s settle the score on this famous little rodent. Why do we even ask this question? It’s all about alliteration—that fun repetition of the ‘W’ sound. But folks have actually tried to figure out a real answer for decades!
What is a Woodchuck, Anyway?
First things first: a woodchuck is just another name for a groundhog (Marmota monax). They are stout, burrowing rodents, not creatures known for tossing logs around! Their main job is digging extensive underground homes, which involves moving dirt, not wood.
So, if a woodchuck could chuck wood, what exactly would “chucking” mean? Does it mean chewing it, digging it up, or tossing it? The definition changes the answer completely!
The Scientific Attempt to Answer the Rhyme
Believe it or not, serious folks have taken a stab at solving this riddle. One of the most quoted studies came from a researcher at Cornell University who estimated how much dirt a groundhog moves when digging a burrow. In 1988, a New York wildlife biologist named Richard Thomas calculated that a woodchuck excavates about 700 pounds of dirt when making its home.
If we assume that “chucking wood” is the equivalent of moving dirt, then we can make an educated guess. However, wood is much lighter than compacted soil.
Here is a quick look at the common estimations based on these lighthearted studies:
| Basis for Estimate | Estimated Volume (Chuck) | Notes |
|---|---|---|
| Dirt Moved by Digging (Approx.) | 35 cubic feet (of dirt) | Based on burrow volume. |
| If Wood Weight Equals Dirt Weight | About 700 pounds of wood | Highly unlikely, as wood is much less dense than dirt. |
| Practical Wood Density Estimate | Approx. 1/10th the volume of dirt moved | A loose guess based on what’s manageable for an animal. |
The short answer remains: A woodchuck probably wouldn’t chuck any wood at all! But for us DIYers, let’s focus on the practical aspect: moving the wood you actually need for your projects.

From Riddle to Reality: How to “Chuck” (Move and Handle) Wood Safely
When you are working on home projects—whether building shelves, framing a small shed, or just bringing firewood inside—you need to move wood efficiently and, most importantly, safely. As your woodworking guide, I want to make sure you treat lumber with respect. Moving heavy material without proper technique can lead to strain, injury, or damaged materials.
Step 1: Assess Your Load Size and Weight
You wouldn’t use a small hand saw to cut down an oak tree, right? Similarly, you shouldn’t try to carry 100 pounds of lumber yourself if you can use tools designed for the job. Always know what you are moving.
Common Lumber Weights (General Estimates)
- 16-foot 2×4: Typically weighs between 10 to 15 pounds, depending on the wood species (pine is lighter than oak).
- Sheet of Plywood (3/4 inch): Can easily weigh 50 to 70 pounds. These are awkward and heavy—get help!
- Stack of Firewood: Weight varies wildly, but a small armload of dry oak can quickly exceed 30 pounds.
Pro Tip: If a piece of wood or a stack makes you feel unbalanced or causes you to strain your back, put it down immediately. Your body is your most important tool!
Step 2: Gather the Right “Chucking” Gear (Tools)
In the DIY world, “chucking” wood means transporting it from the truck to the workshop, or from the cutting table to the assembly area. Here are the essential tools that will save your back and make the job faster:
- Heavy-Duty Work Gloves: Essential for grip and protecting your hands from splinters, rough edges, and sharp corners. Look for nitrile-coated or thick leather gloves.
- Lifting Straps (Forearm Forklifts): These leverage straps distribute the weight across your shoulders and legs, making heavy, awkward items (like plywood) much easier to carry. They are a lifesaver for bulky materials.
- Utility Cart or Dolly: For multiple pieces or very heavy single items, a sturdy wheeled cart is non-negotiable. Ensure the cart has pneumatic (air-filled) tires if you are moving wood across grass or gravel.
- Wood Carriers or Clamps: These specialized clamps attach to the sides of boards, giving you a solid handle for carrying planks.
Step 3: Mastering the Proper Lifting Technique
Safety first, always! Poor lifting technique is a leading cause of home project injuries. Follow these basic rules every single time you lift wood, even a single board.
- Squat, Don’t Bend: Keep your back straight. Bend at your hips and knees, not at the waist. This lets your powerful leg muscles do the heavy lifting.
- Get Close: Keep the load as close to your body as possible. The further the weight is from your center of gravity, the harder your back has to work.
- Lift Smoothly: Avoid jerking or twisting while lifting. If you need to change direction, move your feet completely before rotating your torso.
- Exhale on Effort: Breathe out as you push up from your squat. Holding your breath (the Valsalva maneuver) can dangerously increase blood pressure.
For more detailed information on safe lifting practices recognized by safety experts, you can check out guidelines provided by organizations like the Occupational Safety and Health Administration (OSHA) regarding material handling, even if you are just working at home OSHA Manual Material Handling Guidelines.
Wood “Chucking” Volume: From Pallets to Projects
If you’ve ever bought wood from a lumberyard, you’ve likely dealt with bundles, not individual pieces. Understanding how wood is bundled helps you estimate the total amount you need to move or use.
Lumber Grading and Standard Dimensions
When we talk about how much wood we use, we usually measure it in Board Feet (BF). This measurement system standardizes the volume regardless of the actual length or width, which is perfect for pricing and inventory.
The Formula: (Length in Inches x Width in Inches x Thickness in Inches) / 144 = Board Feet
For standard dimensional lumber (like a 2×4), the thickness is always rounded down in calculation (a 2×4 is calculated as 1.5 inches thick, not 2 inches).
Example Calculation: Moving a Stack of 2x4s
Let’s say you have a stack of ten 8-foot long 2x4s (Pine, standard construction grade).
- Find Board Feet per piece: (96 inches long x 3.5 inches wide x 1.5 inches thick) / 144 = 3.5 BF per piece.
- Total Board Feet: 3.5 BF/piece x 10 pieces = 35 BF total.
While 35 BF doesn’t look like much on paper, ten 8-foot 2x4s stacked together are heavy and unwieldy. This is where estimating the weight and deciding on your moving strategy (dolly vs. hand-carry) becomes critical.
Estimating Pallet Loads
If you are working on a big job, you might bring home a full pallet of lumber. Pallets are bundled tightly and often strapped together. A typical pallet of construction lumber (often called a “stickered load”) can easily weigh between 1,000 and 2,500 pounds.
Rule of Thumb: Never attempt to unload or move a full pallet of wood manually. You will absolutely need mechanical assistance, like a forklift or a pallet jack. If you are new to DIY, always ask the lumberyard to stage the load somewhere easily accessible, like near your driveway entrance, rather than deep in the yard.
Wood Species Matters: Density and Handling
The type of wood profoundly affects how much it weighs and how hard it is to “chuck.” A cubic foot of dense hardwood weighs significantly more than a cubic foot of softwood.
As an example, if you moved one cubic foot of very light Aspen versus one cubic foot of heavy Brazilian Walnut, the Walnut would require far more effort (and potentially straining injury) to lift the same volume.
Here’s a comparison of common species you might bring home for DIY projects. Notice the wide range in density:
| Wood Species | Type | Approximate Weight (Per Cubic Foot, Kilograms) | Handling Difficulty (Relative) |
|---|---|---|---|
| Pine (Construction Grade) | Softwood | 30–40 lbs (13.6–18 kg) | Easy to Moderate |
| Oak (Red or White) | Hardwood | 40–48 lbs (18–21.8 kg) | Moderate to Difficult |
| Maple (Hard Maple) | Hardwood | 45–50 lbs (20.4–22.7 kg) | Moderate to Difficult |
| Cedar (Western Red) | Softwood | 20–25 lbs (9–11.3 kg) | Easy |
When planning a project, always choose the lightest species that meets the strength requirements. Cedar is fantastic for outdoor projects because it’s light and naturally rot-resistant, making it easier to carry around the job site!
Practical Application: Stacking Wood Efficiently
Once you have moved your lumber to the workshop or storage area, the next step is stacking it. Good stacking prevents warping, keeps wood dry, and makes it easier to manage your inventory—it’s the final stage of “chucking” the wood where it needs to be!
Tips for Safe and Stable Stacking
- Use Stickers (Spacing Blocks): Always place small strips of scrap wood (stickers) between layers, stacked perpendicular to the boards. This allows air to circulate, which prevents moisture buildup and mildew.
- Keep it Level: The base layer must be perfectly level and supported. Use treated 4x4s or concrete blocks as the foundation, raising the wood off the ground to prevent moisture wicking.
- Don’t Stack Too High: For home workshops, keep stacks below waist or chest height unless you have robust support framing. Tall, heavy stacks are a huge tipping hazard.
- Keep it Tight: Push boards snug against each other within each layer. Loose stacks can shift under their own weight.
If you are storing wood outdoors, proper seasoning and covering are crucial. Moisture absorption can dramatically increase the weight of the wood, making future moving efforts much harder. For tips on drying lumber, look into local agricultural extension offices, as many universities provide excellent, research-backed guides on proper wood storage and curing to maintain wood integrity, like those offered by forestry departments Penn State Extension on Lumber Storage.
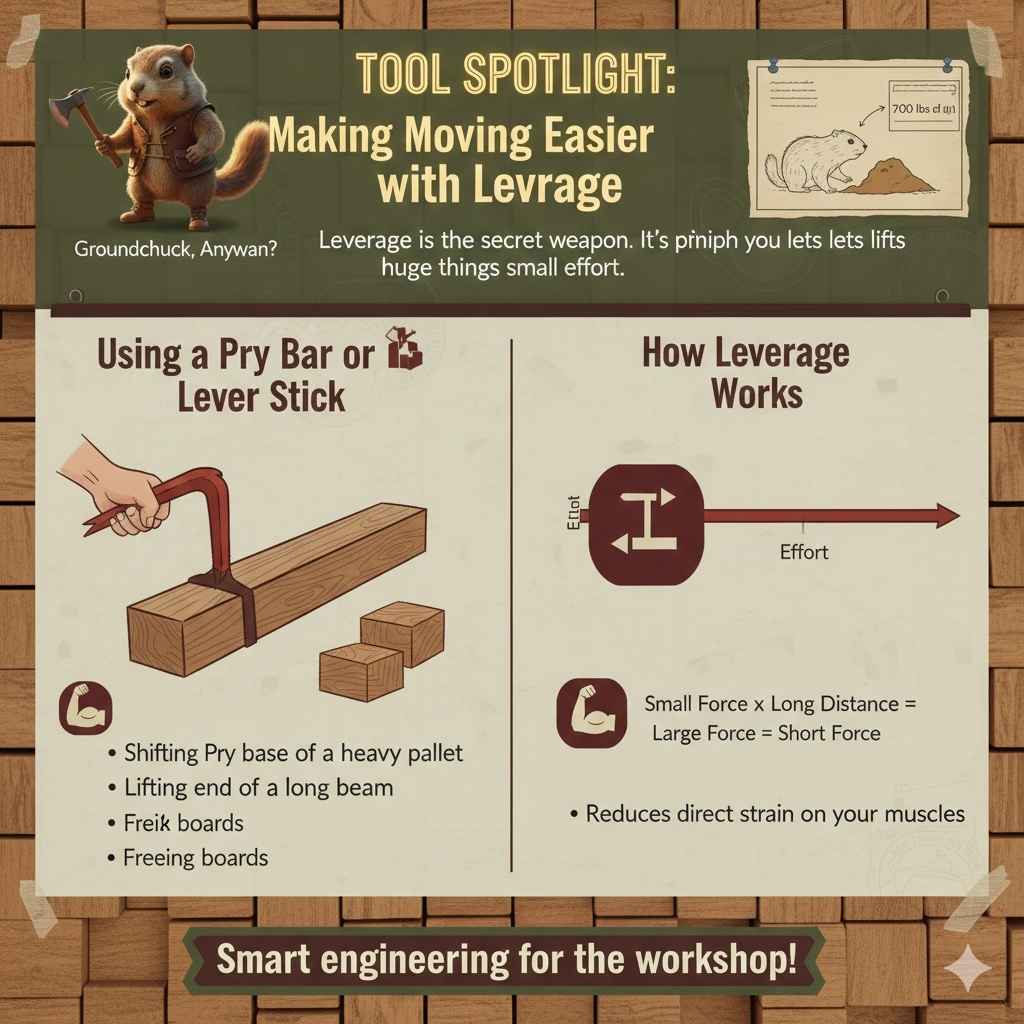
Tool Spotlight: Making Moving Easier with Leverage
Leverage is the secret weapon of DIYers. It’s the principle that lets you lift huge things with small effort. While a woodchuck doesn’t use levers, we certainly should!
Using a Pry Bar or Lever Stick
If you have a piece of lumber that is just slightly too heavy or wedged under something, a simple pry bar (or even a strong scrap piece of wood used as a lever) can help you create enough lift to get your straps or dolly underneath.
When to Use Leverage:
- Shifting the base of a heavy pallet just an inch to slide a jack underneath.
- Lifting one end of a long beam slightly to adjust your grip.
- Freeing boards that have settled tightly together in a stack.
Remember, using a tool for leverage means you are applying force over a distance, reducing the direct strain on your muscles. It’s smart engineering for the workshop!
Conclusion: You’ve Mastered the Move
So, how much wood could a woodchuck chuck? Probably not much, and certainly not as efficiently as you can now! We’ve moved past the fun, confusing tongue twister and focused on what matters in your DIY journey: moving and handling real materials safely and intelligently.
You now understand that chucking wood efficiently isn’t about how many words you can fit into a sentence; it’s about knowing the weight of the wood, using the right lifting mechanics, and employing the right tools like carts and straps. Every time you safely move a stack of lumber, you are applying real-world physics better than any groundhog ever could. Keep learning, keep practicing safe lifting, and you’ll find that even the biggest lumber loads become manageable steps in your next big home project. Happy building!
Frequently Asked Questions (FAQ)
Q1: Is it safe to lift lumber by myself, even if it feels light?
A: It can be risky. Always prioritize your safety. If a piece of wood makes you twist, strain, or hold your breath, get help or use a mechanical aid like a dolly, even if the piece seems light. Single planks are less dangerous than wide, awkward sheets of plywood.
Q2: What is the difference between board feet and actual wood dimensions?
A: Board feet (BF) is a standard unit of volume used for pricing. Actual dimensions are what you measure. For example, a “2×4” is sold as 2 inches by 4 inches, but its actual rough-cut dimension is closer to 1.5 inches by 3.5 inches. Always use the actual (smaller) dimensions for accurate BF calculations.
Q3: How do I keep stacked lumber from bowing or warping in my garage?
A: Support the entire stack evenly. Use stickers (small wood blocks) between every few layers, placed perpendicular to the boards. Ensure the foundation underneath the entire stack is flat and solid concrete or treated lumber, never resting directly on the dirt floor.
Q4: Should I use straps or carry wood by hand more often?
A: Use straps or lifting tools whenever you move more than two or three standard boards at once, or any sheet goods (plywood, MDF). Straps utilize your stronger leg and shoulder muscles, significantly reducing back strain compared to hand-carrying awkward loads.
Q5: Where is the best place to store lumber if I bought too much for my current project?
A: Store wood indoors, off the floor, in a place with consistent, dry airflow. If outdoor storage is necessary, stack it off the ground on blocks, cover the top completely, and allow airflow around the sides. Never store wood directly against a wall, as this traps moisture.
Q6: How heavy is green wood compared to dry kiln-dried wood?
A: Green wood (freshly cut, unseasoned) can be significantly heavier—often 30% to 50% heavier—than kiln-dried wood because it still holds a lot of water content. Always adjust your lifting expectations downward when handling fresh lumber.
Q7: Can I use a simple hand truck (dolly) for moving a bundle of 2x4s?
A: Yes, a sturdy hand truck or utility cart is excellent for bundled 2x4s. For best results, strap the bundle tightly to the dolly’s frame so the wood doesn’t shift as you roll it. Ensure the weight is centered over the axle.