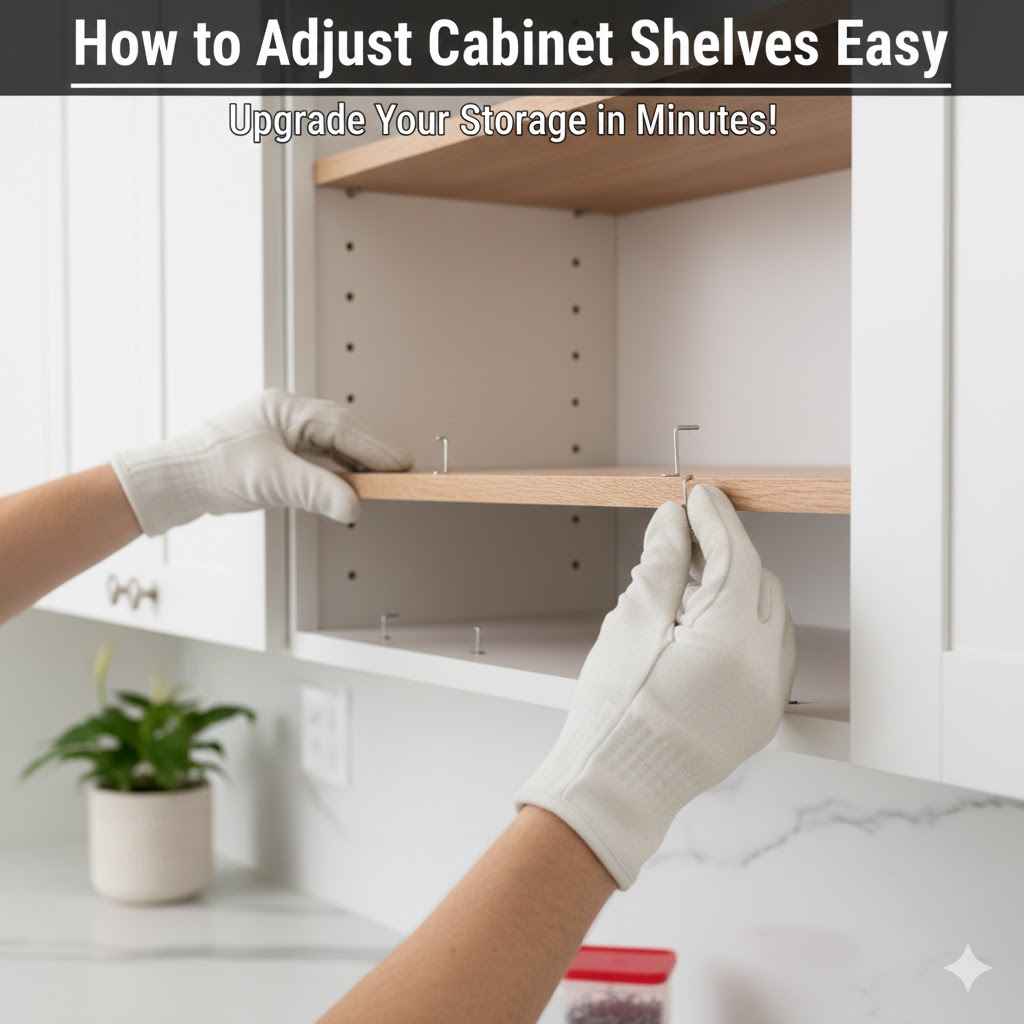
How to Adjust Cabinet Shelves Easy
Sometimes, you need to change where your cabinet shelves sit. Maybe you got new items that are taller or shorter, or you just want to make things fit better. If your shelves use those little plastic clips, you might wonder if it’s tricky.
It can seem that way at first! But really, it’s quite simple. This guide will show you exactly how to adjust cabinet shelves with plastic clips step-by-step.
You’ll be organizing like a pro in no time.
Understanding Cabinet Shelf Adjustment Clips
Cabinet shelves are a common feature in many homes, used for everything from storing pantry items to displaying decor. The ability to adjust these shelves is a key feature that offers flexibility and allows users to customize their storage space. This is especially true for shelves that rely on small, often plastic, clips to hold them in place.
These clips fit into small holes drilled into the sides of the cabinet. When you need to move a shelf, you’re essentially repositioning these clips to a new set of holes. This system is designed for ease of use, but for beginners, the initial setup or adjustment can sometimes feel a bit confusing or even intimidating.
Understanding the basic mechanics of these clips and the process of moving shelves is the first step to gaining confidence in organizing your cabinets efficiently.
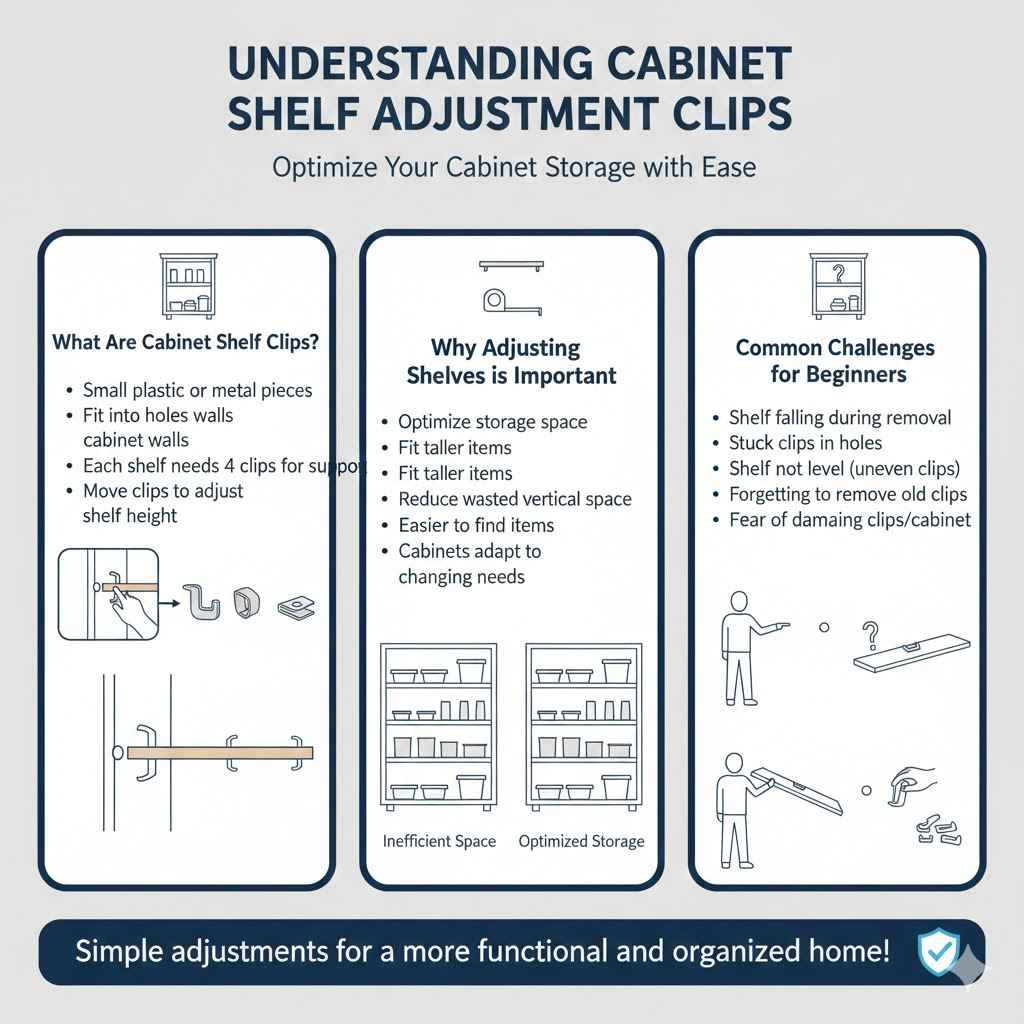
What Are Cabinet Shelf Clips?
Cabinet shelf clips, often called shelf pins or shelf supports, are small pieces, typically made of plastic or metal, that hold up your shelves. They slide into tiny holes drilled in a grid pattern on the inside walls of your cabinets. Each shelf usually needs four clips, one in each corner, to sit on evenly.
When you want to move a shelf higher or lower, you simply move these clips to different holes. The weight of the shelf and its contents rests on these clips, so they need to be strong and fit snugly.
These clips are designed to be simple and functional. They come in various shapes and sizes, but most have a stem that goes into the cabinet hole and a flat or slightly curved top that the shelf rests upon. The plastic ones are common because they are inexpensive and don’t scratch cabinet interiors like metal ones might.
However, some people prefer metal clips for their perceived durability and strength. Regardless of material, their core purpose is the same: to provide a stable resting place for your adjustable shelves.
Why Adjusting Shelves is Important
Adjusting cabinet shelves is not just about making space; it’s about optimizing your storage for better organization and access. When shelves are at the wrong height, you might waste valuable vertical space. Tall items won’t fit, or you’ll have too much empty air above shorter items, making the cabinet look cluttered and inefficient.
Properly spaced shelves make it easier to find what you need quickly. This saves time and reduces frustration. For example, in a kitchen cabinet, adjusting shelves can help you fit larger appliances or stack dishes more effectively.
In a garage, it can mean fitting tools and storage bins with less wasted room.
The ability to customize shelf height is a significant advantage over fixed shelving systems. It means your cabinets can adapt to your changing needs. If you buy new, taller items, you can adjust the shelves to accommodate them without needing to buy new cabinets.
This flexibility contributes to a more functional and less cluttered living or working space. It’s a simple adjustment that can have a big impact on how well your cabinets serve their purpose. The ease with which you can make these changes using plastic clips is a testament to practical design.
Common Challenges for Beginners
When people first try to adjust cabinet shelves with plastic clips, a few things can cause confusion. One common issue is not knowing how to remove the shelf without it falling. Sometimes, the clips get stuck in the holes, making them hard to pull out.
People also worry about putting the shelf back in crooked or not securing it properly, which could lead to items falling. Another point of concern is making sure all four clips are at the exact same height, so the shelf sits level. Forgetting to remove old clips from the previous position can also lead to extra clips being visible or even interfering with the new shelf placement.
These are all normal concerns that a clear, step-by-step approach can easily resolve.
The fear of damaging the cabinet or the clips themselves is also a factor. Plastic clips, while durable for their purpose, can sometimes feel fragile. Beginners might be hesitant to apply the necessary force to remove stuck clips or might worry about breaking them.
Additionally, not having the right tools or knowing what to do if a clip doesn’t seem to fit correctly can add to the stress. However, with a little guidance, these challenges are very manageable. The goal is to make the process straightforward and stress-free, empowering anyone to make these simple adjustments.
How to Adjust Cabinet Shelves with Plastic Clips Step-by-Step
Adjusting cabinet shelves with plastic clips is a straightforward process when you know the right steps. This guide breaks down the task into simple actions. You will learn how to safely remove shelves, reposition the clips, and install shelves at their new height.
By following these instructions, you can quickly customize your cabinet space to fit your needs. This method works for most common cabinet types that use this shelving system. It’s about being systematic and gentle.
Let’s get started with what you’ll need and the first steps.
Gather Your Supplies
Before you begin, gather a few simple items. You will need a soft cloth to protect your cabinet surfaces. A small putty knife or a flathead screwdriver can be helpful if clips are stubborn.
Sometimes, a damp cloth is useful for cleaning dust. It’s also a good idea to have a measuring tape handy if you want to ensure precise spacing. Having a small container or bag to keep the shelf clips organized as you move them is also a smart idea.
This prevents them from getting lost.
Make sure you have adequate lighting in the area you are working. This will help you see the holes and clips clearly. You don’t need any special tools; the system is designed for easy manual adjustment.
The main goal is to have everything ready so you can move smoothly from one step to the next without interruption. This preparation makes the entire process much quicker and less frustrating. For most adjustments, your hands will do the bulk of the work.
Empty the Cabinet
The first crucial step in adjusting your shelves is to empty the cabinet completely. You need to remove all items from the shelf you intend to move, and likely from the shelves above and below it, to give yourself enough room to work safely. Ensure you have a clear space nearby to place your items temporarily.
A kitchen counter, a table, or even the floor (with a protective covering if necessary) can work well. Taking everything out allows you to access the shelf clips easily and prevents any items from falling or getting damaged during the adjustment process.
When emptying the cabinet, it’s helpful to group similar items together. This not only makes it easier to put them back later but also gives you an opportunity to declutter. If you find things you no longer need, this is a perfect time to set them aside for donation or disposal.
This step might seem time-consuming, but it is essential for a smooth and efficient shelf adjustment. Working with an empty cabinet prevents accidental spills or breakage and ensures you have unobstructed access to the shelf supports.
Remove the Shelf
With the cabinet empty, you can now focus on removing the shelf itself. Most shelves sit on four clips, one at each corner. Gently try to lift the shelf up and away from the clips.
If it doesn’t come free easily, the clips might still be holding it tightly. In this case, you might need to use a little gentle force. Wiggle the shelf slightly while lifting.
If the shelf still feels stuck, it’s time to address the clips directly. Avoid pulling too hard, as this could damage the clips or the cabinet.
If the shelf is heavy or awkward, consider asking someone to help you. Having a second person can make removing it much easier and safer, preventing it from dropping or causing injury. Once the shelf is free from the clips, carefully set it aside in your designated temporary storage area.
Make sure to place it where it won’t be damaged and where it’s out of the way. This step prepares the cabinet for the next stage: adjusting the clips.
Remove the Old Shelf Clips
Now, focus on the plastic clips that are holding the shelf at its current height. Look closely at each of the four clips. They should be sitting in the holes in the cabinet walls.
To remove them, gently grasp the stem of the clip and pull it straight out from the hole. They are designed to pull out with relatively little force. If a clip is difficult to pull out, try wiggling it slightly from side to side while you pull.
A small putty knife or a flathead screwdriver can be used to gently pry the edge of the clip away from the cabinet wall, but be very careful not to scratch the surface.
It’s a good idea to have a small container or bag ready to place the clips into as you remove them. This prevents them from rolling away or getting lost, especially if you have many to move. Keep track of how many clips you remove from each side of the cabinet.
This will help you ensure you put the same number back in place. Removing these old clips clears the way for placing them at the new desired height.
Determine the New Shelf Height
Before you place the new clips, decide where you want your shelf to be. Measure the height of the items you plan to store on this shelf. Add an inch or two of extra space above them for easy removal.
Then, look at the grid of holes on the inside of your cabinet. Count the holes from the bottom of the cabinet or from a known reference point, like the floor of the cabinet. Decide on the exact position for your clips.
For example, you might decide to place the clips in the holes that are 10 inches from the cabinet floor.
It’s important to ensure that the clips on both sides of the cabinet are at the exact same height. If one side is even one hole higher than the other, the shelf will sit crooked, which can cause items to slide or even fall. If you want the shelf to be perfectly level, double-check your counting.
You can use a measuring tape to confirm the distance from the cabinet floor to the intended clip position on both the left and right sides. This attention to detail ensures a stable and functional shelf.
Insert the New Shelf Clips
Once you’ve determined the new height, it’s time to insert the plastic clips. Take your clips and push the stem firmly into the selected holes on the inside of the cabinet walls. Make sure each clip is inserted all the way and sits securely in its hole.
You should feel a slight click or resistance when it’s fully seated. Repeat this for all four positions, ensuring that the clips on each side are at the same level. Push them in firmly to make sure they won’t loosen under the weight of the shelf and its contents.
Double-check that each clip is fully inserted and level. Run your finger along the top of the clips on one side, then do the same for the other side, to feel if they are at the same height. If you used a putty knife or screwdriver to remove stubborn clips, be mindful not to damage the holes themselves.
The holes should be clear for the new clips to fit snugly. Properly inserted clips are the foundation for a stable, adjustable shelf.
Replace the Shelf
With the new clips in place, you are ready to put the shelf back. Carefully lift the shelf and align it over the clips. Slowly lower the shelf onto the clips, making sure that all four corners rest securely on the tops of the clips.
You might need to gently maneuver the shelf to ensure it’s sitting evenly on all supports. Once the shelf is resting on the clips, give it a gentle press down to confirm it’s stable. It should feel secure and not wobble.
If the shelf doesn’t seem stable, lift it off again and recheck that the clips are fully inserted and at the correct height on both sides. Sometimes, a slight adjustment to the clip position is all that’s needed. Once the shelf feels solid and level, you’ve successfully adjusted your cabinet shelf.
The system is designed to be intuitive, and with practice, this process becomes very quick. You can now place your items back into the cabinet.
Reload the Cabinet
The final step is to put your items back into the cabinet. Arrange them on the newly positioned shelf. Now that the shelf is at the ideal height, you should notice that your items fit better, and the space feels more organized.
Take advantage of this opportunity to arrange things logically. Place heavier items on lower shelves for stability and lighter items on higher shelves. Grouping similar items together also makes it easier to find what you need in the future.
Observe how the new shelf height affects the overall organization of your cabinet. You might find that you have more usable space than before. If needed, you can repeat this process for other shelves in the cabinet to create a completely customized storage solution.
The ability to adjust shelves is a powerful tool for efficient home organization, and mastering the use of plastic clips is key to unlocking its full potential.
Maintaining Your Cabinet Shelf Clips
Once your cabinet shelves are adjusted, it’s important to keep the clips in good condition. This ensures your shelves remain stable and secure for years to come. Proper care prevents them from breaking or becoming loose, which could lead to accidents.
Regular checks and simple cleaning are all that’s needed to maintain their effectiveness. Taking a few moments to care for them can save you trouble down the line.
Cleaning Shelf Clips
Shelf clips can accumulate dust and grime over time, especially in kitchens or workshops. To clean them, you can typically just wipe them down with a damp cloth. If they are particularly dirty, a mild soap and water solution can be used.
After washing, be sure to dry them completely before putting them back into the cabinet or placing the shelf on them. Moisture can sometimes lead to corrosion if they are metal clips or can make them slip if they are plastic. For general dust, a dry dusting with a soft cloth is usually sufficient.
If you remove the clips for deep cleaning, place them in a small bag or container so you don’t lose them. When cleaning, inspect each clip for any signs of wear or damage. Cracks or significant bending can weaken the clip, making it unsafe.
If you find any damaged clips, it’s best to replace them immediately. Keeping your clips clean not only looks better but also ensures they function as intended.
Checking for Wear and Tear
Plastic shelf clips are generally quite durable, but they can wear out over time, especially if they are used to support heavy loads or are frequently adjusted. Periodically, check the clips for any signs of damage. Look for cracks, chips, or any deformation of the plastic.
If a clip feels loose in the hole or doesn’t seem to hold the shelf securely, it might be time to replace it. This is especially important for clips on shelves that hold heavy items like books or dishes.
Metal clips can sometimes develop rust or have their coating wear off. If you notice rust, it’s a good idea to
Replacing Damaged Clips
If you discover a damaged shelf clip, replacing it is usually a simple process. Most cabinet manufacturers use standard-sized clips that can be purchased at hardware stores or online. Take the damaged clip with you to the store to ensure you get an exact match in size and shape.
If you can’t find an exact match, choose a clip that is the same size and made of a material that can support the weight of your shelf and its contents. It’s always best to replace all four clips if one is damaged, to ensure they provide even support.
When installing new clips, follow the same steps as when you originally adjusted your shelves. Insert the new clip firmly into the hole at the desired height. Ensure it’s secure before placing the shelf back onto it.
Using new, undamaged clips will give you peace of mind, knowing your shelves are stable and your belongings are safe. Keeping a few spare clips on hand is also a good idea for quick replacements.
Troubleshooting Common Shelf Adjustment Issues
Even with clear instructions, sometimes you might run into a problem when adjusting cabinet shelves. These issues are usually minor and have simple solutions. Understanding common hiccups can help you fix them quickly and get your cabinets organized efficiently.
Don’t get discouraged if something doesn’t go perfectly the first time; troubleshooting is part of the process.
Stuck Shelf Clips
One of the most common problems is stubborn shelf clips that are difficult to remove. Over time, dust and friction can cause them to bind tightly in the cabinet holes. If a clip won’t budge with gentle pulling, try wiggling it side to side while applying steady outward pressure.
Sometimes, a small, flat tool like a putty knife or a butter knife can be used to gently lever the edge of the clip away from the cabinet wall. Be careful not to apply too much force, which could damage the clip or scratch the cabinet finish. Spraying a small amount of lubricant, like WD-40, into the gap around the clip can sometimes help loosen it.
Allow it to sit for a few minutes before trying to remove it again. Ensure you wipe away any excess lubricant before placing the shelf back.
If the clips are metal, rust can sometimes be the culprit. In such cases, a rust-penetrating spray might be more effective. Always protect your cabinet surfaces with a cloth or paper towel when using tools or sprays.
If a plastic clip appears to be breaking as you try to remove it, stop and consider if there’s a better way. Sometimes, carefully cutting away a broken clip with a utility knife might be necessary, but this requires extreme caution to avoid injury or damage.
Uneven Shelves
If your shelf sits unevenly after adjustment, it usually means the clips are not at the same height on both sides of the cabinet. The first step is to remove the shelf again. Then, carefully examine the positions of all four clips.
Count the holes from the bottom of the cabinet to the clip on each side. Ensure that the clip on the left side is in the same hole position as the clip on the right side. Sometimes, one clip might have been pushed in slightly further than the others, or it might be a hole position error.
Gently adjust the clips to the correct, level position.
You can use a small level tool on the shelf to confirm it’s perfectly straight before reloading it. If you’re having trouble visually identifying the correct holes, it can be helpful to mark the desired position with a pencil on the cabinet interior, then insert the clips. Another trick is to use a ruler or measuring tape to measure the distance from the bottom of the cabinet to the top of each clip.
All four should measure the same. If the cabinet itself is not level, this can also sometimes cause shelves to appear uneven, though this is less common with adjustable shelving.
Wobbly Shelves
A wobbly shelf can be caused by several factors. The most likely reason is that the clips are not fully seated in their holes, or they are not at the same height. Ensure all four clips are pushed in firmly and are at the same level.
If the shelf itself is warped or damaged, it might also cause wobbling. Inspect the shelf for any signs of damage. If the shelf is the problem, you might need to replace it.
In some cases, if the cabinet holes for the clips are worn out and too large, the clips won’t stay secure. This can be a more complex issue to fix, potentially requiring hole repair kits or different types of shelf supports.
Another possibility is that the weight distribution on the shelf is uneven, putting stress on one side more than the other. Try rearranging your items to distribute the weight more evenly. If the cabinet has adjustable feet at the bottom, make sure the cabinet is sitting level on the floor.
A tilted cabinet can make shelves appear unstable even if the clips are correctly installed. Adjusting these feet can sometimes resolve wobbling issues.
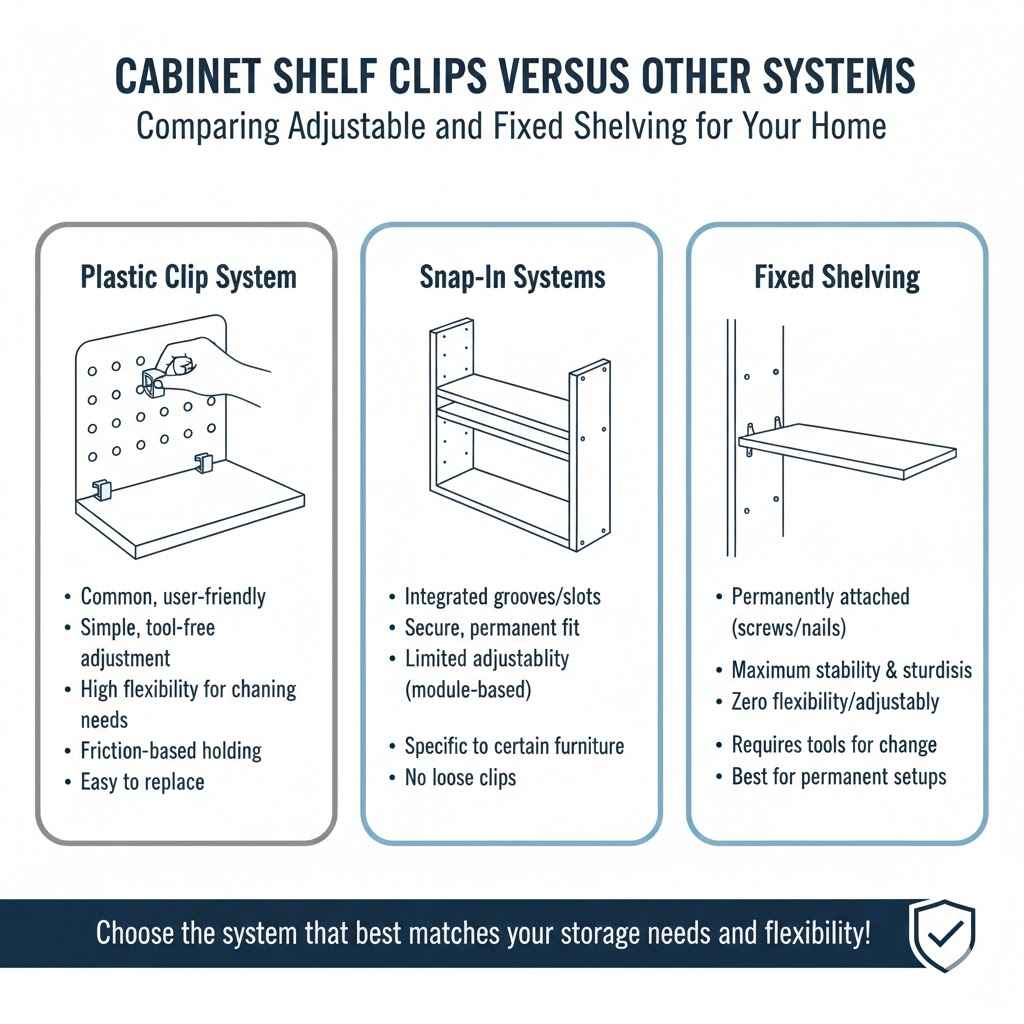
Cabinet Shelf Clips versus Other Systems
Adjustable shelving systems come in various forms. Plastic clips are one of the most common and user-friendly options, but it’s helpful to know how they compare to other methods. This helps in understanding why you might encounter this system and its advantages.
Snap-In Systems
Some cabinets use integrated snap-in systems where shelves slide into built-in grooves or slots. These are often found in modular shelving units or specific types of furniture. They offer a very secure fit, but they lack the adjustability of clip systems.
Once a shelf is snapped in, it stays put unless you disassemble that section of the unit. This can be great for a permanent setup but offers no flexibility for changing needs. The adjustment process here is not about clips but about reconfiguring entire sections or adding/removing modules.
Other systems might involve small pegs that fit into holes, similar to clips, but these pegs might be more decorative or have different locking mechanisms. The key difference with plastic clips is their widespread availability and simple, friction-based holding power. They are designed for easy user adjustment without tools, which is a major plus for most home organizers.
The simplicity is their strength.
Fixed Shelving
Fixed shelving is the simplest form, where shelves are permanently attached to the cabinet structure, usually by screws or nails. This offers maximum stability but zero flexibility. You cannot adjust the height of fixed shelves at all.
If your storage needs change, you would have to cut new shelves or replace the entire cabinet. For situations where the shelf heights are perfectly suited to the items being stored and are unlikely to change, fixed shelving can be a robust solution. However, for general-purpose storage where adaptability is key, adjustable systems like those using plastic clips are far superior.
The choice between fixed and adjustable shelving depends largely on the intended use of the cabinet and the user’s desire for customization. While fixed shelves offer a permanent, sturdy solution, adjustable shelves provide the freedom to adapt to different item sizes and organizational preferences over time. The plastic clip system makes this adaptability accessible to everyone.
Frequently Asked Questions
Question: How do I know if my cabinet shelves use plastic clips?
Answer: Look inside your cabinet on the side walls. You should see small holes arranged in a grid pattern. If there are small pieces, usually plastic or metal, inserted into these holes that the shelf rests on, those are your shelf clips.
Question: Can I use metal clips instead of plastic ones?
Answer: Yes, if your cabinet holes are standard, you can often use metal clips instead of plastic ones if you prefer them for strength or aesthetics. Just ensure they are the same size and fit snugly.
Question: What should I do if a clip breaks while I’m removing it?
Answer: If a clip breaks, carefully remove the remaining pieces. You will need to
Question: Can I store very heavy items on shelves with plastic clips?
Answer: Most plastic clips are designed to hold a significant amount of weight, but it’s important to check the manufacturer’s specifications if available. Distribute heavy items evenly across the shelf and ensure all four clips are securely in place.
Question: Do I need tools to adjust cabinet shelves with plastic clips?
Answer: Generally, no. You should be able to remove and insert the clips and shelves by hand. A putty knife or flathead screwdriver might be helpful for stubborn clips, but use it gently.
Summary
You’ve learned that adjusting cabinet shelves with plastic clips is a simple, DIY task. By emptying the cabinet, carefully removing the shelf and old clips, determining the new height, inserting new clips, and replacing the shelf, you can customize your storage space. Regular maintenance ensures your clips and shelves remain functional and safe.
This easy adjustment process offers great flexibility for organizing your home effectively.