How To Countersink A Screw: A Step-By-Step Guide
In the realm of woodworking and metal fabrication, the technique of countersinking screws is pivotal for achieving a seamless finish and optimal structural integrity. This process involves creating a conical recess around the screw hole, allowing the screw head to sit flush with or below the surface of the material. Proper countersinking not only enhances aesthetic appeal but also mitigates potential damage from protruding screws during assembly.
Mastering this skill requires an understanding of various tools and techniques specific to the materials involved. To discover the intricacies of this essential operation and improve your craftsmanship, continue reading for a comprehensive guide on how to countersink a screw.
How To Countersink A Screw: A Step-By-Step Guide
Countersinking a screw is a vital technique for achieving a flush finish in woodworking and metalworking projects. This process involves creating a conical recess in the material to accommodate the screw’s head, enhancing both aesthetics and functionality. Proper technique ensures that screws sit level with the surface, preventing snagging and fostering a polished look. This briefing highlights essential tools, measurements, and methods, empowering you to master how to countersink a screw effectively and elevate your craftsmanship.
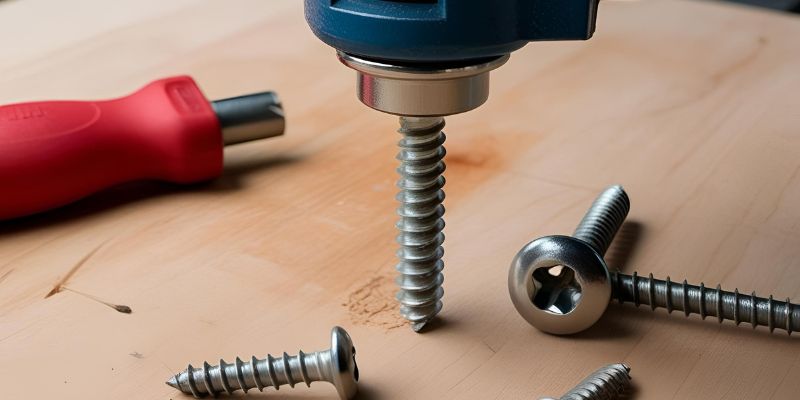
Understanding Countersinking
Definition of countersinking. Importance of countersinking in woodworking and construction. Common applications of countersunk screws.
Countersinking is the process of making a conical hole for a screw. This allows the screw head to sit flush with or below the surface. It is important in woodworking and construction for several reasons:
- Improves appearance: A flush screw looks neat and professional.
- Enhances safety: Smooth surfaces reduce the risk of snagging or injury.
- Increases strength: A countersunk screw can hold better in certain materials.
Common applications include fastening cabinets, attaching hinges, and securing flooring. Understanding countersinking helps in achieving better results in your projects.
Preparation of Materials
Assessing the type of material (wood, metal, etc.). Marking the drilling spots accurately. Properly clamping the workpiece.
Before diving into countersinking, check the type of material you’re using. Is it wood or metal? They require different screws and tools. Next, grab a pencil and mark your drilling spots.
No one wants to play a guessing game with holes! Lastly, use clamps to hold your workpiece in place. It’s like giving your material a warm hug, keeping everything steady while you work.
Now you’re ready to make some magic happen!
| Material | Recommended Screws |
|---|---|
| Wood | Wood screws |
| Metal | Metal screws |
Steps for Countersinking a Screw
Detailed stepbystep instructions. Recommended drilling speed and pressure. Tips for achieving a clean countersink.
To countersink a screw properly, follow these simple steps:
- Mark the spot where the screw will go.
- Use a drill with the correct countersink bit.
- Drill slowly to avoid breaking the wood.
- Apply gentle pressure for a clean finish.
- Check the depth to ensure the screw sits flush.
For best results, use a speed of about 1500 RPM. Always start slow and gradually increase pressure if needed.
Wipe off any debris to maintain a smooth surface. With these tips, you can achieve a perfect countersink!
Common Mistakes to Avoid
Issues with depth and drill bit selection. Misalignment problems. Tips to avoid stripping screws.
Many people make mistakes while countersinking screws. Here are some common issues to watch for:
- Depth: Drill too deep and you can damage the wood or make the screw sit too low.
- Drill Bit Selection: Using the wrong size can lead to misalignment.
- Misalignment Problems: Always check that the drill is straight to avoid crooked screws.
- Stripping Screws: Use the right screwdriver to fit the screw head snugly.
By avoiding these mistakes, your countersinking will be neat and effective.
Finishing Touches
Cleaning up after countersinking. How to fill countersunk holes if needed. Suggestions for finishing and sealing the surface.
After you’ve countersunk those screws, it’s time to tidy up! Start by cleaning any dust or debris around the area. A small brush or vacuum works wonders. If you’ve got holes that look like tiny swimming pools, fill them with wood putty.
Smooth it out and let it dry. Finally, seal that surface with paint or varnish to keep it looking sharp. Besides, who doesn’t want their work to shine like a new penny?
| Step | Action |
|---|---|
| 1 | Clean surrounding area |
| 2 | Fill holes with wood putty |
| 3 | Sand smooth |
| 4 | Seal with paint or varnish |
Maintenance and Care
Ensuring longevity of countersunk screws. Checking for wear and tear in the countersink area. Tips for future projects involving countersinking.
To keep countersunk screws happy and healthy, regular check-ups are key. Look out for any signs of wear in the countersink area, like rust or cracking. If things start to look like a haunted house, it’s time for a change! For future projects, remember to choose the right screw size and angle.
This ensures the screw’s snug fit and happy life. Here’s a helpful table to guide you:
| Tip | Details |
|---|---|
| Check for Rust | Inspect regularly to ensure screws stay strong. |
| Use the Right Size | Match the screw to the material for best results. |
| Keep it Clean | Make sure the countersink area is free of debris. |
By following these tips, your screws will last longer and work better. Plus, they’ll be grateful and treat you to a smooth finish every time!
Conclusion
In summary, countersinking a screw is a straightforward process that enhances both the aesthetics and functionality of your project. By following the right techniques, you can achieve a clean finish that allows screws to sit flush with the surface. Whether you’re a seasoned DIY enthusiast or a beginner, mastering this skill will vastly improve your woodworking and construction results.
FAQs
What Tools Are Needed To Effectively Countersink A Screw?
To effectively countersink a screw, you need a countersink bit tailored to the screw size and material, a drill or drill press for precise drilling, and a suitable screw size to match the countersink depth. Additionally, a depth stop can help ensure consistency in countersinking depth. Using a measuring tool, like a caliper, can assist in achieving the desired depth and angle. Safety gear, such as glasses, is also recommended to protect your eyes while drilling.
How Do You Determine The Correct Size Of Countersink Bit For Different Screw Sizes?
To determine the correct size of a countersink bit for different screw sizes, first check the screw’s diameter, as the countersink should match the screw’s head size. Typically, the bit should be about 1.5 times the screw’s diameter to ensure a proper fit. Additionally, consider the angle of the screw head, usually 82 degrees for wood screws or 90 degrees for machine screws, and select a countersink bit with the corresponding angle. Finally, refer to manufacturer specifications for precise sizing recommendations tailored to specific screw types.
What Materials Are Best Suited For Countersinking Screws Without Damaging The Surface?
Materials that are best suited for countersinking screws without damaging the surface include softwoods, plywood, and high-density fiberboard (HDF). These materials tend to have a forgiving surface that allows for clean countersinking without splitting or damaging the grain. Additionally, using a pilot hole can help prevent any potential damage. Metal and harder materials, like hardwoods, may require extra care or specialized tools to avoid surface damage.
Can You Countersink Screws In Plastic And If So, How Does The Process Differ From Wood Or Metal?
Yes, you can countersink screws in plastic, but the process differs from wood or metal in that plastic can crack or deform if too much heat is generated. To countersink screws in plastic, it’s essential to use a slower speed and lower torque to avoid melting the material. Unlike wood, which can be easily drilled and shaped, or metal, which requires specific bits and tools, countersinking in plastic typically involves using a countersink bit designed for plastic or a standard drill bit with caution. Additionally, using a pilot hole helps prevent cracking and ensures a clean entry for the screw.
What Are The Benefits Of Countersinking Screws In A Woodworking Project?
Countersinking screws in a woodworking project provides several benefits, including a flush finish that enhances the aesthetic appeal of the surface. It also prevents the screw heads from protruding, which helps avoid potential snags and injuries. Additionally, countersinking can increase the holding power of the screws by allowing for better alignment and surface contact. Lastly, it can make it easier to sand or paint over the area, resulting in a more professional-looking final product.