How To Change Hardwired Light To Plug In: Essential Guide
You can easily change a hardwired light fixture to a plug-in unit by disconnecting the wires inside the junction box, capping the old wires, and installing a standard outlet box with a corded light kit. Always turn off the power at the breaker first for safety. This modification offers great flexibility for renters or redesigning spaces.
Hey there, DIY friend! Dealing with a light fixture that’s stuck exactly where it is can be frustrating, right? Maybe you want to move that beautiful new lamp or you’re renting and can’t make permanent changes. Hardwired lights offer a clean look, but they lack flexibility. Changing a hardwired light fixture so it uses a standard wall plug is a common project, and I promise, it’s simpler than you think!
We’re going to walk through every step together, focusing heavily on safety. By the end of this guide, you’ll have the confidence to tackle this project without needing an electrician. Ready to bring some flexibility to your lighting setup? Let’s dive into how to change hardwired light to plug in.
Why Convert Your Hardwired Light to Plug-In? The Benefits
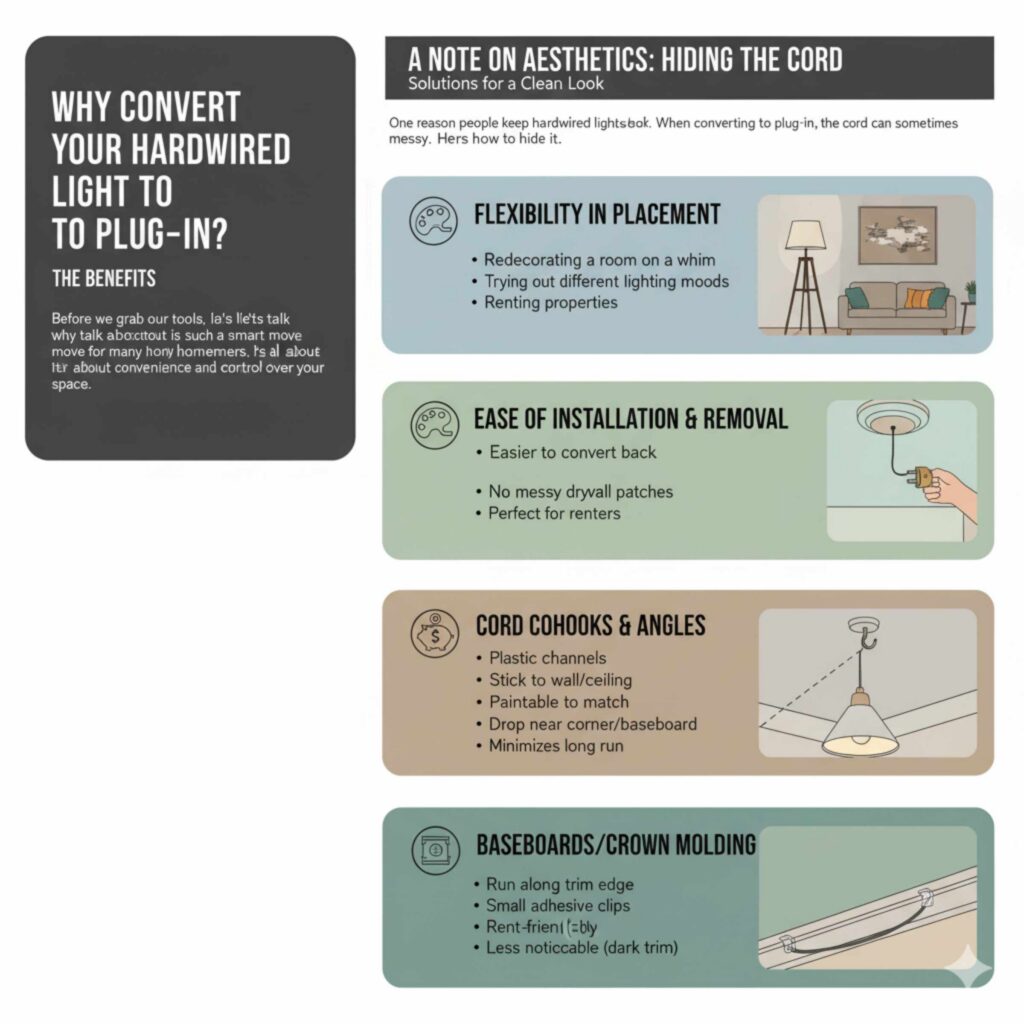
Before we grab our tools, let’s talk about why this conversion is such a smart move for many homeowners and renters. It’s all about convenience and control over your space.
Flexibility in Placement
The biggest win here is mobility. A hardwired fixture locks your light source into one spot. Once you convert it to a plug-in cord, you can move the fixture anywhere within reach of an outlet. This is perfect for:
- Redecorating a room on a whim.
- Trying out different lighting moods in various corners.
- Renting properties where you can’t alter the permanent wiring.
Ease of Installation and Removal
If you’re ever moving out, converting back to hardwired is much easier when you’ve used a plug-in kit. You simply remove the new cord assembly, and the original house wires are already capped and safely tucked away in the junction box. No messy drywall patches from removing an outlet.
Cost-Effectiveness
Hiring an electrician just to move a light fixture a few feet can add up quickly. Doing this conversion yourself using affordable plug-in cord kits keeps your budget happy. This project is highly affordable.
Safety First: Essential Precautions Before You Start
I can’t stress this enough: Electricity is not a toy. Every time you work near wires, you must prioritize safety. A quick trip to the breaker box saves a lot of heartache later. Think of this as the most important step in the entire process.
The Golden Rule: Kill the Power!
You must completely de-energize the circuit you are working on. If you skip this, you risk serious shock or starting a fire.
- Locate the Breaker Box: Find your home’s main electrical panel (often in a garage, basement, or utility closet).
- Identify the Circuit: Flip the switch for the room or area where the light is located. If the breakers aren’t clearly labeled, you might need a partner.
- Test for Power: Use a non-contact voltage tester. Hold the tip of the tester near the wires coming out of the ceiling or wall where the fixture connects. If the tester lights up or beeps, the power is still on. Go back and find the correct breaker.
Expert Tip: For extra peace of mind, you can also turn off the main breaker for the entire house, but typically, just the circuit breaker is sufficient if you are 100% certain you have the right one.
Tools and Materials You Will Need
Having everything laid out before you start makes the job flow smoothly. Here is a simple checklist of what you’ll need for converting a hardwired light to plug-in. These are standard items found at any hardware store.
Required Tools
- Non-Contact Voltage Tester (Essential safety tool!)
- Wire Strippers/Cutters
- Screwdrivers (Phillips and Flathead)
- Needle-Nose Pliers (Helpful for bending wires)
- Wire Nuts (Connectors)
- Electrical Tape
- Stepladder (Sturdy and safe)
Required Materials
- Plug-in Light Conversion Kit (Often called a swag kit or plug-in canopy kit). This usually includes the cord, plug, and sometimes a new canopy (the ceiling plate).
- A new outlet box, if you are installing a new outlet below (Optional, depending on your final plan).
- Wall anchors or a ceiling hook (if you plan to hang the cord from a new spot).
For reference on electrical safety standards in the U.S., you can always consult resources like the Occupational Safety and Health Administration (OSHA) guidelines regarding electrical work, although this simple conversion is generally considered low-risk when power is off as outlined by OSHA standards.
Step-by-Step Guide: How to Change Hardwired Light to Plug In
We are breaking this down into three main phases: Decommissioning the old fixture, preparing the junction box, and installing the new plug-in assembly. Follow these steps closely, and you’ll have a flexible light in no time.
Phase 1: Safely Removing the Existing Hardwired Fixture
This part is mostly disassembly. Take your time so you don’t damage the ceiling or the existing house wiring.
- Confirm Power Off: Double-check with your voltage tester one last time.
- Remove the Fixture Cover/Shade: Take off any glass globes or covers blocking access to the mounting screws.
- Unscrew the Fixture: Carefully unscrew the mounting nuts or screws holding the light body to the ceiling bracket. Support the weight of the fixture so it doesn’t fall when you remove the last screw.
- Expose the Wires: Once the fixture is hanging down, you will see the house wires connected to the fixture wires, usually secured by wire nuts.
- Disconnect the Wires: Twist off the wire nuts. Separate the fixture wires from the house wires. Set the old fixture aside.
Phase 2: Securing and Capping the House Wires
This is the crucial step where you make the old connection safe and ready for a plug. You are essentially turning the hole in the ceiling into a safe, capped connection point, preparing for the new cord.
-
Identify House Wires: In most standard U.S. installations, you will see three wires coming from the ceiling junction box:
- Black (Hot): Carries the current.
- White (Neutral): Completes the circuit.
- Bare Copper or Green (Ground): Safety wire.
- Cap the Wires: Using new, appropriately sized wire nuts, securely twist one onto each of the house wires (Black, White, and Ground) individually. Make sure they are tight—give each wire a gentle tug to confirm the connection is firm.
- Tuck Wires Away: Gently fold these capped wires back up into the ceiling junction box.
-
Cover the Box: You have two options here, depending on your plan:
- Option A (Simple Cover): If you are happy leaving the junction box accessible in the ceiling but want it covered, screw a standard, blank metal junction box cover plate over the opening. This is the quickest and safest method if you aren’t immediately installing a new fixture there.
- Option B (Using the New Canopy): If your plug-in kit came with a decorative canopy (the plate that sits flush against the ceiling), attach this empty canopy to the ceiling box. It will cover the wires, acting as a transition point for the new cord.
Important Note on Grounding: Always ensure the ground wire (bare copper or green) is properly connected to the junction box metal if the box is metal, or capped securely if the box is plastic. A proper ground connection is vital for safety, as noted by electrical safety guidelines.
Phase 3: Installing the Plug-In Light Assembly
Now we install the flexible part—the cord and plug assembly. If you are using a standard swag kit, it often comes with hardware to hang the cord across the ceiling if needed.
- Prepare the Cord Assembly: Take your new plug-in cord assembly. It will have a set of wires exposed at the end that attaches to the light you are using (this might be the old fixture or a new one).
-
Connect the Light Fixture: Connect the wires from your actual light fixture to the corresponding wires on the new plug-in cord assembly. Typically, this follows standard color coding:
- Black (Hot) connects to Black (or smooth/marked wire).
- White (Neutral) connects to White (or ribbed/unmarked wire).
- Green/Bare Ground connects to Ground (if applicable).
- Secure Connections: Twist the corresponding wires together firmly and secure them with new wire nuts. Tug test them again!
- Mount the New Canopy (If applicable): Attach the new plug-in canopy to the ceiling box, ensuring the cord passes neatly through the opening.
- Position the Light: If you are using a swag kit, follow the kit’s instructions to install the required ceiling hooks or guide clips to route the cord attractively to your desired location.
- Plug It In: Finally, run the cord down the wall or along the ceiling to a nearby outlet. Plug it in!
Choosing the Right Plug-In Conversion Kit
Not all kits are created equal. Choosing the right one ensures a neat, safe, and attractive final result. Since you are converting from a hardwired system, you need something robust enough to handle the load.
Here’s a comparison to help you select wisely:
| Kit Type | Best For | Pros | Cons |
|---|---|---|---|
| Simple Cord Kit (Swag Kit) | Replacing small pendant lights or lamps. | Very inexpensive; easy to route with hooks. | Cord is often visible; requires ceiling hooks. |
| Plug-In Canopy Kit | Replacing ceiling fans or flush mounts. | Covers the existing junction box cleanly; looks professional. | Less flexible in placement once installed. |
| Lamp Conversion Kit (Internal Wiring) | Converting a decorative object into a plug-in lamp. | Allows for creative use of non-standard bases. | Requires more complex internal wiring knowledge. |
Troubleshooting Common Issues During Conversion
Even with clear steps, DIY projects can sometimes throw us a curveball. Here are a few common snags homeowners run into and how to solve them quickly.
Problem 1: I can’t find the correct breaker!
This is frustrating but fixable. If the main panel isn’t labeled well, you need to use the process of elimination. Start by flipping one breaker at a time, checking if the light goes off. Once you find it, put a piece of bright tape on it immediately and label it clearly. If you still can’t find it, turn off the Main Breaker to shut off all power to the house while you work. This is the safest backup plan.
Problem 2: The wire colors don’t match the new kit exactly.
This often happens with older wiring. If you see only two wires (Black and White) in the ceiling box, it means the circuit does not have a dedicated ground wire installed. For a plug-in conversion, you can safely proceed, but you must cap the ground wire from the new cord separately and do not connect it to anything. If you see old cloth-wrapped wires, be extremely gentle when stripping them, as the insulation is brittle.
Problem 3: The light flickers after I plug it in.
Flickering almost always means a loose connection. Turn the power off immediately! Re-open the connections you just made (either the connection to the house wires or the connection to the light fixture itself). Twist the wire nuts tighter, ensuring all bare copper strands are fully encased. If the issue persists, the fixture itself might be the problem, or the cord kit might be slightly damaged.
A Note on Aesthetics: Hiding the Cord
One reason people keep hardwired lights is the clean look. When converting to plug-in, the cord can sometimes look messy running across the ceiling or wall. Here are a few ways to make that cord disappear, often without any major drywall work:
- Cord Concealers/Raceways: These are plastic channels you can buy that stick to the wall or ceiling. You tuck the cord inside, and they are paintable to match your wall color perfectly. They are fantastic for renters because they usually adhere with strong double-sided tape.
- Swag Hooks and Angles: Use the swag hooks provided in many kits, but place them strategically. Run the cord diagonally across the ceiling to the nearest corner, then drop it down the wall near an existing corner or baseboard. This minimizes the long, straight run across the middle of the room.
- Use Baseboards/Crown Molding: If the light is near the edge of the room, run the cord along the top edge of the baseboard molding. Use small, clear adhesive clips to hold it flush against the trim. Most people won’t notice a thin black cord against dark trim.

Frequently Asked Questions (FAQ) for Beginners
Q1: Is it safe to cap off the hardwired electrical wires in the ceiling?
Yes, it is safe, provided you turn off the power at the breaker first and use appropriately sized, secure wire nuts on every single wire (hot, neutral, and ground). You must then cover the connection point with a blank plate or a new canopy.
Q2: Do I need an electrician to change a hardwired light to a plug-in?
For this specific conversion, where you are simply capping the house wires and using a commercially manufactured cord kit, a licensed electrician is usually not legally required, especially if you are replacing the fixture with a low-wattage light. However, if you are uncomfortable with any step, consulting a pro is always the safest bet.
Q3: What is the purpose of the ground wire in this conversion?
The ground wire (bare copper or green) is a crucial safety feature. If a hot wire accidentally touches the metal casing of the light, the ground wire provides a safe path for that electricity to go into the earth, tripping the breaker. When capping the wires, always cap the house ground wire securely and separately.
Q4: Can I use the old light fixture with the new plug-in cord?
Absolutely! Most plug-in conversion kits are designed to connect directly to the wires coming from your existing fixture. You just need to ensure the fixture itself is in good working order before reconnecting it.
Q5: If I don’t use a canopy, what covers the hole in the ceiling?
If you remove the light entirely and just want to secure the wires, you must cover the hole with a standard, non-conductive (plastic) or grounded (metal) blank junction box cover plate. This prevents dust, debris, and curious fingers from touching the capped wires.
Conclusion: Turn a Fixed Light Into Flexible Lighting—Safely and Smartly
Converting a hardwired light fixture to a plug-in is one of the most practical and budget-friendly DIY lighting upgrades you can do. With the right tools, a quality plug-in conversion kit, and careful attention to electrical safety, you can enjoy greater flexibility, easier future changes, and a renter-friendly solution—without calling an electrician. By always turning off the breaker, securely capping house wires, and following proper grounding practices, this project remains both safe and code-conscious. Whether you’re redesigning a room, updating old lighting, or simply want more control over placement, learning how to change a hardwired light to a plug-in empowers you to customize your space with confidence and style!