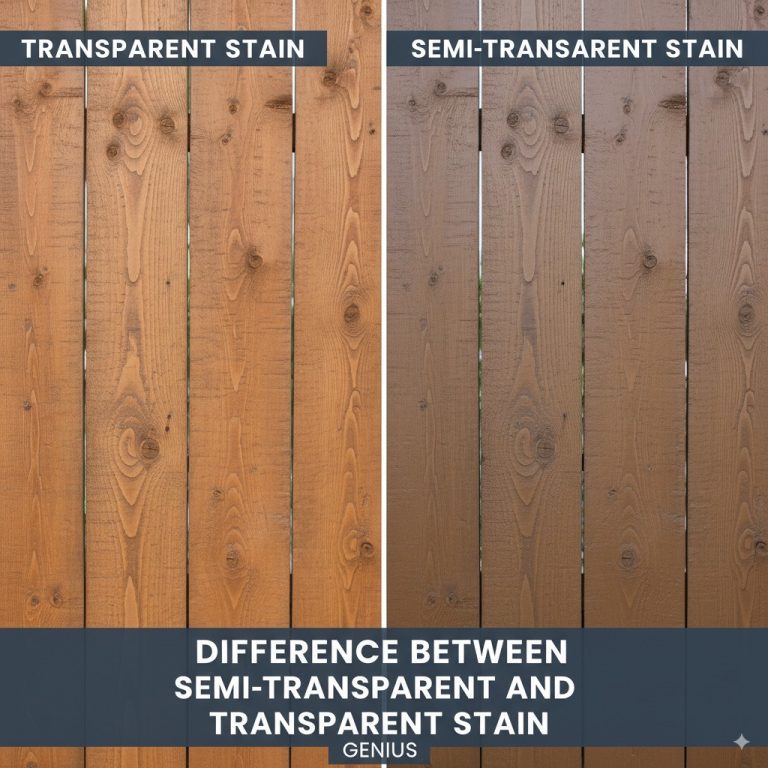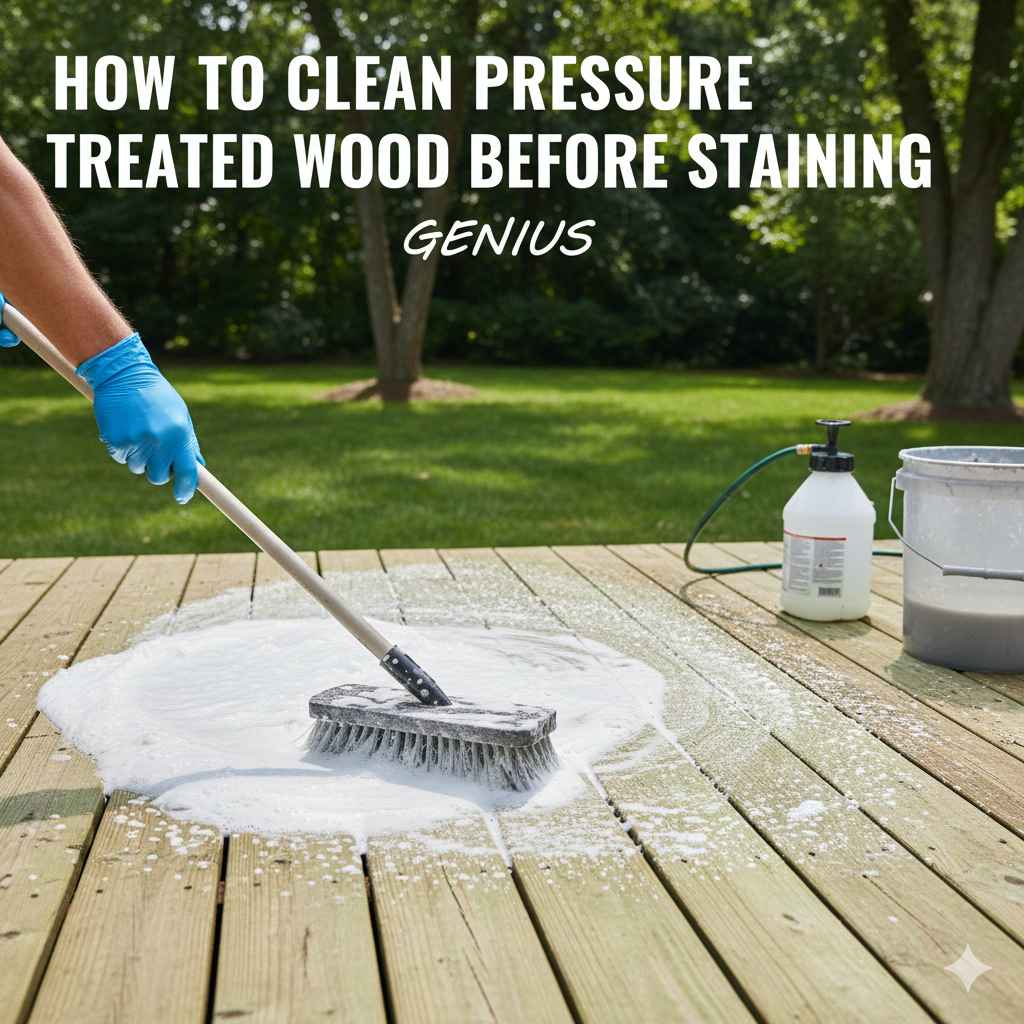
How To Clean Pressure Treated Wood Before Staining: Genius
To clean pressure treated wood before staining, first check if it’s dry using the water test. Then, wet the surface, apply a dedicated wood cleaner or an oxygen bleach solution with a pump sprayer, and gently scrub with a soft-bristled brush. Rinse thoroughly with a garden hose or a low-pressure power washer and let it dry completely for 48 hours before staining.
Hello there! It’s Md Meraj, your friendly guide for all things home and wood. So, you have a beautiful new deck or fence made of pressure treated wood, and you’re ready to give it a gorgeous coat of stain. But wait! Before you pop open that can, there’s a crucial step that many people skip: cleaning.
You might think, “It’s new, how dirty can it be?” It’s a super common question! But prepping your wood is the secret to a professional-looking finish that lasts for years. Skipping this step can lead to a blotchy, peeling mess down the road. Don’t worry, though. I’m here to walk you through it. We’ll make this process simple, safe, and maybe even a little fun. Let’s get that wood ready for its new look!
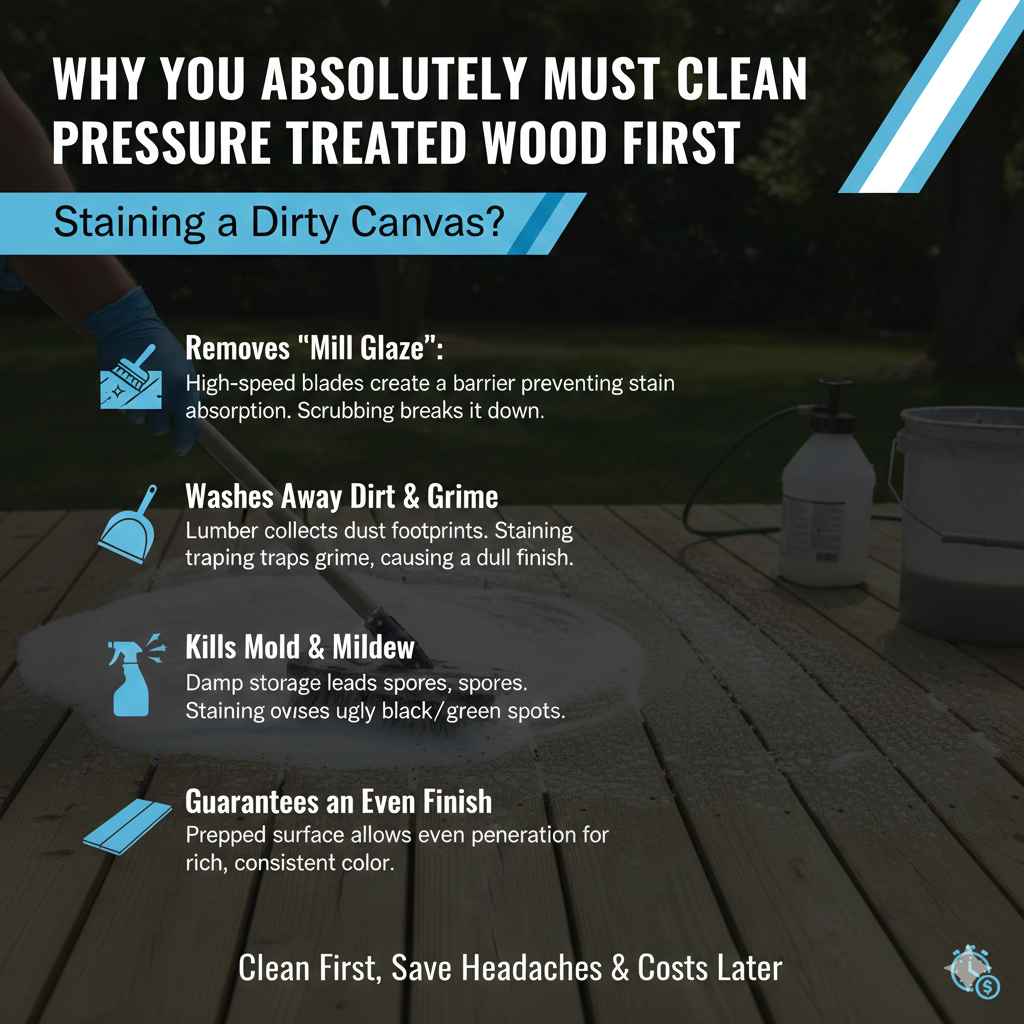
Why You Absolutely Must Clean Pressure Treated Wood First
Think of staining like painting a picture. You wouldn’t start on a dirty canvas, right? The same idea applies to your wood. Even brand-new pressure treated lumber isn’t ready for stain right out of the gate. Here’s why cleaning is a non-negotiable first step:
- It Removes “Mill Glaze”: When wood is milled, the high-speed blades can create a hard, shiny surface called mill glaze. This glaze acts like a barrier, preventing stain from soaking in properly. A good cleaning and light scrubbing helps break it down.
- It Washes Away Dirt and Grime: Your lumber has been on a long journey—from the mill, to the truck, to the lumberyard, to your home. Along the way, it has picked up a surprising amount of dust, dirt, and footprints. Staining over this grime traps it underneath, leading to a dull and uneven finish.
- It Kills Mold and Mildew Spores: Pressure treated wood is often damp and stored in stacks, creating the perfect home for invisible mold and mildew spores. If you stain over them, they can continue to grow, causing ugly black or green spots to appear later.
- It Guarantees an Even Finish: A clean, prepped surface allows the stain to penetrate the wood fibers evenly. This gives you that rich, consistent color you’re looking for, without any splotches or light spots.
Taking a little time to clean now saves you a huge headache and the cost of re-staining your project much sooner than you should have to.
First Things First: Is Your Wood Dry Enough?
Before you even think about cleaning, you need to make sure your pressure treated wood is ready. This type of wood is treated with chemical preservatives using a high-pressure water process, which means it’s saturated with moisture when you buy it. Applying stain to wet wood is a recipe for disaster—the stain can’t soak in and will peel off.
So, how do you know if it’s dry enough? It’s time for the “Sprinkle Test.”
- Find a small, out-of-the-way spot on your deck or fence.
- Sprinkle a few drops of water onto the surface.
- Watch what happens.
If the water beads up on the surface, the wood is still too wet and sealed. It needs more time to dry out. Check it again in a week or two.
If the water soaks into the wood within a few minutes, congratulations! Your wood is thirsty and ready for cleaning and staining. Depending on your climate and how fresh the wood is, the drying process can take anywhere from a few weeks to a few months.
Gather Your Simple Tools and Supplies
You don’t need a workshop full of fancy equipment for this job. Here’s a quick checklist of what you’ll need to get started. Safety first, always!
Safety Gear
- Waterproof gloves
- Safety glasses or goggles
- Old clothes you don’t mind getting dirty
Cleaning Supplies
- A garden hose with a spray nozzle
- A bucket
- A stiff-bristled, long-handled brush (avoid wire brushes, as they can damage the wood)
- A pump sprayer (optional, but makes applying cleaner much easier)
- A good quality wood cleaner
Optional Tool
- A pressure washer (use with extreme caution – more on this below!)
Choosing the Right Cleaner: Commercial vs. DIY
Walking down the cleaning aisle can be overwhelming. You have a few great options for cleaning your pressure treated wood, and the best choice depends on how dirty your wood is.
A quick warning: Never use chlorine bleach! It’s harsh, breaks down the wood fibers, and can harm your surrounding plants. Stick to cleaners made for wood.
Here’s a simple breakdown of your best options:
| Cleaner Type | Pros | Cons | Best For |
|---|---|---|---|
| Commercial Wood Cleaner/Brightener | Specially formulated for wood; highly effective on tough stains and mildew; often brightens the wood’s color. | Can be more expensive than DIY options. | Older wood, stubborn stains, or significant mildew growth. |
| Oxygen Bleach (e.g., OxiClean) | Eco-friendly and safe for plants; great at killing mildew and removing graying; affordable. | You have to mix the powder with water yourself. | General cleaning, removing mold/mildew, and brightening new or slightly aged wood. |
| Simple Soap and Water | Very inexpensive and readily available; non-toxic. | Least effective; won’t remove mildew or tough stains. | Brand new wood that only has light surface dirt. |
For most projects, I recommend starting with an oxygen bleach solution. It’s effective, affordable, and safe for your yard. You can find more information about maintaining treated wood from resources like the Forest Products Laboratory, which emphasizes gentle cleaning methods.
Step-by-Step: How to Clean Your Pressure Treated Wood
Alright, you’ve done the sprinkle test and gathered your supplies. Let’s get to work! Follow these simple steps for a perfectly clean surface.
Step 1: Prepare Your Work Area
Safety and preparation are key. Before you start mixing cleaners, take a few minutes to protect the area around your wood.
- Move any patio furniture, grills, or potted plants away from the deck or fence.
- Cover any nearby shrubs, flowers, or grass with plastic sheeting. Even though oxygen bleach is plant-safe, concentrated cleaner can still cause harm.
- Lightly spray your plants and sheeting with water. A wet surface helps dilute any cleaner that might splash onto it.
Step 2: Wet the Wood Surface
Using your garden hose, give the entire wood surface a good rinse. Don’t blast it, just get it uniformly damp. This does two important things:
- It prevents the cleaner from drying out too quickly, giving it time to work its magic.
- It helps the cleaner spread more evenly across the surface.
Step 3: Mix and Apply Your Cleaner
Follow the manufacturer’s instructions on your commercial cleaner or oxygen bleach. Typically, you’ll mix a powder or concentrate with water in a bucket.
Once mixed, the easiest way to apply it is with a pump sprayer. This gives you a nice, even coat without much effort. If you don’t have one, you can use your deck brush to apply the cleaner from the bucket, working in small, manageable sections (about 4×4 feet at a time).
Step 4: Let it Sit, Then Scrub!
Let the cleaner sit on the wood for about 10-15 minutes. You should start to see the dirt and grime lifting. Don’t let it dry on the surface—if an area starts to dry, just mist it lightly with water.
Now it’s time for a little elbow grease. Grab your stiff-bristled brush and start scrubbing! Work in the direction of the wood grain to avoid scratching the surface. This scrubbing action is what really lifts the embedded dirt and breaks down any remaining mill glaze.
Step 5: Rinse Everything Thoroughly
Once you’ve scrubbed a section, it’s time to rinse. Using your garden hose, rinse the wood completely until all the suds and grime are gone. Start at the highest point and work your way down.
Make sure you also rinse your plastic sheeting and any nearby plants to wash away any overspray. Continue this process—apply, wait, scrub, rinse—section by section until the entire project is clean.
A Quick Word on Using a Pressure Washer
A pressure washer can be a fantastic tool, but it can also be your wood’s worst enemy if used incorrectly. Too much pressure can gouge the soft fibers of treated pine, leaving permanent marks and a fuzzy, splintered surface.
If you choose to use a pressure washer, follow these golden rules:
- Use the Lowest Possible Pressure Setting. For softwoods like pressure treated pine, you should never exceed 500-800 PSI.
- Use a Fan-Tip Nozzle. A 25 or 40-degree fan tip is perfect. Never use a zero-degree (red) nozzle—it will destroy your wood.
- Keep Your Distance. Hold the wand at least 12-18 inches away from the wood surface.
- Keep Moving. Use long, sweeping motions in the direction of the wood grain. Never stop in one spot, as this will cause etching.
A pressure washer is best for rinsing, not for the primary cleaning. The real work is done by the cleaner and the brush.
The Final Steps: Drying and Sanding
You’re almost there! Once the wood is sparkling clean, there are just two final things to do before you can stain.
Let It Dry Completely
This is the most important waiting game you’ll play. Your wood needs to be bone dry before you apply stain. After a thorough cleaning, it will be saturated with water. You must wait at least 48 hours in good, sunny weather for it to dry out completely.
If it’s humid or cool, give it an extra day or two. Rushing this step will trap moisture under the stain, leading to peeling and failure. Be patient—it’s worth it!
To Sand or Not to Sand?
After washing and scrubbing, you might notice the wood surface feels a little rough or “fuzzy.” This is called “wood furring,” and it happens when the wood fibers swell with water and then dry. Sanding is an optional step, but one I highly recommend for a perfectly smooth, professional finish.
- Use a pole sander for decks or a random orbit sander for easier jobs.
- Use 60 to 80-grit sandpaper. This is coarse enough to smooth the fibers and open up the wood pores for better stain absorption, but not so fine that it seals them back up.
- After sanding, sweep or blow off all the dust before staining.
Safety First: A Quick Reminder
Working with treated wood and cleaners requires a little extra care. The chemicals used in modern pressure treated wood (like ACQ or CA) are safer than the old arsenic-based formulas (CCA), but you should still take precautions.
- Always wear gloves and eye protection.
- Never burn pressure treated wood scraps. Burning releases the chemical preservatives into the air, which is harmful to breathe. Check with your local waste authority for proper disposal.
- Wash your hands thoroughly after handling the wood, especially before eating.
For more detailed safety information, you can always refer to guidelines from the Environmental Protection Agency (EPA).
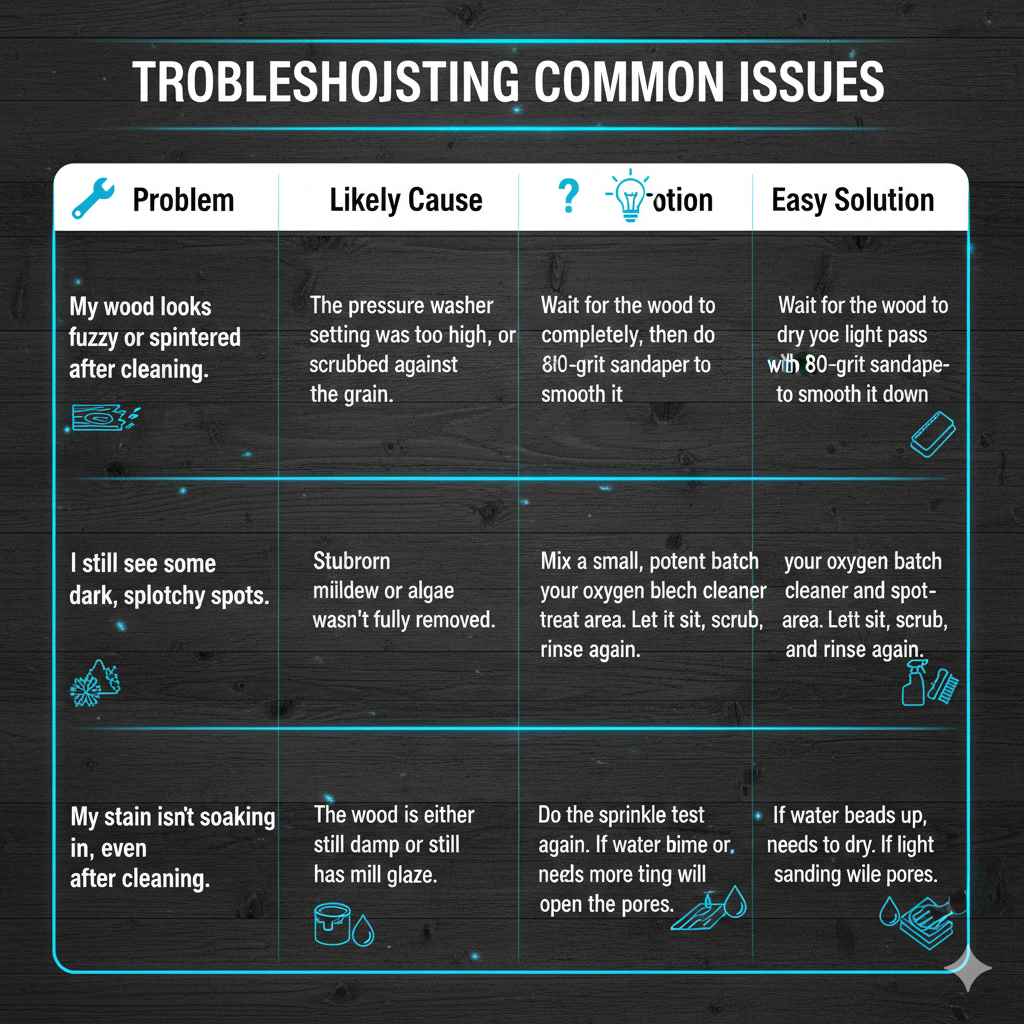
Troubleshooting Common Issues
Even with the best plan, sometimes things don’t go perfectly. Here’s a quick guide to solving common problems.
| Problem | Likely Cause | Easy Solution |
|---|---|---|
| My wood looks fuzzy or splintered after cleaning. | The pressure washer setting was too high, or you scrubbed against the grain. | Wait for the wood to dry completely, then do a light pass with 80-grit sandpaper to smooth it down. |
| I still see some dark, splotchy spots. | Stubborn mildew or algae that wasn’t fully removed. | Mix a small, potent batch of your oxygen bleach cleaner and spot-treat the area. Let it sit, scrub, and rinse again. |
| My stain isn’t soaking in, even after cleaning. | The wood is either still damp or still has mill glaze. | Do the sprinkle test again. If water beads up, it needs more time to dry. If it’s dry, a light sanding will open the pores. |
Frequently Asked Questions (FAQ)
1. Do I have to clean brand new pressure treated wood?
Yes, absolutely. New pressure treated wood comes with a waxy “mill glaze” from the production process and is covered in surface dirt from transport and storage. Cleaning removes these barriers, allowing your stain to absorb evenly and adhere properly for a long-lasting finish.
2. How long after cleaning pressure treated wood can I stain it?
You must wait until the wood is completely dry. A good rule of thumb is to wait at least 48 hours after a thorough cleaning, assuming you have warm, sunny, and dry weather. If it’s cool or humid, it’s safer to wait 72 hours or more. Always perform the “sprinkle test” to be sure.
3. Can I use regular household bleach to clean my deck?
No, you should never use chlorine bleach on wood. It is too harsh and breaks down the lignin, which is the natural glue that holds wood fibers together. This damages the wood, making it more prone to future decay. Stick to oxygen bleach or a dedicated commercial wood cleaner.
4. What is the best cleaner for pressure treated wood?
For most situations, a cleaner with sodium percarbonate (the active ingredient in oxygen bleach like OxiClean) is the best choice. It’s effective at removing dirt and killing mildew, brightens the wood, and is much safer for your plants and the environment than harsh chemicals.
5. What happens if you stain pressure treated wood too soon?
If you stain pressure treated wood when it’s still wet, the stain will not be able to penetrate the wood fibers. The moisture trapped inside will push the stain off the surface as it tries to escape, causing the finish to peel, flake, and fail within a year or even sooner.
6. Does a pressure washer clean the wood enough on its own?
No, a pressure washer alone only removes the top layer of loose dirt. It does not kill mold and mildew spores, nor does it effectively remove tough, oily grime or mill glaze. You must use a proper wood cleaner to break down these contaminants before rinsing with a pressure washer on a low setting.
Conclusion: Your Beautiful Finish Awaits
And there you have it! Cleaning your pressure treated wood isn’t a difficult job, but it is the most important one you’ll do to ensure a beautiful, durable finish. By taking the time to test for dryness, choose the right cleaner, and give the wood a good scrub, you’re setting your project up for success.
Remember the key steps: check if it’s dry, clean it well, rinse it thoroughly, and let it dry completely again. That little bit of effort now will pay off tenfold when you’re admiring your gorgeous, evenly stained deck or fence for years to come. Now you’re ready for the fun part—applying that stain! Happy building!