How to Cover a Lampshade with Fabric: Effortless Guide
Quick Summary:
Covering a lampshade with fabric is a simple DIY project that transforms your lighting. With just a few tools and a favorite fabric, you can easily update an old lampshade or create a custom look for a new one, adding a personal touch to any room.
Hello there! Md Meraj here, your friendly guide to making your home look its best. Ever looked at a lampshade and thought, “You could be so much more!”? I know I have. Sometimes, those store-bought shades just don’t quite match our style, or maybe they’re a bit worn out. The good news is, you don’t need to be a master seamstress or a seasoned pro to give a lampshade a beautiful fabric makeover. It’s a surprisingly easy project that can make a big difference in your home’s decor. We’ll go step-by-step, and I promise, by the end, you’ll feel confident and ready to tackle this project with your own hands. Let’s get started on creating a shade that truly shines!
In this guide, we’ll walk through everything you need to know. We’ll cover the tools you’ll need, how to choose the perfect fabric, and the exact steps to get that professional-looking finish. You’ll learn simple techniques that make this project accessible even if you’ve never done anything like it before. Ready to bring new life to your lamps?
Why Cover a Lampshade with Fabric?
Giving your lampshade a fabric facelift is a fantastic way to personalize your space. It’s more than just a decorative choice; it’s a practical solution too. Maybe your current shade is stained, faded, or just plain boring. Instead of buying a new one, which can be surprisingly expensive, you can revive what you already have. This project allows you to:
- Match Your Decor: Find the exact fabric that complements your curtains, sofa, or rugs.
- Express Your Style: From bold patterns to subtle textures, your shade becomes a statement piece.
- Save Money: Revitalize an old shade for a fraction of the cost of a new one.
- Learn a New Skill: It’s a rewarding beginner DIY project that boosts your confidence.
- Create Custom Lighting: Different fabrics can subtly alter the light that passes through, creating a unique ambiance.
Think about the lamps in your living room, bedroom, or even a cozy reading nook. A well-chosen fabric can completely change the mood of the space. It’s a small change with a big impact!

Choosing Your Fabric: The Foundation of Your New Shade
The fabric you pick is crucial. It sets the tone, affects the light, and determines how easy the project will be. Here’s what to consider:
Fabric Types to Consider
For lampshades, you generally want fabrics that aren’t too thick or too sheer. They should be able to drape nicely and allow light to filter through. Some great options include:
- Cotton: Versatile, comes in countless patterns and colors, and is easy to work with. Look for quilting cotton or lighter-weight home decor cottons.
- Linen: Offers a natural, slightly textured look that diffuses light beautifully.
- Silk or Silk Blends: For a more luxurious feel, though they can be a bit trickier to handle and more expensive.
- Lightweight Upholstery Fabrics: If you want something durable and with a bit more body. Ensure they aren’t too heavy.
- Specialty Lampshade Fabrics: These are designed to be flame-retardant and allow light to pass through effectively.
Fabrics to Avoid
Some fabrics are best left off the lampshade:
- Very Thick Fabrics: Like heavy denim or canvas, which can block too much light and be difficult to wrap smoothly.
- Very Sheer Fabrics: Such as chiffon or organza, unless you plan on layering them or using a specific technique, as they might not hide the old shade well.
- Fuzzy or Plush Fabrics: Like velvet or faux fur, which can be a fire hazard and are hard to clean.
- Fabrics with Large, Raised Embellishments: Beads or sequins can create uneven surfaces and hot spots.
How Much Fabric Do You Need?
It’s always better to have a little extra than not enough. To figure out how much you need, measure the circumference of the top and bottom of your lampshade, and then measure its height. You’ll need enough fabric to go around the shade plus a little overlap, and enough to cover the height with some extra for trimming. A good rule of thumb is to add about 2-3 inches to the circumference and 2 inches to the height for your cutting measurements. This ensures you have enough to work with for seams and neat edges.
Essential Tools and Materials
Gathering your supplies before you start makes the process smooth and enjoyable. Here’s what you’ll likely need:
The Must-Haves
- Your Lampshade: The one you’re giving a makeover!
- Fabric: Your chosen material.
- Fabric Scissors: Sharp scissors dedicated to fabric will give you clean cuts.
- Measuring Tape or Ruler: For accurate measurements.
- Fabric Glue or Spray Adhesive: A strong adhesive that works well with fabric. Look for one that dries clear. Brands like Aleene’s Fabric Fusion or Odif 505 spray are popular.
- Craft Knife or Rotary Cutter: For precise trimming.
- Cutting Mat: If using a rotary cutter, this protects your surfaces.
- Pencil or Fabric Marker: To mark your fabric.
- Old Cardboard or Paper: For creating a pattern if needed.
- Optional: Iron and Ironing Board: To press seams or smooth out wrinkles.
Choosing Your Adhesive
The adhesive is key to a professional finish. You have a couple of main options:
| Adhesive Type | Pros | Cons | Best For |
|---|---|---|---|
| Fabric Glue | Strong hold, permanent, dries clear. | Can be a bit messy if not applied carefully, requires some drying time. | Seams, edges, and securing the fabric all around the shade. |
| Spray Adhesive | Quick application, covers large areas evenly, good for temporary positioning before permanent adhesion. | Can be messy if not used in a well-ventilated area or with protective coverings, may require multiple applications for very secure hold. | Covering the entire surface of the shade quickly, especially if the shade has a smooth, non-porous surface. |
Always test your adhesive on a scrap piece of fabric first to ensure it works well and doesn’t stain or soak through your material.
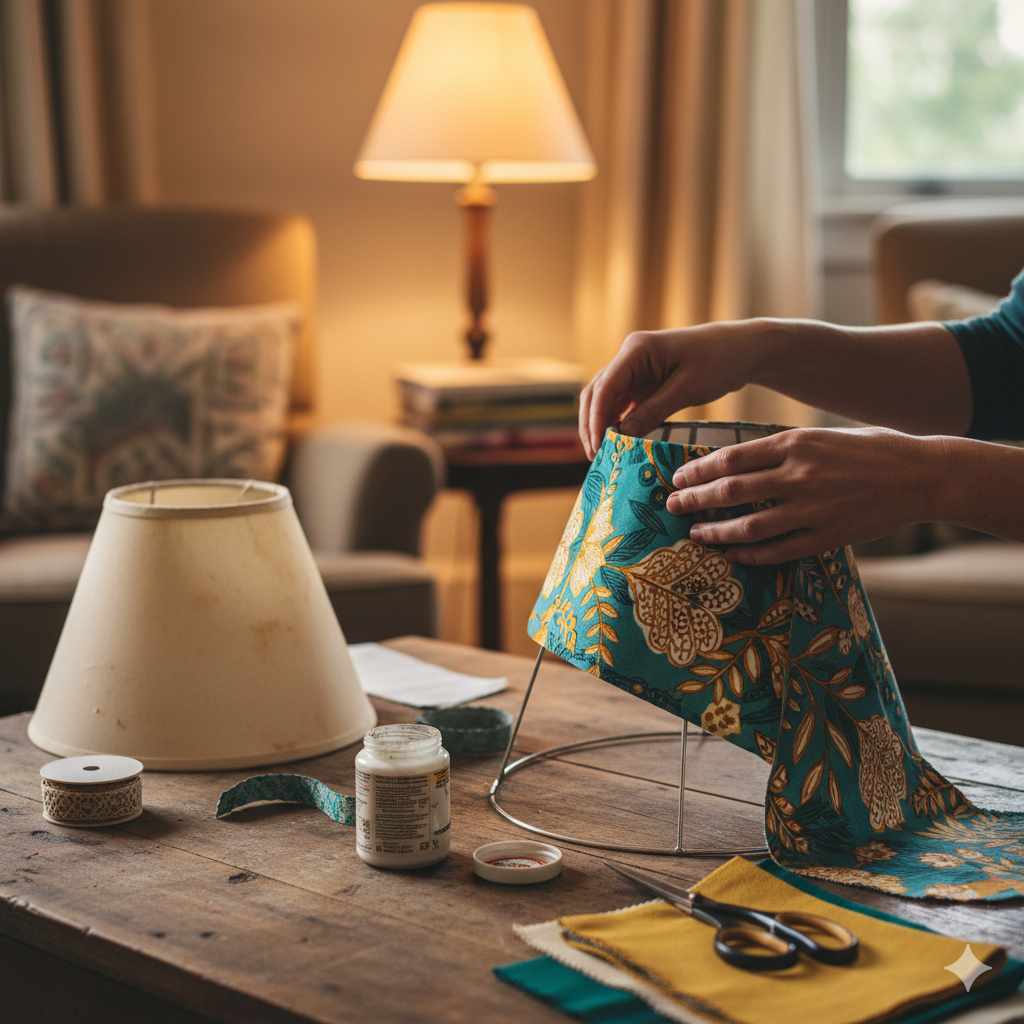
Step-by-Step Guide: How to Cover a Lampshade with Fabric
Let’s get down to business! This method is for a typical drum or tapered lampshade with a frame. We’ll aim for a seamless, professional look.
Step 1: Prepare Your Workspace and Lampshade
Find a clean, well-lit area to work in. Lay down some old newspaper or a drop cloth to protect your surfaces, especially if you’re using spray adhesive. If your lampshade is dusty, give it a gentle wipe-down with a dry cloth.
Step 2: Measure and Cut Your Fabric
This is where precision matters. There are two main ways to do this:
-
The Wrapping Method (for simple drum shades):
- Measure the circumference of the shade at its widest point. Add about 1 inch for overlap.
- Measure the height of the shade. Add about 1 inch to the top and 1 inch to the bottom for trimming and securing.
- Lay your fabric flat and mark these dimensions. Cut out your rectangular piece of fabric.
-
The Pattern Method (for tapered or more complex shapes):
- You can create a paper pattern. Take a piece of paper that’s larger than your shade.
- Wrap the paper around the shade, smoothing it as you go. Use tape to hold it in place.
- Carefully cut along the top and bottom edges of the shade, creating a curved cut.
- Cut vertically along one side of the shade where the paper overlaps.
- Unwrap the paper. This is your pattern.
- Lay the paper pattern on your fabric, pin it in place, and cut around it, adding about 1 inch all around for seam allowance and trimming.
For most beginners, the wrapping method for a drum shade is the easiest to start with.
Step 3: Attach the Fabric to the Shade Frame
This is where the magic happens. You’ll be working with the frame of the lampshade.
- Apply Adhesive to the Frame: Start at the top or bottom edge of the lampshade frame. Apply a thin, even line of fabric glue or spray adhesive along the metal rim. Work in sections, about 4-6 inches at a time, so the adhesive doesn’t dry out before you attach the fabric.
- Position the Fabric: Take your fabric piece. If you used the wrapping method, align one long edge of the fabric with the edge of the shade frame where you applied the adhesive. If you used the pattern method, align the edge of your fabric pattern with the edge of the shade frame.
- Secure the First Edge: Carefully press the fabric onto the glued rim. Ensure it’s straight and smooth. Work your way around the shade, pressing the fabric firmly onto the adhesive.
- Continue Around the Shade: As you move along the frame, continue applying adhesive in small sections and pressing the fabric onto it. Keep the fabric taut but not stretched, smoothing out any wrinkles as you go.
Step 4: Overlap and Secure the Seam
Once you’ve gone all the way around the shade, you’ll have an overlap where the fabric ends meet.
- Create the Overlap: Overlap the starting edge of the fabric by about 1 inch over the ending edge.
- Apply Adhesive for Seam: Apply a line of fabric glue or spray adhesive along the entire length of the edge where the overlap will occur.
- Secure the Seam: Carefully press the overlapped fabric down onto the glued edge. Ensure the seam is smooth and lies flat. You might want to add a little extra glue along the inside edge of the seam for extra security.
If your fabric is slightly sheer, you might see the old shade through the seam. You can hide this by carefully trimming the bottom layer of the overlap so it’s slightly narrower than the top layer before gluing.
Step 5: Finish the Top and Bottom Edges
This step requires patience and a steady hand to get a clean, professional look.
-
At the Top Edge:
- Apply adhesive to the top rim of the lampshade frame.
- Carefully fold the excess fabric over the top rim and press it down firmly onto the adhesive. Work in small sections.
- You’ll notice the fabric will bunch or pleat slightly where it meets the spokes or supports of the frame. This is normal. You can try to make these pleats as neat and even as possible.
- Once the fabric is secured all around the top rim, use your craft knife or scissors to carefully trim away any excess fabric that hangs over the very top edge.
-
At the Bottom Edge:
- Repeat the process for the bottom edge. Apply adhesive to the bottom rim of the frame.
- Fold the excess fabric over the bottom rim and press it down.
- Again, neat pleats where the fabric meets the frame are expected. Try to make them as uniform as possible.
- Trim any excess fabric hanging over the bottom edge with your craft knife or scissors.
For a super neat finish, some people like to add a trim (like ribbon or bias tape) along the top and bottom edges after the fabric is secured. This can cover any minor imperfections and add a decorative touch.
Step 6: Let It Dry and Inspect
Allow the fabric glue or spray adhesive to dry completely according to the manufacturer’s instructions. This is usually at least a few hours, but overnight is best for maximum adhesion. Once dry, inspect your work. Gently tug on the fabric to ensure it’s securely attached. Smooth out any remaining wrinkles or bumps. Trim any stray threads.
Tips for a Professional Finish
Want your lampshade to look like it came from a high-end boutique? Here are a few extra tips:
- Pre-wash Your Fabric: If using cotton or linen, pre-wash and iron it to prevent shrinking later.
- Iron Your Fabric: Before cutting, iron your fabric to ensure it’s perfectly flat. This helps with accurate measurements and a smooth finish.
- Work in Good Light: This helps you see wrinkles and ensure even application of adhesive.
- Use a Pattern for Tapered Shades: While it takes a little extra time, a paper pattern will give you a much more accurate cut for tapered shades, reducing waste and making application easier.
- Be Patient with Pleats: The areas where the fabric meets the frame at the top and bottom can be tricky. Take your time, fold the fabric neatly, and use just enough adhesive to secure it without oozing out.
- Consider a Liner: For some shades, especially those with darker or patterned fabrics, you might want to add a lampshade liner. These are thin, fabric-like materials that adhere to the inside of your shade, providing a more even light diffusion and hiding the frame structure.
- Test Your Adhesive: Always test your glue on a scrap of your fabric and a similar surface to the lampshade frame to ensure it holds well and doesn’t discolor.
A great resource for understanding different types of adhesives and their uses in crafting is found on sites like the This To That adhesive guide, which helps you choose the right glue for different materials.
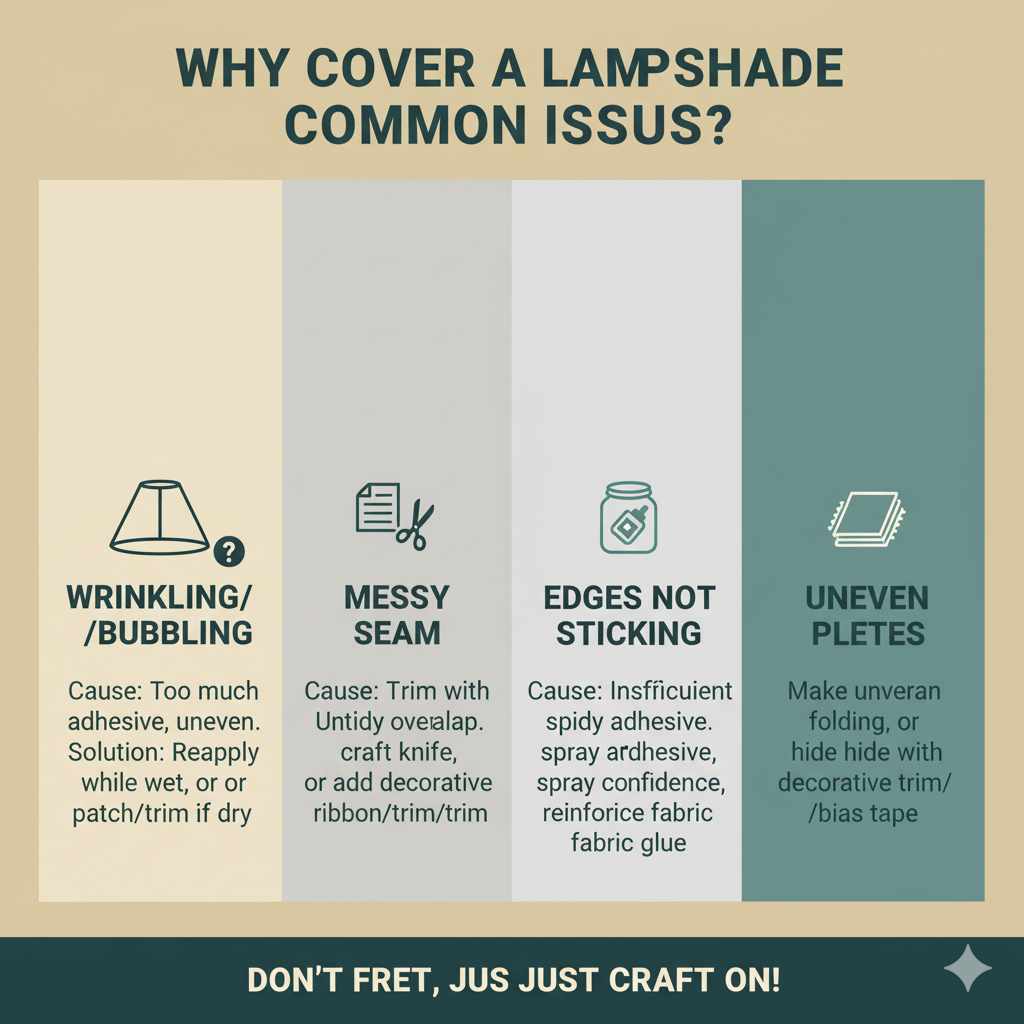
Troubleshooting Common Issues
Even with the best intentions, you might run into a few snags. Here’s how to handle them:
Problem: Fabric is wrinkling or bubbling.
Solution: This often happens if the fabric isn’t kept taut while applying or if there’s too much adhesive. If the adhesive is still wet, try gently peeling back the fabric in that section and re-applying it, smoothing it out as you go. If it’s dry, you might need to carefully trim away the bubbled area and patch it with a small piece of fabric, or, if it’s extensive, you may need to start over.
Problem: The seam is visible and messy.
Solution: If the overlap isn’t neat, you can try to carefully trim the edges with a sharp craft knife to create a cleaner line before gluing. For a quick fix on a visible seam, consider adding a decorative ribbon or trim along the seam line.
Problem: Fabric is not sticking well at the edges.
Solution: Ensure you’re applying enough adhesive to the rim and pressing the fabric down firmly. If the rim is very smooth, a spray adhesive might offer better coverage. For extra hold, you can reinforce the edges with a thin bead of fabric glue once the initial application is dry.
Problem: Pleats at the top/bottom are uneven.
Solution: This is common. Try to make them as uniform as possible. If they are very noticeable, a decorative trim (ribbon, bias tape) along the top and bottom edges will cover a multitude of pleating sins and add a professional touch.
FAQ: Your Lampshade Covering Questions Answered
Q1: Can I use any fabric to cover a lampshade?
A1: It’s best to use fabrics that are not too thick or too sheer. Cotton, linen, and lightweight home decor fabrics are excellent choices. Avoid very heavy or highly textured materials that might block light or be difficult to work with.
Q2: How much fabric do I need?
A2: Measure the circumference and height of your lampshade. Add about 1-2 inches to both measurements to allow for overlap, trimming, and securing the fabric neatly around the top and bottom edges.
Q3: What kind of glue should I use?
A3: Strong fabric glue or a permanent spray adhesive designed for fabric works best. Ensure it dries clear and is permanent for a lasting hold. Always test it on a scrap piece first.
Q4: My lampshade is tapered. How do I get the fabric to fit smoothly?
A4: For tapered shades, creating a paper pattern is highly recommended. Cut a pattern that matches the exact shape of the shade, then use it to cut your fabric, adding an inch for seam allowance and finishing. This ensures a snug, smooth fit.
Q5: Is it safe to cover a lampshade with fabric?
A5: Yes, it’s generally safe as long as you use fabrics that are not highly flammable. Avoid synthetic materials that can melt easily. Also, ensure the bulb you use is not too close to the fabric and doesn’t generate excessive heat. Always follow the manufacturer’s recommendations for bulb wattage for your lamp base.
Q6: How do I make the edges look neat?
A6: Carefully apply adhesive to the frame rim, fold the fabric over, and press firmly. Trim excess fabric with a sharp craft knife. For extra neatness and a decorative touch, consider adding a ribbon or bias tape trim along the top and bottom edges after the fabric is secured.
Q7: What if my fabric has a pattern? How do I make sure it lines up?
A7: If your fabric has a directional pattern or a specific motif you want to feature, start by positioning your fabric carefully. Ensure the pattern is straight and centered before you begin gluing. For patterned fabrics, the overlap seam is where you’ll need to be most careful to match the pattern as closely as possible.
Conclusion
And there you have it! You’ve successfully learned how to cover a lampshade with fabric. See? It’s a project that’s well within reach for any DIY enthusiast, and the results can be incredibly rewarding. You’ve transformed a plain or outdated lampshade into a custom piece that perfectly reflects your style and enhances your home’s ambiance.
Remember, the key is patience, careful measurement, and choosing the right materials. Don’t be afraid to experiment with different fabrics and patterns. Each lampshade you cover will build your confidence and skill. So, go ahead, pick out that perfect fabric, and start creating beautiful, personalized lighting for your home. Happy crafting!