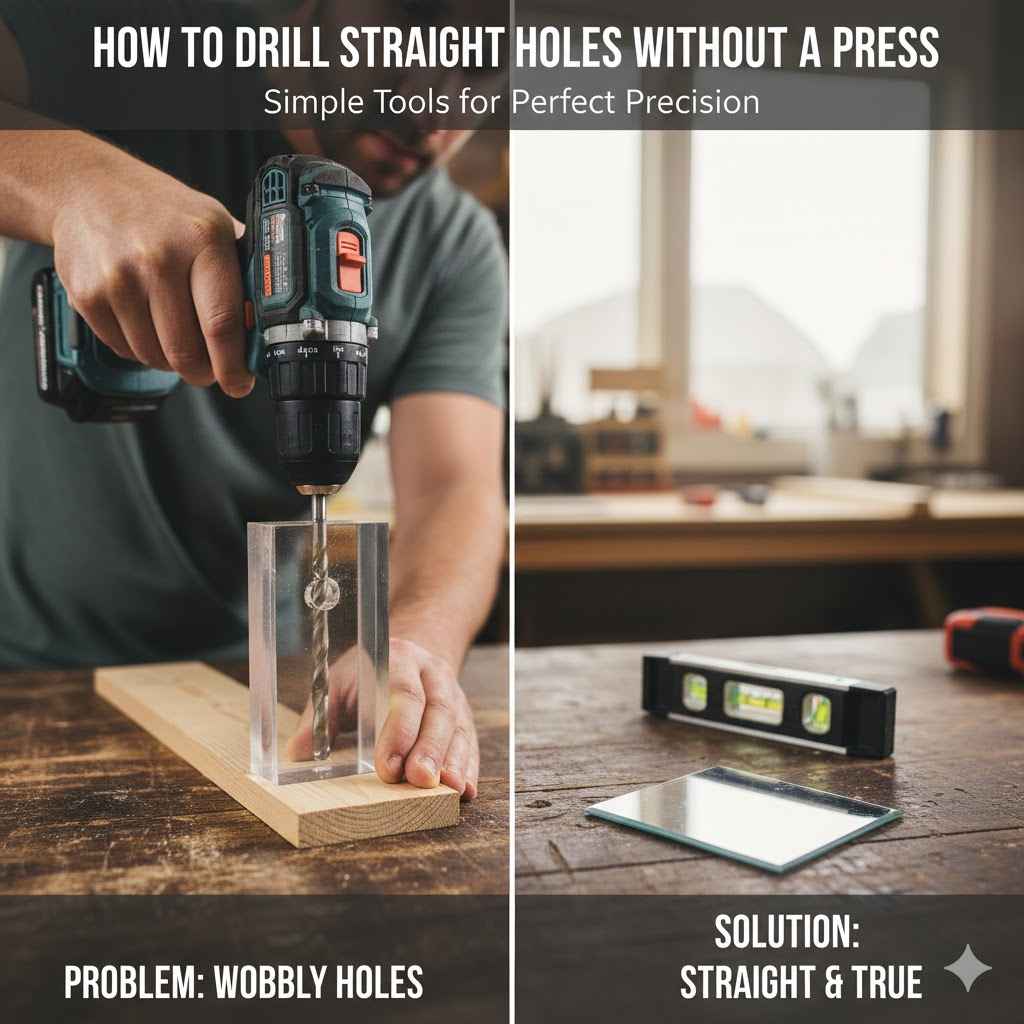
How to Drill Straight Holes Without a Press
Many people learning to work with tools find drilling perfectly straight holes a bit tricky. It’s easy to see why. Without the steady guidance of a drill press, your hand can wobble, making the hole go crooked.
This can ruin projects or make them look messy. But don’t worry! You don’t need fancy equipment to get great results.
This guide will show you how to drill straight holes without a drill press with simple, easy steps that anyone can follow. Get ready to make clean, precise holes every time.
Getting Started How to Drill Straight Holes Without a Drill Press
Drilling straight holes by hand can seem like a challenge, especially when you’re starting out. The main difficulty is keeping your drill perfectly perpendicular to the surface. Even a slight angle can cause the bit to wander, leading to an off-center or angled hole.
This is where a drill press shines, as its fixed arm guides the bit precisely. However, not everyone has access to a drill press. This section will cover the fundamental steps and preparations needed to achieve accuracy with a handheld drill.
We will explore essential tips for success.
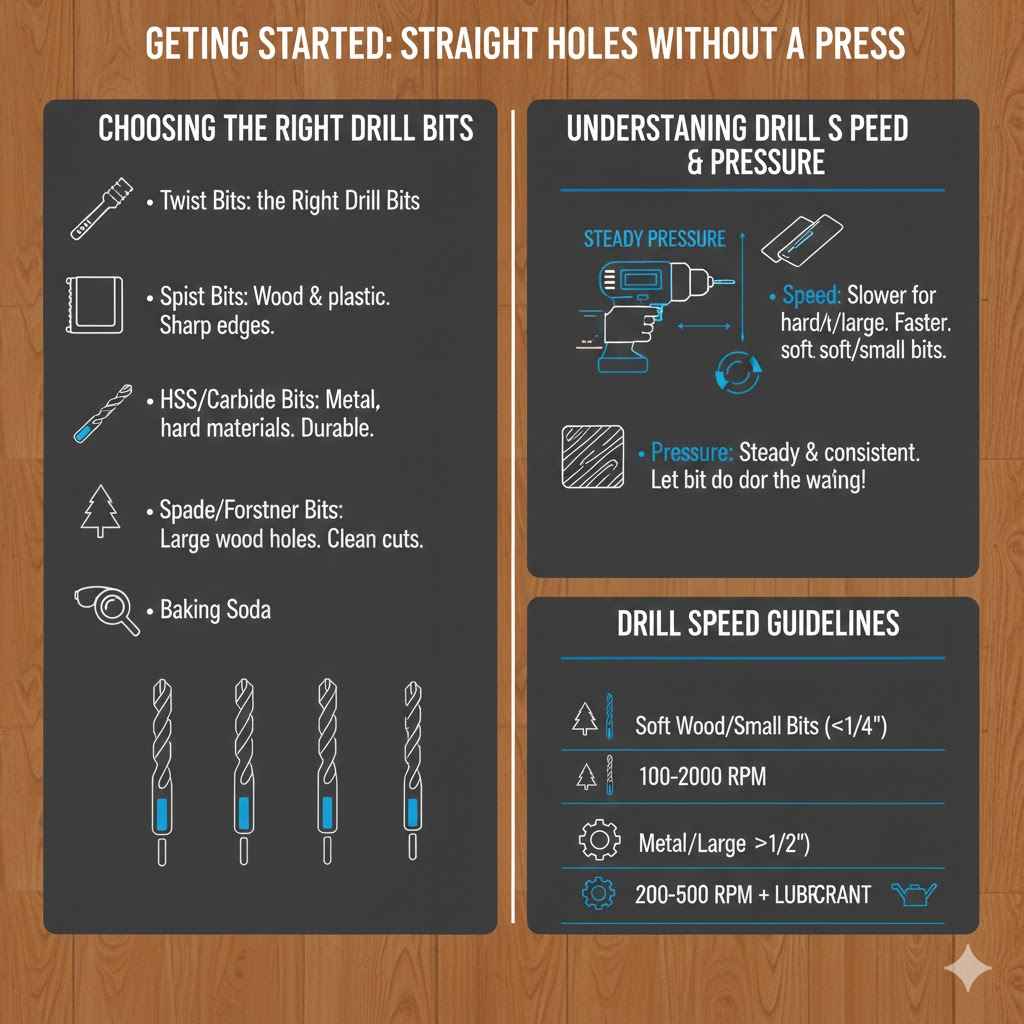
Choosing the Right Drill Bits
Selecting the correct drill bit is crucial for clean and straight holes. The type of bit you use depends on the material you are drilling into. For wood, twist bits are common and effective.
They have sharp edges that cut through wood easily. For harder materials like metal or plastic, you’ll need bits made from high-speed steel (HSS) or even carbide-tipped bits for maximum durability and precision. The sharpness of the bit is also key.
A dull bit will require more force, increasing the chance of it slipping or the hole going crooked. Always check your bits for sharpness before starting a job. A bit that feels rough on the edge might need sharpening or replacing.
When you’re drilling into different materials, the bit material and design play a big role. For instance, spade bits or Forstner bits are excellent for larger holes in wood, creating a clean entrance and exit. For very hard materials like concrete or masonry, you’ll need a masonry bit with a carbide tip designed to hammer and drill.
Using the wrong bit can not only make the job harder but also damage the material and the bit itself. Always research the best type of bit for your specific project material to ensure a smooth drilling experience and a quality result.
Understanding Drill Speed and Pressure
The speed at which your drill spins and the pressure you apply are vital for drilling straight. Too fast a speed, especially with larger bits, can cause the bit to overheat, bind, and wander. Too slow a speed can lead to inefficient cutting and a rough hole.
Generally, slower speeds are better for harder materials and larger bits, while faster speeds can be used for smaller bits in softer materials like wood. The general rule of thumb is that the bigger the drill bit, the slower the speed you should use. This prevents the bit from overheating and reduces the stress on your hand, making it easier to control.
Pressure is also key. You want to apply steady, consistent pressure. Pressing too hard can force the bit to go off course, especially when starting the hole.
It can also cause the bit to bind in the material, which is dangerous and can damage your drill. On the other hand, not applying enough pressure means the bit won’t cut effectively, leading to a lot of friction and heat without making progress. The goal is to let the drill bit do the work.
Think of it as guiding the bit, not forcing it. You should feel the bit cutting into the material cleanly.
Drill Speed Guidelines
- For softwoods and small diameter bits (under 1/4 inch), a speed of around 1000-2000 RPM is often suitable.
- For hardwoods and medium diameter bits (1/4 to 1/2 inch), reduce the speed to about 500-1000 RPM.
- For metals and larger bits (over 1/2 inch), use very slow speeds, typically 200-500 RPM, and always use a lubricant.
These speeds are general guidelines and can vary based on your specific drill model and the exact material. Many modern drills have variable speed triggers, which allow you to fine-tune the speed easily. Experimenting on scrap material is the best way to find the sweet spot for your project.
Remember that a good lubricant can make a significant difference when drilling metal, helping to keep the bit cool and sharp, and improving the overall quality of the hole.
Essential Tools and Techniques for Straight Holes
Achieving straight holes without a drill press relies heavily on using the right tools and employing smart techniques. These methods help stabilize your drill and guide it accurately. Even simple aids can make a huge difference.
This section will detail various tools and simple tricks that allow you to achieve the precision of a drill press right at your workbench. We’ll look at how to prepare your workspace and your materials for optimal results.
Using a Drill Guide or Jig
A drill guide, also known as a drill jig, is a simple yet incredibly effective tool for ensuring straight holes. These devices are essentially small, handheld fixtures that hold your drill bit at a precise 90-degree angle to the surface. They often have a metal bushing that the drill bit slides into, preventing any wobbling or angling.
Some guides are designed for specific tasks, like drilling straight holes at the edge of a board or into round stock. They are portable and much more affordable than a full drill press, making them a great option for hobbyists and DIYers.
Using a drill guide involves placing the guide flat on your work surface where you want the hole. Then, you you intend it to. Many guides also have a flat base with markings to help you position them accurately relative to the edge or center of your workpiece.
Types of Drill Guides
- Universal Drill Guides: These are versatile and can be used on flat surfaces, edges, and even round objects. They typically have adjustable fences or guides to help with alignment.
- Edge Drilling Guides: Specifically designed for drilling holes parallel to the edge of a piece of wood or other material, often used for making shelf pin holes or dowel joints.
- Pocket Hole Jigs: While primarily for creating pocket holes for joinery, many pocket hole jigs incorporate a drill guide feature to ensure the angled holes are drilled precisely.
When selecting a drill guide, consider the types of projects you undertake most often. If you frequently drill holes near the edge of boards, an edge drilling guide will be very useful. For more general purposes, a universal drill guide offers the most flexibility.
Some higher-end guides also feature multiple bushing sizes to accommodate different drill bit diameters, further increasing their utility and precision.
Clamping Your Workpiece
Properly clamping your workpiece is absolutely essential for drilling straight holes. When you apply pressure to drill, the material can shift or move, throwing your angle off. Securing the workpiece prevents this movement, allowing you to focus on controlling the drill.
Use sturdy clamps, such as C-clamps or bar clamps, to hold the material firmly to your workbench or a stable surface. Make sure the clamps are positioned so they don’t interfere with your drilling path or the drill itself. Having the workpiece firmly in place is one of the most basic yet critical steps to successful straight drilling.
When clamping, aim to distribute the pressure evenly across the material. Avoid overtightening, which can sometimes warp thin materials. For irregular shapes or when drilling into a smaller piece, consider using a vise or even temporary wooden blocks to create a stable platform.
The goal is for the material to be completely immobile during the drilling process. This stability is what allows the drill bit, guided by your hand or a jig, to enter the material at the intended angle without deviation. A loose workpiece is the enemy of a straight hole.
Clamping Best Practices
- Use at least two clamps to secure the workpiece firmly.
- Position clamps so they do not obstruct the drill or your ability to guide it.
- Ensure the workpiece is flush with the workbench or drilling surface to prevent the drill from catching or slipping.
- For delicate materials, use soft jaws or a piece of scrap wood between the clamp and the workpiece to prevent marring.
The stability provided by clamping is paramount. If you’re drilling a hole near the edge of a board, ensure the clamp is on the opposite side and doesn’t get in the way of your drill’s rotation. If drilling through a larger sheet, clamping at multiple points will provide maximum security.
A little extra time spent on proper clamping will save you a lot of frustration and rework down the line.
Marking Your Drill Point Accurately
Before you even pick up the drill, accurately marking where you want the hole is vital. A precise mark serves as your target. A common mistake is to simply estimate the spot.
For wood, using a pencil is standard. For harder materials, a center punch is essential. A center punch creates a small indentation that guides the drill bit perfectly and prevents it from “walking” or skittering across the surface when you start drilling.
This is especially important when drilling into metal or shiny surfaces where a pencil mark might not be visible or precise enough.
Using a ruler and a square is key for accuracy. Mark your intended spot and then use a combination square or speed square to ensure your mark is at a perfect 90-degree angle to any relevant edge or surface. This pre-drilling accuracy translates directly to the accuracy of your final hole.
If your initial mark is off, your hole will be off, no matter how straight you drill. Taking a moment to double-check your measurements and marks will pay dividends in the quality of your work. A good starting point means a good end result.
Marking Techniques
- Pencil for Wood: Use a sharp pencil to make a clear, concise mark. A fine-point pencil is better than a thick one for precision.
- Center Punch for Metal/Plastic: Use a sharp center punch and hammer to create a small dimple. This dimple acts as a guide for the drill bit.
- Combination Square: Use a combination square to ensure your marks are square to edges, which is critical for aligned holes.
- Rulers and Measuring Tapes: Double-check all measurements before making your mark. Accuracy here is paramount.
For even greater precision, especially when drilling multiple holes that need to be perfectly aligned, consider using painter’s tape over the marked area. You can make your mark on the tape, then carefully peel and apply it to your workpiece. This can help prevent tear-out in wood and provide a surface where your mark is more visible and stable.
It also helps the drill bit bite into a consistent surface, reducing the chance of it slipping.
Advanced Techniques for Perfect Holes
Once you’ve mastered the basics, there are advanced techniques and accessories that can further enhance your ability to drill straight holes without a drill press. These methods often involve combining multiple tools or using specialized bits and guides. This section will explore these more refined approaches, helping you achieve professional-level results for even the most demanding projects.
These techniques build upon the foundational principles of stability and guidance.
Using a Self-Centering Bit Guide
A self-centering bit guide is a step up from a basic drill guide. These guides are designed to automatically center themselves on the edge of a board, making them ideal for drilling perfectly placed holes for hinges, shelf pins, or joinery without needing to meticulously mark and measure. The guide has an internal mechanism that grips the edge of the material and holds the drill bit perfectly perpendicular to it.
This ensures that the hole is drilled exactly where you intend it to be, with consistent spacing and alignment.
These guides are particularly useful for tasks requiring a high degree of accuracy, such as installing cabinet hardware or creating precise shelf layouts. By eliminating the need for constant measuring and re-measuring, they significantly speed up the process and reduce the chances of error. The self-centering feature means you don’t have to worry about aligning the guide perfectly by eye; it does the work for you.
This makes them invaluable for anyone who needs to drill multiple identical holes with perfect consistency.
Benefits of Self-Centering Guides
- Automatic Centering: Ensures holes are perfectly placed on the edge of material.
- Consistent Alignment: Ideal for repeatable tasks like installing hinges or shelf pins.
- Ease of Use: Simplifies complex alignment tasks, reducing setup time.
- Precision: Provides a higher level of accuracy than manual marking and guiding alone.
When using a self-centering bit guide, it’s still important to ensure the workpiece is securely clamped. While the guide centers itself, the material itself needs to remain stationary. Also, be mindful of the thickness of the material your guide is designed for, as some are specific to certain ranges of board thickness.
Proper maintenance, like cleaning out any sawdust or debris from the mechanism, will ensure the guide continues to function accurately for years to come.
The Role of Lubrication
Lubrication is often overlooked, but it plays a critical role in drilling straight, clean holes, especially when working with metal or hard plastics. Lubricants, such as cutting oil or even a bit of household oil, reduce friction between the drill bit and the material. This friction generates heat, which can dull the bit, cause it to wander, and make drilling more difficult.
By keeping the bit cool and reducing wear, lubrication helps the bit cut more cleanly and stay on its intended path.
When drilling metal, using a lubricant is almost always recommended. It helps to flush away metal shavings and prevents the bit from “galling,” a process where metal from the workpiece welds itself to the drill bit. This not only makes drilling easier but also extends the life of your drill bits.
For softer materials like wood, lubrication is generally not necessary, as the wood fibers themselves often provide a form of lubrication. However, for very dense hardwoods or when drilling at high speeds, a light application of wax or soap can sometimes help.
Lubricant Applications
- Metal Drilling: Always use a dedicated cutting oil or a multipurpose lubricant for drilling into steel, aluminum, or brass. Apply it directly to the drill bit or the hole location.
- Hard Plastics: Some hard plastics can benefit from a lubricant to prevent melting or gumming up the drill bit. A small amount of water or a specialized plastic lubricant can work.
- Wood: Generally not required. If drilling into very hard woods at high speed and noticing excessive heat or binding, a dab of beeswax or even bar soap can help.
The type of lubricant you use can depend on the specific metal. For aluminum, a specialized aluminum cutting fluid is best. For steel, a general-purpose cutting oil is usually sufficient.
Remember to wipe off excess lubricant after drilling to prevent it from staining or damaging the material. Proper lubrication is a simple step that can significantly improve the quality of your drilled holes and the longevity of your tools.
Using a Drill Press Attachment for Handheld Drills
For those who want some of the benefits of a drill press without buying a full machine, there are drill press attachments designed for handheld drills. These attachments typically consist of a sturdy base, a vertical column, and a mechanism that holds your drill and guides it down in a straight line. Your handheld drill mounts onto this mechanism.
While not as rigid as a dedicated drill press, these attachments offer a significant improvement in straightness over freehand drilling.
These attachments are great for users who need to drill a lot of holes straight and consistently but don’t have the space or budget for a full drill press. They provide a stable platform, ensuring the drill bit descends perpendicular to the base. Some models even have adjustable depth stops, allowing you to drill to a precise depth every time.
They are a fantastic compromise, offering much of the precision of a drill press at a fraction of the cost and size. Setting them up might take a few minutes, but the payoff in accuracy is substantial.
Advantages of Drill Press Attachments
- Increased Accuracy: Provides a stable, guided path for the drill bit, significantly improving straightness.
- Depth Control: Many models include adjustable depth stops for consistent hole depths.
- Space-Saving: Much smaller and more portable than a full drill press.
- Cost-Effective: Offers drill press-like functionality at a lower price point.
When using a drill press attachment, ensure it is firmly mounted to your workbench. The stability of the attachment itself is crucial for the accuracy of your holes. Read the manufacturer’s instructions carefully to ensure you mount your handheld drill correctly and understand all its features, such as depth adjustments and angle settings if available.
This accessory can truly transform your ability to drill straight holes at home.
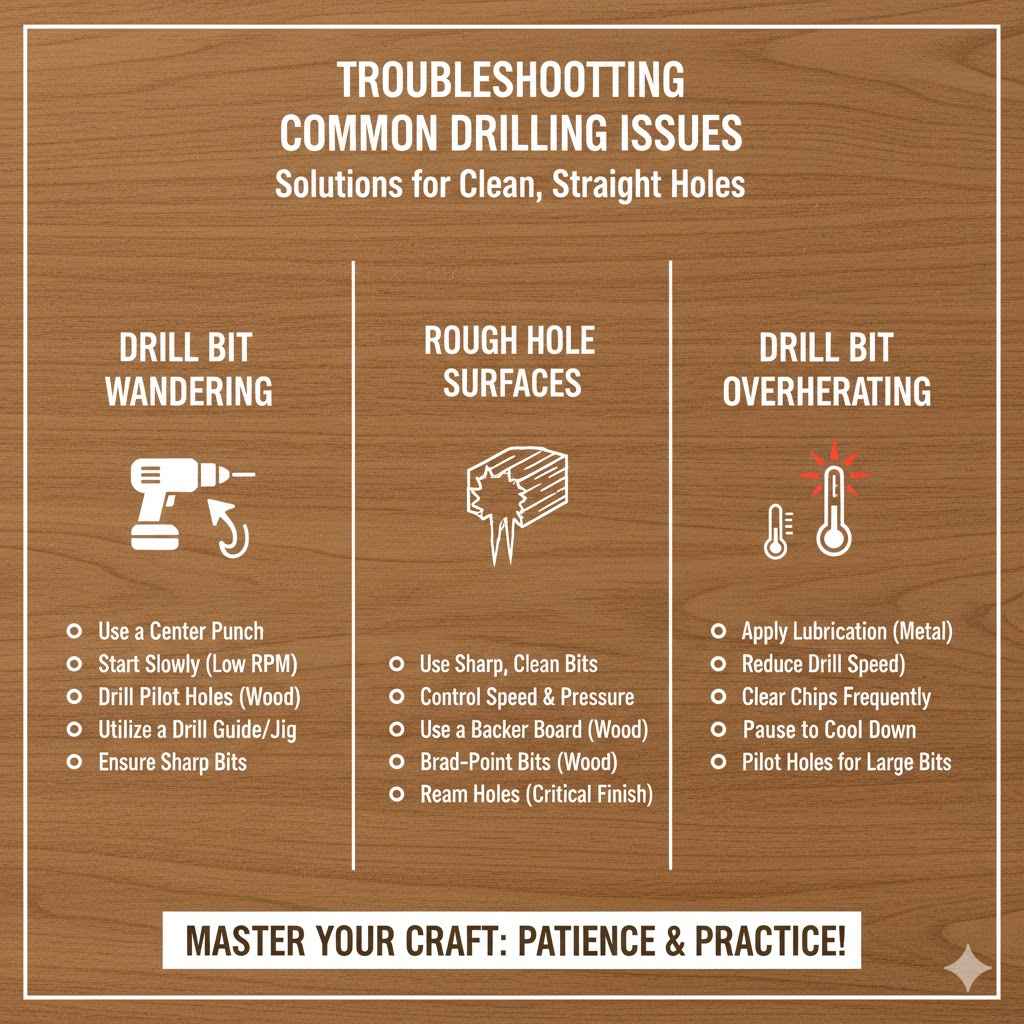
Troubleshooting Common Issues
Even with the best techniques, you might encounter problems when drilling. Common issues include the drill bit wandering, the hole being too rough, or the drill bit overheating. This section will address these challenges and provide practical solutions to help you overcome them.
Understanding these common problems and how to fix them is part of becoming proficient in drilling straight holes.
Drill Bit Wandering
Drill bit wandering is when the bit starts to move away from your intended mark as it begins to cut. This is most common when starting a hole, especially on smooth or hard surfaces. The best defense against wandering is proper marking with a center punch, especially for metal.
For wood, ensuring you start with a pilot hole, which is a small hole drilled first, can also help. If the bit still wanders, try starting the drill at a very slow speed and applying gentle pressure until the bit bites into the material. Then, increase speed and pressure as needed.
Using a drill guide or jig, as discussed earlier, is another excellent way to prevent wandering. The guide physically holds the bit in place, forcing it to start at the correct angle. Sometimes, a bit that isn’t sharp can also contribute to wandering because it’s not cutting effectively, just sliding.
So, always ensure your drill bits are sharp before you begin. A sharp bit creates a clean starting point and minimizes the chance of it veering off course.
Solutions for Wandering Bits
- Use a Center Punch: For metal or hard materials, a center punch creates an indentation that locks the bit’s starting position.
- Start Slowly: Begin drilling at a very low speed until the bit engages the material, then gradually increase speed.
- Pilot Holes: For larger holes in wood, drill a small pilot hole first to guide the larger bit.
- Drill Guides: Employing a drill guide will physically prevent the bit from moving off-center.
If you find the bit is still wandering despite these measures, it might be a sign that your drill bit is dull. Sharpening or replacing the bit is often the simplest and most effective solution. Additionally, ensure the workpiece is absolutely stable.
Any movement in the material can exacerbate the problem of the drill bit wandering.
Rough Hole Surfaces
A rough hole surface can result from several factors. If you are drilling into wood, using a dull bit, drilling too fast, or applying uneven pressure can all lead to splintering and tearing, creating a rough interior. For metal, a rough hole might indicate the drill bit is overheating or that you are not using a lubricant.
If the bit is not sharp, it will tear rather than cut cleanly, leaving a ragged edge. For wood, using a bit designed for clean cuts, like a brad-point bit, can help.
When drilling wood, backing the material with a scrap piece of wood can prevent “tear-out” on the exit side, which is a common cause of rough holes. Place the scrap wood directly behind where the drill bit will exit the workpiece. As the bit breaks through the main material, it will enter the scrap wood, providing support and resulting in a much cleaner exit hole.
This is a simple technique that significantly improves the finish of your drilled holes.
Tips for Smoother Holes
- Use Sharp Bits: Always use sharp drill bits appropriate for the material.
- Control Speed: Adjust drill speed according to the material and bit size. Slower is often better for cleaner cuts.
- Use a Backer Board: For wood, place a scrap piece of wood behind the exit point to prevent tear-out.
- Apply Consistent Pressure: Steady, even pressure leads to smoother cuts than jerky movements.
For particularly critical holes where surface finish is paramount, you can also ream the hole after drilling. A reamer is a tool designed to enlarge and smooth out existing holes. However, for most DIY projects, focusing on the drilling technique and using sharp tools should provide a sufficiently smooth finish.
Drill Bit Overheating
Overheating is a common problem, especially when drilling metal or hard materials for extended periods. The friction generated between the spinning drill bit and the material creates heat. When the bit gets too hot, it can lose its temper (harden), become dull quickly, and even break.
This can also damage the workpiece, especially if it’s plastic or wood, causing melting or scorching.
The primary ways to combat overheating are by using appropriate drill speeds, applying steady and not excessive pressure, and using lubrication. For metal, a cutting fluid is essential. For wood, pausing the drilling process periodically to let the bit cool down can be effective.
If you are drilling a deep hole, withdrawing the bit partially every so often to clear chips and allow air to cool it can also help. Many modern drills have a fan that helps cool the motor, but the bit itself needs attention.
Preventing Overheating
- Use Lubrication: Especially for metal, cutting fluid is key to dissipating heat.
- Reduce Speed: Slower drill speeds generate less friction and heat.
- Clear Chips Frequently: For deep holes, withdraw the bit often to remove material and allow cooling.
- Use a Pilot Hole: For larger bits, a pilot hole reduces the workload and friction.
If your drill bit does get very hot, allow it to cool down completely before attempting to drill again. Trying to drill with an overheated bit will only make the problem worse. Sometimes, a bit that has overheated may be permanently damaged and require replacement.
A little patience and proper technique go a long way in preventing this issue.
Frequently Asked Questions
Question: Can I really drill perfectly straight holes without a drill press?
Answer: Yes, absolutely. While a drill press offers the most consistent accuracy, with the right tools and techniques like using a drill guide, clamping your work, and practicing steady hand control, you can achieve very straight holes for most projects.
Question: What is the best way to start a hole so the drill bit doesn’t slip?
Answer: For metal or hard plastics, use a center punch to create a small dimple that guides the drill bit. For wood, a sharp pencil mark combined with a slow start speed or a small pilot hole helps prevent slipping.
Question: How do I know what speed to use on my drill?
Answer: Generally, use slower speeds for larger bits and harder materials, and faster speeds for smaller bits and softer materials like wood. Many drills have speed settings or variable speed triggers to help you control this.
Question: Will a drill guide make a big difference?
Answer: A drill guide, or jig, is one of the most effective tools for ensuring straight holes without a drill press. It physically constrains the drill bit to a 90-degree angle, greatly reducing wobbling.
Question: Is it okay to drill into a piece of wood that is not clamped?
Answer: No, it’s never ideal. Unclamped wood can shift or spin when you drill, making it impossible to drill a straight hole and potentially dangerous. Always secure your workpiece firmly.
Conclusion
You now have the knowledge to confidently drill straight holes without a drill press. By using simple tools like drill guides, proper clamping, and accurate marking, you can achieve precise results. Remember to select the right bits, control your speed and pressure, and use lubrication when needed.
With practice, your handheld drilling will become much more accurate and professional.