How to Dry Pressure-Treated Wood Without Warping
Drying pressure-treated wood can seem tricky, especially if you’re new to DIY projects. Many people worry about their lumber bending or twisting out of shape as it dries, which can ruin their plans. It’s a common problem that can leave beginners feeling frustrated.
But don’t worry, it’s easier than you think! We’ll walk you through simple steps to get your wood dry and straight. This guide will show you exactly how to dry pressure-treated wood without warping.
Dry Pressure-Treated Wood Without Warping Methods
This section covers the essential techniques for drying pressure-treated lumber effectively. We will explore why pressure-treated wood behaves differently when drying compared to regular lumber and the best ways to approach this process. Understanding these basics is key to achieving straight, usable wood for your projects.
We will also look at the common pitfalls to avoid.
Understanding Pressure-Treated Wood Moisture
Pressure-treated wood has gone through a special process where chemicals are forced deep into the wood fibers. This makes it resistant to rot and insects, which is great for outdoor use. However, this treatment also means the wood holds a lot of moisture, often much more than untreated wood.
This high moisture content is the main reason why it’s prone to warping when it dries.
When the wood dries, the water inside evaporates. As water leaves, the wood fibers shrink. If this shrinking happens unevenly, some parts of the wood will become smaller than others.
This uneven shrinkage causes the wood to bend, twist, or cup – we call this warping. Pressure-treated wood is particularly susceptible because the chemicals can affect how evenly the water leaves the wood.
For beginners, noticing this high moisture content can be confusing. You might assume it’s already dry enough for use. However, allowing it to dry properly before building is crucial for the longevity and stability of your project.
Getting this right means your fence posts stay upright, your deck boards stay flat, and your garden beds maintain their shape.
Why Even Drying Matters
- Wood shrinks as it dries. This is a natural process. When water molecules leave the wood’s cells, the cells get smaller.
- Uneven drying causes uneven shrinkage. If one side of a board dries faster than the other, that side will shrink more. This difference in shrinkage creates internal stresses within the wood.
- These stresses lead to warping. The board will bend, twist, or cup to relieve these stresses. Warped wood is difficult to work with and can compromise the structural integrity of a project.
Preparing Pressure-Treated Wood for Drying
Before you start drying, proper preparation is key. This involves checking the wood and ensuring you have the right conditions. Getting these steps right sets you up for success and helps prevent common mistakes that lead to warped lumber.
Inspect Your Wood
First, look closely at the wood you have. Is it already noticeably bent or twisted? While some slight imperfections are normal, severe warping before drying can be harder to fix.
Also, check for any surface cracks. These can sometimes indicate that the wood is drying too quickly or unevenly already.
Note the moisture content if you have a moisture meter. For new, pressure-treated lumber, the moisture content can be anywhere from 20% to over 60%. The higher the percentage, the more drying time and care it will need.
Aim for a moisture content around 15-19% for most building projects. This is considered “construction dry.”
Gather Your Materials
You don’t need many special tools. A flat, level surface is essential. You’ll also need spacers, often called “stickers,” to separate the boards and allow air to flow.
These can be thin strips of scrap wood, like 1x2s or even small pieces of plywood. Ensuring good air circulation is the core principle here.
Consider the environment where you’ll be drying the wood. A dry, shaded area is best. Direct sunlight can heat the wood unevenly, leading to faster drying on one side and increasing the risk of warping.
Avoid damp or humid locations, as this can slow down drying or even encourage mold growth.
The Best Way to Dry Pressure-Treated Wood
Drying pressure-treated wood properly is all about controlling the rate of moisture loss. The goal is to let the wood dry slowly and evenly. This prevents the wood fibers from shrinking too quickly in one spot.
Here, we will detail the most effective methods to achieve this.
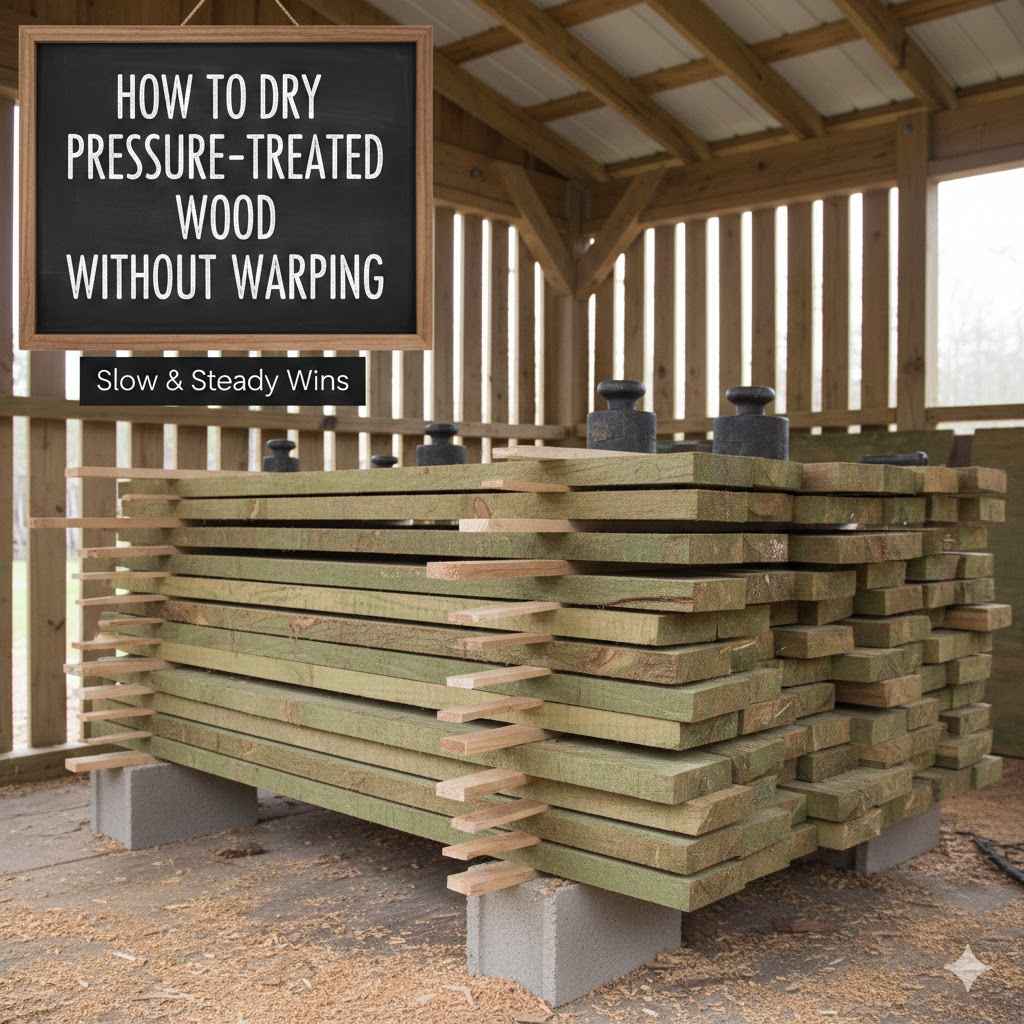
Stacking Your Lumber
The most common and effective method is air-drying. This involves stacking the lumber with spacers between each board. This creates air channels.
Air can then circulate freely around every piece of wood, helping it dry uniformly.
Start by finding a level spot. This could be on a flat patio, a dry concrete slab, or even just level ground if you use a base to keep the wood off the soil. Lay down your first layer of stickers.
These should be perfectly flat and spaced evenly apart. You can use small blocks of wood or thicker stickers.
Place your first layer of pressure-treated boards on top of these stickers. Then, place another layer of stickers on top of those boards. Continue stacking, ensuring each layer of stickers lines up directly above the stickers in the layer below.
This creates vertical air shafts.
- Use dry spacers: Always use dry, seasoned wood for your stickers. If your stickers are wet, they will transfer moisture to the lumber you are trying to dry, defeating the purpose.
- Space stickers correctly: The distance between stickers is important. For common board sizes like 2×6 or 2×8, spacing stickers about 16 to 24 inches apart is usually sufficient. For wider boards, you might need more stickers.
- Keep stacks stable: Ensure your stacks are stable and won’t topple over. If you’re stacking high, consider bracing the sides. This also helps maintain the flatness of the lumber in the stack.
Controlling Environmental Factors
The environment plays a huge role in how your wood dries. Sunlight, wind, and humidity all impact the process. Managing these factors will greatly improve your chances of drying wood without warping.
Shade is your friend: Always dry your wood in a shaded area. Direct sun heats the wood surface much faster than the interior. This causes the outer layers to dry and shrink while the inner layers are still wet and swollen.
This difference is a primary cause of warping.
Protect from rain: While you want air circulation, you don’t want the wood getting soaked by rain. A simple roof structure or covering the top of the stack with a tarp (loosely, to allow airflow) can protect it from precipitation. Make sure the cover doesn’t trap moisture underneath.
Consider wind: A gentle breeze can be beneficial for drying. It helps carry away moist air. However, strong winds can dry out one side of the wood too quickly.
If you live in a very windy area, you might need to place your stack in a more sheltered spot or use windbreaks.
Monitoring and Turning
Drying is not a set-it-and-forget-it process. You need to keep an eye on your wood and sometimes intervene to ensure it dries evenly.
Check for moisture: Periodically use a moisture meter to check the wood. Measure in different spots on various boards. You want to see the moisture content decreasing steadily.
If one board is drying much faster than others, it might indicate a problem with airflow or its position in the stack.
Flip boards if needed: In some cases, you might notice a board is cupping significantly. If this happens, you can try flipping it over in the stack. This might help the board dry on the other side and potentially flatten out.
It’s a bit of trial and error.
Allow ample time: Drying can take weeks or even months, depending on the thickness of the wood, the humidity, and the temperature. Be patient. Trying to rush the process is often what leads to warping.
Advanced Techniques and Tips
Beyond the basic stacking and air-drying, a few extra steps can help ensure your pressure-treated wood dries perfectly straight. These are often used by professionals but are easy enough for DIYers to implement.
Weighting Your Stack
To combat warping, especially in wider or longer boards, you can add weight to the top of your lumber stack. This physical pressure helps keep the boards flat as they shrink.
Place heavy objects on the very top layer of stickers. These could be concrete blocks, large rocks, or other heavy, flat items. Distribute the weight evenly across the entire surface of the stack.
This constant downward pressure counteracts the internal forces that cause cupping and twisting.
The amount of weight needed can vary. For standard 2x lumber, a few concrete blocks per section should suffice. For larger timbers, you might need more.
The key is consistent pressure applied throughout the drying period.
Using Fans for Airflow
While natural air circulation is good, you can improve it with fans. Industrial fans or even powerful box fans can be directed at the stacks to keep air moving. This is especially useful in areas with little natural breeze or when you need to speed up drying slightly.
Position the fans so they blow air across the sides of the lumber stacks, not directly at one end. The goal is to create a gentle, consistent airflow all around the wood. Avoid pointing fans directly at the wood for extended periods, as this can still lead to uneven drying.
Make sure the fans don’t dry the wood too quickly. Monitor moisture content closely. If you see the surface drying much faster than the core, reduce fan speed or duration.
Sealing Cut Ends
When pressure-treated wood is cut, the preservative treatment is often removed from the exposed ends. These cut ends can dry out much faster than the rest of the board, leading to checking (small cracks) or increased warping at the ends.
You can use a wood end-grain sealer to slow down moisture loss from cut ends. Apply the sealer generously to all cut surfaces immediately after making the cut. This helps ensure the ends dry at a rate more similar to the rest of the board.
Common sealers include wax-based products or specialized end-grain sealants. They work by creating a barrier that prevents water from evaporating too quickly from the exposed wood fibers. This is particularly useful for longer pieces of lumber.
Example: A carpenter building a large deck might cut several 12-foot joists to size on-site. Sealing the ends of these joists right after cutting will help them dry more uniformly with the rest of the wood, preventing cracks from forming near the ends.
Common Mistakes and How to Avoid Them
Even with the best intentions, some mistakes can happen. Knowing what to look out for can save your lumber from becoming unusable.
Mistake 1 Drying Wood in Direct Sunlight
As mentioned, sun exposure is a major cause of warping. The heat creates a significant temperature difference between the wood’s surface and its core, causing uneven shrinkage.
How to avoid: Always choose a shaded location for drying. If a completely shaded area isn’t available, consider building a simple, open-sided structure to provide shade.
Mistake 2 Stacking Wood Directly on the Ground
Ground contact is bad for drying. It prevents air circulation underneath the stack, traps moisture, and can encourage mold or insect activity.
How to avoid: Always elevate your lumber stack. Use a few sturdy, dry lumber pieces or concrete blocks as a base. Ensure there’s at least a few inches of space between the ground and the bottom layer of wood.
Mistake 3 Not Using Spacers or Using Too Few
Without proper spacing, air cannot flow between the boards. This leads to stagnant air pockets and slow, uneven drying.
How to avoid: Use plenty of stickers and space them correctly. Aim for consistent spacing throughout the stack. The number of stickers needed depends on the width and length of your lumber, but usually, one sticker every 16-24 inches for standard boards is a good starting point.
Mistake 4 Rushing the Drying Process
Pressure-treated wood takes time to dry, especially thicker dimensions. Trying to use it too soon after purchase, or trying to speed it up too much, is a recipe for disaster.
How to avoid: Be patient. Allow weeks or even months for drying, depending on conditions and wood thickness. Use a moisture meter to confirm dryness before use.
Mistake 5 Not Considering Wood Thickness
Thicker pieces of lumber, like 4×4 posts or 2×12 boards, will take significantly longer to dry than thinner 1x or 2x lumber. They also have a greater potential to warp due to the larger volume of moisture to lose.
How to avoid: Adjust your drying time and potentially your stacking strategy for thicker lumber. For very thick pieces, more frequent stickers and potentially more weight on the stack might be necessary.
Case Studies in Drying Lumber
Seeing how others have successfully dried their wood can be very helpful. These real-world examples show the principles in action.
Case Study 1 A Deck Project’s Success
Sarah was building a large deck and bought several 2×6 pressure-treated boards. She had heard that these boards could warp easily. To avoid this, she decided to let them dry for a month before installing them.
She stacked the boards in her backyard under a large oak tree, which provided ample shade. She used dry 1×2 strips as stickers, placing them about 20 inches apart on each layer. She ensured the stack was level and elevated off the ground by about 4 inches using scrap concrete blocks.
After two weeks, she used a moisture meter and found the boards were still around 25% moisture. She waited another two weeks. By the end of the month, the moisture content was down to 18%.
When she installed the deck boards, they were all straight and laid perfectly flat. This careful drying made her deck project look professional.
Case Study 2 Garden Bed Construction Challenges
Mark was building raised garden beds using 2×12 pressure-treated lumber. He was in a hurry and decided to use the boards straight from the lumber yard, assuming they were already dry enough. He built the beds and then filled them with soil.
Within a few weeks, he noticed that the sides of the garden beds were starting to bow outwards. The higher moisture content in the wood, combined with the pressure of the soil, caused significant warping. Some boards even developed small cracks.
He learned a valuable lesson about the importance of drying. For his next project, he purchased the lumber well in advance, stacked it properly with stickers in a shaded area, and allowed it to dry for over six weeks. The resulting garden beds were much straighter and have held their shape well over time.
Statistics on Wood Warping
Studies show that improperly dried lumber is a leading cause of structural issues in construction. For instance, a report from a building science institute indicated that over 30% of structural failures in residential decks could be attributed to material defects, including warped lumber.
Another survey of professional builders found that nearly 60% of them spend extra time selecting straight lumber and an additional 20% spend time allowing pressure-treated lumber to air dry before use to prevent callbacks related to warping. This highlights the practical importance of proper drying techniques.
Sample Scenarios for Drying
-
Scenario A: Small DIY Project
You have a few 2×4 pressure-treated boards for building a small outdoor bench.
Find a level spot in your yard that gets shade most of the day.
Use scrap 1×2 wood as stickers, spaced about 18 inches apart.
Stack the boards, ensuring stickers align vertically.
Let them dry for 2-3 weeks. Check moisture with a meter; aim for below 20%. -
Scenario B: Large Fence Building Project
You need to build a 6-foot fence using many 4×4 posts and 2x6s for rails.
Clear a large, level area in a shaded spot.
Elevate the lumber stack significantly off the ground on sturdy supports.
Use thicker stickers (like 2x2s) for the heavier posts and wider boards, spaced 16 inches apart.
Consider adding some weight (e.g., cinder blocks) on top of the wider boards to help keep them flat.
Allow at least 4-8 weeks of drying time, monitoring with a moisture meter.
Frequently Asked Questions
Question: How long does pressure-treated wood take to dry?
Answer: The drying time for pressure-treated wood varies greatly. It can take anywhere from a few weeks to several months. Factors like the thickness of the wood, the temperature, humidity, and how well you manage airflow all play a big role.
Thicker boards take much longer.
Question: Can I dry pressure-treated wood indoors?
Answer: Yes, you can dry pressure-treated wood indoors, but it’s often best done in a well-ventilated garage or shed rather than a living space. Ensure there’s good airflow to prevent moisture buildup and potential mold. Avoid direct heat sources, as this can cause rapid, uneven drying.
Question: What moisture content is considered dry for pressure-treated wood?
Answer: For most construction projects, a moisture content of 15% to 19% is considered dry. New pressure-treated lumber often starts much higher, sometimes over 60%. Using a reliable moisture meter is the best way to check.
Question: Will painting or staining help prevent warping?
Answer: Painting or staining can offer some protection, especially from surface moisture changes, but it won’t prevent warping caused by internal moisture loss. It’s best to let the wood dry properly first before applying any finishes. The finish acts more as a protective layer once the wood is dry.
Question: Is it okay to use warped pressure-treated wood?
Answer: It’s generally not recommended to use significantly warped pressure-treated wood for structural or visible parts of a project. Warped pieces are difficult to work with, can compromise the project’s integrity, and make it look unprofessional. It’s always better to use straight, properly dried lumber.
Summary
Successfully drying pressure-treated wood without warping involves careful stacking, controlling the environment, and patience. Using spacers, keeping wood in shade, and elevating it are key steps. Monitor moisture levels and consider adding weight to heavier boards.
This approach ensures your lumber stays straight and ready for your projects, leading to durable and attractive results you can be proud of.