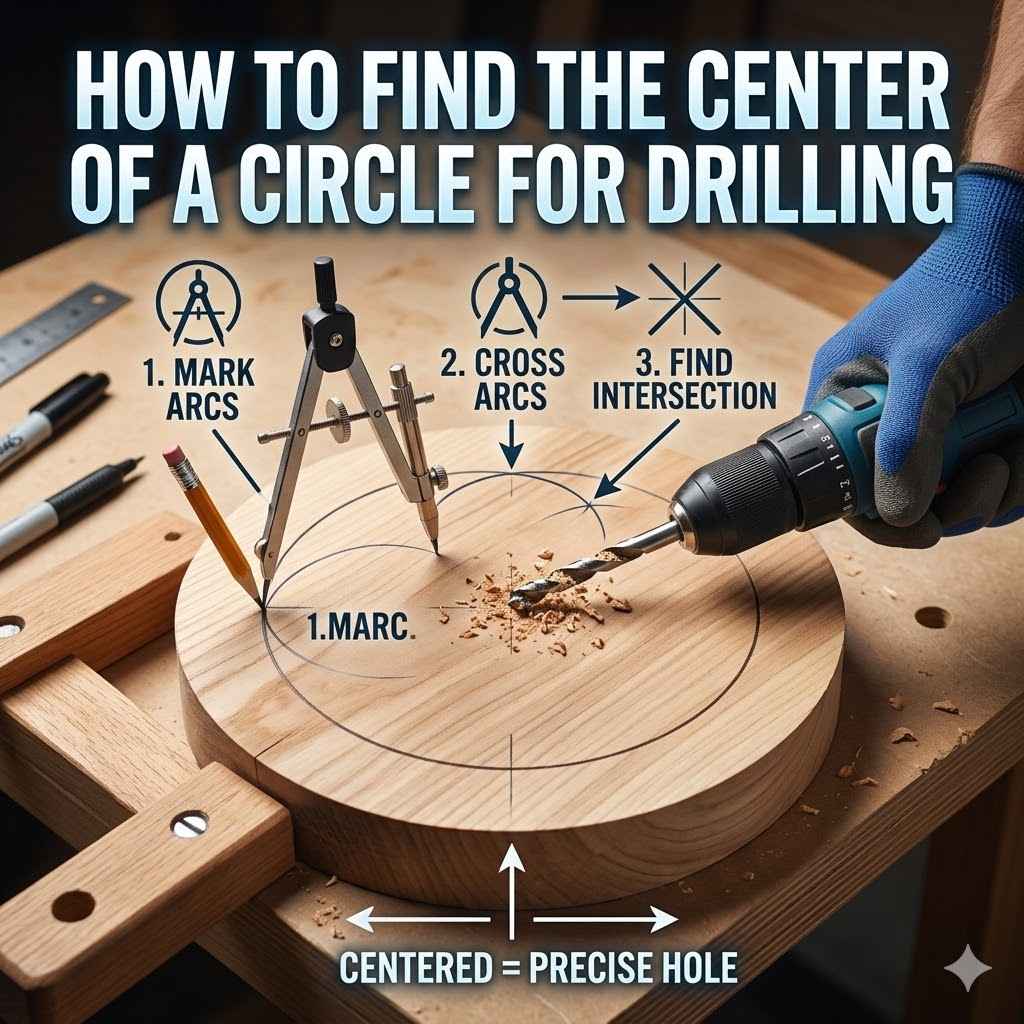
How to Find the Center of a Circle for Drilling
Sometimes you need to drill a hole right in the middle of a circle. This might sound easy, but it can be tricky if you don’t know the right tricks. Many people starting out find this a bit confusing.
But don’t worry! This guide will show you exactly how to find the center of a circle for drilling. We will walk through simple steps so you can get it right every time.
Finding the Circle’s Center for Accurate Drilling
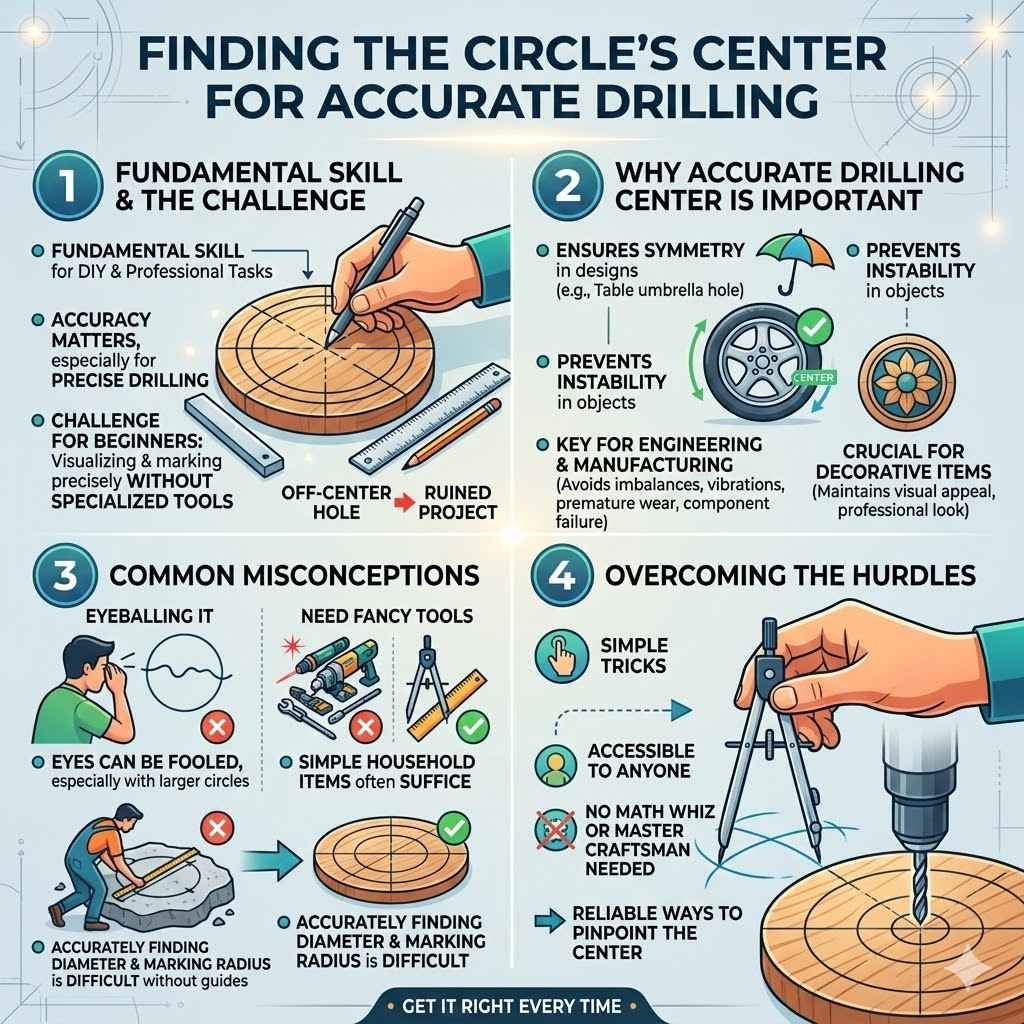
Knowing how to find the exact center of a circle is a fundamental skill for many DIY projects and professional tasks, especially when precise drilling is required. Whether you’re working with wood, metal, or plastic, an off-center hole can ruin your project. This section covers the basic idea and why accuracy matters.
We will break down the process into easy steps.
The main challenge for beginners is visualizing and marking the precise center without specialized tools. Without a clear mark, drilling often results in a hole that’s slightly off, which can be visually unappealing or functionally incorrect for what you’re trying to achieve. This can lead to wasted materials and frustration.
This guide aims to demystify the process.
Why Accurate Drilling Center is Important
Accurate drilling from the center is key for many reasons. It ensures symmetry in designs. For example, when making furniture, like a table with a central hole for an umbrella, it must be perfectly centered.
A misaligned hole will look wrong and could make the umbrella unstable.
In engineering and manufacturing, precision is paramount. A hole drilled off-center in a mechanical part can cause imbalances. This imbalance can lead to vibrations, premature wear, and even failure of the component.
For instance, in a rotating part like a wheel hub, the center must be exact for smooth operation.
For decorative items, like a circular inlay or a pattern of holes, the visual appeal depends entirely on precise placement. Even a slight deviation can make the entire piece look unprofessional or amateurish. This attention to detail separates good work from great work.
Common Misconceptions About Finding the Center
One common mistake is assuming you can just eyeball it. Our eyes can be easily fooled, especially with larger circles or when working quickly. Another misconception is that you need fancy tools.
While some tools can help, simple household items often suffice for finding a circle’s center accurately.
Many people believe you need to measure the diameter and divide by two. This is a good start, but finding the diameter accurately and then marking a perfect radius line can be difficult without a stable guide. This is where the methods described later come into play, offering more reliable ways to pinpoint the center.
These simple tricks are designed to overcome these common hurdles, making the process accessible to anyone. You don’t need to be a math whiz or a master craftsman to get it right.
Simple Methods for How to Find the Center of a Circle for Drilling
This section provides several straightforward methods to locate the center of any circle. We’ll cover techniques that use basic geometry and common tools. Each method is explained step-by-step, making it easy to follow.
The goal is to give you options so you can choose the one that best suits your materials and tools.
We will explore methods involving measuring, folding, and using shapes to guide your marking. These techniques are practical and effective, whether you’re marking a piece of plywood for a craft project or a metal plate for a mechanical assembly. The key is to create intersecting lines or points that lead you directly to the circle’s true center.
Method 1 The Tangent Line Method
This method is very reliable and uses simple measurements. You will need a ruler or measuring tape and a pencil. It works by drawing lines that touch the edge of the circle.
The key idea is that the center of the circle lies on a line that is perpendicular to a tangent line and passes through the point of tangency.
To start, pick any point on the edge of your circle. This is your first point of tangency. Now, draw a straight line that just touches this point on the circle’s edge and extends outward.
This line is called a tangent line.
Next, measure a short distance along this tangent line from your chosen point. Mark this spot. From your original point on the circle’s edge, measure across the circle towards the opposite side.
Your measurement should be perpendicular to the tangent line. This can be tricky without a carpenter’s square or protractor.
A simpler way to achieve this without special tools is to use a right-angle triangle. If you don’t have one, you can create a 90-degree angle by using a piece of paper folded correctly, or by using the Pythagorean theorem (a^2 + b^2 = c^2) to mark points that form a right angle.
Once you have your perpendicular line marked, you can draw another tangent line on a different part of the circle’s edge and repeat the process. Where the perpendicular lines you marked intersect, that point will be the center of your circle. This method requires careful drawing and measuring.
Step-by-Step Guide for the Tangent Line Method
- Mark a point anywhere on the circumference of your circle.
- Draw a straight line that just touches this point and extends away from the circle. This is your tangent line.
- Measure a short, convenient distance along this tangent line from your point. Mark this spot.
- Now, you need to draw a line perpendicular to your tangent line, passing through your original point on the circle. If you have a carpenter’s square, use it. If not, you can make a right angle by folding a piece of paper into a perfect corner, or by using a method to create a 90-degree angle using string or a ruler.
- Draw this perpendicular line. It will pass through the circle’s interior.
- Repeat steps 1-5 on a different spot on the circle’s circumference.
- The point where the two perpendicular lines you drew intersect is the center of the circle.
Method 2 The Chord Intersection Method
This method uses two chords of the circle and their perpendicular bisectors. A chord is any straight line segment whose endpoints both lie on the circle. The perpendicular bisector of a chord always passes through the center of the circle.
By finding the perpendicular bisectors of two different chords, their intersection point will be the center.
This is a very accurate method. First, you draw any two chords inside the circle. Make sure they are not parallel to each other.
Then, you find the midpoint of each chord. Finally, you draw a line perpendicular to each chord through its midpoint.
To find the midpoint of a chord, you can simply measure its length and mark the halfway point. To draw a perpendicular line through the midpoint without a protractor, you can use a compass and straightedge, or a technique involving arcs. This involves opening a compass to a radius larger than half the chord length, placing the compass point at one end of the chord, and drawing arcs above and below the chord.
Repeat this from the other end of the chord. The line connecting the two points where these arcs intersect is perpendicular to the chord.
Once you have the perpendicular bisectors for both chords, the spot where these two bisector lines cross is the precise center of the circle. This method is robust and works well on various materials.
Step-by-Step Guide for the Chord Intersection Method
- Draw a line segment connecting any two points on the circle’s edge. This is your first chord.
- Measure the length of this chord and mark its midpoint.
- Draw a line that is perfectly perpendicular to the chord and passes through its midpoint. This line is the perpendicular bisector.
- Now, draw a second chord anywhere else in the circle, making sure it’s not parallel to the first one.
- Find the midpoint of this second chord.
- Draw the perpendicular bisector for this second chord, passing through its midpoint.
- The point where the two perpendicular bisectors intersect is the center of the circle.
Method 3 The Paper Folding Method
This is a quick and clever way to find the center, especially useful if you have a paper template of the circle or can trace it onto paper. It relies on the geometric property that any line passing through the center of a circle is its diameter, and all diameters bisect each other at the center.
Take your circular object or paper template. Fold it exactly in half. The crease you create is a diameter of the circle.
Then, fold the circle in half again, making sure the edges align perfectly. The new crease will also be a diameter.
The point where these two creases intersect is the exact center of the circle. This method is incredibly simple and requires no measuring tools, just the ability to fold accurately. It’s perfect for quick markings or when precision is needed without fuss.
Step-by-Step Guide for the Paper Folding Method
- Place your circular object or paper template on a flat surface.
- Carefully fold the circle in half, bringing one edge exactly to meet the opposite edge. Crease the fold firmly. This crease represents a diameter.
- Now, take this folded circle and fold it in half again. Align the two straight edges created by the first fold. Crease this fold firmly. This second crease is another diameter.
- Unfold the paper. The point where the two creases cross is the exact center of the circle.
Method 4 Using a Compass
A traditional drawing compass can also be used to find the center. This method is accurate and visual, especially if you are drawing the circle yourself or have the circle already drawn clearly. It uses the concept that the center is equidistant from all points on the circumference.
If you are drawing the circle with a compass, the center is already established. You simply place the compass point on your desired center and set the radius to draw the circle.
If you have a drawn circle, place the compass point anywhere on the circumference. Set the compass to a radius that is more than halfway across the circle. Draw an arc that extends inside and outside the circle.
Repeat this process from at least two other points on the circumference.
The point where these arcs intersect will be the center of the circle. This method is highly accurate for drawing and marking.
Step-by-Step Guide for Using a Compass
- If you are drawing the circle, place the compass point on your desired center location and set the radius. Draw the circle. The center is already found.
- If the circle is already drawn, place the compass point on any point on the circle’s edge.
- Set the compass opening (radius) to be greater than half the diameter of the circle.
- Draw an arc that crosses into the circle.
- Repeat steps 2-4 from at least two other points on the circle’s circumference.
- The point where all the arcs intersect is the center of the circle.
Tools and Tips for Marking the Center
Once you have found the center, marking it clearly is crucial for accurate drilling. The tool you use for marking depends on the material and the precision required. A sharp pencil is common for wood, while a scriber is better for metal.
It’s often helpful to make a small ‘X’ at the center point. This ‘X’ provides two lines that intersect, making it very clear where your drill bit should start. For extra precision, you can use a center punch.
This is a small tool with a pointed tip that you strike with a hammer to create a small indentation.
This indentation helps prevent your drill bit from “walking” or slipping when you start drilling, especially on smooth surfaces like metal or hard plastics. A center punch mark gives the drill bit a secure starting point.
Choosing the Right Marking Tool
- Pencil: Best for wood and softer materials. It’s easy to use and erase if needed. Ensure the tip is sharp for a fine mark. A soft lead pencil (like a 2B) will leave a darker, more visible mark.
- Scriber: Ideal for metal, plastic, and hard surfaces. It creates a fine, precise line by scratching the surface. This mark won’t rub off easily, making it excellent for marking out cuts or drilling points on materials where a pencil mark would be too faint or could smudge.
- Chalk Line/Chalk: Useful for larger circles on rough surfaces like concrete or construction materials. It provides a visible line that’s easy to see from a distance. However, it’s not ideal for precision drilling.
Using a Center Punch for Precision
A center punch is a metal tool with a hardened pointed tip. When you strike the blunt end with a hammer, the pointed tip creates a small dimple in the material. This dimple acts as a guide for your drill bit.
For metalworking, using a center punch is almost essential. Without it, a drill bit can easily slide across the smooth metal surface before it bites into the material, leading to an off-center hole. The small indentation created by the punch stops the drill bit from moving sideways.
To use it, hold the punch at the marked center point and give it a firm tap with a hammer. The indentation should be just deep enough to guide the drill bit. Avoid striking too hard, as this could damage the material or make the dimple too large.
Making an ‘X’ Mark
Creating an ‘X’ at the center point is a simple yet effective way to ensure accuracy. Draw two intersecting lines that meet at the calculated center. The point where they cross is your center.
This ‘X’ mark provides a visual guide that is easy to align your drill bit with. For drilling, place the tip of your drill bit exactly where the two lines of the ‘X’ cross. If you are using a drill press, align the ‘X’ mark with the center of the drill bit.
This double-line indicator helps double-check your alignment.
Drilling the Hole Centered on Your Mark
Now that you have accurately found and marked the center of your circle, it’s time to drill. Proper drill bit selection and drilling technique are important to maintain that accuracy. This section covers how to get the best results when drilling.
Always start slowly. Let the drill bit bite into the material and establish itself in the center mark. Use steady pressure.
If you’re drilling through thick material, consider drilling partway, then flipping the material over to drill from the other side. This technique, called “back drilling” or “plug drilling,” helps prevent tear-out on the exit side.
Drill Bit Selection
Choose the right drill bit for the material you are drilling.
- Wood: Standard twist drill bits work well. For larger holes, a spade bit or Forstner bit might be necessary. Forstner bits are great for making flat-bottomed holes.
- Metal: HSS (High-Speed Steel) drill bits are recommended. You may need cutting fluid or oil to keep the bit cool and lubricated, especially for harder metals.
- Plastic: Standard twist bits can work, but sometimes specialized plastic drill bits or even wood bits can be used carefully to avoid melting the plastic. Start with a slow speed.
Drilling Technique
Start your drill at a slow speed. This allows the tip of the drill bit to settle into the center mark or the indentation from a center punch.
Once the bit is steady, increase your speed and apply consistent, moderate pressure. Avoid forcing the drill. Let the drill bit do the work.
If drilling a deep hole, pull the drill bit out periodically to clear chips and debris. This also helps prevent the bit from overheating. For wood, this clearing action prevents the hole from getting packed with sawdust.
For metal, it removes shavings that can jam the bit.
For larger holes, you might need to drill a pilot hole first. A pilot hole is a smaller hole drilled before the final, larger hole. This guides the larger drill bit and makes drilling easier and more accurate.
Preventing Drill Bit Wander
Drill bit wander is when the drill bit slides off the intended center mark when you start drilling. Using a center punch is the best way to prevent this on hard surfaces.
On wood, you can create a small notch or divot with a knife or awl at the center mark. This gives the drill bit a place to start without slipping. Another trick is to place a piece of masking tape over the center mark.
This can help the drill bit grip better initially.
Always ensure your drill is held perpendicular to the surface. An angled start will result in an angled hole, even if you began at the correct center point.
Real-Life Examples
Many common tasks rely on finding the center of a circle for drilling. Here are a couple of examples where this skill is essential.
- Building a DIY Garden Planter: Imagine you are building a circular wooden planter box for flowers. You need to drill drainage holes in the bottom. If you’re making a circular base for the planter, you might also need to drill a central hole to attach a decorative element or a support. Ensuring these holes are perfectly centered makes the entire planter look professional and function correctly.
- Mounting a Ceiling Fan: When installing a ceiling fan, the mounting bracket often needs to be attached to a central point on a wooden joist or a specific ceiling electrical box. If this box is circular, or if you need to drill a central hole for a wire to pass through, accuracy is key for a secure and balanced installation. A misaligned fan can wobble and be noisy.
Case Study: Crafting a Circular Tabletop
A hobbyist decided to make a custom circular tabletop from a piece of plywood. They wanted to drill a precise hole in the exact center to fit a metal support rod.
First, they used the paper folding method on a paper template of the circle. They folded it in half twice and marked the intersection of the creases. Then, they transferred this center mark to the plywood using a pencil.
For extra security against the drill bit wandering on the wood, they made a small ‘X’ mark.
Using a sharp twist drill bit sized for the rod, they started drilling slowly, ensuring the bit was aligned with the ‘X’. They applied steady pressure and completed the hole. The result was a perfectly centered hole, allowing the metal rod to fit snugly and securely.
This ensured the tabletop was stable and looked good.
Statistic: Importance of Precision in DIY
A survey by a popular DIY magazine found that 65% of home improvement projects that go wrong are due to measurement or cutting errors. Of these errors, a significant portion relates to inaccurate placement of holes or cuts, highlighting how crucial skills like finding the center of a circle for drilling truly are.

Frequently Asked Questions
Question: What is the easiest way to find the center of a circle?
Answer: The paper folding method is often the easiest and quickest for many situations. You just fold the circle in half twice, and where the creases cross is the center.
Question: Can I find the center of a circle without any tools?
Answer: Yes, the paper folding method works without any special tools, only requiring the ability to fold accurately. You can also use string to find measurements, but a ruler or pencil helps significantly.
Question: How do I prevent my drill bit from slipping when drilling a hole in the center?
Answer: Use a center punch to make a small indentation at the marked center point, especially on metal. For wood, making a small ‘X’ mark with a pencil or a shallow notch with a knife helps guide the drill bit.
Question: What if my circle is on a very hard surface like metal?
Answer: For metal, the chord intersection method or tangent line method are precise. Always use a center punch to create a starting dimple for your drill bit, and consider using cutting fluid to keep the bit cool.
Question: Do I need a special drill bit to drill in the center of a circle?
Answer: No, you typically don’t need a special drill bit. Standard twist drill bits work fine for most materials. The key is accurate marking and careful drilling technique.
Summary
You’ve learned several ways to find the center of a circle for drilling. From simple folding to using geometry, these methods ensure accuracy. Always mark your center clearly with a pencil or scriber.
For tough materials, use a center punch. Choose the right drill bit and drill slowly at first. With these steps, your drilling will be perfectly centered every time.