How to Fix a Pull Chain on a Fan: Genius Solution
Don’t let a broken fan pull chain leave you in the heat! This guide offers a genius, beginner-friendly solution to quickly fix your fan’s pull chain, restoring comfort to your home with simple steps and common household items.
Is your ceiling fan stuck on one speed, or worse, won’t turn on at all because of a tricky pull chain? You’re not alone! A malfunctioning pull chain is a super common issue that can be frustrating, especially when the weather heats up. But don’t worry, you don’t need to be an electrician or a handyman to solve this. With a few simple tools and this easy-to-follow guide, you’ll be able to fix your fan’s pull chain and get it working perfectly again. We’ll walk through the process step-by-step, making it simple and stress-free. Get ready to feel the breeze again!
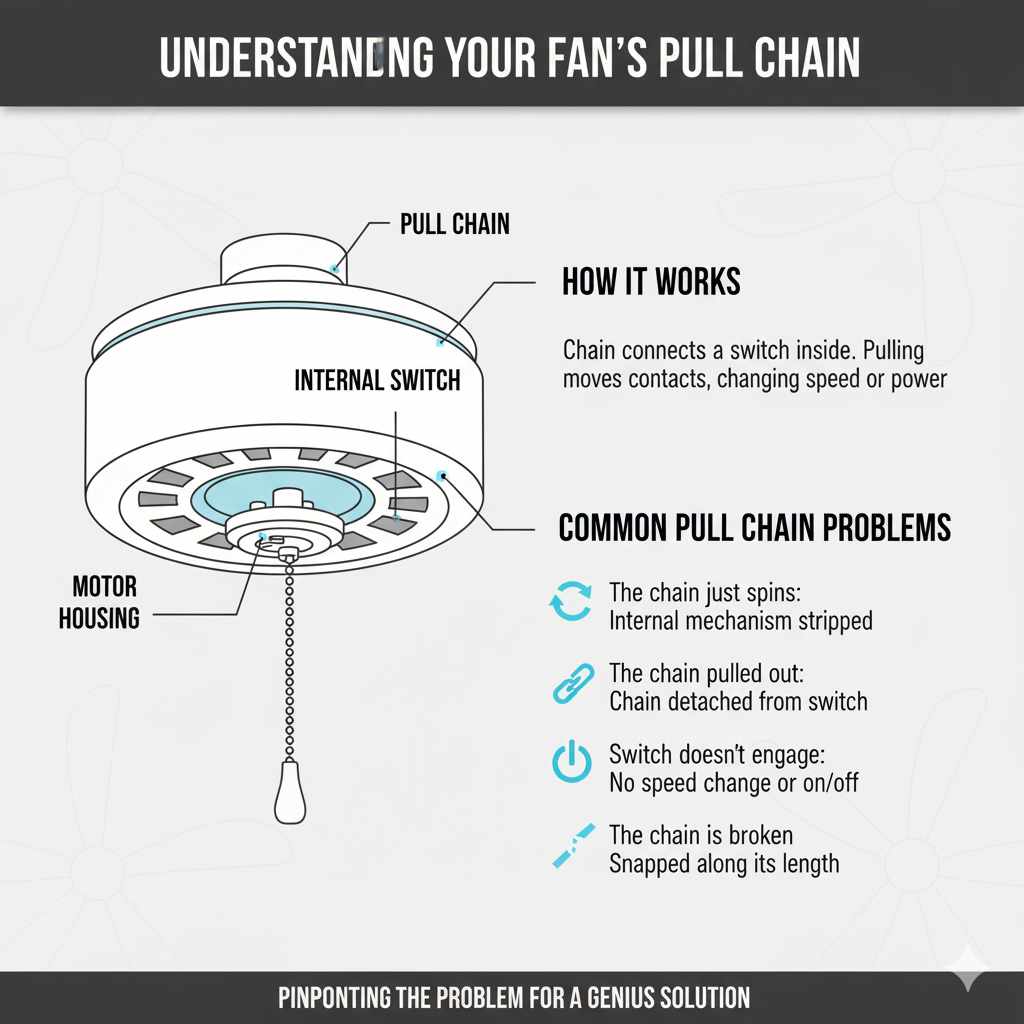
Understanding Your Fan’s Pull Chain
Before we dive into fixing it, let’s quickly understand how these pull chains usually work. Most ceiling fans have a simple mechanism. The pull chain connects to a switch inside the fan’s motor housing. When you pull the chain, it moves a lever or a series of contacts within the switch, changing the fan’s speed or turning it on and off. Over time, the internal parts of the switch can wear out, the chain can break, or the connection can become loose. Knowing this helps us pinpoint the problem and find the right solution.
Common Pull Chain Problems
You might be experiencing a few different issues with your fan’s pull chain:
- The chain just spins: This often means the internal mechanism that grips the chain has stripped or broken.
- The chain pulled out of the switch: The end of the chain might have detached from the switch mechanism.
- The switch doesn’t engage: You pull the chain, but nothing happens – no speed change, no on/off.
- The chain is broken: The chain itself has snapped somewhere along its length.
Tools You Might Need
Gathering your tools beforehand makes the process much smoother. For most fixes, you won’t need much, and you might already have these items around the house:
- Screwdriver set: You’ll likely need a Phillips head and possibly a flathead screwdriver to open the fan’s housing.
- Pliers: Needle-nose pliers are especially handy for gripping small parts and manipulating the chain.
- Wire cutters or strong scissors: If you need to cut the chain or remove a broken piece.
- Replacement pull chain: You can buy these at most hardware stores. They usually come with a connector.
- A small step ladder or sturdy stool: To safely reach the fan.
- Gloves: To keep your hands clean and protected.
- Safety glasses: Always a good idea when working overhead.
Safety First!
Before you do anything, safety is paramount. Working with electrical appliances requires caution. Always remember:
- Turn off the power: This is the MOST important step. Go to your home’s electrical panel (breaker box) and flip the breaker that controls the fan. If you’re unsure which breaker it is, you can turn off the main breaker, but this will cut power to your entire home. It’s best to label your breakers clearly! Double-check that the fan is off by trying to operate it after flipping the breaker.
- Work from a stable platform: Use a sturdy ladder or step stool, ensuring it’s placed on a level surface.
- Don’t rush: Take your time and work deliberately.
For more information on electrical safety, the U.S. Consumer Product Safety Commission offers excellent resources.
Step-by-Step: The Genius Fix for Your Fan Pull Chain
Let’s get this fan working again! We’ll focus on the most common and often the “genius” solution: replacing the pull chain and possibly the switch mechanism.
Step 1: Access the Fan’s Motor Housing
With the power safely turned off, it’s time to get to the heart of the problem. You’ll need to open up the part of the fan where the pull chains emerge.
- Locate the screws: Look for screws around the bottom of the fan’s motor housing, often hidden beneath a decorative cover or near where the blades attach.
- Remove the screws: Carefully unscrew the housing. Keep the screws in a safe place, like a small bowl or magnetic tray, so you don’t lose them. Some fan covers simply snap off or have a twist-lock mechanism, so check your fan’s design.
- Gently lower the cover: Once loose, gently lower the cover. It might be connected by a few wires, but usually, it’s just the pull chain switch inside.
Step 2: Identify the Pull Chain Switch
Inside the housing, you’ll see the wiring and the pull chain switch. This is a small, often plastic, component with a lever or a rotating mechanism that the chain attaches to. You’ll likely see one or more chains coming out of it. If your fan has multiple chains (for light and fan speeds), identify the one you need to fix.
What to look for:
- Broken chain end: See if the chain has simply come unhooked from the switch.
- Damaged switch: Check if the lever or internal mechanism of the switch looks broken or worn.
- Loose connection: Sometimes, the chain can slip off its anchor point.
Step 3: The “Genius” Solution – Replacing the Pull Chain and Switch
The most reliable and often easiest “genius” fix is to replace the entire pull chain switch. These are inexpensive and widely available. While you can sometimes reattach a chain that has slipped off, if the internal mechanism is worn, it will likely happen again soon.
Option A: Reattaching a Dislodged Chain (Temporary Fix)
If the chain has simply popped off its anchor point on the switch’s lever or ball mechanism, you might be able to reattach it.
- Examine the switch: Look closely at the switch. You’ll see where the chain is supposed to connect.
- Use pliers: Gently use your needle-nose pliers to hook the end of the chain back onto the designated spot. Make sure it’s securely attached.
- Test carefully: Before reassembling, briefly turn the power back on at the breaker and test the chain. If it works, turn the power off again and proceed to reassemble. If it slips off again, you’ll need to replace the switch.
Option B: Replacing the Pull Chain Switch (Recommended Long-Term Fix)
This is the most effective and lasting solution for most broken pull chains.
- Identify the switch type: Look at the old switch. It will have a model number or be described by its function (e.g., 3-speed fan switch, 4-wire, etc.). You’ll also note how many wires are connected to it.
- Purchase a new switch: Take the old switch (or a photo of it) to your local hardware store or search online for a replacement. Common types are 3-speed switches for fans and single-pole switches for lights. Ensure you get the correct one for your fan’s configuration. You can find replacements at hardware stores or online retailers like Amazon or dedicated fan parts websites.
- Disconnect the old switch: Carefully note which wire from the fan connects to which terminal on the old switch. You can take a photo or draw a diagram. Then, gently disconnect the wires. They might be attached with small wire nuts or spade connectors.
- Connect the new switch: Attach the wires from the fan to the corresponding terminals on the new switch. Use wire nuts if necessary, ensuring they are twisted on securely. If your new switch comes with a new pull chain, attach it according to the switch’s instructions.
- Attach the new pull chain: If the new switch didn’t come with a chain, or you’re just replacing the chain itself, you’ll need a replacement pull chain. These are usually sold in kits with a connector. Thread the new chain through the switch mechanism and secure it with the provided connector or a small loop.
Important Note on Wire Connections: If you are unsure about wiring, consult a qualified electrician. Improper wiring can be dangerous. For most basic fan switches, the connections are straightforward: incoming power wires connect to one set of terminals, and wires going to the fan motor connect to another. Always ensure wire connections are secure and insulated.
Step 4: Reassemble the Fan Housing
Once the new switch and chain are securely installed and you’ve double-checked all connections:
- Tuck wires neatly: Carefully arrange the wires inside the housing so they don’t get pinched when you put the cover back on.
- Position the cover: Align the fan housing cover with the motor base.
- Secure the cover: Reinstall the screws you removed earlier. Make sure they are snug but don’t overtighten, as this can strip the threads or crack the plastic.
Step 5: Restore Power and Test
Now for the moment of truth!
- Turn power back on: Go back to your electrical panel and flip the breaker back on.
- Test the fan: Gently pull the new chain. Your fan should cycle through its speeds or turn on/off as expected.
Congratulations! You’ve successfully fixed your fan’s pull chain!
When to Consider a Whole New Fan
While fixing a pull chain is usually a straightforward DIY task, there are times when it might be more practical to replace the entire fan:
| Indicator | Reason to Consider Replacement |
|---|---|
| Age and Condition | Fans older than 10-15 years may have outdated electrical components or motor issues that are more costly to repair than replace. |
| Frequent Breakdowns | If you’re constantly fixing the same fan, it’s a sign of underlying problems. |
| Noise or Wobbling | Persistent, loud noises or excessive wobbling can indicate motor wear or balance issues that a new fan would resolve. |
| Energy Efficiency | Newer fans are significantly more energy-efficient, saving you money on electricity bills. The U.S. Department of Energy has great tips on choosing efficient models. |
| Outdated Style | A new fan can also be a great way to update the look of your room. |
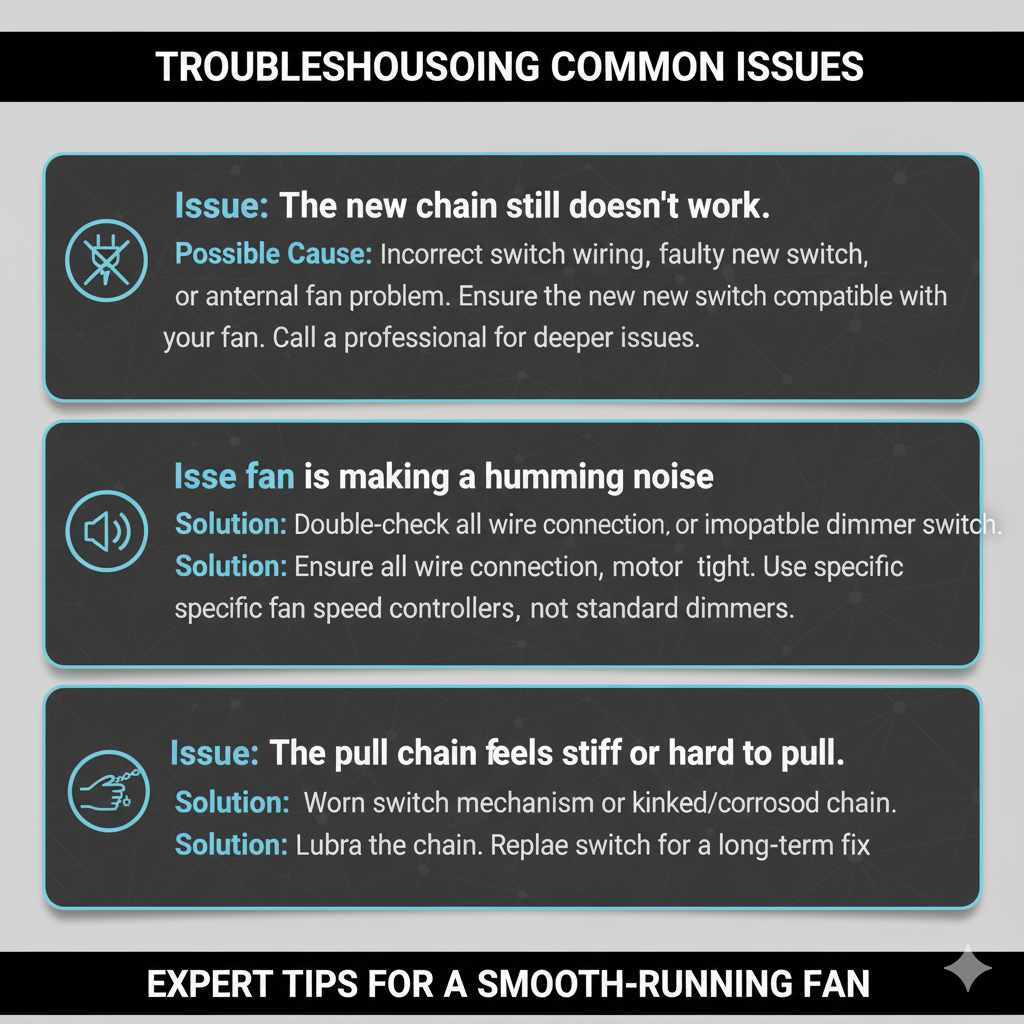
Troubleshooting Common Issues
Even with the best guides, sometimes things don’t go exactly as planned. Here are a few common hiccups and how to handle them:
Issue: The new chain still doesn’t work.
Possible Cause: Incorrect switch wiring, faulty new switch, or another internal fan problem.
Solution: Double-check all wire connections. Ensure the new switch is compatible with your fan. If you’ve followed all steps and it still doesn’t work, the issue might be deeper within the fan’s motor or wiring harness, and it might be time to call a professional or consider a new fan.
Issue: The fan is making a humming noise.
Possible Cause: This can sometimes happen if the switch isn’t making a solid connection or if there’s an issue with the motor. It can also be due to using an incompatible dimmer switch if your fan is connected to one.
Solution: Ensure all wire connections are tight. If the noise persists, it might indicate a motor issue. Fans should not be controlled by standard dimmer switches; they require specific fan speed controllers. Check the manufacturer’s recommendations for your fan model.
Issue: The pull chain feels stiff or hard to pull.
Possible Cause: The internal mechanism of the switch is starting to wear out, or the chain itself is getting kinked or corroded.
Solution: Sometimes, a little lubrication on the chain can help. If it’s the switch, replacing it is the best long-term fix, as mentioned in our “genius solution” steps.
Frequently Asked Questions (FAQ)
Q1: How do I know if I need to replace the pull chain or the whole switch?
A1: If the chain itself is broken or frayed, you might be able to replace just the chain. However, if the chain pulls but nothing happens, or if the chain spins freely without engaging the switch, the internal mechanism of the switch is likely worn out, and replacing the entire switch is the most reliable solution.
Q2: Can I use a regular light switch for my fan pull chain?
A2: No, you should not use a standard light switch. Fan speed switches have specific internal mechanisms to control different motor speeds. Using the wrong type of switch can damage the fan or create a fire hazard.
Q3: How much does a replacement pull chain switch cost?
A3: Replacement pull chain switches are generally very affordable, typically costing between $5 and $20, depending on the type and brand. You can find them at most hardware stores or online.
Q4: My fan has two pull chains – one for the light and one for the fan. How do I know which switch to buy?
A4: You’ll need to identify which chain is for the fan and which is for the light. Often, the fan speed switch has more wires (typically 4 or 5) than a simple light switch (typically 2). It’s best to remove the old switch and take it with you to the hardware store or consult your fan’s manual to ensure you get the correct replacement.
Q5: Is it safe to replace the pull chain switch myself?
A5: Yes, it is generally safe for beginners to replace a pull chain switch, provided you follow the crucial step of turning off the power at the breaker box before starting. If you are uncomfortable working with wiring, it’s always best to consult a qualified electrician.
Q6: My pull chain broke off inside the fan. What should I do?
A6: If the chain broke off inside the switch mechanism, you will almost certainly need to replace the entire pull chain switch. You’ll need to open the fan housing to access and remove the old switch and install a new one.
Q7: How do I attach the new chain to the switch?
A7: Most replacement pull chain switches come with a new chain and a small connector. You typically thread the chain through the switch’s internal mechanism and then use the connector to create a loop or attach the end. Some chains simply loop through a hole in the switch’s lever.
Conclusion
Fixing a broken pull chain on your fan doesn’t have to be a daunting task. By understanding the simple mechanics involved and following these clear, step-by-step instructions, you can confidently tackle this common home repair. Remember, safety is always the first step – always turn off the power before you begin! Whether you’re reattaching a dislodged chain or performing the more robust fix of replacing the entire switch, you’re well on your way to restoring cool air and comfort to your home. This DIY solution not only saves you money but also builds your confidence in handling home maintenance. So, grab your tools, follow these tips, and enjoy a perfectly functioning fan once again!