How to Fix Warped Wood: A Complete Guide to Restoring Your Project
Warped wood can be fixed by using heat or moisture to reverse the warping. Additionally, if the wood is severely warped, it may need to be sanded or planed to restore its flatness.
Warped wood can be a frustrating problem when working with furniture or other wooden structures. Whether it’s a result of moisture, uneven drying, or improper storage, a warped piece of wood is not only visually unappealing but can also affect its functionality.
Luckily, there are several methods to fix warped wood and restore it to its original condition. This article will provide you with simple and effective solutions to straighten and repair warped wood, giving you the confidence to tackle this common issue on your own. Whether you’re a DIY enthusiast or a professional woodworker, these techniques will help you salvage your project and achieve a flawless finish.
Identifying And Assessing Warped Wood
When it comes to working with wood, one of the most frustrating issues that can arise is warped wood. Whether you’re building furniture, installing flooring, or working on a home improvement project, dealing with warped wood can throw a wrench in your plans. The good news is that with the right knowledge and techniques, you can fix warped wood and restore it to its original shape. In this article, we will focus on the first step in the process: identifying and assessing warped wood.
Common Causes Of Warping
Before we dive into the various types of wood warp, let’s first understand the common causes of warping. By identifying the root cause, you can prevent future instances of warped wood. There are several factors that can lead to wood warping:
- Exposure to moisture: Moisture is one of the primary culprits behind wood warping. When wood absorbs moisture unevenly, it can cause the fibers to expand or contract, resulting in warping. This is why it’s crucial to protect wood from excessive moisture or sudden changes in humidity levels.
- Inadequate drying: If wood has not been properly dried before use, it is more prone to warping. This is especially true for freshly cut or green wood, which contains a higher moisture content. Proper drying techniques, such as air-drying or kiln-drying, can help minimize the risk of warping.
- Improper storage: Storing wood in unsuitable conditions can contribute to warping. Exposure to extreme temperatures or direct sunlight can cause the wood to expand or contract, leading to warping. It’s essential to store wood in a controlled environment that maintains stable temperature and humidity levels.

Types Of Wood Warp
Now that we understand what causes wood to warp, let’s discuss the different types of wood warp. By identifying the specific type of warp, you can determine the best course of action to fix it:
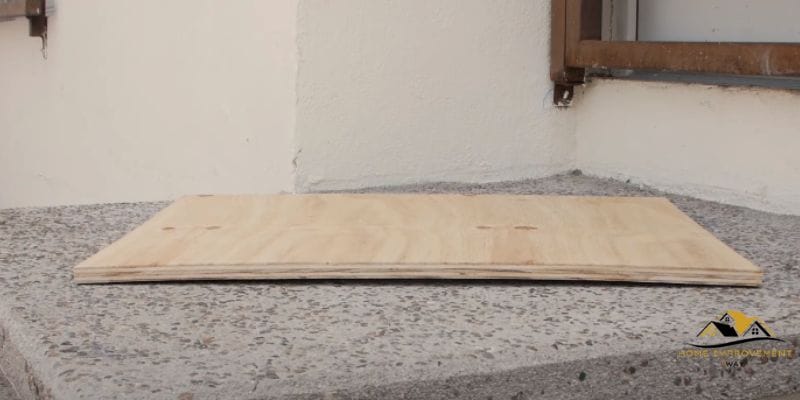
- Bow: Bowing occurs when the wood bends along the length, forming a curve. This type of warp is commonly seen in long, narrow pieces of wood.
- Cup: Cupping happens when the edges of the wood curl up or down, creating a concave or convex shape. Cupping is often caused by moisture imbalance on the surface of the wood.
- Twist: Twisting occurs when the wood warps in a spiraling motion. It can be caused by uneven drying or internal stresses within the wood.
- Crown: Crown is the opposite of cupping, where the center of the wood becomes higher than the edges, forming a convex shape. Uneven shrinkage is a common cause of crown.
Evaluating The Extent Of Damage
Once you have identified the type of wood warp, it’s crucial to evaluate the extent of the damage. This will help you determine whether the wood can be salvaged or if it needs to be replaced. Here are a few indicators to assess the severity of the warp:
- Magnitude: Measure the degree of warp using a straightedge or measuring tape. This will give you a better idea of the amount of correction needed.
- Stability: Check if the wood warp is stable or if it continues to change over time. If the warping is still occurring, it may indicate an ongoing issue that needs to be addressed.
- Structural integrity: Assess whether the warped wood compromises the structural integrity of your project. If it affects the stability or functionality, replacement may be necessary.
By accurately identifying and assessing warped wood, you can proceed with the appropriate steps to fix it. In the next part of this series, we will explore effective techniques for correcting different types of wood warp.
Methods For Fixing Warped Wood
Learn effective methods for fixing warped wood with these easy-to-follow steps. Restore your wood to its original shape and ensure its durability using simple techniques.
Moisture And Heat Technique
One effective method for fixing warped wood is using the moisture and heat technique. By combining moisture and heat, you can coax the wood back into shape. Here’s how you can do it:
- Start by placing a damp cloth directly on the concave side of the wood.
- Then, using an iron set to medium heat, apply gentle pressure on the cloth for a few seconds.
- Make sure to move the iron slowly, allowing the moisture to penetrate the wood fibers.
- Repeat this process multiple times, gradually applying more pressure, until the wood starts to regain its original shape.
- Don’t forget to check the progress regularly to avoid overcorrection.
Humidity And Weight Technique
Another effective technique for fixing warped wood involves using humidity and weight. This method helps to relax the wood fibers, allowing them to straighten out naturally. Here’s how to implement this technique:
- First, find a container or basin large enough to accommodate the warped wood.
- Fill the container with water until it’s about halfway full.
- Place a wire rack or something similar at the bottom of the container to elevate the wood above the water.
- Gently place the warped wood on the rack, ensuring it is evenly supported.
- Cover the container with a plastic sheet to create a humid environment.
- Allow the wood to absorb the moisture for several hours or overnight.
- Afterward, remove the wood from the container and place it on a flat surface.
- Apply weight evenly across the surface of the wood using heavy objects, such as books or weights.
- Let the wood sit under the weight for a few days or until it has straightened out.
Using Clamps And Pressure Technique
The clamps and pressure technique is another effective way to fix warped wood. By applying controlled pressure, you can gradually straighten the wood and reshape it. Here’s how you can use this technique:
- Start by identifying the concave or convex areas of the wood.
- Place suitable-sized wooden blocks on each side of the wood, aligned with the affected area.
- Secure the blocks with clamps, ensuring they firmly hold the wood in place.
- Gradually tighten the clamps, applying gentle pressure.
- Periodically check the wood’s progress, adjusting the clamps if necessary.
- Leave the clamps in place for several hours or days until the wood has straightened out.

Preventing Wood Warping
Wood warping is a common problem that can affect the quality and durability of your woodworking projects. To ensure your wood remains flat and straight, it’s crucial to take preventive measures. In this section, we will discuss two key aspects of preventing wood warping: proper wood selection and preparation, as well as effective storage and handling techniques. Additionally, we’ll explore how applying protective finishes can further safeguard your wood from warping.
Proper Wood Selection And Preparation
Choosing the right type of wood is essential to prevent warping. Different species of wood have varying levels of moisture content and stability. Opting for woods that are naturally more stable, such as oak or maple, can reduce the chances of warping. Additionally, ensure that the wood you select is kiln-dried or properly seasoned to minimize moisture-related issues.
Before you begin working with the wood, it’s crucial to prepare it properly. Start by removing any rough edges, knots, or irregularities that could contribute to warping. This can be done by planing or sanding the wood to create a smooth and even surface. By taking the time to properly prepare your wood, you’re setting the foundation for a warp-free project.
Effective Storage And Handling Techniques
How you store and handle your wood can significantly impact its stability. Improper storage can expose the wood to fluctuating temperatures and humidity levels, leading to warping. To prevent this, store your wood in a well-ventilated area with consistent humidity. Wrapping the wood in plastic or covering it with a tarp can also help maintain moisture balance.
When handling the wood, avoid placing excessive pressure on one spot. Ensure even distribution of weight and support the wood throughout the entire length. This can be achieved by using sturdy sawhorses or clamps. By handling the wood with care, you reduce the risk of causing stress or deformation that can result in warping.
Applying Protective Finishes
Applying protective finishes is another effective way to prevent wood warping. These finishes create a barrier that can protect the wood from moisture absorption, which is one of the primary causes of warping. Consider using finishes such as varnish, lacquer, or paint, depending on your project’s requirements and the type of wood you are working with.
Before applying the protective finish, make sure the wood is clean and free from any dust or debris. Sanding the wood lightly can help create a smooth surface for the finish to adhere to. Apply the finish evenly, following the manufacturer’s instructions. This additional layer of protection can greatly contribute to the long-term stability of your wood, minimizing the risk of warping.
Conclusion
Warping wood can be a frustrating issue, but with the right approach, it can be fixed. By carefully following the steps outlined in this blog post, you can restore the shape of your wood and ensure its durability. Remember to prioritize proper storage, moisture control, and gradual adjustments to prevent future warping.
With these tips in mind, you’ll be able to tackle any warped wood project with confidence and ease. Happy woodworking!


