How to Install a Larson Storm Door Handle
Fixing your storm door can feel like a big job, especially when it’s a part you use every day like the handle. Many people wonder How to Install a Larson Storm Door Handle because they think it might be complicated or require special tools. But don’t worry!
We’re here to show you that it’s actually quite simple. With just a few common items and our easy-to-follow steps, you’ll have your new handle in place in no time. Let’s get started on making your storm door work like new again.
Replacing Your Larson Storm Door Handle
This guide will walk you through the process of replacing your Larson storm door handle. We’ll cover everything from understanding why your handle might need replacing to making sure your new one is installed correctly. This section will help you identify the parts you need and prepare for the installation.
We aim to make this a straightforward task for anyone.
Why Replace Your Storm Door Handle
Storm door handles can wear out over time due to regular use and exposure to the elements. The metal might corrode, the springs can become weak, or the handle itself might break. Sometimes, a handle might just become loose and wobbly, making it hard to open or close the door smoothly.
Replacing a damaged or worn-out handle improves your door’s functionality and appearance. It also ensures the safety and security of your home by keeping the storm door properly latched.
A loose handle can be more than just annoying; it can be a security risk. If the latch mechanism is not fully engaging because of a faulty handle, your storm door might not stay securely closed. This could leave your main door more vulnerable.
Also, a broken handle can be a safety hazard, especially if it has sharp edges or breaks off unexpectedly, potentially causing injury.
-
Wear and Tear
Handles are touched hundreds of times a year, leading to gradual wear. The constant pushing, pulling, and turning can loosen screws, weaken internal mechanisms, or even cause the handle material itself to degrade. Over years of use, this is completely normal.
-
Corrosion and Weather Damage
Storm doors are exposed to rain, sun, and temperature changes. This can cause metal handles to rust or corrode, making them stiff or brittle. Plastic parts might become faded and weak from UV exposure, eventually cracking.
-
Accidental Damage
Sometimes, a handle can be damaged by accident. A strong gust of wind slamming the door, an object falling against it, or even rough handling can break or bend a handle, making it unusable.
Gathering Your Tools and Supplies
Before you start, make sure you have all the necessary tools and your new Larson storm door handle. Having everything ready will make the job go much faster and smoother. You don’t want to be halfway through and realize you’re missing a key item.
The exact handle you need will depend on your specific Larson storm door model. Most Larson handles come with a kit that includes the necessary screws and parts for installation. If you’re unsure which handle to buy, it’s a good idea to check the model number on your existing door or consult the Larson website or a hardware store specialist.
Having the correct handle is the first step to a successful replacement.
You will likely need a few basic tools. A Phillips head screwdriver is essential, as most storm door handles use Phillips screws. You might also need a flathead screwdriver for prying or loosening tight parts.
Some installations may require a drill with appropriate bits, especially if pilot holes need to be made or existing ones need reaming. A measuring tape can be helpful if you need to confirm screw hole spacing, though this is often standard.
- Phillips Head Screwdriver
This is your primary tool for removing old screws and installing new ones. Ensure it fits snugly into the screw heads to avoid stripping them.
- Flathead Screwdriver
A flathead screwdriver can be useful for gently prying open trim pieces or dislodging stubborn screws. Use it carefully to avoid scratching surfaces.
- Pliers (Optional)
Sometimes, old screws can be difficult to turn. Pliers can provide extra grip to help loosen them. They can also be useful for holding small parts.
- New Larson Storm Door Handle Kit
Make sure the kit is compatible with your door. It should include the handle, spindle, screws, and any necessary mounting plates or gaskets.
Step-by-Step Guide: How to Install a Larson Storm Door Handle
This section offers a detailed, easy-to-follow guide on how to install a Larson storm door handle. We will break down the process into simple, manageable steps. Our aim is to ensure that anyone, regardless of their DIY experience, can successfully complete this task.
Follow these steps carefully to get your storm door handle working perfectly.
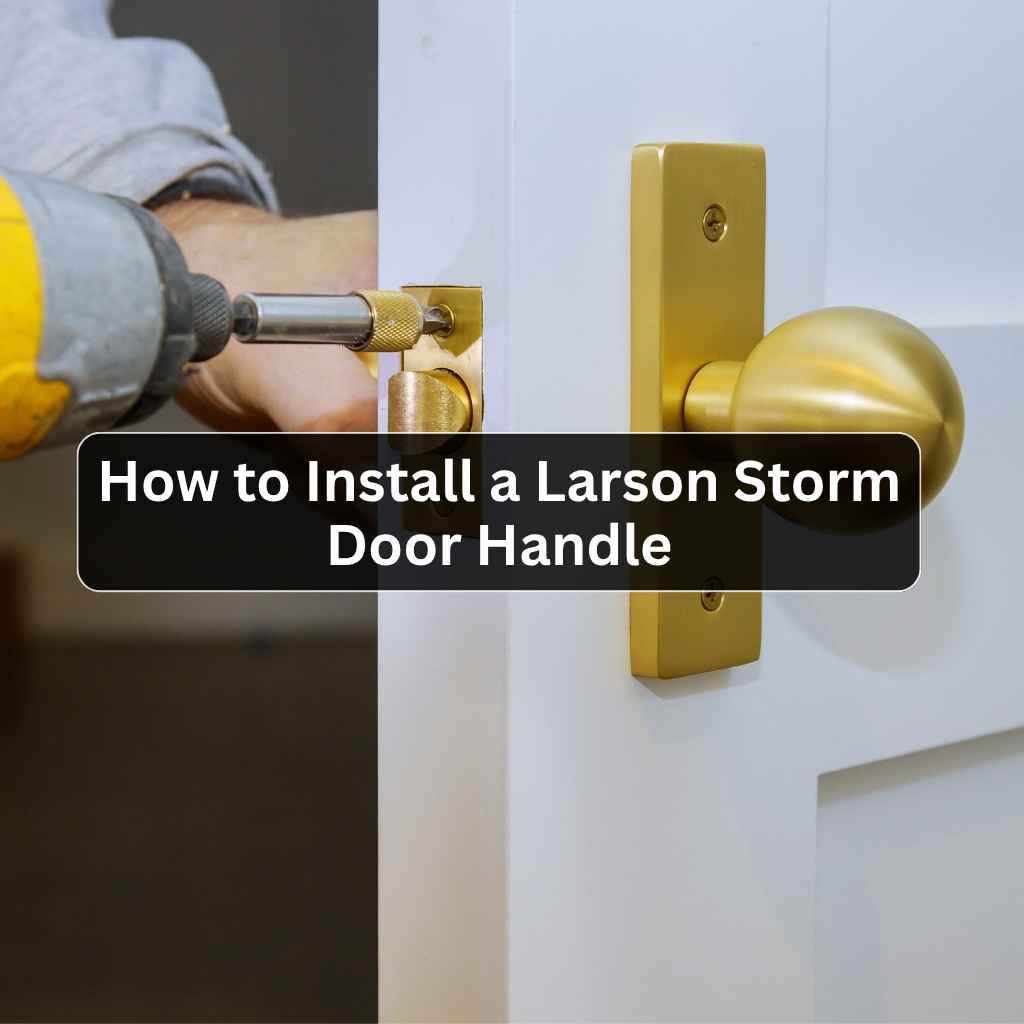
Removing the Old Door Handle
The first major step is to carefully remove the old handle from your storm door. This usually involves unscrewing the handle from both sides of the door. Take note of how the screws are positioned and any other parts that come off with them.
This will make putting the new handle on much easier.
Most storm door handles are attached with two long screws that go all the way through the door’s frame. You will typically find these screws on the interior side of the door. Once you’ve identified them, use your Phillips head screwdriver to turn them counter-clockwise.
Be patient, especially if the screws are a bit stiff or corroded. If they are difficult to turn, a small amount of penetrating oil might help, but be sure to wipe away any excess afterward.
As you unscrew, the handle components on both the inside and outside of the door will begin to loosen. It’s a good idea to have someone help you hold the handle parts in place as you remove the last screw. This prevents them from falling and potentially getting lost or damaged.
Once all screws are removed, you should be able to pull the old handle assembly away from the door. Pay attention to any gaskets or plates that were between the handle and the door frame, as these will need to be reinstalled or replaced.
- Locate the screws on the interior side of the storm door.
These are typically located on the edge of the door that faces inward when the door is closed. You’ll usually see two screws that run through the door’s core to hold the exterior handle in place.
- Use a Phillips head screwdriver to remove the screws.
Turn the screws counter-clockwise. Apply steady pressure to avoid stripping the screw heads. If they are tight, a gentle wiggle of the screwdriver might help break them free.
- Remove the old handle assembly.
Once the screws are out, the exterior handle and interior mechanism should be loose. Carefully pull them away from the door. You might need to gently pry if they are stuck.
- Keep track of any small parts.
There might be small gaskets, washers, or mounting plates. Set these aside in a safe place so you don’t lose them, especially if you plan to reuse them.
Installing the New Larson Storm Door Handle
Now it’s time to put on your new Larson storm door handle. This part is usually even simpler than taking off the old one. You’ll be essentially reversing the steps you just took, but with new parts.
First, check if your new handle kit comes with a new spindle. This is the rod that connects the interior and exterior handles. Make sure it’s the correct length for your door’s thickness.
Some handles have adjustable spindles, while others are fixed. Insert the spindle through the hole in your storm door. Ensure it is oriented correctly so that it will operate the latch mechanism when the handles are turned.
Next, align the exterior handle with the spindle and the screw holes on the door. Then, position the interior handle on the opposite side, making sure its spindle also lines up with the hole. You might need to gently twist the spindle or the interior handle slightly for a perfect fit.
Once everything is aligned, insert the new screws provided in your kit through the interior handle and into the exterior handle or spindle.
As you tighten the screws, ensure the handles are straight and that there’s no binding or excessive force needed. Tighten them evenly on both sides. Don’t overtighten, as this can damage the door or the new handle.
Once the screws are snug, test the handle to see if it operates smoothly and engages the latch correctly. If it feels stiff, loosen the screws slightly and try again.
Here’s a common scenario:
- Prepare the new handle components.
Lay out the new handle, spindle, and screws. If there are any gaskets or mounting plates, identify where they go.
- Insert the spindle through the door.
The spindle usually goes through a pre-drilled hole in the edge of the door. Make sure it’s facing the right direction.
- Attach the exterior handle.
Align the exterior handle over the spindle and with the screw holes. If your door has a specific cutout for the handle, ensure it fits snugly.
- Attach the interior handle.
Place the interior handle on the opposite side, guiding the spindle into its corresponding slot. Line up the screw holes.
- Insert and tighten the new screws.
Use your Phillips head screwdriver to secure both handles. Tighten them gradually and evenly.
- Test the handle’s function.
Turn the handle to ensure it operates the door’s latch smoothly. Check that it retracts and extends properly.
Troubleshooting Common Issues
Even with the best instructions, you might run into a small snag. Don’t worry, most problems are easy to fix. This section covers common issues you might face and how to resolve them.
A little patience goes a long way when fixing things around the house.
One frequent problem is that the new handle feels loose after installation. This usually means the screws aren’t tight enough. Double-check that all screws are fully tightened, but avoid overtightening, which can strip the threads or crack plastic parts.
If the screws keep loosening, check if there are washers that might have been missed. Sometimes, the pre-drilled holes in the door itself might be a bit worn, and slightly larger screws or a bit of wood filler can help secure them better.
Another issue could be that the handle operates stiffly or doesn’t fully engage the latch. This often points to misalignment. Ensure the spindle is straight and correctly inserted into both the interior and exterior handles.
Check that the handles themselves are flush against the door and not at an angle. If the door frame is slightly warped, it can put pressure on the mechanism. Gently loosen the screws a quarter turn and see if the stiffness reduces.
Then, re-tighten them evenly.
If you find that the new handle doesn’t fit quite right, it might be that you have the wrong handle model for your door. Always verify the compatibility before purchasing. Sometimes, minor adjustments to the door frame or the handle itself might be needed, but this should be a last resort and done with care.
- Handle is loose
Ensure all screws are tightened evenly. If the holes are stripped, consider using slightly larger screws or wood filler for a secure fit.
- Handle operates stiffly
Check for proper alignment of the spindle and handles. Loosen screws slightly and re-tighten evenly. Ensure the door frame isn’t binding the mechanism.
- Latch does not engage fully
Verify the spindle is correctly seated. Ensure the handles are properly aligned and flush with the door. Misalignment is the most common cause.
- New handle doesn’t fit
Confirm you have the correct model for your Larson storm door. Some minor adjustments might be possible, but always prioritize the correct fit.
Maintaining Your Storm Door Handle
After successfully installing your new Larson storm door handle, it’s important to know how to keep it in good working order. Proper maintenance ensures your handle lasts longer and continues to function smoothly. These simple tips will help you care for your storm door hardware.
Regular cleaning is key to preventing corrosion and wear. Wipe down the handle with a soft, damp cloth to remove dirt and grime. For tougher spots or minor oxidation, you can use a mild soap and water solution.
Avoid abrasive cleaners or harsh chemicals, as these can damage the finish and the material of the handle. After cleaning, dry the handle thoroughly with a soft cloth to prevent water spots.
Periodically, you should check the tightness of the screws holding the handle in place. Over time, vibrations from the door or general use can cause them to loosen slightly. A quick check every few months and a gentle tighten if needed can prevent the handle from becoming wobbly.
This simple step can save you from needing to replace the handle again prematurely.
Lubrication is also beneficial, especially for the internal latch mechanism that the handle operates. A small amount of silicone-based lubricant applied to the moving parts of the latch can ensure smooth operation. Do not use oil-based lubricants, as they can attract dirt and dust, which can gum up the mechanism over time.
Applying lubricant directly to the handle itself isn’t usually necessary unless you notice it squeaking or sticking.
- Regular Cleaning
Wipe the handle with a damp cloth frequently. This removes dirt, salt, and other elements that can cause damage or wear.
- Check Screw Tightness
Every few months, ensure the handle screws are snug. A loose handle can lead to more significant problems down the line.
- Gentle Lubrication
Apply a light silicone spray to the latch mechanism if it feels stiff. This keeps the moving parts working smoothly without attracting debris.
- Inspect for Damage
Keep an eye out for any signs of wear, cracks, or corrosion on the handle. Addressing small issues early can prevent larger problems.
Frequently Asked Questions
Question: How do I know if I have the right replacement handle for my Larson storm door?
Answer: Check your existing door for a model number or look for identifying marks. You can also consult the Larson website or contact their customer support with your door’s details. Bringing a picture of your current handle to a hardware store can also help in finding a match.
Question: Can I install a Larson storm door handle myself?
Answer: Yes, absolutely. The process is designed to be straightforward and typically only requires basic tools like a screwdriver. Our step-by-step guide makes it easy for most homeowners to do it themselves.
Question: What if the new handle screws don’t seem to fit the old holes?
Answer: Sometimes the new screws are a slightly different size. If the holes are too large, you might need to use wood filler or a dowel rod to secure them. If they are too small, slightly larger screws of the same type might work.
Ensure you are using the screws provided in the new handle kit first.
Question: My old handle had a lock. Does the new one need a lock too?
Answer: That depends on the
Question: How often should I lubricate my storm door handle?
Answer: You typically only need to lubricate the latch mechanism, not the handle itself, if it feels stiff or noisy. A light spray of silicone lubricant once or twice a year, or as needed, is usually sufficient. Avoid over-lubricating.
Summary
You’ve learned how to install a Larson storm door handle with confidence. From identifying the need for a replacement to gathering tools and completing the installation, the steps are clear and achievable. By following these simple instructions, you can easily improve your storm door’s function and appearance.
Enjoy your newly working door!