How to Install Ceiling Fan With Remote: Easy DIY Guide
Installing a ceiling fan with a remote is straightforward. It enhances comfort and offers convenience.
With some basic tools and patience, anyone can do it. Ceiling fans are a great addition to any room. They help circulate air, making spaces more comfortable. Adding a remote control to your fan can make using it even easier.
Imagine changing fan speeds or turning on lights without getting up. Sounds good, right? Many people hesitate to install a fan themselves. They fear it’s too complicated. But it doesn’t have to be. With clear instructions and the right tools, installation is simple. This guide will walk you through each step. By the end, you’ll have a fan that keeps you cool and is easy to control. Let’s get started!
Choosing The Right Ceiling Fan
Ceiling fan size matters a lot. Small rooms need small fans. Big rooms need big fans. Measure your room first. Large fans cool better in large spaces. Small fans fit well in cozy rooms. The right fan size makes a big difference. It helps in cooling and decoration.
Energy-efficient fans save money. Look for fans with good energy ratings. They use less power. This means lower electric bills. Better for the environment too. Many fans come with energy-saving features. They have efficient motors and smart designs. Choosing these fans is smart. It helps both your wallet and the planet.
Tools And Materials Needed
Gather the essential tools and materials for installing a ceiling fan with a remote. You’ll need a ladder, screwdriver, wire stripper, and a voltage tester. Include the fan, remote control, mounting bracket, and light bulbs if applicable. Ensure safety by checking all parts before starting installation.
Essential Tools
A screwdriver is important. It helps tighten screws. Use a drill for holes. A ladder is needed to reach the ceiling. Wire cutters help with wires. A voltage tester checks for safety. Tape measure helps measure things. You need pliers for gripping. Wrench tightens bolts. Safety glasses protect your eyes.
Additional Supplies
Mounting brackets hold the fan. Wire connectors join wires. Screws attach parts. Electrical tape wraps wires. Ceiling fan kit includes fan and remote. Batteries power the remote. Light bulbs for fan lights. Instruction manual for guidance. Decorative covers for style. Remote control holder keeps remote safe.
Safety Precautions
Always turn off the power at the circuit breaker. This prevents electric shocks. Use a voltage tester to check wires. Ensure they are not live. Double-check the wires before touching. Never handle electrical parts with wet hands. Wet hands can cause shocks. Keep a safe distance from open wires. Use insulated tools for safety. Insulated tools protect from electric currents.
Set the ladder on a flat surface. This keeps it stable. Make sure the ladder is not wobbly. Ask someone to hold the ladder base. This adds extra support. Never stand on the top step. It is risky and unsafe. Always face the ladder while climbing. Keep three points of contact at all times. This helps balance and prevents falls.

Credit: diy.stackexchange.com
Preparing The Installation Site
Ensure the ceiling has strong support. The fan needs a secure base. Check the joists and brackets. Use a stud finder to locate them. If the support is weak, reinforce it. This prevents accidents. Safety first!
Remove items from the room. This includes furniture and decor. Give yourself space to work. Clean the floor and ceiling. Dust can cause problems. A clear area helps you move easily. Organize your tools nearby. Ready to begin!
Installing The Mounting Bracket
First, hold the bracket up to the ceiling. Make sure it fits well. Use screws to secure it tightly. It should not move. A loose bracket can be dangerous. Use a screwdriver to tighten the screws.
Check that the bracket is level. Use a level tool for this. The fan will not work well if it’s not straight. A crooked fan can wobble. Always double-check your work.
Align the bracket with the ceiling hole. This is where the wires come out. Make sure all wires are free. They should not get pinched. Pinched wires can cause problems later.
Double-check the alignment. Ensure the fan will hang straight. A well-aligned fan looks better. It also works better. Proper alignment is important for safety too.

Credit: www.youtube.com
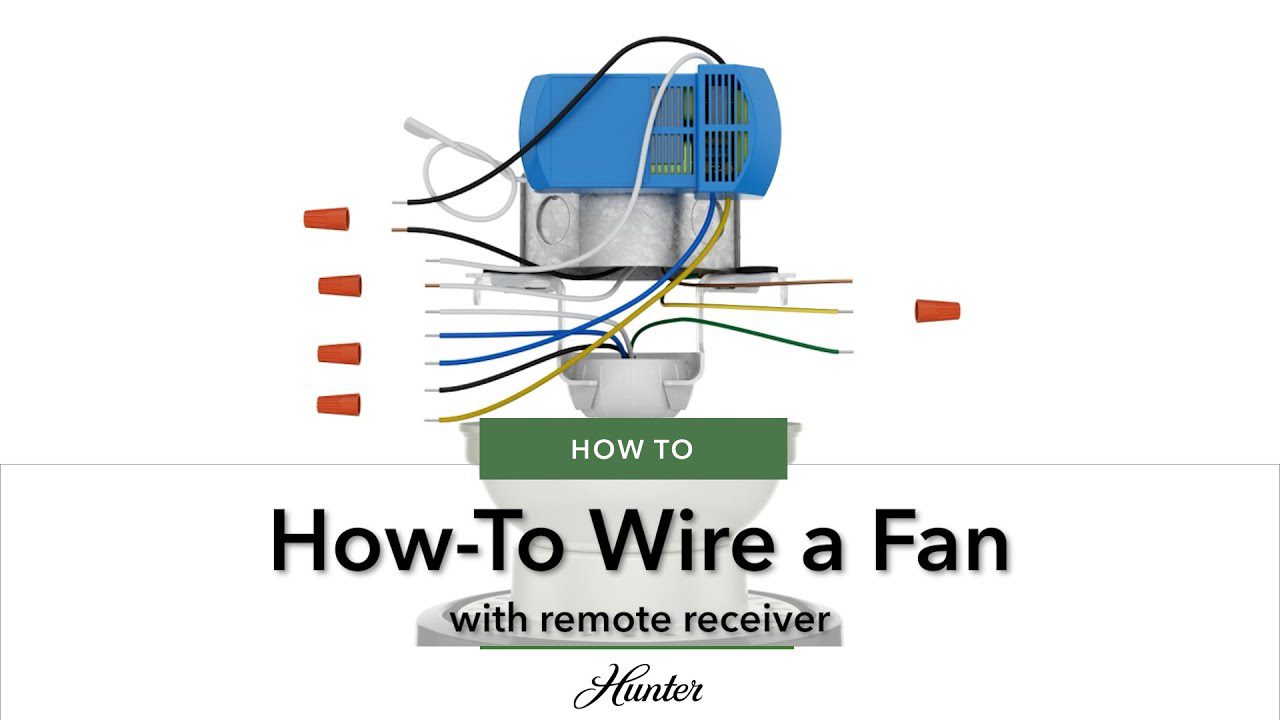
Wiring The Ceiling Fan
First, turn off the power. Next, find the black, white, and green wires. Match these wires to the ones in the ceiling. Black to black. White to white. Green to green. Twist them together tightly. Use wire nuts to keep them safe. Check each wire. Make sure they are secure.
Secure all wires with electrical tape. Wrap the tape around the nuts. This keeps them tight. Test each wire. Pull gently. They should not come apart. Look for loose ends. Cut them if needed. Keep the area clean. No wires should stick out. Make sure everything is neat.
Attaching Fan Blades And Light Kit
Fan blades should be attached securely. Use screws to fasten each blade. Make sure they are tight. Loose screws can cause wobbling. Wobbling fans can be noisy and unsafe. Blades must be balanced for smooth operation. Follow the instructions from the fan box. Different fans might have different methods. Check the balance after installation. Balanced blades make the fan work better. This is important for safety and efficiency.
Most fans come with a light kit. Attach the light kit under the fan. Use the provided screws. Connect the wires carefully. Follow the colors of the wires. Black to black, white to white. Use wire nuts for safety. Make sure the lights are secure. Test the lights before finishing. Lights should work before sealing the fixture. This ensures everything is connected well.
Setting Up The Remote Control
First, find the small pairing button on the remote. It might be inside the battery compartment. Press this button for a few seconds. The fan will make a sound or light up. This shows the remote is ready to pair.
Turn the fan on with the wall switch. Press the power button on the remote. The fan should start. If not, try pairing again. Make sure the fan and remote have power. Check batteries if needed.
Test all the buttons on the remote. Try changing the fan speed. Try turning the light on and off. Ensure the fan responds to each command. If something doesn’t work, check the instructions. Re-pair the remote if necessary.
Final Checks And Adjustments
Conduct a final inspection to ensure all parts are secure and aligned. Test the remote’s functionality and fan settings. Make necessary adjustments for optimal performance and safety.
Balancing The Fan
Balancing is important. A wobbly fan can be noisy. Check the blades. They should be even. Use a balancing kit if needed. Kits have weights. Weights can fix the wobble. Follow the kit instructions carefully.
Ensuring Stability
Stability is key. Make sure the mounting bracket is tight. Use a screwdriver. Tighten any loose screws. Check the fan’s downrod. It should be snug. A loose downrod can cause problems. Inspect the remote control. It should work smoothly. Test all buttons. Ensure the fan responds well. Adjust as necessary for perfect operation.
Troubleshooting Common Issues
Installing a ceiling fan with a remote can be tricky. Check the wiring connections and remote settings first. Ensure the fan blades are balanced to avoid wobbling.
Remote Control Problems
The remote may not work due to batteries. Check if they are in place. Replace old batteries with new ones. Ensure the remote is pointed at the fan. There should be no obstacles between the remote and the fan. The fan’s receiver might be faulty. Reset the remote by turning off the fan. Wait for a few seconds, then turn it back on. Sometimes, a simple reset can fix the issue.
Noise And Vibration
A fan may make noise if it is imbalanced. Check the blades. Ensure all are tightened well. Loose parts can cause vibrations. Use a screwdriver to fix loose screws. Sometimes, a fan is noisy because of dirt. Clean the blades and motor. Dust can cause the fan to wobble. Use a soft cloth for cleaning. Make sure to turn off the fan before cleaning.
Frequently Asked Questions
How Do You Hook Up A Ceiling Fan With Remote Control?
To install a ceiling fan with remote control, connect the wires according to the manual. Attach the remote receiver to the fan. Secure the fan to the ceiling. Test the remote for functionality. Ensure the fan blades are balanced for smooth operation.
Follow safety precautions during installation.
What Do I Do With The Red Wire When Installing A Ceiling Fan With Remote?
Connect the red wire to the ceiling fan’s light kit if it has one. Use a wire nut for safety. If your fan doesn’t have a light, cap the red wire with a wire nut to prevent electrical hazards. Always ensure connections are secure before turning on the power.
Does A Remote-controlled Ceiling Fan Need A Wall Switch?
A remote-controlled ceiling fan doesn’t require a wall switch. It operates using a handheld remote. You can still install a wall switch for manual control if preferred. This setup offers flexibility and convenience for easy fan operation.
Can A Ceiling Fan With Remote Be Wired To Two Switches?
Yes, you can wire a ceiling fan with remote to two switches. Use a dual switch setup for separate light and fan control. Ensure compatibility with the fan’s wiring and remote system. Consult an electrician if unsure for safe installation.
Conclusion
Installing a ceiling fan with a remote is straightforward. Follow the steps carefully. Ensure all tools and parts are ready. Turn off the electricity before starting. Connect the wires as instructed. Secure the fan tightly to avoid wobbling. Test the fan and remote functions.
Make sure everything works properly. Enjoy the comfort and energy savings. A ceiling fan adds value to any room. It’s a practical and stylish upgrade. With patience and attention, anyone can do it. Now, stay cool and relaxed in your refreshed space.