How to Install a Ceiling Light Mounting Bracket in 6 Steps
Turn off power at the breaker, then screw the mounting bracket into the ceiling electrical box before connecting the fixture wires. A bracket rated below the fixture weight can pull loose and drop a light within weeks of installation. This guide covers preparation, wiring by color, and testing the finished installation in about one hour.
Preparation And Tools
Best Electrical Tool Kit Pick
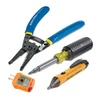
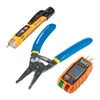
Klein Tools 80018P 4-Piece Residential Tool Kit – $51.99
Covers the voltage tester and wire stripper this guide lists in the Preparation and Tools section before you touch any wiring.
- Best for: A complete kit for the full bracket installation
- Why we picked it: Includes the voltage tester and wire stripper this guide’s prep list calls for
- Main drawback: Pricier than buying a single tool
Compare more ceiling bracket installation tool options
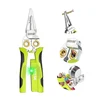
 Option 1 FAITIO Wire Stripper with Voltage Tester – $14.99
|
 Option 2 Klein Tools 80041 Outlet Repair Tool Kit – $59.72
|
 Option 3 SEESE 8-in-1 Wire Stripper with Voltage Tester – $15.19
|
As an Amazon Associate we earn from qualifying purchases.
Collect the right tools for the job. You will need a screwdriver. A drill is helpful too. Make sure you have screws and anchors. Get a ladder. It should be sturdy. Have a tape measure. Check if the wiring is new. You might need a voltage tester. A pencil is useful for marking.
Safety is very important. Turn off the electricity. Use the main switch. Wear safety goggles. Protect your eyes. Have a partner to help. Check your ladder. It must be stable. Ensure the tools are safe. No broken tools allowed. Keep your work area clean. Avoid tripping hazards. Test the light fixture before installing. Ensure proper insulation.
Removing The Old Fixture
First, find the circuit breaker for the light. Turn it off. This stops any electricity flow. It’s safer this way. You won’t get a shock. Check the light switch. Make sure the light is off. Double-check the circuit breaker.
Use a screwdriver to remove the old fixture. Hold the fixture carefully. It might be heavy. Slowly pull it away. You will see some wires. They connect to the ceiling. Loosen the wire nuts. Now, gently separate the wires. Remember how they connect. This will help later. Keep everything organized.
Installing The Mounting Bracket
Find the center of the ceiling. This is where the light will hang. Hold the bracket up to the ceiling. Use a pencil to mark the screw holes. Make sure the bracket is straight. Use a level if you have one. Check the marks again to be sure.
Pick up a screwdriver. Use it to drive screws into the ceiling. Tighten the screws until the bracket is firm. Check if the bracket wiggles. If it moves, tighten the screws more. Be careful not to over-tighten them. Ensure the bracket stays in place.
Connecting Electrical Wires
Identifying Wire Colors is very important. Black wires carry power. White wires are neutral. Green or bare wires are for grounding. Each wire color has a job. It helps keep you safe. Always check the color before connecting.
Using Wire Connectors is easy. They keep wires together. Twist wires before connecting. Use wire connectors to secure them. Make sure they fit tight. Check them again for safety. Loose wires can be dangerous.
Attaching The New Light Fixture
Begin by holding the light fixture close to the ceiling. Make sure all wires are not tangled. Align the holes of the fixture with those on the mounting bracket. Check that the fixture is straight. This will ensure the light hangs properly. If needed, adjust the position. Proper alignment is important for safety.
Use a screwdriver to tighten the screws. Make sure each screw is secure. Do not leave any screw loose. Tight screws help keep the fixture in place. Ensure all screws are equally tight. Double-check each screw for safety. Your light fixture should now be firmly attached.
Testing The Installation
Turn the power back on at the main circuit breaker. Ensure all switches are in the off position first. Safety is key. Check if power is restored by turning on a small device. A lamp is a good choice. If it works, power is back.
Switch on the newly installed ceiling light. Observe if the light turns on smoothly. Watch for flickering or buzzing sounds. These are signs of issues. If everything works fine, the installation is successful. Make sure the light stays on without problems.
Troubleshooting Common Issues
Flickering lights can be annoying. It might mean a bulb is loose. Tighten the bulb carefully. Sometimes, the bulb is not the problem. Check the power supply. Make sure wires are secure. A bad connection can cause flickering. Replace any damaged wires. Consult an electrician if unsure. Safety is important. Don’t touch wires with wet hands.
Loose connections are common. They can make lights not work well. Turn off the power first. Inspect all wire connections. Make sure they are tight. Use a screwdriver to secure them. Loose wires can be dangerous. Double-check each connection. Replace any worn-out parts. Seek help if needed. Always prioritize safety.
Frequently Asked Questions
What Tools Are Needed For Installation?
You’ll need a screwdriver, drill, wire stripper, and pliers. A voltage tester ensures safety. Ensure your ladder is sturdy for access. Having a tape measure helps with precise positioning. Gather all tools before starting the installation to streamline the process.
Safety goggles are recommended to protect your eyes from debris.
How Do I Ensure Safety During Installation?
Turn off power at the circuit breaker before starting. Use a voltage tester to confirm the wires are dead. Ensure your ladder is stable and positioned securely. Wear safety goggles to protect your eyes from debris. Follow instructions carefully to avoid mistakes.
Double-check all connections to prevent electrical hazards.
Can I Install A Bracket On Any Ceiling?
Most ceilings can accommodate light brackets, but check the material. Drywall, plaster, and wood are suitable for installation. Ensure the bracket’s weight matches the ceiling’s load capacity. Consult a professional if unsure about structural integrity. Some ceiling types may require specific anchors for secure installation.
How Long Does The Installation Process Take?
The installation typically takes about one to two hours. This includes preparing tools and materials. Time may vary based on experience and ceiling type. Complex setups or unfamiliarity can extend the duration. Ensure all tools are ready to streamline the process.
Allocate extra time for troubleshooting any issues.
Conclusion
Installing a ceiling light mounting bracket can seem tricky. But it’s manageable with the right steps. Gather your tools and follow the instructions. Safety is key, so turn off the power first. Keep the bracket secure and stable. Check the fit of the light before finalizing.
Enjoy the new look and light in your room. Practice makes the process easier over time. Soon, you’ll find yourself more confident with DIY projects. Remember, patience and attention to detail lead to success. Happy lighting!
Sponsored / affiliate links. As an Amazon Associate I earn from qualifying purchases. I may earn additional commission from eligible campaigns.