
How to Install a Chandelier on a High Ceiling
Hey there! So, you’ve got your eyes on a gorgeous chandelier, but that high ceiling in your home is making you second-guess how to get it up there safely and securely. I totally get it—those soaring ceilings are stunning, but they can feel intimidating when it’s time to install something as elegant as a chandelier. Don’t worry, though! I’ve tackled this project myself, and I’m excited to walk you through every step of the process.
Whether you’re a DIY enthusiast or just curious about how it’s done, this guide is packed with practical tips to make your chandelier installation smooth and stress-free. Let’s dive in and turn your high-ceiling space into a showstopper!
Why Install a Chandelier on a High Ceiling?
High ceilings are a dream feature in any home. They make rooms feel grand, airy, and luxurious. But without the right lighting, that space can feel empty or even a little cold. A chandelier is the perfect solution. It draws the eye upward, fills the room with warmth, and adds a touch of sophistication. I remember standing in my living room, staring at my 20-foot ceiling, thinking, “This needs something special.”
That’s when I decided a chandelier was the way to go. Not only does it light up the space, but it also becomes a conversation piece. Plus, installing one yourself can save you hundreds of dollars compared to hiring a professional.
Tools and Materials You’ll Need
Before we get started, let’s gather everything you’ll need. Having the right tools and materials on hand makes the process so much easier. Here’s a list I put together based on my own experience:
| Item | Purpose |
|---|---|
| Chandelier | The star of the show! Make sure it’s rated for your ceiling height. |
| Ladder or scaffolding | To safely reach the high ceiling. Rent scaffolding for extra stability. |
| Voltage tester | To ensure the power is off before working with wires. |
| Wire cutters/strippers | For preparing the electrical wires. |
| Screwdrivers (Phillips and flat) | For securing the mounting bracket and chandelier. |
| Drill with bits | For installing anchors or drilling new holes if needed. |
| Ceiling medallion (optional) | To cover any gaps or add a decorative touch. |
| Wire nuts | To connect the chandelier wires to your home’s wiring. |
| Chain or rod kit | To adjust the chandelier’s height for your ceiling. |
| Helper | Trust me, an extra pair of hands is a lifesaver! |
I learned the hard way that skipping even one of these can slow you down. For example, I didn’t have a voltage tester at first and had to double-check the breaker multiple times. Save yourself the hassle and grab everything before you start.
Safety First: Preparing for the Installation
Installing a chandelier on a high ceiling isn’t just about aesthetics—it’s about staying safe. Working at heights and dealing with electricity can be risky if you’re not careful. Here’s how I made sure everything went smoothly:
First, turn off the power at your circuit breaker. Don’t just flip the light switch—go to the breaker box and shut off the circuit for the room you’re working in. Use a voltage tester to confirm the wires are dead. I can’t stress this enough: never assume the power is off.
Next, set up your ladder or scaffolding on a flat, stable surface. If you’re using a ladder, make sure it’s tall enough to reach your ceiling comfortably. I rented scaffolding for my 18-foot ceiling, and it gave me a solid platform to work from. If you go this route, check that it’s locked in place and have someone spot you.
Finally, enlist a helper. I tried to do this solo at first, but holding a heavy chandelier while balancing on a ladder was a nightmare. My friend ended up saving the day by passing me tools and steadying the fixture.
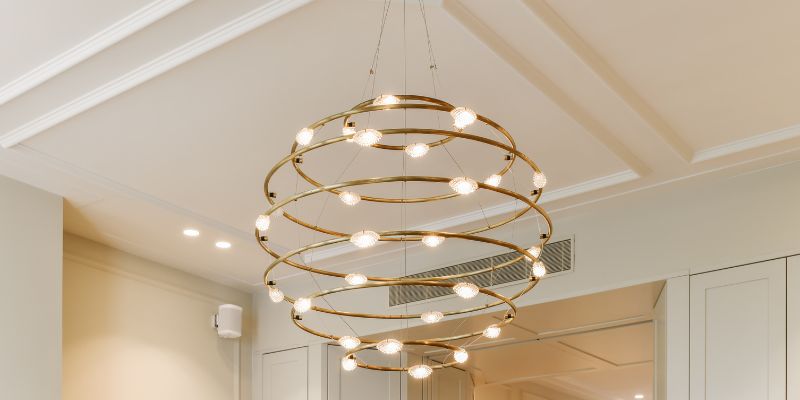
Choosing the Right Chandelier for Your High Ceiling
Not all chandeliers are created equal, especially for high ceilings. When I was shopping for mine, I learned a few key things to consider:
- Size: A chandelier that’s too small will get lost in a tall space. As a rule of thumb, add the length and width of your room in feet, and that number (in inches) is a good diameter for your chandelier. For example, my 20×15-foot living room called for a 35-inch-wide chandelier.
- Weight: High ceilings often mean heavier fixtures. Make sure your ceiling’s electrical box is rated to support the chandelier’s weight. Most standard boxes can handle up to 50 pounds, but check yours to be sure.
- Style: Think about your room’s vibe. My modern farmhouse-style home looked best with a wrought iron chandelier, but a crystal one might suit a more formal space.
- Height: Chandeliers for high ceilings often come with adjustable chains or rods. Measure your ceiling height and decide how low you want it to hang. I hung mine about 8 feet above the floor to keep it out of reach but still impactful.
Pro tip: Take a photo of your room and sketch where the chandelier will go. It helped me visualize the final look before I bought anything.
Step-by-Step Guide to Installing Your Chandelier
Now, let’s get to the fun part—actually installing that chandelier! I’ll break it down into clear steps based on how I did it in my home.
Step 1: Remove the Old Fixture (If Any)
If there’s an existing light fixture, start by removing it. Turn off the power (you already did this, right?). Unscrew the fixture from the ceiling and carefully disconnect the wires. I found it helpful to take a quick photo of the wiring before disconnecting anything—it made reconnecting the new chandelier a breeze.
Step 2: Install the Mounting Bracket
Most chandeliers come with a mounting bracket that secures to the ceiling’s electrical box. Line up the bracket with the box and screw it in tightly. If your chandelier is extra heavy, you might need to install a brace bar or a heavy-duty electrical box. I had to swap out my standard box for a sturdier one because my chandelier weighed 40 pounds.
Step 3: Adjust the Chandelier’s Height
High ceilings often require a longer chain or rod to get the chandelier to the right height. Thread the chandelier’s wires through the chain or rod, following the manufacturer’s instructions. I used a chain and cut it to length with pliers, leaving a little extra for adjustments. Have your helper hold the chandelier while you measure to make sure it hangs where you want it.
Step 4: Connect the Wires
This part can feel tricky, but it’s straightforward if you take it slow. Strip about half an inch of insulation from the chandelier’s wires. Match the wires to your home’s wiring: black (or red) to black (hot), white to white (neutral), and green or copper to green or copper (ground). Twist each pair together and secure with a wire nut. I double-checked my connections to avoid any loose wires, which can cause flickering or worse.
Step 5: Secure the Chandelier
With the wires connected, lift the chandelier and attach it to the mounting bracket. This is where your helper really shines—my friend held the fixture while I screwed it in. Make sure it’s tight and doesn’t wobble. If you’re using a ceiling medallion, slide it into place before securing the canopy (the decorative cover that hides the wires).
Step 6: Test It Out
Before you clean up, turn the power back on and flip the switch. If the chandelier lights up, you’re golden! If not, double-check your wiring or consult an electrician. My chandelier worked on the first try, and I couldn’t stop smiling at how it transformed the room.

Adding a Ceiling Medallion for Extra Flair
I decided to add a ceiling medallion to give my chandelier a polished look. It’s a decorative piece that sits between the chandelier and the ceiling, hiding any imperfections or gaps. If your high ceiling has exposed beams or textured plaster, a medallion can make the installation look seamless.
To install one, apply adhesive to the back of the medallion and press it against the ceiling. Hold it in place for a minute or two until it sticks. If it’s heavy, use small screws to secure it to the ceiling joist. I painted mine to match the ceiling for a cohesive look, but you can go bold with a contrasting color.
Maintaining Your Chandelier
Once your chandelier is up, you’ll want to keep it sparkling. High ceilings make cleaning a bit tricky, but it’s worth the effort. I use a long pole with a soft cloth to gently dust mine every few months. For deeper cleaning, I lower the chandelier (if possible) or use scaffolding to reach it. Avoid harsh chemicals—warm water and mild soap work best for most finishes.
Also, check the bulbs regularly. High ceilings can make bulb changes a hassle, so I switched to LED bulbs that last for years. They’re energy-efficient and come in warm tones that mimic traditional incandescent bulbs.
Common Mistakes to Avoid
I made a few blunders during my installation, so let me save you some trouble:
- Skipping the voltage tester: Always confirm the power is off. I got lucky, but you might not.
- Choosing the wrong size: A tiny chandelier on a high ceiling looks out of place. Measure your room first.
- Not securing the bracket: A loose bracket can cause the chandelier to sag or fall. Double-check it.
- Ignoring weight limits: If your electrical box isn’t rated for your chandelier’s weight, it’s a safety hazard.
When to Call a Professional
I love DIY projects, but sometimes it’s smarter to call in an expert. If your ceiling is over 20 feet, the chandelier is extremely heavy, or you’re not comfortable with electrical work, hire a licensed electrician. I almost tackled my foyer’s 25-foot ceiling myself, but decided to play it safe and hire a pro. It cost me about $500, but the peace of mind was worth it.
Conclusion
Installing a chandelier on a high ceiling is a rewarding project that can completely transform your home. I still get compliments on mine every time someone walks into my living room. It’s not just about the light—it’s about creating a focal point that makes your space feel special. By following these steps, staying safe, and choosing the right fixture, you’ll have a stunning chandelier that you can be proud of. So, grab your tools, enlist a friend, and get ready to light up your high ceiling in style. You’ve got this!
FAQs
What’s the best way to clean a chandelier on a high ceiling?
I use a long pole with a soft microfiber cloth to dust it every few months. For a deep clean, I rent scaffolding and use warm water with a drop of dish soap. Avoid harsh chemicals, as they can damage the finish.
How do I know if my ceiling can support a heavy chandelier?
Check the electrical box’s weight rating, usually stamped on the inside. Most standard boxes hold up to 50 pounds. If your chandelier is heavier, install a brace bar or a heavy-duty box.
Can I install a chandelier without a helper?
It’s tough but possible for smaller fixtures. I tried it alone and struggled to hold the chandelier while connecting wires. A helper makes it safer and faster.
How low should a chandelier hang on a high ceiling?
I hung mine about 8 feet above the floor to keep it out of reach, but still visually striking. Adjust based on your room’s height and furniture layout.
Do I need a ceiling medallion for my chandelier?
It’s optional, but I love how it hides gaps and adds elegance. If your ceiling has imperfections or you want a decorative touch, it’s a great addition.