How to Install Laminate Floor on Concrete: A Step-by-Step Guide
To install laminate floor on concrete, start by preparing the concrete surface and ensuring it is clean and level. +# Installing laminate floor on concrete requires careful preparation and attention to detail.
With the right steps, you can transform your concrete floor into a beautiful and durable laminate surface. First, it is important to prepare the concrete by removing any debris and cleaning it thoroughly. Additionally, make sure the concrete is level to ensure a smooth installation.
With the proper tools and techniques, you can successfully install laminate floor on concrete and enjoy the benefits of a stylish and functional flooring solution.
Preparation
Before you begin installing laminate flooring on concrete, it is crucial to properly prepare the surface. By taking the time to clean the concrete and check for moisture, you can ensure a smooth and long-lasting installation. This step-by-step guide will walk you through the necessary precautions to take before laying down your laminate floor.
Clean The Concrete Surface
The first step in preparing your concrete surface for laminate flooring is cleaning. Dust, debris, and any other particles must be removed to create a clean and smooth surface. Here’s how you can do it:
- Begin by sweeping the entire concrete floor to remove any loose dirt or debris. Use a broom or vacuum cleaner to ensure a thorough cleaning.
- If there are any stubborn stains or residue on the concrete, you can use a mild soap solution to scrub the affected areas. Rinse off the soap with clean water and allow the surface to dry completely.
- Once the concrete is dry, you can further remove any remaining dust or particles by using a damp mop or cloth. This final cleaning step will ensure a clean surface for the installation process.
Check For Moisture
Before proceeding with the installation of laminate flooring, it is vital to check for moisture in the concrete. Excess moisture can cause damage to the laminate and lead to mold or mildew growth. Here’s how you can perform a moisture check:
- Place a plastic sheet, approximately 2 feet by 2 feet, on the concrete floor. Secure it on all sides with duct tape.
- Leave the plastic sheet undisturbed for 24 hours.
- After 24 hours, remove the plastic sheet and check for any condensation or moisture on the concrete surface. If there is any moisture present, it indicates a high level of moisture in the concrete, and additional measures must be taken before installing the laminate flooring.
By thoroughly cleaning the concrete surface and checking for moisture, you are setting the stage for a successful laminate floor installation. Taking these precautions will not only ensure the longevity of your floor but also provide a clean and comfortable living space. Once you have completed the preparation process, you can move on to the next step: laying down the underlayment.
Underlayment
Choosing the right underlayment is a crucial step when installing laminate flooring on concrete. The underlayment serves as a barrier between the concrete subfloor and the laminate flooring, providing cushioning, moisture protection, and noise reduction. Here, we will discuss how to choose the right underlayment and how to measure and cut it for a seamless installation.
Choose The Right Underlayment
When it comes to selecting the underlayment for your laminate flooring, consider these factors:
- Moisture resistance: Opt for underlayment that has a moisture barrier to prevent any moisture from seeping through the concrete subfloor and damaging the laminate flooring. This is especially important for areas with high humidity or where moisture may be present, such as basements or bathrooms.
- Sound absorption: Look for underlayment with sound-dampening properties to reduce the noise caused by footsteps or other environmental sounds. This is particularly important for multi-level homes or condos.
- Thickness: Choose underlayment with an appropriate thickness that provides sufficient cushioning and support for the laminate flooring. A thickness of around 2-3mm is generally recommended, but check the manufacturer’s guidelines for your specific laminate flooring.
Measure And Cut Underlayment
To ensure a proper fit, follow these steps to measure and cut the underlayment:
- Measure the dimensions of the room: Start by measuring the length and width of the room using a tape measure. Multiply these measurements to determine the total square footage of the room.
- Account for any obstacles: Take note of any obstacles in the room, such as doorways or columns, as you will need to cut the underlayment around them.
- Roll out the underlayment: Unroll the underlayment material across the entire floor, making sure it covers the entire area. Trim any excess material using a utility knife.
- Cut around obstacles: When you encounter obstacles, such as doorways or columns, carefully make cuts in the underlayment to fit around them. Ensure that the underlayment fits snugly against the walls, leaving no gaps.
- Overlap and tape seams (if necessary): If the underlayment comes in rolls, you may need to overlap the edges by a few inches and secure them with tape. Consult the manufacturer’s instructions for proper seam installation.
By selecting the right underlayment and properly measuring and cutting it, you will create a solid foundation for your laminate flooring, ensuring a durable and long-lasting installation.
Flooring Installation
Looking to install laminate flooring on concrete? Here’s a step-by-step guide for a seamless process. From preparing the surface to laying the planks, follow these instructions to achieve a professional and durable flooring installation.
Installing laminate flooring on concrete can give your space a fresh and modern look. It’s a popular choice for homeowners due to its durability and easy maintenance. In this guide, we will take you through the step-by-step process of installing laminate flooring on concrete, from preparing the planks to cutting and fitting them. By following these instructions carefully, you can achieve a professional-looking installation and enjoy the benefits of a beautiful laminate floor in your home.
Prepare The Laminate Planks
Before you begin installing the laminate planks, it’s important to ensure that they are ready for installation. Here are the steps to prepare the planks:
- Allow the laminate planks to acclimate to the room’s temperature and humidity for at least 48 hours.
- Clean the concrete surface thoroughly to remove any dust, dirt, or debris. This will ensure proper adhesion of the laminate planks.
- Install a vapor barrier or underlayment to prevent moisture from seeping through the concrete and damaging the laminate.
Start At A Corner
Once the laminate planks are prepared, it’s time to start the installation process. Here’s how to begin:
- Start at a corner of the room and lay the first plank with the tongue side facing the wall.
- Leave a small gap between the plank and the wall to allow for expansion.
- Use spacers to maintain a consistent gap between the planks and the wall throughout the installation.
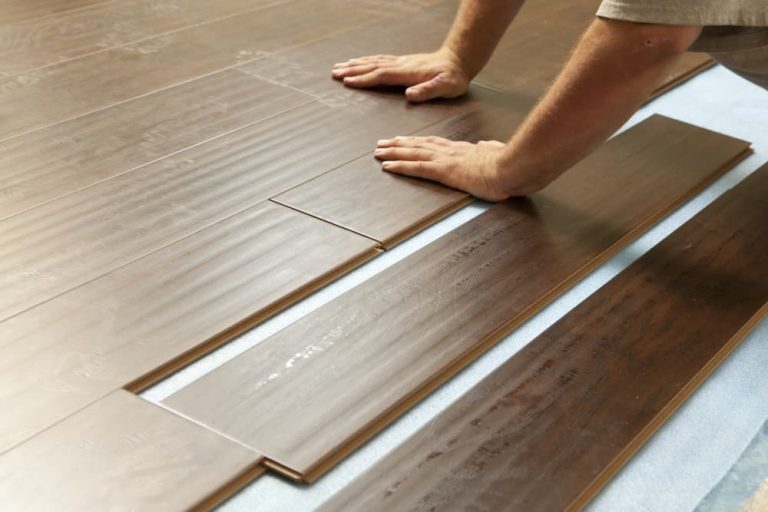
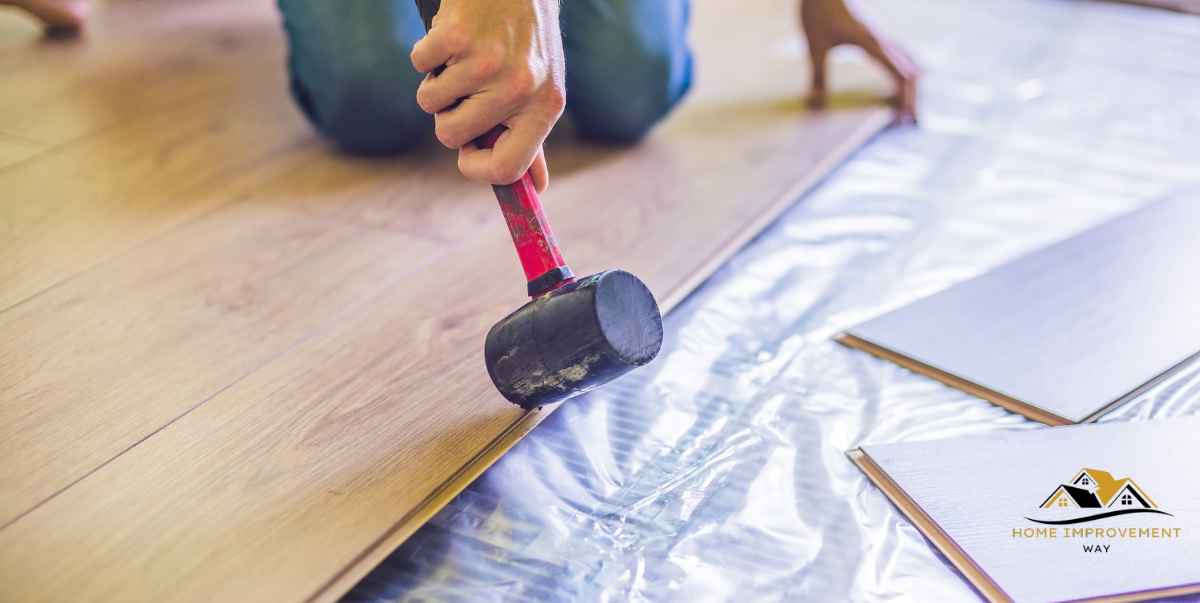
- Continue laying the planks row by row, interlocking them together using the click-lock system.
Lock The Planks Together
Properly locking the laminate planks together is crucial to ensure a secure and seamless installation. Follow these steps to lock the planks:
- Position the next plank at a slight angle to the previous one.
- Insert the tongue of the new plank into the groove of the installed plank.
- Lower the new plank into place, pressing it down firmly to engage the locking mechanism.
- Repeat this process for the rest of the planks, ensuring each one is securely locked together.
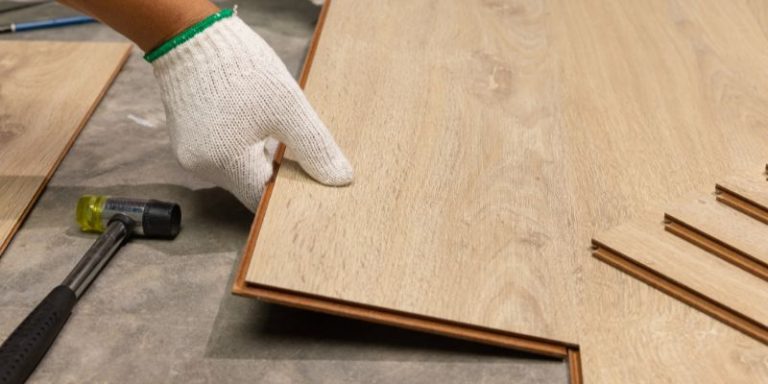
Cutting And Fitting
As you approach the walls or obstacles in the room, you may need to cut the laminate planks to fit. Here’s how to do it:
- Measure the space where the plank needs to be cut.
- Using a saw or a laminate cutter, carefully cut the plank to the required size.
- Fit the cut plank into place, ensuring it aligns smoothly with the rest of the installed planks.
- Continue installing the remaining planks, making necessary cuts and fittings as needed.
By following these steps, you can successfully install laminate flooring on concrete and transform your space with a stylish and durable floor. Take your time during the installation process, ensuring each step is done carefully and accurately. Remember to always refer to the manufacturer’s instructions for specific guidelines related to your laminate flooring product. Now you’re ready to enjoy your newly installed laminate floor!
Finishing Touches
After successfully installing laminate flooring on your concrete surface, it’s time to add the final touches that will make your project look polished and professional. Taking care of small details like trimmings and baseboards will not only enhance the aesthetic appeal of your new floors but also ensure a seamless transition between the flooring and other elements in the room.
Trim The Door Casings
One crucial step in finishing your laminate flooring project is to trim the door casings to accommodate your new floors. This process ensures that your flooring fits neatly under the casings, giving it a clean and cohesive look. Here’s how you can do it:
- Start by placing a piece of laminate next to the door casing, ensuring that it’s flush with the surface.
- Take a handsaw and carefully trim the casing by cutting off the necessary amount to allow the laminate to slide underneath.
- Once the casing is trimmed, use a chisel or utility knife to remove any excess material that may hinder the installation.
- Test the fit by placing the laminate under the casing. If it slides in smoothly, you’re good to go.
- Repeat this process for all door casings in the room, ensuring a consistent and seamless look throughout.
Install Baseboards
Installing baseboards is the final step to complete the look of your laminate flooring project. Baseboards not only provide a finished appearance but also protect the edges of the laminate and hide any gaps or imperfections along the walls. Here’s how you can install baseboards:
- Measure the length of each wall and cut the baseboards accordingly using a miter saw.
- Place the cut baseboards along the walls, ensuring they are flush against the floor and evenly spaced.
- Attach the baseboards to the walls using a nail gun, making sure to secure them firmly.
- Repeat this process for all walls, taking care to align the corners neatly and ensure a consistent height.
- Once installed, fill any nail holes with wood filler and sand the baseboards for a smooth finish.
By following these finishing touches of trimming the door casings and installing baseboards, you’ll add the perfect final details to your laminate flooring installation. Not only will your floors look impeccable, but the seamless transition and added protection will ensure the longevity of your new investment. With these simple steps, you’re ready to enjoy the beauty and durability of your new laminate floors for years to come.

Maintenance And Care
After installing laminate flooring on concrete, proper maintenance and care are essential to ensure its longevity and preserve its appearance. Follow these guidelines to keep your laminate floor looking beautiful for years to come.
Clean Regularly
To maintain the shine and cleanliness of your laminate floor, regular cleaning is necessary. Here’s how to clean your laminate floor:
- Sweep or vacuum: Remove loose dirt and debris by sweeping with a soft-bristle broom or vacuuming with a floor attachment. Avoid using a vacuum cleaner with a beater bar as it may damage the floor.
- Damp mop: Fill a bucket with warm water and add a mild laminate floor cleaner. Dip a mop or microfiber cloth into the mixture, wring it out well, and then gently mop the floor.
- Dry promptly: After damp mopping, make sure to dry the floor immediately using a clean, dry cloth or a mop with an absorbent pad. Leaving excess water on the laminate floor can cause damage.
Protect From Moisture And Sunlight
Laminate flooring is not waterproof, so it’s important to protect it from excessive moisture. Follow these tips to prevent damage:
- Use rugs or mats: Place mats and rugs in high-traffic areas, especially near entrances, to trap dirt and moisture before it reaches the floor.
- Wipe up spills promptly: If any liquids spill on the floor, immediately wipe them up to prevent them from seeping into the laminate and causing damage.
- Avoid excessive sunlight: Prolonged exposure to sunlight can fade the color of laminate flooring. To protect it, use curtains or blinds to control the amount of sunlight entering the room.
Repair Damaged Areas
If your laminate floor gets damaged, act quickly to repair it and prevent further issues. Follow these steps to fix damaged areas:
- Assess the damage: Identify the extent of the damage, whether it’s a small scratch, a chip, or a more significant issue.
- Use a repair kit: Purchase a laminate floor repair kit from a hardware store. These kits often include materials like putty, touch-up markers, and a putty knife.
- Apply the repair materials: Follow the instructions provided with the repair kit to fill in scratches or gaps, blend the color with the rest of the floor, and smooth the surface.
- Allow time to dry: Let the repaired area dry completely before allowing any foot traffic or furniture placement.
By following these maintenance and care tips, you can ensure your laminate floor on concrete remains in excellent condition. Regular cleaning, protection from moisture and sunlight, and prompt repairs will help your floor retain its beauty and durability for many years to come.
Conclusion
Installing laminate floor on concrete is an efficient and cost-effective way to enhance the aesthetics of your space. By following the right steps and using the appropriate tools, you can achieve a professional-looking result. Remember to prepare the concrete surface properly, choose the right underlayment, and carefully lay down the laminate planks.
With proper installation, you can enjoy the durability and beauty of laminate flooring for years to come. So, go ahead and transform your concrete floor into a stylish and inviting space.