How to Make a Pull Start Eliminator with a Drill Fast
Many people find starting small engines tricky. Dealing with a stubborn pull start can be frustrating, especially for beginners. That’s why learning How to Make a Pull Start Eliminator with a Drill Fast is super helpful.
It sounds complicated, but it’s actually quite simple. We’ll walk through it step-by-step, making it easy for anyone to follow. Get ready to make starting your equipment a breeze!
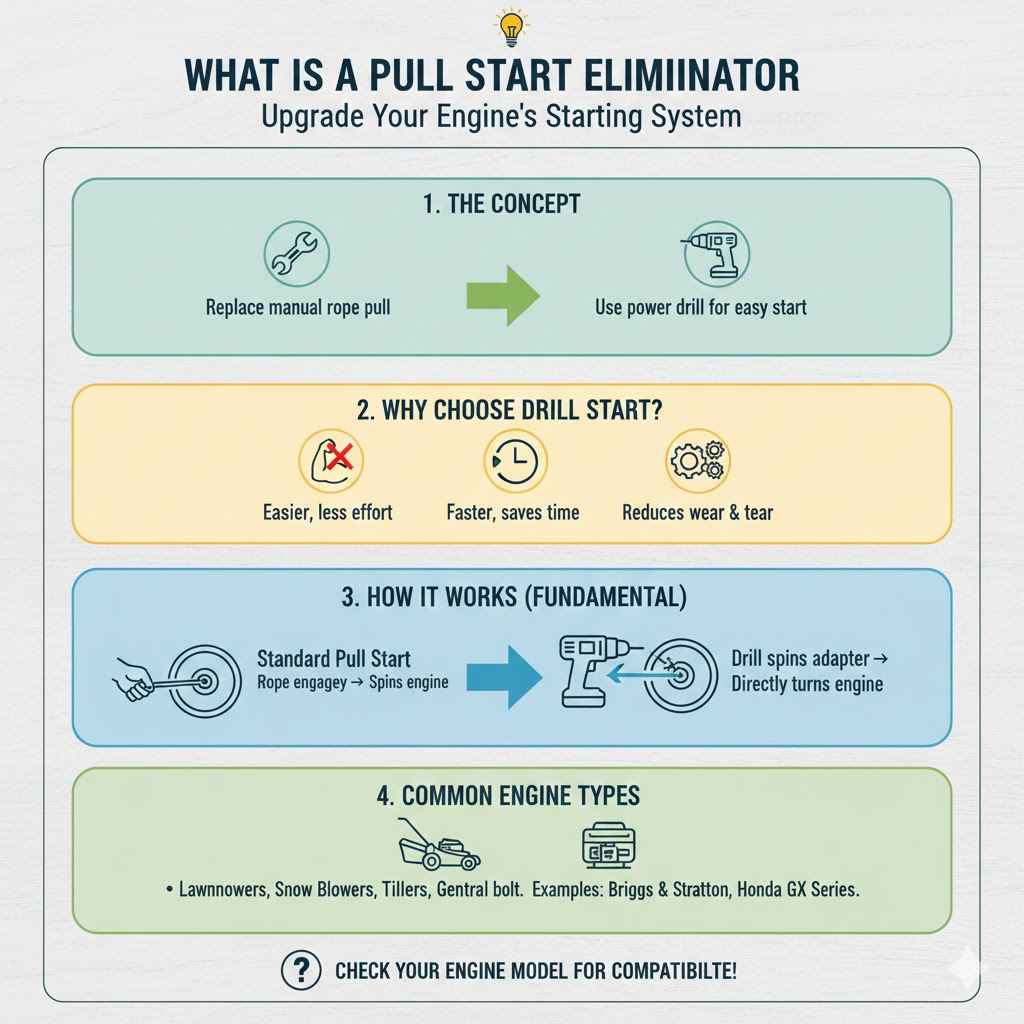
What Is a Pull Start Eliminator
A pull start eliminator is a clever device that lets you start your small engine using a power tool, like a drill, instead of the usual rope pull. This makes starting much easier and quicker. It’s a great way to get your mower, generator, or other equipment running without all the effort.
Think of it as upgrading your engine’s starting system.
For many people, especially those new to engine maintenance or DIY projects, the concept of modifying an engine’s starting mechanism can seem a bit intimidating. They might worry about damaging their equipment or not having the right tools. The good news is that making a pull start eliminator is surprisingly straightforward.
It doesn’t require advanced mechanical skills. We are going to break down exactly what you need and how to put it together, step by step. You’ll be surprised at how simple it is.
Why Choose a Drill Start
Using a drill to start an engine offers several big advantages. First, it’s much easier than yanking on a pull cord, especially if the cord is worn or the engine is hard to turn over. This is a lifesaver for people who might have trouble with physical exertion.
Second, it’s faster. You can get your engine going in seconds. This is fantastic when you’re in a hurry.
Finally, it can help prolong the life of your engine’s starter mechanism by reducing wear and tear.
The convenience of a drill start cannot be overstated. Imagine needing to start your generator quickly during a power outage. Fumbling with a pull cord in the dark and rain can be stressful.
A quick connection with a drill and your generator is humming. For older individuals or those with physical limitations, the strain of pulling a starter cord can be a barrier to using their equipment. A drill starter removes this barrier entirely.
It empowers users to operate their machines with ease and confidence.
How It Works Fundamentally
At its core, a pull start eliminator works by transferring the rotational force from your drill directly to the engine’s flywheel or crankshaft. The standard pull start mechanism uses a recoil starter with a spool and a rope. When you pull the rope, it engages a starter pulley, which in turn spins the engine.
The eliminator
When you engage your drill, its motor spins the adapter. This spinning adapter directly turns the engine’s internal components, much like the pull cord would, but with more consistent and powerful torque. This bypasses the need for the manual pulling action altogether.
It’s a very direct mechanical connection. The adapter is designed to precisely match the engine’s starting engagement point, ensuring a smooth and efficient transfer of power.
Common Engine Types for Modification
Many small engines commonly found in outdoor power equipment are good candidates for this modification. This includes engines on lawnmowers, snow blowers, tillers, and some go-karts or small ATVs. The key is to identify the engine’s starting mechanism.
Most engines that use a recoil starter with a central bolt on the flywheel or a crankshaft stub are suitable.
Examples include Briggs & Stratton engines, which are very popular on many lawn care machines. Honda GX series engines are also often modified. Even some older two-stroke engines used in chainsaws or weed whackers can be adapted, though the specific adapters might vary.
It’s important to check your specific engine model to ensure compatibility before purchasing parts or starting the project. Many online forums and manufacturer websites offer compatibility guides.
Gathering Your Tools and Materials
To successfully create your pull start eliminator, you’ll need a few specific items. The most important is the pull start eliminator adapter itself. These are often sold online and are designed for specific engine types or general use.
You’ll also need a compatible drill, preferably a cordless one with good torque. Make sure your drill’s chuck can grip the adapter securely.
Beyond the core components, you might need some basic hand tools. A socket set, wrenches, and possibly a screwdriver will likely be necessary for removing the old pull start and attaching the new adapter. Safety gear like gloves and eye protection is always a good idea when working with tools and engines.
Having a clean workspace will also make the process smoother.
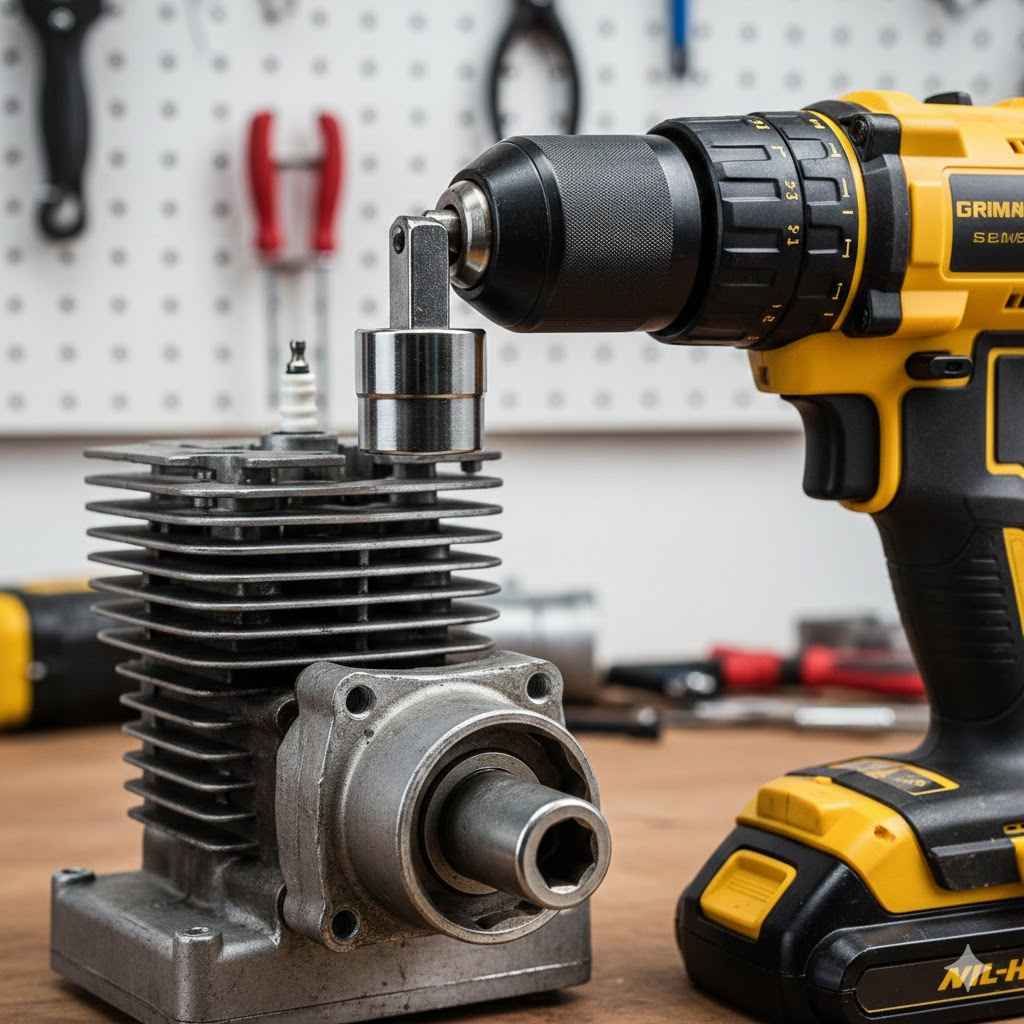
The Pull Start Eliminator Adapter
This is the heart of your project. The adapter is typically a metal piece with a socket on one end designed to fit a specific bolt or shaft on your engine. The other end will have a shape that your drill chuck can grip, often a hex shape or a square drive.
These adapters come in various sizes and designs to fit different engine flywheels or crankshafts.
When buying an adapter, pay close attention to the specifications. Some are designed to engage with the flywheel nut directly, while others might require a specific bolt to be inserted into the engine’s crankshaft. It’s crucial to get an adapter that mates correctly with your engine’s starting assembly.
An ill-fitting adapter won’t work and could potentially damage your engine or the adapter itself. Reading product reviews can help you choose a reliable and well-made adapter.
Choosing the Right Drill
Your drill is the engine of your new starting system. A cordless drill is ideal for portability and ease of use. The most important factor is its torque.
You need a drill that has enough power to turn the engine over, especially if it’s a bit stiff. A drill with at least 18 volts and a good amount of torque (often measured in inch-pounds or Newton-meters) is recommended. Higher torque drills are better at overcoming resistance.
Look for a drill with a variable speed trigger. This allows you to start the engine slowly and smoothly, which is better for the components. A drill with a keyed or keyless chuck that opens wide enough to accommodate your chosen adapter is also essential.
If the chuck is too small, it won’t grip the adapter properly, leading to slippage. Ensure the chuck mechanism is robust and can withstand the forces involved.
Essential Hand Tools
You’ll need a few common tools to complete the installation. A standard socket set is usually the most important. You’ll likely need to remove the existing pull start assembly.
This might involve removing a few bolts holding the housing in place. Wrenches, both standard and possibly some specialized ones, might be required depending on the bolts used on your engine.
A screwdriver set, including flathead and Phillips head types, can also be handy for prying or accessing smaller components. Sometimes, a bit of gentle persuasion is needed to remove old parts. Having a set of pliers can also be useful for gripping and turning stubborn nuts or bolts.
Keeping these basic tools on hand makes most DIY engine tasks much easier.
Safety Considerations
Safety is paramount when working on any mechanical project. Always wear safety glasses to protect your eyes from flying debris or accidental slips. Work gloves will protect your hands from cuts and scrapes.
Ensure your workspace is well-lit and free from clutter. Make sure the engine is completely cool before you begin any work to avoid burns.
It’s also a good idea to disconnect the spark plug wire before you start removing the old pull starter. This prevents the engine from accidentally firing while you are working on it. Double-check that your drill battery is removed or the drill is set to a safe mode until you are ready to test the system.
Following these simple safety steps will ensure a smooth and safe DIY experience.
Step-by-Step Installation Guide
Installing a pull start eliminator is a straightforward process that can be done in a relatively short amount of time. It involves removing the old pull start mechanism and attaching the new adapter. We will guide you through each stage, making it easy to follow.
Start by locating the pull start housing on your engine. It’s usually a plastic or metal cover that encloses the rope and recoil mechanism. You will need to remove this cover to access the components underneath.
Depending on your engine model, this might involve unscrewing a few bolts or clips.
Removing the Old Pull Start
First, make sure the engine is cool and the spark plug wire is disconnected. This is a critical safety step. You will then need to access the bolts that hold the pull start recoil assembly to the engine.
These are typically located around the perimeter of the pull start housing or directly into the engine’s flywheel cover.
Use your socket set or wrenches to carefully remove these bolts. Keep the bolts in a safe place, as you might need them for reassembly or for a different part of the project. Once the bolts are removed, you should be able to lift the entire pull start recoil assembly off the engine.
Sometimes, there might be a small rope or spring mechanism that needs a little gentle manipulation to come free. Take note of how it was attached so you can refer back if needed.
Attaching the New Adapter
Now it’s time to install your pull start eliminator adapter. This part will connect directly to the engine’s rotating component. If your adapter is designed to fit onto a central flywheel bolt, align it carefully with the bolt and tighten it securely.
If it engages with the crankshaft stub, ensure it is seated properly.
Some adapters might come with their own hardware, like a specialized bolt or nut. Follow the instructions provided with your specific adapter. It’s crucial that this adapter is firmly attached and spins true with the engine’s crankshaft.
Any wobble or looseness can cause problems and potentially damage the engine or the adapter. Make sure it’s snug but don’t overtighten to the point of stripping threads.
Securing the Eliminator Mechanism
Depending on the design of your pull start eliminator kit, there might be additional components to secure. Some kits include a bracket or plate that attaches to the engine block or the starter housing area to provide a stable point for the drill to connect. Ensure any such brackets are bolted on tightly.
The goal is to create a stable platform for the drill to engage with the adapter.
If your kit involves a specific bolt to go into the crankshaft, ensure it’s the correct length and thread type for your engine. Once attached, give it a gentle shake to confirm it is secure. You do not want any movement or play in this component once the drill is engaged.
A solid connection is key for efficient starting.
Testing the New System
Before you try to start the engine, it’s wise to do a preliminary test. Reconnect the spark plug wire. Place your drill chuck onto the pull start eliminator adapter.
Make sure the drill is set to the correct rotation direction for starting the engine (usually counter-clockwise when viewed from the front, but check your engine manual). Slowly engage the drill’s trigger to see if the engine cranks over.
You should feel the drill engaging with resistance as it turns the engine. If it spins freely without turning the engine, the adapter is not properly engaged. If the drill seems to be straining excessively, double-check that everything is installed correctly and that the adapter is mating properly with the engine’s starting mechanism.
A smooth cranking motion is what you’re looking for. This initial test will reveal any installation issues.
Operating Your New Drill Start System
Once your pull start eliminator is installed, operating it is incredibly simple. You’ll use your drill just like you would to start the engine. This new method makes starting your equipment much more accessible for everyone.
The process is designed to be as intuitive as possible. You’ll simply need to make a quick connection with your drill. This eliminates the need for the old, sometimes tricky, pull cord.
It’s a modern upgrade that brings real convenience to your equipment.
Connecting the Drill
Before you connect, ensure your drill is set to the correct rotational direction. This is vital for the engine to start properly. Most engines start by rotating counter-clockwise when viewed from the front, but it is always best to confirm with your engine’s manual.
Make sure the drill’s chuck is open wide enough to fit over the adapter securely.
Slide the drill chuck onto the pull start eliminator adapter. Tighten the chuck around the adapter firmly. You want it to grip well so it doesn’t slip when you apply power.
A good, solid connection is key to transferring the drill’s power effectively to the engine. Once it’s secure, you are ready for the next step.
Starting the Engine
With the drill securely attached to the adapter, you are ready to start the engine. Slowly and steadily squeeze the drill’s trigger. You should feel the engine begin to crank over.
Continue applying power until the engine catches and starts running. You can then release the drill’s trigger and detach the drill from the adapter.
If the engine doesn’t start immediately, don’t force it. Release the trigger and check that your spark plug wire is connected and the fuel is on. You can try again.
It might take a few seconds of cranking for the engine to fire up, especially if it hasn’t been run in a while. The beauty of this system is that you can crank it for longer periods if needed, without straining your arms or back.
Disconnecting the Drill
Once the engine is running smoothly, release the trigger on your drill. The adapter will stop spinning with the engine. You can then carefully slide the drill chuck off the pull start eliminator adapter.
It’s a good practice to place the drill down and out of the way. This ensures it doesn’t get accidentally bumped or interfere with the running engine.
The adapter will remain attached to the engine. You can leave it there; it’s designed not to interfere with the engine’s normal operation or any other functions. The main advantage is that your engine is now ready to be started with your drill anytime you need it.
This makes spontaneous use of your equipment much easier.
Troubleshooting Common Issues
Even with a well-designed system, you might run into minor hitches. Most issues are simple to resolve with a bit of attention to detail. We’ll cover some common problems and how to fix them.
Pay attention to the sounds and feelings during operation. These often give clues about what might be wrong. Most problems stem from connections not being tight enough or the wrong part being used.
Drill Spins Freely No Engine Crank
This is a common issue and usually means the drill is not engaging the engine’s starting mechanism properly. Check that the pull start eliminator adapter is firmly attached to the engine’s flywheel or crankshaft bolt. Ensure it’s not spinning loosely on its own mounting point.
Also, verify that your drill chuck is gripping the adapter securely. If the chuck is slipping, it won’t transfer power. You might need to tighten the chuck more or use a drill bit extension if the adapter is recessed.
Sometimes, a bit of grit or debris can prevent a good connection; clean both the adapter and the chuck.
Engine Cranks But Won’t Start
If the engine turns over but won’t start, the issue is likely not with your pull start eliminator but with the engine’s fuel or ignition system. Ensure the fuel tank is full and the fuel line is open. Check that the choke is set correctly for starting a cold engine.
Make sure the spark plug wire is securely connected to the spark plug. If it’s loose, the spark won’t ignite the fuel. You might also need to clean or replace the spark plug if it’s fouled.
If none of these basic engine checks resolve the issue, you might need to consult your engine’s service manual for more advanced troubleshooting.
Adapter Slipping or Wobbling
If you notice the adapter wobbling or slipping, it’s a sign that it’s not securely fastened to the engine or the drill chuck isn’t gripping it properly. For adapter slippage on the engine, re-tighten the mounting bolts or nuts that secure the adapter to the flywheel or crankshaft. Ensure the mating surfaces are clean and flat.
If the drill chuck is slipping on the adapter, you need to ensure a better grip. Make sure the adapter’s shape is suitable for your drill chuck. Sometimes, adapters have specific surfaces designed for drill bits or sockets.
If it’s a hex shape, ensure your drill’s chuck can get a solid bite. You might need a drill bit adapter for your chuck if the eliminator adapter has a non-standard shape.
Benefits of a Drill Start System
Upgrading to a drill start system offers a significant improvement in usability and convenience for many types of equipment. It’s more than just a novelty; it provides real practical advantages for a wide range of users.
The ease of starting is the most obvious benefit. This makes using your equipment accessible to a broader audience, including those with limited physical strength or mobility. It streamlines the process of getting your tools ready to go.
Increased Ease of Use
For many, the physical act of pulling a starter cord can be difficult, especially for older engines that are harder to turn over. A drill starter eliminates this strenuous activity. Anyone who can operate a drill can now start the engine, regardless of their strength.
This makes equipment like lawnmowers, generators, and tillers much more approachable. It removes a significant barrier to entry for using these tools. The quick and effortless start means less time spent wrestling with equipment and more time getting tasks done.
Time Savings and Efficiency
Starting an engine with a drill can be significantly faster than using a pull cord. You can get the engine running in seconds, which is especially valuable when you’re in a hurry or need to restart a hot engine quickly.
This efficiency boost can make a big difference, particularly for commercial users or those who need to start and stop equipment multiple times during a job. Less time spent starting means more time for the actual work, improving overall productivity.
Reduced Wear on Starter Components
Pull cords and recoil starters can wear out over time, and a broken starter can be an annoying and costly repair. By bypassing the traditional pull start mechanism, you reduce the wear and tear on these components. This can potentially extend the lifespan of your engine’s original starting system.
The drill applies a more consistent and controlled rotational force. This controlled engagement is often gentler on the engine’s internal starting components than the sudden, jerky motion of a manual pull. This can lead to fewer breakdowns and less maintenance over the long run.
Accessibility for More Users
This modification opens up the use of engine-powered equipment to a wider demographic. People who might have found pull-starting too difficult due to age, injury, or physical limitations can now easily operate their machines. It promotes independence and makes tasks more manageable for everyone.
For instance, a grandparent might be able to easily start a lawnmower for their grandchild to use, or someone recovering from an injury can continue to maintain their property without assistance. The drill start system democratizes the use of these tools, making them accessible to a broader range of people.

Frequently Asked Questions
Question: Is this modification safe for my engine
Answer: Yes, when done correctly with the right adapter, this modification is safe. It essentially
Question: How much torque does my drill need
Answer: A drill with at least 18 volts and good torque is recommended, typically over 300 inch-pounds, to ensure it can reliably crank the engine.
Question: Can I use any drill
Answer: While most drills can work, higher torque and variable speed drills offer the best performance and control for starting engines.
Question: What if I don’t have the exact adapter for my engine
Answer: You can often find universal adapters or adapters specific to your engine make and model online. Ensure it matches your engine’s flywheel nut or crankshaft stub.
Question: Will this void my engine warranty
Answer: Modifying your engine’s starting system might void your manufacturer’s warranty. It’s best to check your warranty terms before proceeding.
Wrap Up
You’ve learned how to make a pull start eliminator with a drill fast. This simple upgrade transforms how you start your equipment. It uses a special adapter and your power drill.
No more struggling with pull cords. Get your engine running quickly and easily. Enjoy the convenience and power!