How to Make Plywood Waterproof Best Methods
Making plywood waterproof might seem tricky, especially if you’re new to woodworking or DIY projects. You might worry about the best ways to protect your plywood from water damage, or if it’s even possible to make it truly waterproof. But don’t worry, it’s easier than you think!
This guide breaks down exactly what you need to do, step by step. We’ll show you simple, effective ways to seal your plywood so it can handle moisture. Get ready to learn the best tricks for How to Make Plywood Waterproof: Best Methods so your projects last longer.
Choosing the Right Plywood for Water Resistance
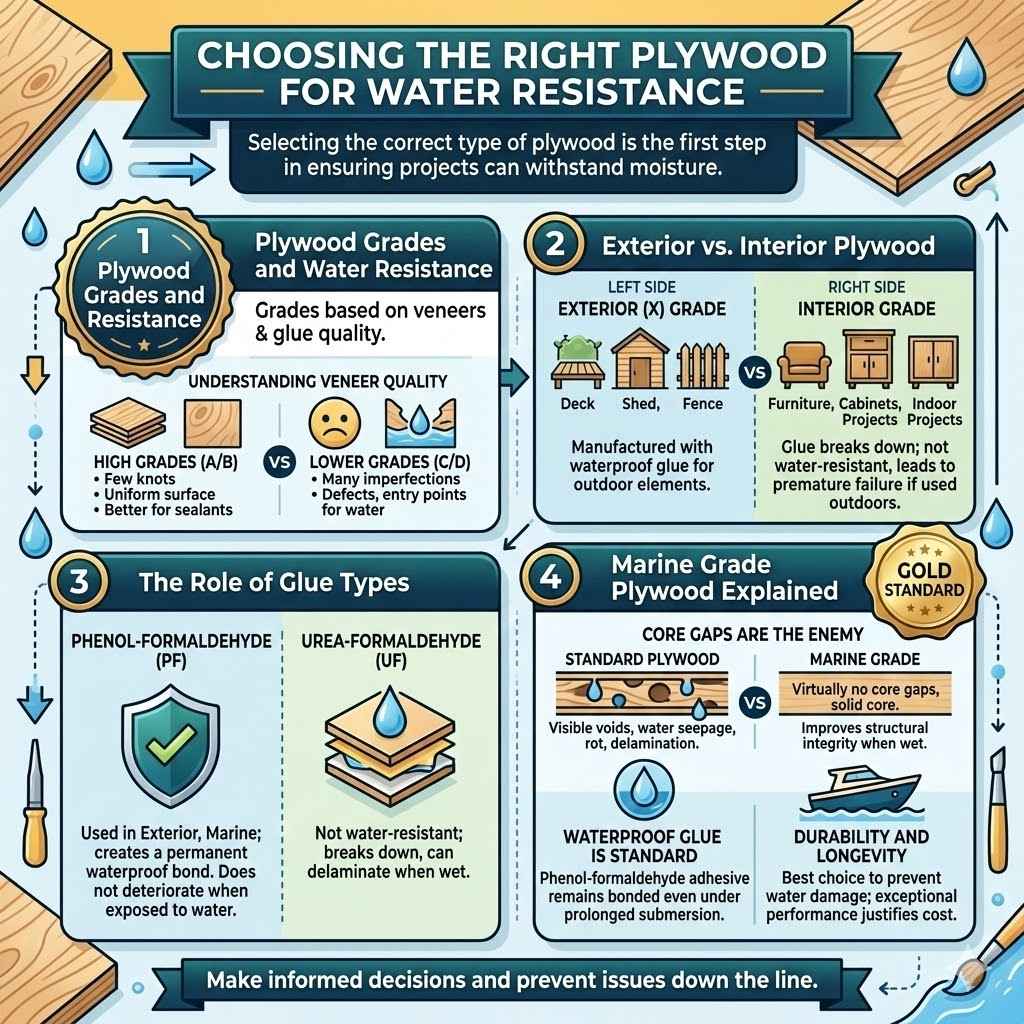
Selecting the correct type of plywood is the very first step in ensuring your projects can withstand moisture. Not all plywood is created equal, and some types are much better suited for environments where water is a concern. Understanding the differences between various grades and constructions will help you make informed decisions, saving you time and preventing potential issues down the line.
We will explore the key features to look for and the types of plywood that offer superior water resistance right from the start. This section will set a strong foundation for all subsequent waterproofing efforts, making your task much simpler.
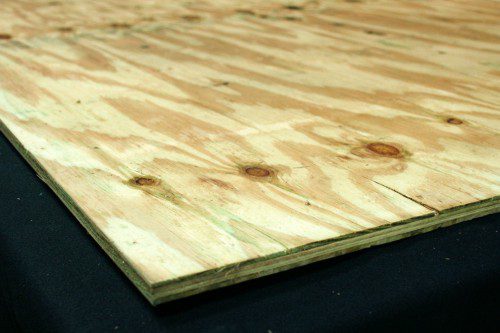
Plywood Grades and Their Water Resistance
Plywood is graded based on the quality of its veneers and the glue used. Exterior (X) grade plywood is specifically designed for outdoor use and often uses waterproof glues. Interior plywood might use glues that can break down when exposed to moisture.
Understanding Veneer Quality
Veneers are the thin layers of wood that make up plywood. Higher grades, like A or B, have fewer knots and defects, which means a more uniform surface. This uniformity is important for sealants and finishes to adhere properly. Lower grades, like C or D, have more imperfections that can act as entry points for water if not sealed very carefully.
The Role of Glue Types
The adhesive used to bond the wood layers is critical for water resistance. Phenol-formaldehyde (PF) glue is a waterproof adhesive commonly used in exterior-grade plywood. It creates a bond that will not deteriorate when exposed to water or humidity. Interior plywood often uses urea-formaldehyde (UF) glue, which is not water-resistant and can delaminate (separate) when wet. Always check the product specifications for the type of glue used.
Exterior vs. Interior Plywood
Exterior grade plywood is manufactured with waterproof glue and is intended for applications where it will be exposed to the elements, such as decks, sheds, and fences. Interior plywood is suitable for furniture, cabinets, and other indoor projects where moisture is not a significant concern. Using interior plywood for outdoor projects is a common mistake that leads to premature failure.
Marine Grade Plywood Explained
Marine grade plywood is the gold standard for water resistance. It is made with waterproof glue and has virtually no core gaps, meaning there are no voids where water can collect and cause rot. This makes it ideal for boat building and other applications where extreme moisture exposure is expected.
Core Gaps Are the Enemy
Core gaps are spaces between the wood plies in standard plywood. Water can seep into these gaps, freeze and expand, or simply encourage rot and delamination. Marine grade plywood is specifically constructed to eliminate these gaps, ensuring a solid, continuous core. This solid construction significantly improves its structural integrity when wet.
Waterproof Glue is Standard
Like exterior grade, marine plywood uses only waterproof adhesives, typically phenol-formaldehyde. This glue is incredibly durable and resistant to the constant presence of moisture found in marine environments. It ensures that the plies remain bonded together even under prolonged submersion or high humidity.
Durability and Longevity
Due to its construction and adhesives, marine grade plywood offers exceptional durability and longevity in wet conditions. While it is more expensive, its performance in demanding situations justifies the cost for critical applications. It’s the best choice when you absolutely need to prevent water damage.
Preparing Your Plywood for Waterproofing
Before you apply any waterproofing treatment, proper preparation is key to a successful and long-lasting finish. Think of it like preparing a canvas for painting; a clean, smooth surface will hold the protective layers much better. This stage involves cleaning, sanding, and ensuring the plywood is completely dry. Neglecting any of these steps can lead to issues like peeling, bubbling, or incomplete protection later on. We will walk through each essential preparation step so your waterproofing efforts are effective.
Cleaning the Plywood Surface
A clean surface is the foundation for any effective sealant. Dust, dirt, grease, or old finishes can prevent the waterproofing product from adhering properly, leading to premature failure. Taking the time to thoroughly clean the plywood will ensure the best possible bond.
Removing Dust and Debris
After cutting or sanding, plywood will have fine dust. A soft brush or a vacuum cleaner can remove this. A damp cloth can also be used, but make sure the plywood dries completely afterward.
Wiping Down with Mild Soap and Water
For more stubborn dirt or grease, use a mild soap solution. Apply it with a clean cloth, working in the direction of the wood grain. Rinse the surface thoroughly with clean water and allow it to air dry completely.
Checking for Mold or Mildew
If the plywood has been exposed to moisture for a while, it might have mold or mildew. A solution of one part bleach to three parts water can kill these. Scrub the affected areas, rinse well, and ensure it dries completely.
Sanding for a Smooth Finish
Sanding not only makes the surface smooth for finishing but also helps to open up the wood pores. This allows waterproofing treatments to penetrate better, creating a more durable barrier. A smooth surface also makes application of sealants and finishes much easier.
Using the Right Grit Sandpaper
Start with a medium-grit sandpaper, around 100-120 grit, to remove any rough spots or imperfections. Follow up with a finer grit, like 180-220 grit, to create a smooth surface. Always sand in the direction of the wood grain.
Ensuring Even Surface Coverage
Work systematically across the entire surface, ensuring you sand all areas evenly. Pay attention to edges and corners. A smooth, uniform surface is crucial for an even coat of waterproofing material.
Wiping Away Sanding Dust
After sanding, it’s vital to remove all the fine dust. Use a tack cloth or a vacuum with a brush attachment. Any remaining dust will interfere with the adhesion of your waterproofing product.
Drying the Plywood Thoroughly
This is perhaps the most critical step in preparation. Applying any waterproofing product to damp plywood will trap moisture inside. This trapped moisture can cause delamination, rot, mold growth, and compromise the effectiveness of your chosen treatment.
Air Drying in a Well-Ventilated Area
Allow the plywood to air dry in a warm, well-ventilated space. This could be outdoors on a sunny day or indoors with fans and open windows. Drying can take 24-48 hours, depending on humidity and temperature.
Using Fans or Dehumidifiers
To speed up the drying process, use fans to circulate air over the surface. In humid conditions, a dehumidifier can be very effective at removing moisture from the air and the wood.
Checking for Complete Dryness
You can check if the plywood is dry by feeling its surface and edges for any coolness or dampness. A moisture meter is the most accurate tool to ensure the moisture content is below 15%, ideally closer to 12%.
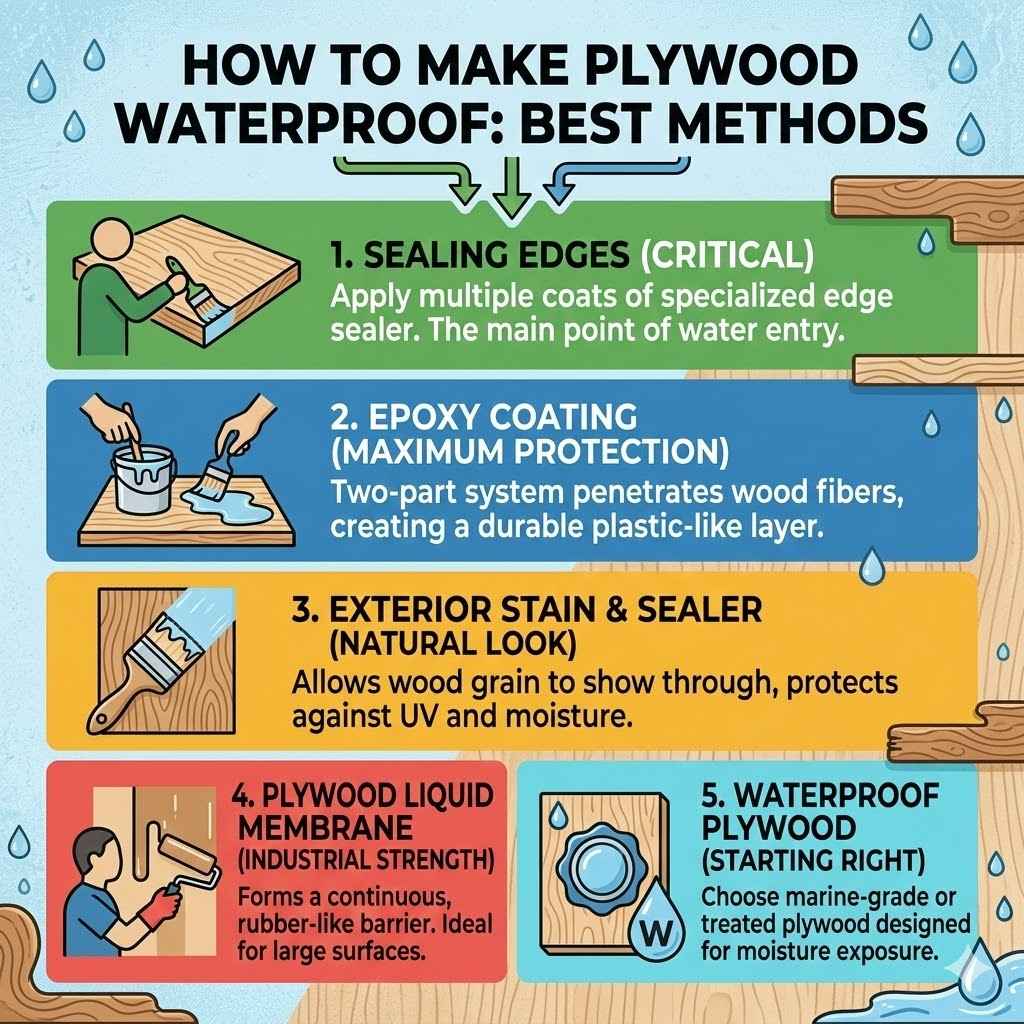
How to Make Plywood Waterproof Best Methods Explained
Now that your plywood is clean, smooth, and perfectly dry, it’s time to apply the waterproofing treatments. There are several effective methods, each suited for different needs and applications. We will go through the most popular and reliable techniques. Choosing the right method depends on the level of exposure to water, the desired appearance, and the type of project you are working on. Follow these detailed steps to give your plywood the best protection.
Using Waterproof Sealants and Varnishes
Waterproof sealants and varnishes create a protective barrier on the surface of the plywood. They are designed to repel water and prevent it from penetrating the wood fibers. These are common choices for many DIY projects due to their ease of application and availability.
Types of Waterproof Sealants
Polyurethane, epoxy, and marine-grade varnishes are excellent choices. Polyurethane offers good durability and water resistance. Epoxy provides a very hard, waterproof shell but can be more challenging to apply. Marine varnish is specifically formulated for harsh, wet conditions.
Application Process
Apply the sealant or varnish in thin, even coats using a brush or roller. Always follow the manufacturer’s instructions regarding drying times between coats. Typically, two to three coats are recommended for adequate protection.
Drying and Curing Times
Allow each coat to dry completely before applying the next. The final coat will need to cure for a specified period before the plywood is subjected to any moisture. This curing process is essential for the sealant to reach its maximum hardness and water-repellent properties.
Reapplication for Long-Term Protection
Even the best sealants will eventually wear down. For long-term protection, it’s good to inspect the surface periodically and reapply a coat of sealant every few years, especially if the plywood is outdoors.
Applying Exterior Paint for Protection
Exterior grade paint offers a layer of protection against water and UV rays. While not as completely waterproof as specialized sealants, a good quality exterior paint can significantly extend the life of plywood used in damp environments.
Choosing the Right Exterior Paint
Opt for 100% acrylic latex exterior paint. These paints are flexible, durable, and resist cracking and peeling. Gloss or semi-gloss finishes tend to offer better water resistance than matte finishes.
Priming is Essential
Always use an exterior primer before painting. A good quality primer will seal the wood surface, improve paint adhesion, and provide an extra layer of moisture resistance. Look for a primer specifically designed for wood or exterior use.
Multiple Coats for Best Results
Apply at least two coats of exterior paint, allowing sufficient drying time between each. Ensure you cover all surfaces, including edges and undersides, to prevent water from entering.
Maintenance and Touch-Ups
Periodically inspect the painted surface for any chips or wear. Touch up any damaged areas promptly to maintain the protective barrier. Regular maintenance will prevent water from reaching the wood beneath the paint.
Using Waterproofing Wood Stains and Sealers
Waterproofing wood stains and sealers penetrate the wood to protect it from within. They often provide a more natural look than paint or varnish, while still offering good water resistance.
Understanding Penetrating Sealers
These products soak into the wood, bonding with the fibers to create a water-repellent barrier. They are ideal if you want to preserve the natural look of the wood.
Application Techniques
Apply the stain or sealer liberally with a brush, roller, or sprayer, allowing it to soak into the wood. Wipe off any excess product that does not penetrate after about 15-20 minutes.
Drying and Protection Longevity
Allow the product to dry and cure according to the manufacturer’s instructions. The longevity of the protection varies, but reapplying every one to three years is common, depending on exposure.
Combining Stain and Sealant Properties
Many products are available that combine the color of a stain with the protective properties of a sealer, offering a two-in-one solution for your plywood.
Waterproofing with Epoxy Resin
Epoxy resin is a powerful waterproofing solution that creates an incredibly durable and watertight barrier. It’s a more advanced method, but it offers superior protection for projects that will be heavily exposed to water.
Choosing the Right Epoxy System
Use a marine-grade epoxy system that is specifically designed for wood. These systems typically come in two parts: a resin and a hardener, which are mixed together.
Surface Preparation is Crucial
As mentioned earlier, the surface must be perfectly clean, dry, and sanded. Epoxy adheres best to a slightly rough surface that has been properly prepared.
Mixing and Application
Follow the manufacturer’s instructions precisely for mixing the resin and hardener. Once mixed, the epoxy has a limited pot life, so work quickly and efficiently. Apply it with a brush, roller, or squeegee.
Multiple Coats and Filling Gaps
Apply several thin coats, allowing each to cure partially before applying the next. Epoxy can also be used to fill any small voids or imperfections in the plywood, creating a completely sealed surface.
UV Protection Considerations
Many epoxies are not inherently UV resistant and can yellow or degrade when exposed to sunlight. If your project will be in direct sun, consider applying a UV-resistant varnish or paint over the cured epoxy.
Advanced Waterproofing Techniques for Extreme Conditions
For projects that face severe or constant water exposure, like boat components or outdoor furniture that sits directly on wet ground, standard methods might not be enough. Advanced techniques involve specialized materials and application methods to ensure maximum protection. These methods might require more skill or specific tools but offer unparalleled defense against water damage. We will explore these more robust solutions for when durability is paramount.
Using Fiberglass and Resin for a Sealed Shell
Applying fiberglass cloth saturated with epoxy resin creates a robust, seamless shell over the plywood. This method is commonly used in boat building and for creating highly durable, waterproof surfaces.
What is Fiberglass Cloth?
Fiberglass cloth is a woven fabric made from fine glass fibers. It provides structural strength and a surface for the epoxy to bind to, creating a composite material that is very strong and waterproof.
The Lay-Up Process
This involves applying layers of epoxy resin and fiberglass cloth. The cloth is laid onto the wet epoxy and then saturated with more epoxy. Each layer is smoothed out to ensure no air bubbles are trapped.
Creating a Seamless Barrier
When done correctly, this process creates a continuous, impermeable layer that completely seals the plywood. This is one of the most effective ways to make plywood truly waterproof, even for submersion.
Finishing Touches
After the fiberglass and epoxy have cured, the surface can be sanded smooth and painted or varnished for UV protection and aesthetics.
Applying Waterproof Membranes or Coatings
For very demanding applications, like foundations or structures in constantly wet areas, specialized waterproof membranes or liquid-applied coatings offer a high level of protection. These are often industrial-grade solutions.
Types of Membranes
These can include rubberized asphalt, modified bitumen, or synthetic polymer sheets. They are applied to the plywood surface like a large sticker, overlapping seams to create a continuous barrier.
Liquid-Applied Coatings
Polyurethane, polyurea, or cementitious coatings can be applied to the plywood. These cure to form a tough, flexible, and seamless waterproof layer. They are often applied with specialized spraying equipment.
When to Use These Methods
These methods are usually for large-scale projects or situations where extreme water ingress is a major concern and cost is less of a factor. They offer a very high level of assurance against leaks and water damage.
Proper Application is Key
These advanced systems require careful attention to detail during application. Proper surface preparation, correct mixing ratios, and ensuring complete coverage are vital for their effectiveness.
Using Specialized Marine Plywood Adhesives
When constructing with marine plywood, using appropriate adhesives is crucial for maintaining its water resistance. Standard wood glues will fail in wet environments.
Waterproof Adhesives are Non-Negotiable
Always use adhesives specifically rated as waterproof or marine-grade. Polyurethane construction adhesives and marine-grade epoxies are excellent choices for bonding marine plywood.
Ensuring Full Coverage and Clamping
Apply the adhesive evenly to both surfaces being joined. Proper clamping is essential to ensure a strong bond and to squeeze out any excess adhesive, preventing voids.
Sealing Joints and Edges
Even with waterproof adhesives, it’s good practice to seal any exposed joints or edges with a marine-grade sealant for an extra layer of protection.
Long-Term Durability in Wet Conditions
Using the right adhesives ensures that the entire assembly remains structurally sound and water-resistant over time, even when subjected to constant moisture.
Real-Life Examples and Scenarios
To better understand how these waterproofing methods are applied, let’s look at some real-world examples and common scenarios. Seeing how others have successfully protected their plywood projects can provide practical insights and inspiration. These examples highlight the importance of choosing the right method for the job.
Example 1: Outdoor Planter Box
A homeowner wants to build a planter box for their garden that will sit on a patio. The plywood will be exposed to rain and soil moisture.
Chosen Method: Exterior grade plywood was used. The exterior surfaces were sanded, primed with an exterior wood primer, and then painted with two coats of high-quality exterior semi-gloss paint. The interior was treated with a penetrating wood sealer designed for planters.
Result: The planter box has held up well for three years, showing no signs of rot or delamination. The paint provides a good aesthetic and protective layer, while the interior sealer protects it from the soil and occasional watering.
Example 2: Workshop Shelving
A woodworker needed to build shelves in a garage that sometimes experiences dampness. The shelves would hold tools and materials.
Chosen Method: Standard interior plywood was used, but thoroughly waterproofed. The shelves were sanded and then coated with three layers of polyurethane varnish. Special attention was paid to sealing the edges and undersides.
Result: The shelves remain strong and free from moisture damage. The polyurethane created a hard, clear shell that repels water effectively. This was a cost-effective way to waterproof interior plywood for a semi-damp environment.
Scenario 1: Building a Garden Shed Base
You are building a base for a garden shed. The shed will sit on concrete, but the base itself will be made of plywood and needs to resist ground moisture and occasional rain.
Steps:
1. Use exterior grade plywood.
2. Seal all edges and surfaces thoroughly with an exterior wood sealant or a good quality exterior paint and primer.
3. Consider applying a liquid waterproofing membrane on the underside that will face the ground.
4. Ensure good drainage around the shed to prevent water pooling.
Scenario 2: Creating an Outdoor Tabletop
You want to build an outdoor dining table. The tabletop will be made of plywood and will need to withstand sun, rain, and spills.
Steps:
1. Use marine grade plywood for the best water resistance.
2. Sand the surface very smooth.
3. Apply multiple coats of marine varnish or a high-quality exterior polyurethane, ensuring full coverage.
4. For even better protection, consider applying a layer of epoxy resin over the plywood, followed by UV-resistant topcoats.
5. Regularly maintain the finish by re-applying varnish or sealant as needed.

Frequently Asked Questions
What is the easiest way to make plywood waterproof?
For ease and good results on many projects, applying multiple coats of a high-quality exterior polyurethane varnish or exterior paint with a good primer is often the simplest and most effective method. Ensure you cover all surfaces, especially edges.
Can I make regular interior plywood waterproof enough for outdoor use?
Yes, but it requires thorough preparation and multiple layers of a strong waterproofing product like exterior paint, polyurethane, or even epoxy resin. It won’t be as durable as using exterior or marine-grade plywood from the start, and regular maintenance will be needed.
How many coats of waterproofing are usually needed?
For most sealants, paints, and varnishes, at least two to three coats are recommended for adequate protection. For more demanding applications or with thinner products, more coats might be necessary. Always follow the manufacturer’s recommendations.
Does waterproofing plywood affect its appearance?
It can. Paint will completely cover the wood grain, providing a colored finish. Varnishes and sealers can add a sheen or slightly darken the wood, enhancing its natural look while providing protection.
Epoxy resin creates a glossy, durable finish.
How long does waterproof plywood last?
The lifespan of waterproofed plywood depends heavily on the method used, the quality of materials, the level of exposure to water, and maintenance. Properly waterproofed exterior or marine-grade plywood in moderate conditions can last many years, sometimes decades. Inferior methods or constant extreme exposure will shorten its life significantly.
Conclusion
Keeping plywood dry is important. You’ve learned how to pick the right wood and prepare it well. We went over easy methods like paint and varnish, and tougher ones like epoxy and fiberglass. By following these steps, you can make your plywood projects last much longer, no matter how wet they get. Choose the best method for your needs and enjoy building things that will stand the test of time and water.