How to Pass a Radon Test: Expert Tips for a Clean Bill of Health
To pass a radon test, you need to complete a 48- to 72-hour short-term test or a 90-day long-term test in your home or property. These tests should be conducted in the lowest lived-in level of the building, away from drafts and windows, and left undisturbed for the entire testing period.
Additionally, it’s essential to follow the specific instructions provided with the radon test kit to ensure accurate results. Radon is a radioactive gas that occurs naturally in the ground and can seep into homes through cracks and gaps in the foundation.
Prolonged exposure to high levels of radon can be harmful to your health, so it’s crucial to regularly test and mitigate radon in your living environment.
Why Radon Testing Is Important
Radon testing is crucial for ensuring a safe living environment. To pass a radon test successfully, homeowners should consider proper ventilation, sealing cracks, and investing in a reliable testing kit. Don’t take any chances when it comes to your family’s health and well-being.
The Dangers Of Radon
Radon is a naturally occurring radioactive gas that is odorless, colorless, and tasteless. It is produced from the decay of uranium found in soil, rocks, and water. But why is radon testing so crucial? The answer lies in the potential dangers it poses to our health and well-being.
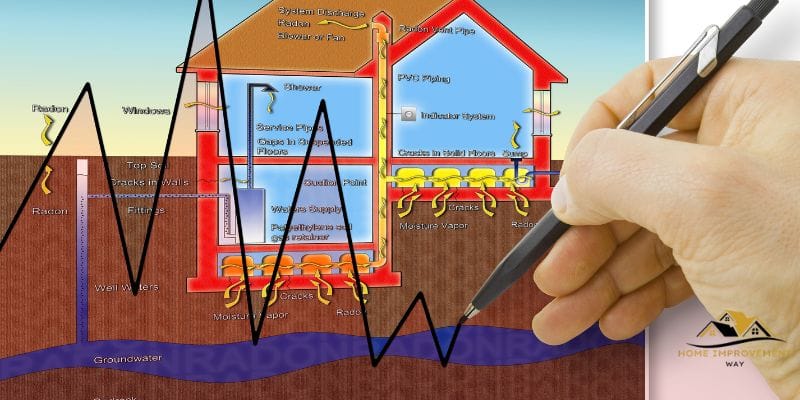
Radon gas can enter your home through cracks in the foundation, gaps in floors, and through well water. Since radon is invisible, we often don’t realize its presence until it’s too late. Exposure to high levels of radon over an extended period can lead to severe health implications.
Health Risks Associated With Radon
The health risks associated with radon exposure are significant and should not be taken lightly. According to the Environmental Protection Agency (EPA), radon is the second leading cause of lung cancer in the United States, responsible for an estimated 21,000 deaths each year. Prolonged exposure to elevated levels of radon increases the risk of developing lung cancer, especially for smokers.
When radon gas is inhaled, it decays further, releasing tiny radioactive particles that can damage the cells lining the lungs. This damage can eventually lead to lung cancer. What makes radon particularly concerning is that symptoms of radon-induced lung cancer may not appear until many years after exposure, making early detection crucial.
Regular radon testing is essential to ensure your home’s safety and mitigate the risk of long-term health issues. Identifying and addressing elevated radon levels will allow you to take necessary measures to protect yourself and your loved ones.
Conclusion: Radon testing is imperative to safeguard our health and minimize the risks associated with prolonged exposure to high levels of this radioactive gas. By prioritizing radon testing, you can take proactive steps to create a safe living environment for you and your family. Don’t underestimate the importance of radon testing; it could save lives.
Note: Information on radon’s health risks and the importance of testing should be thoroughly researched and validated to ensure accuracy and compliance with local regulations.
Preparing For A Radon Test
If you’re planning to buy or sell a house, scheduling a radon test is an important step toward ensuring the safety and well-being of your family. Radon is a colorless and odorless gas that can seep into homes through cracks in the foundation or water sources.
Prolonged exposure to high levels of radon can pose serious health risks, including an increased risk of lung cancer. To ensure accurate test results, it’s crucial to properly prepare for a radon test. This article will guide you through the essential steps you need to take to get ready for this crucial test.
Understanding Radon Testing
Before diving into the preparations, it’s important to have a basic understanding of how radon testing works. Radon testing measures the concentration of radon gas in a property and determines if mitigation is necessary. There are two main approaches to radon testing: short-term and long-term tests.
- Short-term tests: These tests are the quickest and most common method for initial radon screening. They typically last between 2 to 7 days and provide a snapshot of the radon levels in your home.
- Long-term tests: If short-term test results are inconclusive or if you want a more accurate average radon level over time, long-term tests are recommended. These tests extend over a duration of 90 days to a year.
Both types of tests are effective in determining radon levels, but short-term tests give you faster results and help you take immediate action if needed. It’s crucial to follow the testing guidelines provided with the test kit to ensure accurate results.
Getting A Professional Radon Test Kit
Now that you’re familiar with the different types of radon tests, it’s time to get a professional radon test kit. These kits can be obtained from authorized radon testing companies or local health departments. Since accuracy is key, it’s highly recommended to use a professional test kit to obtain reliable results.
| Benefits of Professional Radon Test Kits |
|---|
| ✓ High-quality testing equipment |
| ✓ Accurate and reliable results |
| ✓ Detailed instructions for proper usage |
| ✓ Assistance and support from radon experts |
Professional test kits are specifically designed to provide accurate measurements and often come with detailed instructions to ensure proper usage. Additionally, you can rely on the expertise and guidance of radon professionals if you have any questions or concerns during the testing process.
Note: Avoid test kits available in general stores that may provide inferior results. Choosing a professional radon test kit is an investment in your health and the accuracy of the results.
Conducting A Radon Test
Conducting a radon test is an essential step in ensuring the safety of your home and the well-being of your family. Radon is a radioactive gas that can seep into buildings from the ground, and long-term exposure to high levels of radon can increase the risk of lung cancer.
Therefore, it is important to conduct regular radon tests to detect and mitigate any potential issues. In this article, we will guide you through the process of setting up a test kit and monitoring radon levels in your home.
Setting Up The Test Kit:
Setting up a radon test kit is a straightforward process that can be done by following a few simple steps. Here’s how:
- Start by selecting a suitable location for the test kit. It is recommended to place the kit in the lowest livable area of your home, such as the basement or ground floor.
- Ensure that the test kit is placed at least 20 inches above the floor and away from exterior walls, windows, doors, and air vents. This will help prevent any interference with the results.
- Open the test kit and remove any packaging, making sure not to touch or tamper with the testing materials. Follow the instructions provided by the manufacturer.
- Place the kit in the designated location, ensuring that it remains undisturbed for the duration of the testing period.
- Seal the test kit according to the instructions provided, and record the start date and time on the designated space. This will help you accurately track the testing period.
- Remember to keep doors and windows closed as much as possible during the testing period to ensure accurate results.
Monitoring Radon Levels:
Once the radon test kit is set up, it’s important to monitor the radon levels to determine if any further action is needed. Here are some key points to keep in mind:
- Allow the test kit to remain undisturbed for the recommended testing period, typically between 2 to 7 days.
- Avoid moving or tampering with the test kit during this time, as it may affect the accuracy of the results.
- After the testing period, carefully seal the test kit and send it to a certified laboratory for analysis.
- Once the results are obtained, take appropriate action based on the recommended guidelines provided by local authorities or professionals.
- If the radon levels are found to be high, it is recommended to consult a radon mitigation specialist who can help you develop a plan to reduce the levels.
By following these steps and conducting regular radon tests, you can ensure the safety of your home and protect your family from the potential risks associated with radon exposure.
Interpreting Radon Test Results
Get accurate results in your radon test with expert interpretation. Learn the best strategies to pass the test and ensure a safe living environment.
Once you’ve conducted a radon test in your home, it’s essential to interpret the results accurately to understand the potential dangers and take the necessary actions. This section will guide you through understanding the radon levels and the recommended actions based on the test results.
Understanding The Radon Levels
Radon levels are typically measured in picocuries per liter (pCi/L). It’s important to note that there is no safe level of radon, as even low levels can pose a health risk over time.
Here’s a breakdown of the different radon levels and their implications:
| Radon Level (pCi/L) | Implications |
|---|---|
| Below 2 pCi/L | Although below the recommended action level, it’s still advisable to reduce radon levels further. |
| 2 – 4 pCi/L | Consider taking action to reduce radon levels, especially if you spend a significant amount of time in the affected area. |
| Above 4 pCi/L | Immediate action is necessary to mitigate radon exposure. Consult a professional radon mitigation contractor to develop a plan and reduce levels. |
Recommended Actions Based On Test Results
The appropriate action to take depends on the radon levels detected during the test:
- Below 2 pCi/L: Even though the levels are below the recommended action level, it’s still advisable to take steps to further reduce radon levels. Implementing preventive measures can provide peace of mind and ensure the long-term safety of your household.
- 2 – 4 pCi/L: While this falls within the acceptable range, it’s still wise to consider taking action to reduce radon levels. Especially if you spend a significant amount of time in the area where higher levels were detected, it’s essential to take measures to mitigate radon exposure.
- Above 4 pCi/L: Immediate action is necessary to protect your health. With radon levels exceeding 4 pCi/L, it’s crucial to consult a professional radon mitigation contractor. They will assess the situation, develop a customized plan, and implement effective measures to reduce the levels of radon in your home.
Remember, no matter the test results, it’s always better to err on the side of caution when it comes to radon exposure. Taking proactive steps to reduce radon levels can significantly reduce the risks and ensure a healthier living environment for you and your loved ones.
Mitigating Radon Gas In Your Home
Radon gas is a serious health risk and it’s important to take action if high levels of radon are detected in your home. Mitigating radon gas can help create a safe living environment for you and your family. In this section, we will discuss when to consider radon mitigation and different techniques you can use to reduce radon levels in your home.
When To Consider Radon Mitigation
If you’ve conducted a radon test and the results show levels above the recommended limits, it’s crucial to consider radon mitigation. Radon levels can vary from season to season, so it’s important to conduct multiple tests to get an accurate average reading. If the average reading exceeds 4 picocuries per liter (pCi/L), it’s time to take action.
| Radon Levels | Recommended Actions |
|---|---|
| Below 2 pCi/L | No action needed |
| 2 – 4 pCi/L | Consider radon mitigation |
| Above 4 pCi/L | Take immediate action for radon mitigation |
Radon Mitigation Techniques
There are several effective techniques available for radon mitigation. The technique that is right for your home depends on various factors, including its design, foundation type, and geographical location. Here are a few commonly used techniques:
- Sub-Slab Depressurization (SSD): This technique involves creating a pressure differential to prevent radon gas from entering your home. A vent pipe is inserted through the foundation and connected to a fan, which draws the gas out from beneath the building through the pipe. The gas is then safely expelled outside, reducing the radon levels indoors.
- Sump Pit Radon Mitigation: If your home has a sump pit, it can be used as an entry point for radon mitigation. A PVC pipe is installed in the sump pit and connected to a fan, which redirects the radon gas from below the floor into the pipe. The gas is then vented safely outside.
- Crawlspace Radon Mitigation: For homes with crawlspaces, installing a vapor barrier along with a ventilation system is an effective method. The vapor barrier helps to reduce radon gas seepage, while the ventilation system ensures proper airflow to prevent radon buildup.
- House Pressurization: This technique involves pressurizing the home’s interior to prevent radon entry. By using a fan, outdoor air is blown into the house, creating positive pressure and reducing the potential for radon infiltration.
It’s important to consult with a professional radon mitigation contractor to determine the most suitable technique for your home. They have the expertise to assess your home’s specific requirements and provide effective radon mitigation solutions.
Conclusion
To sum it up, passing a radon test is crucial for the safety of your home and your family’s health. By following the steps outlined in this blog, including testing your home regularly, sealing any entry points, and employing the help of a professional, you can ensure a safe living environment.
Remember, radon is invisible and odorless, so taking proactive measures to combat it is essential. Stay informed and take action to protect what matters most. Be proactive, be safe!