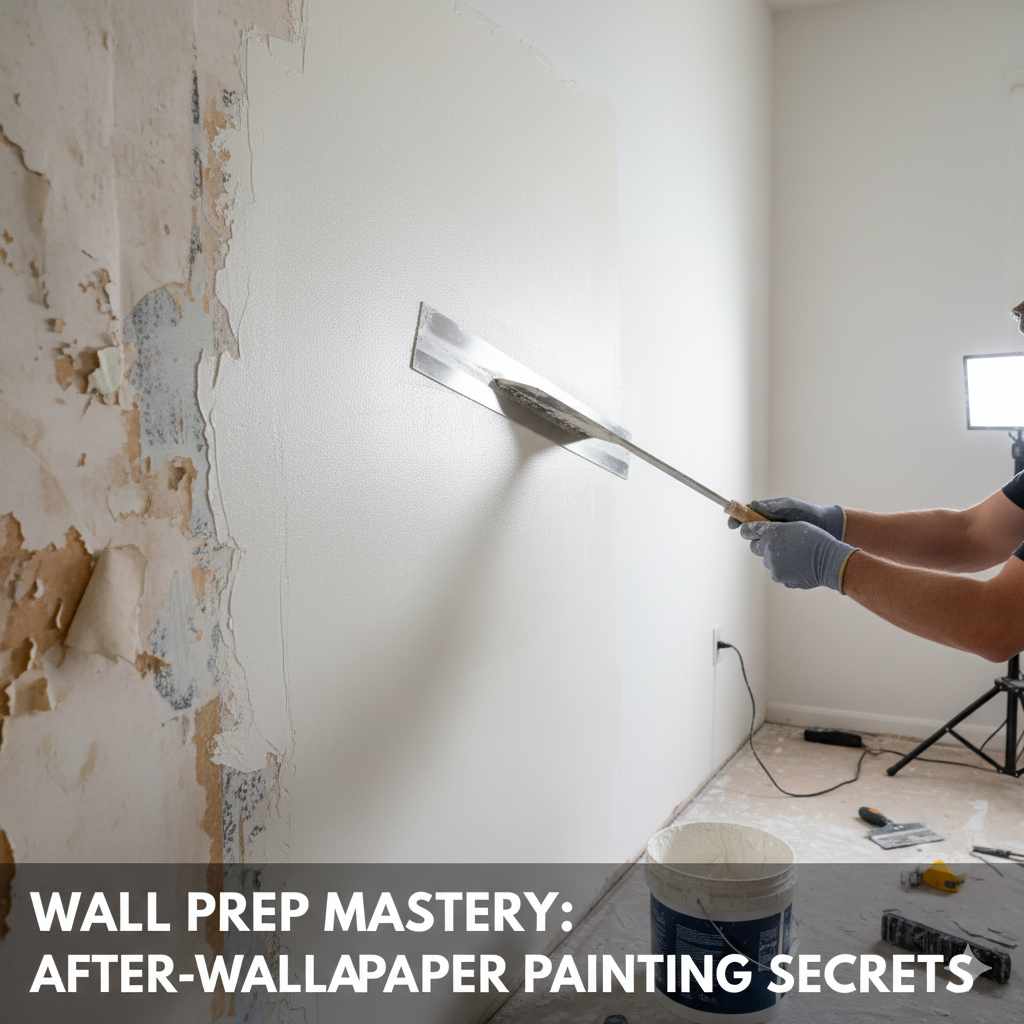
How to Prep Walls for Painting After Removing Wallpaper: Essential Guide
Prep walls for painting after removing wallpaper by thoroughly cleaning, repairing damage, and applying a primer. This ensures a smooth, even finish for your new paint job.
Ever tackled wallpaper removal only to find a sticky, bumpy mess underneath? You’re not alone! It’s a common hurdle when refreshing a room. Peeling off old wallpaper can leave behind stubborn adhesive, rough patches, and sometimes even gouges in your drywall. Trying to paint over this unprepared surface is a recipe for disappointment – think bubbles, peeling paint, and an uneven look. But don’t worry! With a few simple steps and the right approach, you can transform those post-wallpaper walls into a perfectly smooth canvas for your new paint. Let’s get your walls ready for a beautiful new look!
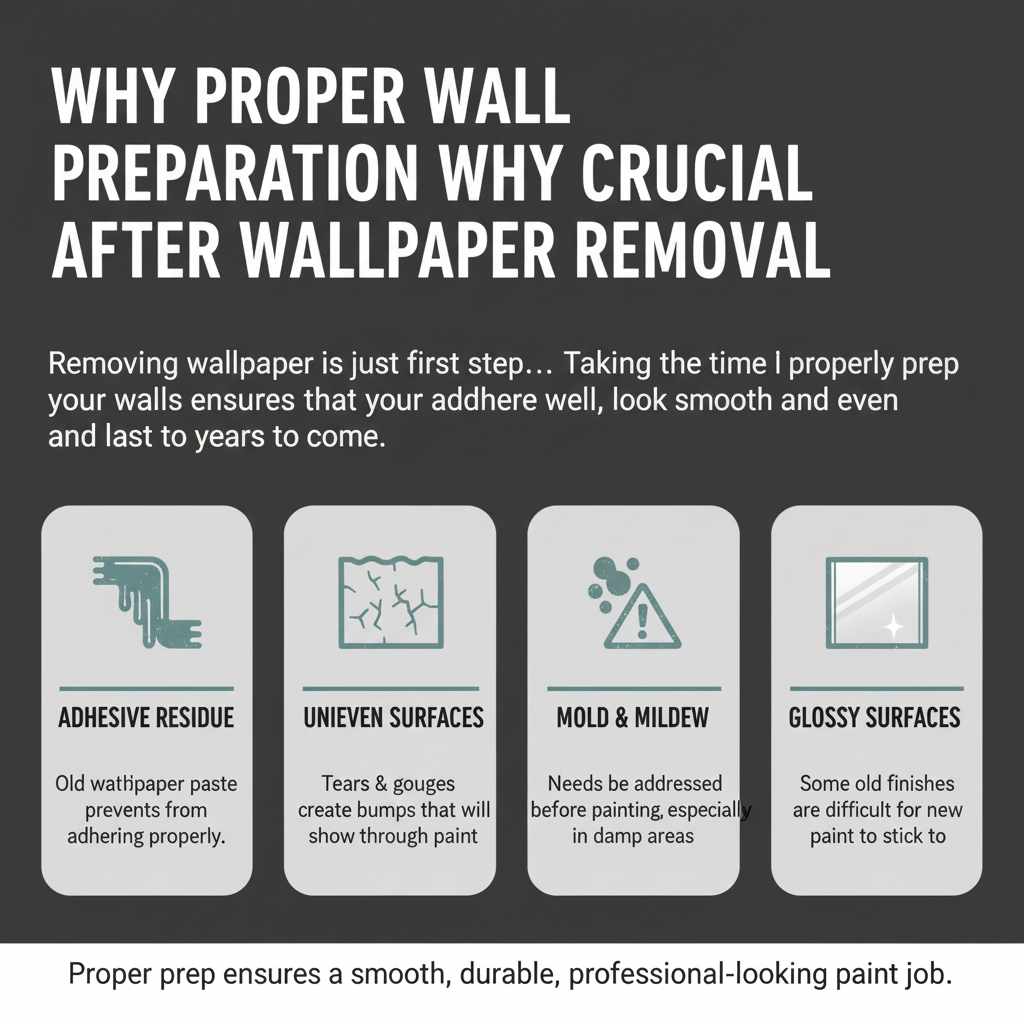
Why Proper Wall Preparation is Crucial After Wallpaper Removal
Removing wallpaper is just the first step in your painting project. The real magic, and the key to a professional-looking finish, happens in the preparation stage. Skipping this can lead to a host of problems that will haunt your beautiful new paint job. Think of it like building a sturdy house – you need a solid foundation. For painting, that foundation is your wall surface.
- Adhesive Residue: Old wallpaper paste is notoriously sticky and can prevent new paint from adhering properly.
- Uneven Surfaces: Tears in the drywall paper or gouges from scraping can create bumps and divots that will show through paint.
- Mold and Mildew: If wallpaper has been up for a long time, especially in damp areas, mold or mildew might have taken hold, which needs to be addressed before painting.
- Glossy Surfaces: Some old wallpapers or the adhesive used can leave a slightly glossy finish that paint struggles to stick to.
Taking the time to properly prep your walls ensures that your paint will adhere well, look smooth and even, and last for years to come. It’s a step that truly pays off in the end result.
Essential Tools and Supplies You’ll Need
Before you dive in, gather your supplies. Having everything ready will make the process much smoother and more enjoyable. Here’s a checklist of what you’ll likely need:
| Category | Tools/Supplies | Purpose |
|---|---|---|
| Cleaning | Sponge or rags Bucket Warm water Mild dish soap or TSP substitute |
Washing away residue and grime. |
| Scraping & Repair | Putty knife or wallpaper scraper Sanding block or electric sander Medium-grit (100-150) and fine-grit (220) sandpaper Drywall joint compound (spackle) Putty knife for applying compound Utility knife |
Removing stubborn bits, smoothing imperfections, filling holes. |
| Priming & Painting Prep | Painter’s tape Drop cloths or plastic sheeting Primer (water-based or oil-based, depending on the wall) Paint roller and brushes Paint tray |
Protecting surfaces, ensuring paint adhesion, and applying the first coat. |
| Safety | Gloves Safety glasses Dust mask |
Protecting yourself from dust, chemicals, and debris. |
Don’t forget to wear old clothes! This can get messy, and you want to protect your good outfits.
Step-by-Step Guide: Prepping Walls for Painting After Wallpaper Removal
Let’s break down the process into manageable steps. Follow these carefully, and you’ll have perfectly prepped walls in no time!
Step 1: Remove All Remaining Wallpaper and Adhesive
Even after the bulk of the wallpaper is gone, there’s often sticky residue and small scraps left behind. This is the most tedious part, but it’s crucial.
- Dampen the Walls: Mix warm water with a bit of mild dish soap or a specialized wallpaper remover solution. You can also use a TSP substitute (trisodium phosphate substitute) for tougher grime, but always follow product instructions carefully.
- Apply the Solution: Use a sponge or a garden sprayer to apply the solution to the remaining wallpaper and adhesive. Let it soak for about 10-15 minutes to soften the paste. Don’t let it dry out; reapply if needed.
- Scrape Gently: Use a putty knife or wallpaper scraper to gently scrape away the softened adhesive. Hold the scraper at a low angle to avoid gouging the drywall paper. Work in small sections.
- Stubborn Spots: For very stubborn areas, you might need to reapply the solution and let it sit longer, or try a dedicated adhesive remover.
This step requires patience. Rushing it will mean you’ll be dealing with sticky spots under your new paint.
Step 2: Wash the Walls Thoroughly
Once all the visible wallpaper and adhesive are off, it’s time for a good cleaning. This removes any lingering residue, dirt, or grease that could interfere with paint adhesion.
- Prepare Cleaning Solution: Mix warm water with a mild detergent (like dish soap) or a TSP substitute. Again, check product instructions.
- Wash Walls: Use a clean sponge or soft cloth to wash the walls from top to bottom. Rinse your sponge frequently in clean water.
- Rinse: After washing, rinse the walls thoroughly with a clean sponge and plain water to remove any soap residue. Soap left on the walls can also prevent paint from adhering properly.
- Dry: Allow the walls to dry completely. This can take several hours, or even overnight, depending on humidity. You can speed this up with fans, but avoid direct heat which can cause damage.
A clean surface is paramount for a smooth paint finish.
Step 3: Inspect and Repair Wall Damage
Now that the walls are clean and dry, it’s time to look for imperfections. This is where you’ll fix any holes, cracks, or gouges left from wallpaper removal or from previous damage.
- Check for Dents and Gouges: Run your hand over the walls to feel for any unevenness. Look closely for any areas where the drywall paper might have been torn or nicked.
- Fill Small Holes and Cracks: For small nail holes, minor dents, or hairline cracks, use a good quality lightweight spackling compound or drywall joint compound. Apply it with a putty knife, pressing it into the imperfection. Smooth it flat with the wall surface, feathering the edges so it blends in.
- Repair Larger Gouges: For deeper gouges, you might need to apply the compound in thin layers, allowing each layer to dry before applying the next. For very large or deep holes, you might need a drywall patch kit.
- Allow Compound to Dry: Let the joint compound dry completely. Drying times vary depending on the product and thickness, but it’s usually a few hours. It will typically turn from a wet grey to a lighter, chalky white.
Don’t rush this step! Properly dried and filled imperfections are key to a smooth final paint coat.
Step 4: Sand the Repaired Areas and the Entire Wall
Sanding is essential for creating a perfectly smooth surface. It knocks down any bumps from the dried joint compound and slightly roughens the entire wall surface, giving the primer and paint something to grip onto.
- Sand Repaired Spots: Once the joint compound is completely dry, use a sanding block with medium-grit sandpaper (around 100-150 grit) to carefully sand down the dried compound. Sand in a circular motion until the patched area is flush with the rest of the wall. Be gentle to avoid creating a noticeable dip.
- Smooth with Fine Grit: After smoothing the patches, switch to fine-grit sandpaper (220 grit) and lightly sand the entire wall surface. This is a light “dusting” to ensure overall smoothness and to de-gloss any remaining sheen.
- Clean Off Dust: This is super important! Use a damp cloth or a tack cloth to wipe down the entire wall and remove all sanding dust. You can also use a vacuum with a brush attachment. Dust is the enemy of a smooth paint finish.
A good sanding job makes a world of difference. If you have a lot of wall area to sand, consider using an electric orbital sander, but be very careful not to over-sand or damage the drywall paper. Always wear a dust mask and safety glasses during sanding.
Step 5: Prime the Walls
Priming is a non-negotiable step after removing wallpaper. It seals the repaired areas, covers any lingering stains or marks, and provides a uniform surface for your paint to adhere to.
- Choose the Right Primer: For most situations after wallpaper removal, a good quality water-based drywall primer or a stain-blocking primer is ideal. If you had significant mold issues, consider a mold-inhibiting primer. If there are dark, stubborn stains, an oil-based primer might be more effective at blocking them. Check the primer’s label for its intended use.
- Apply Primer: Using a roller for the main wall areas and a brush for the edges and corners, apply a thin, even coat of primer.
- Coverage: Ensure you get good coverage, especially over the spackled areas. Primer will often highlight any missed imperfections, so you might spot something you missed during sanding. If so, let the primer dry, lightly sand the spot, and re-prime that area.
- Drying Time: Let the primer dry completely according to the manufacturer’s instructions. This is usually a few hours.
Priming is like giving your walls a smooth, welcoming foundation for the color you’ve chosen. It ensures your paint color looks true and vibrant.
Step 6: Final Inspection and Touch-Up
Before you even think about rolling on that beautiful new paint color, take one last look.
- Check for Blemishes: With the primer on, the wall surface will look more uniform. Inspect it carefully under good lighting for any missed spots, uneven patches, or lingering texture issues.
- Light Sanding: If you find any rough spots or dust nibs, lightly sand them with 220-grit sandpaper.
- Wipe Again: Wipe down any sanded areas with a damp cloth to remove dust.
- Touch-Up Prime: If you had to do any significant touch-ups with spackle or sanding, apply a little more primer to those spots and let them dry.
This final check is your last chance to ensure a flawless paint job. It’s much easier to fix now than after your new paint is on!
Common Mistakes to Avoid
Even with the best intentions, some common pitfalls can turn a smooth prep job into a headache. Here are a few to watch out for:
- Not removing all the adhesive: This is the biggest culprit for paint peeling later.
- Not washing the walls: Any grease or grime will prevent paint from sticking.
- Rushing the drying times: Ensure compound and primer are fully dry before moving to the next step.
- Over-sanding or sanding too aggressively: This can damage the drywall paper, creating more work.
- Skipping the primer: This is essential for adhesion and an even finish after wallpaper removal.
- Not cleaning up dust: Dust is the enemy of a smooth paint job.
By being aware of these common mistakes, you can steer clear of them and ensure a successful outcome.
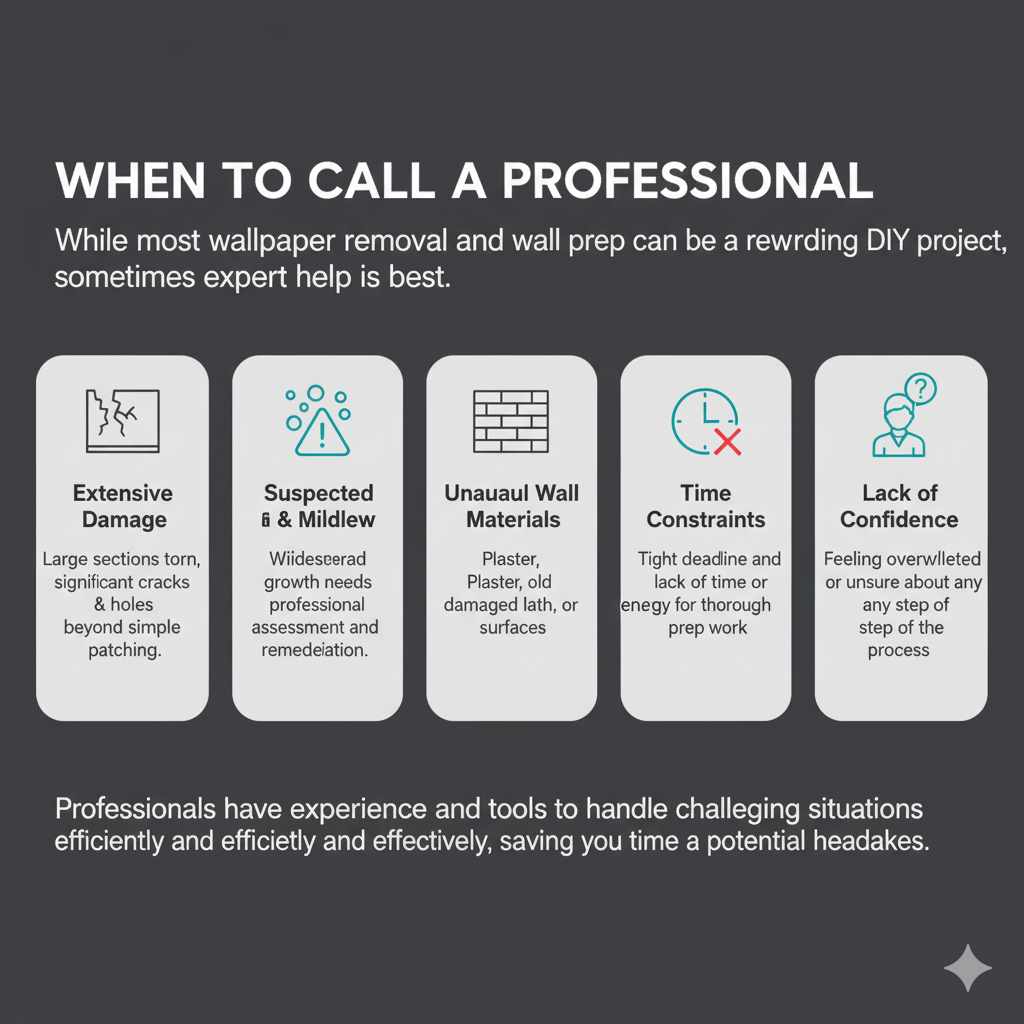
When to Call a Professional
While most wallpaper removal and wall prep can be a rewarding DIY project, there are times when calling in a professional might be the best option. If you encounter any of the following, it’s worth considering expert help:
- Extensive Drywall Damage: If large sections of drywall paper have been torn off, or if there are significant cracks and holes that go beyond simple patching.
- Suspected Mold or Mildew: If you discover widespread mold or mildew, it’s crucial to have it assessed and remediated by professionals to ensure it’s handled safely and effectively. The EPA provides guidance on mold, but professional assessment is often recommended for significant infestations.
- Unusual Wall Materials: If your walls are made of plaster, or if you encounter old, damaged lath and plaster, the repair methods can be different and more complex.
- Time Constraints: If you have a tight deadline and lack the time or energy to dedicate to thorough prep work.
- Lack of Confidence: If you’re feeling overwhelmed or unsure about any step of the process, a professional can ensure it’s done correctly the first time.
Professionals have the experience and tools to handle challenging situations efficiently and effectively, saving you time and potential headaches.
Frequently Asked Questions (FAQ)
Here are some common questions homeowners have about prepping walls after wallpaper removal:
Q1: How long does it take to prep walls after removing wallpaper?
A1: The time can vary greatly depending on the size of the room, how difficult the wallpaper was to remove, and the extent of wall damage. It can take anywhere from a few hours for a small, easy job to several days for a larger, more challenging project.
Q2: Can I paint directly over old wallpaper adhesive?
A2: No, you absolutely should not paint directly over old wallpaper adhesive. It’s sticky and will prevent your new paint from adhering properly, leading to peeling, bubbling, and a poor finish.
Q3: What’s the best way to remove stubborn wallpaper glue?
A3: For stubborn glue, try a dedicated wallpaper adhesive remover solution. You may also need to use a scraper and repeat the dampening and scraping process. Ensure you wash the walls thoroughly afterward.
Q4: Do I need to prime if the walls look okay after removing wallpaper?
A4: Yes, priming is essential. Even if the walls look okay, primer seals the surface, covers any faint adhesive residue, and ensures your new paint adheres evenly for a smooth, professional finish.
Q5: Can I use regular drywall mud for repairs?
A5: For minor repairs, lightweight spackling compound or drywall joint compound is best. For larger areas, you might use a setting-type joint compound. Regular drywall mud is generally too heavy and prone to cracking for surface repairs.
Q6: How do I know if I have mold behind the wallpaper?
A6: Signs of mold can include a musty smell, dark or discolored patches on the wall, or a fuzzy texture. If you suspect mold, it’s important to address it carefully, as it can be a health hazard. Professionals are often recommended for significant mold issues.
Conclusion
Successfully prepping your walls after removing wallpaper is the foundation for a beautiful, lasting paint job. It might seem like a lot of work, but by following these steps – from thorough cleaning and meticulous repair to careful sanding and priming – you’re setting yourself up for a fantastic outcome. Remember, patience is key. Take your time with each stage, ensure everything is dry and clean before moving on, and don’t hesitate to give your walls a final inspection. With these techniques, you’ll transform those challenging post-wallpaper walls into a smooth, perfect canvas that will showcase your new paint color beautifully. Happy painting!