How to Recover a Lampshade: Proven Essential Guide
Quick Summary: Recovering a lampshade wire frame is an achievable DIY project. This guide breaks down the process into simple, manageable steps, transforming your old shade into a beautiful, custom piece with minimal cost and effort. You’ll learn the essential tools, materials, and techniques to bring new life to your lighting.
Have you ever looked at a perfectly good lampshade and thought, “If only it wasn’t this color or pattern”? Or perhaps your favorite lamp shade has a tear or a stain that just won’t budge? Don’t toss it just yet! Recovering a lampshade is a fantastic way to refresh your decor without buying new. It’s a project that lets your creativity shine, and I’m here to show you just how simple it can be. We’ll walk through everything you need, from picking the right fabric to getting that professional-looking finish. Get ready to give your lamps a stylish makeover!
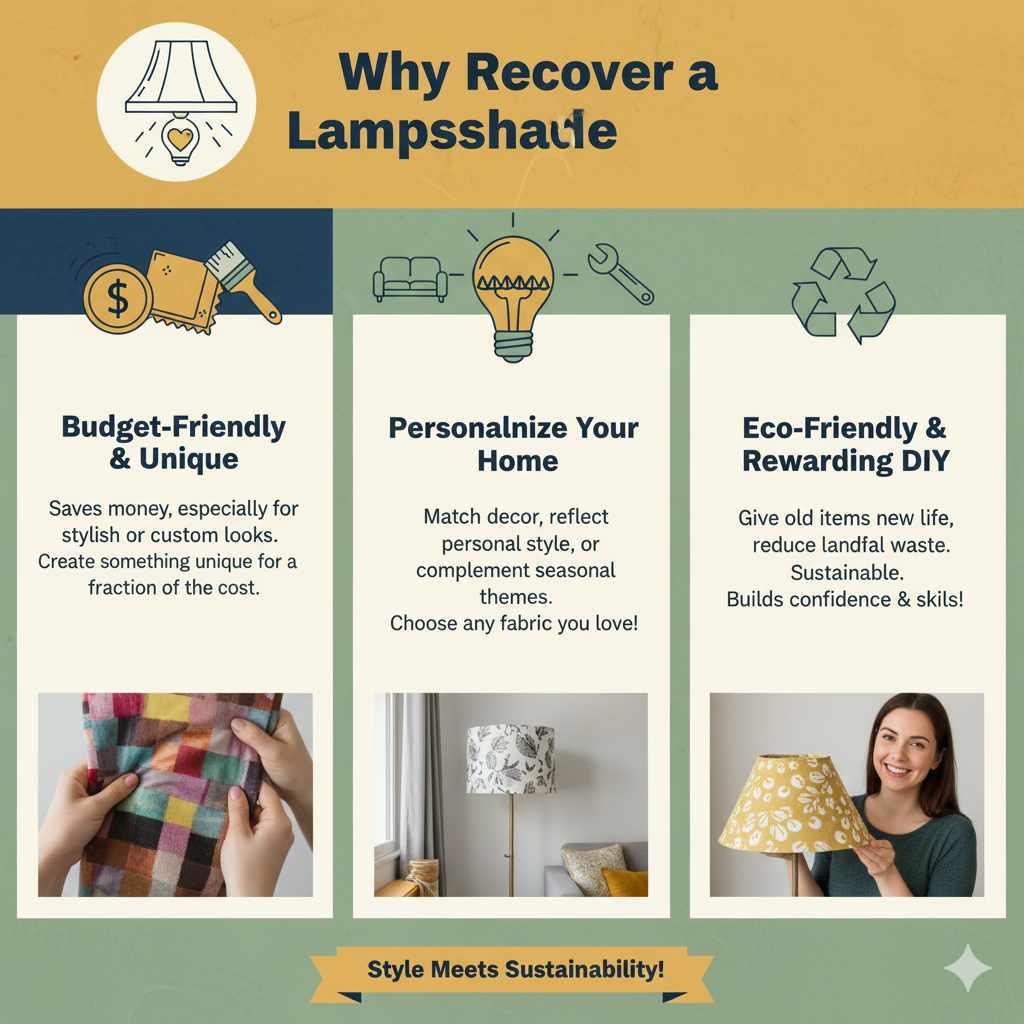
Why Recover a Lampshade?
There are so many great reasons to recover a lampshade. For starters, it’s incredibly budget-friendly. Buying a new lampshade, especially a stylish or custom one, can add up quickly. With a little fabric and some basic supplies, you can create something unique for a fraction of the cost. It’s also a wonderful way to personalize your home. Your lamps can perfectly match your existing decor, reflect your personal style, or even complement a seasonal theme. Think about it: you can choose any fabric you love, from bold patterns to subtle textures, and make your lighting truly your own.
Beyond aesthetics and cost, recovering a lampshade is also an environmentally conscious choice. Instead of contributing to landfill waste, you’re giving an existing item a new lease on life. This practice aligns with a more sustainable approach to home decorating, allowing you to be both stylish and eco-friendly. Plus, it’s a rewarding DIY project that builds your confidence in home improvement skills. You’ll be amazed at what you can create with just a few hours and some simple tools!
Understanding Your Lampshade Wire Frame
Before we dive into recovering, it’s important to understand the structure you’re working with. Most lampshades, especially those that are candidates for recovering, are built around a wire frame. This frame provides the shape and support for the shade. These frames are typically made of metal – usually steel or aluminum – and consist of several rings connected by vertical struts (sometimes called spider arms or harp supports). The top ring is usually smaller than the bottom ring, creating the classic tapered shape of many lampshades.
The way the fabric is attached can vary. Some shades have fabric glued directly to the frame and a liner, while others might have fabric stretched and secured with trim or tape. For the purpose of recovering, we’re often dealing with a frame that might have old fabric remnants, a slightly damaged original material, or a frame that’s perfectly intact but needs a new look. Knowing this structure helps us understand how to remove the old material and how to securely attach the new fabric. The integrity of this wire frame is crucial for a well-shaped finished product.
Essential Tools and Materials
Gathering the right tools and materials before you start is key to a smooth and successful project. It’s like preparing your workbench before starting any woodworking task – it saves time and frustration later! Here’s what you’ll need to recover your lampshade wire frame:
Tools You’ll Need:
- Pliers: A good pair of needle-nose pliers will be invaluable for bending and snipping wires, especially when removing old material or making minor adjustments to the frame.
- Wire Cutters: For cleanly cutting through any stubborn wires if you need to remove old attachments.
- Scissors: Sharp fabric scissors are a must for precise cutting of your new fabric.
- Measuring Tape or Ruler: To accurately measure your lampshade for fabric cutting.
- Seam Ripper: Extremely useful for carefully removing old fabric and glue without damaging the frame.
- Hot Glue Gun and Glue Sticks: For securely attaching fabric edges and trim. Low-temp glue guns are often safer for delicate fabrics.
- Fabric Glue (Optional): For a more flexible bond or for specific fabric types.
- Craft Knife or Rotary Cutter: For making clean cuts, especially in tight spots.
- Gloves: To protect your hands from sharp edges or hot glue.
- Masking Tape or Painter’s Tape: To temporarily hold fabric in place while glue dries.
Materials You’ll Need:
- New Fabric: Choose a fabric that suits your style and the lamp. Consider the weight and opacity. Cotton, linen, and polyester blends are common choices.
- Lampshade Frame: The wire frame you’re recovering. Ensure it’s clean and sturdy.
- Lining Fabric (Optional): If your original shade had a liner or you want to diffuse the light more, you might want a thin, light-colored fabric for this.
- Trim or Ribbon: For finishing the top and bottom edges, adding decorative flair.
- Spray Adhesive or Fabric Glue: To adhere the fabric to the frame or any internal support.
- Measuring Tape: For measuring the shade circumference and height.
- Old Newspaper or Drop Cloth: To protect your work surface.
Having these items ready will make the process much smoother. Remember, safety first! Always work in a well-lit area and be mindful of sharp tools and hot glue.
Step-by-Step Guide: How to Recover a Lampshade Wire Frame
Let’s get to the fun part! Following these steps will guide you through recovering your lampshade, turning an old or tired shade into something new and exciting.
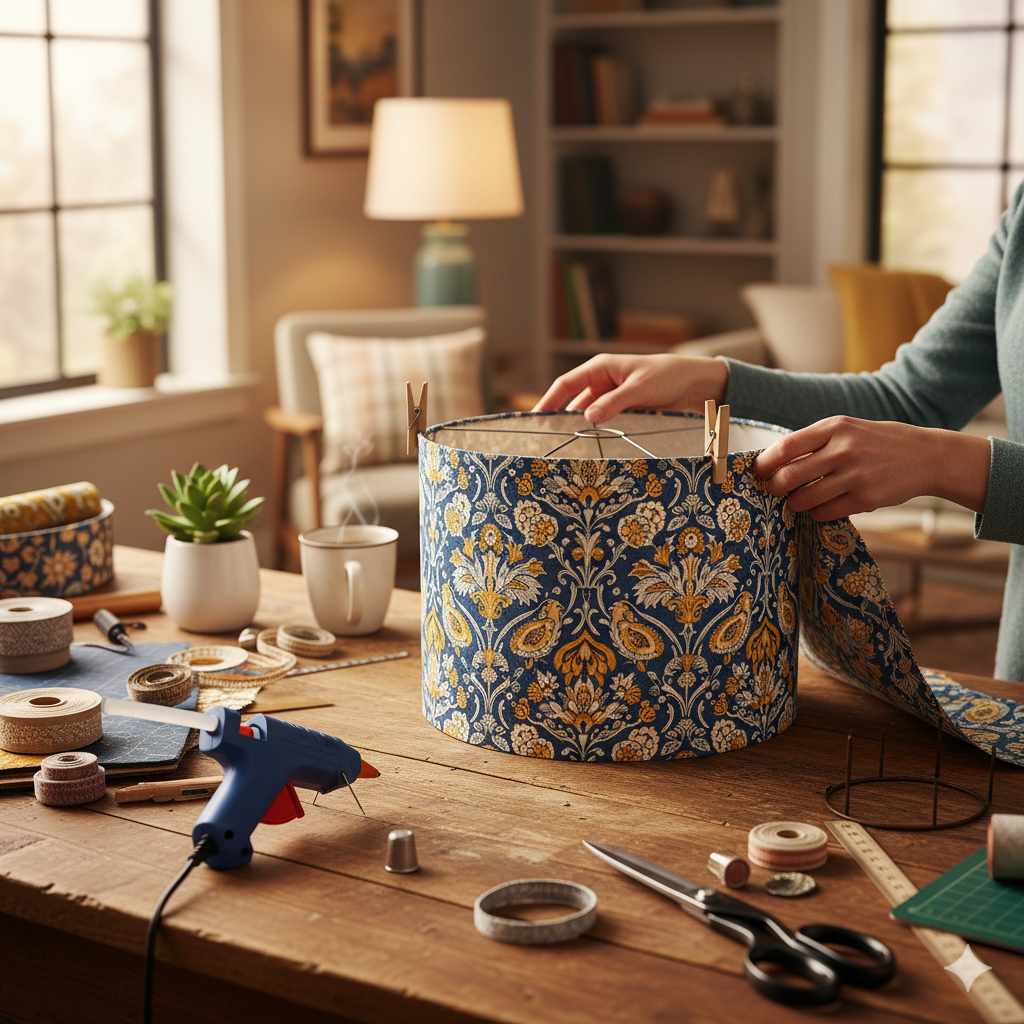
Step 1: Remove the Old Fabric
This is where your seam ripper and pliers will come in handy. Carefully examine how the old fabric is attached. Most often, it’s glued or taped around the top and bottom rings, and sometimes along the struts. Start by gently pulling away any loose trim or fabric. Use your seam ripper to carefully loosen the fabric from the glue along the edges. If there’s a lot of glue residue, you might need to gently scrape it away with a craft knife or even a bit of heat from a hairdryer (on a low setting) to soften it. Be patient; you don’t want to bend or damage the wire frame itself. Once the fabric is off, use your pliers or wire cutters to snip away any remaining threads or old adhesive strips. The goal is to have a clean, bare wire frame.
Step 2: Measure and Cut Your New Fabric
Now it’s time to prepare your new fabric. You’ll need to measure the height of your lampshade frame and the circumference of the bottom ring. To get the circumference, you can wrap a flexible measuring tape around the widest part of the shade. Add about 1 inch (2.5 cm) to this measurement for seam allowance and overlap. For the height, measure from the top ring to the bottom ring along the side of the shade. Add about 1 inch (2.5 cm) to the top and bottom for hemming or attaching to the frame.
Lay your chosen fabric flat on a clean surface, preferably with a cutting mat underneath if you’re using a rotary cutter. Using your measurements, draw the rectangle for your fabric piece. Ensure your lines are straight and your corners are square. Carefully cut out the fabric using sharp fabric scissors or a rotary cutter. If you’re using a lining fabric, cut that piece to the exact same dimensions.
Tip: If your lampshade has a complex shape or angled struts, you might need to cut a pattern from paper first. Drape paper over the frame, mark the edges, and then transfer those shapes to your fabric.
Step 3: Attach the Fabric to the Frame
This is a critical step for a neat finish. You can either glue the fabric directly to the frame, or if your frame has internal support panels, you might be able to glue it to those. For a direct-to-frame approach, start by applying a thin bead of hot glue or fabric glue to the top wire ring. Carefully align one long edge of your fabric rectangle with this ring, pressing it down firmly. Work your way around the ring, keeping the fabric taut and smooth. Avoid wrinkles or sags.
Once the top edge is secure, move to the bottom ring. Apply glue to the bottom ring and gently pull the fabric down, ensuring it remains smooth and wrinkle-free. Press the fabric firmly onto the glued ring. You’ll have some excess fabric here, which you’ll fold over and secure to create a neat edge. Work in small sections, applying glue and pressing the fabric down. If you’re using a lining fabric, you’ll attach it in the same way, either before or after the outer fabric, depending on how you want to finish the edges.
Step 4: Secure the Edges and Finish
Now, let’s neaten up those edges. At the top and bottom, you’ll have excess fabric. Fold this excess fabric over the wire rings and secure it with hot glue or fabric glue. For a very clean finish, you can tuck the raw edge of the fabric under before gluing. This creates a hemmed edge. Ensure the fabric is pulled taut as you glue it down.
Attaching to Struts: If your frame has vertical struts, you’ll need to secure the fabric to these as well. Carefully fold the fabric around each strut, creating neat pleats or folds if necessary, and secure them with a dab of hot glue. Make sure these are as smooth as possible. This step requires a bit of patience to get a professional look.
Adding Trim: Once the fabric is securely attached and all edges are neat, you can add trim or ribbon. Apply a bead of hot glue along the top and bottom edges, over where the fabric is attached to the rings. Carefully press your trim or ribbon into the glue, working your way around the shade. Overlap the ends of the trim slightly for a seamless finish.
Step 5: Final Touches and Inspection
Take a step back and admire your work! Inspect the entire lampshade for any loose threads, glue drips, or uneven areas. Trim any stray threads with your scissors. If you see any small gaps or areas where the fabric isn’t sticking well, a tiny bit of extra glue can fix it. Make sure the fabric is smooth and wrinkle-free all around. If you used a lining, ensure it’s also neatly attached and not visible from the outside.
Once you’re happy with the look, allow all the glue to dry completely. Then, carefully attach the lampshade to your lamp base. Turn on the light and see how your new shade transforms the room! You’ve successfully recovered a lampshade!
Choosing the Right Fabric for Your Lampshade
The fabric you choose is crucial to the final look and feel of your lampshade. It affects how light is diffused, the overall style, and how durable the shade will be. Here’s a guide to help you pick the perfect material:
Fabric Types:
- Cotton: Versatile, easy to work with, and comes in countless prints and colors. It’s a great choice for beginners.
- Linen: Offers a natural, slightly textured look that can add warmth and sophistication. It can be a bit more delicate than cotton.
- Polyester Blends: Often more durable and wrinkle-resistant than natural fibers. They can mimic the look of linen or silk at a lower cost.
- Silk/Satin: Provides a luxurious feel and a soft glow. These can be more challenging to work with and may require professional cleaning.
- Burlap/Jute: For a rustic or bohemian look. These are coarser weaves and might require a lining to prevent excessive light bleed.
- Sheer Fabrics: For a light, airy feel. They offer minimal light diffusion and are best for decorative purposes.
Considerations When Choosing:
- Opacity: How much light do you want to pass through? Opaque fabrics will create a more directed light, while sheer fabrics will diffuse it more broadly.
- Color and Pattern: Will the color blend with your decor? Will the pattern be too busy or too subtle? Consider how the color will look when the light is on.
- Weight: Heavy fabrics can be harder to attach smoothly and might sag over time. Lighter to medium-weight fabrics are generally easier for DIY projects.
- Flammability: While most home decor fabrics are treated to be flame-retardant, it’s always good to check. Ensure your fabric meets safety standards, especially for lamps that get warm. The Code of Federal Regulations Title 16, Part 1610 covers the flammability of textiles, which is a good reference for safety standards.
- Ease of Cleaning: Some fabrics are easier to spot-clean than others.
A good rule of thumb is to choose fabrics that are not too stretchy and have a stable weave. Pre-washing your fabric (if recommended by the manufacturer) can also help prevent shrinkage after you’ve finished your lampshade.
Troubleshooting Common Lampshade Recovery Issues
Even with the best intentions, you might run into a few hiccups. Here are some common problems and how to solve them:
| Problem | Solution |
|---|---|
| Wrinkles or Sags in Fabric | Ensure you’re pulling the fabric taut as you glue it. If it’s already dry, you might need to carefully peel it back and reapply. For minor wrinkles, a bit of steam from an iron (held at a distance) or a hairdryer might help, but be cautious not to melt glue or damage fabric. |
| Uneven Edges or Trim | Take your time when cutting and attaching the trim. If it’s uneven, you can carefully peel it off and reapply. For fabric edges, ensure you’re folding a consistent hem before gluing. |
| Glue Showing Through Fabric | Use a thin bead of glue and try to keep it on the wire frame itself, not on the visible fabric surface. If it shows, you might need to use a fabric that’s less sheer or add a lining. |
| Fabric Not Sticking Well | Ensure the wire frame is clean and free of dust or old glue residue. Use enough glue for a strong bond, but not so much that it seeps through. Fabric glue or spray adhesive can sometimes offer a stronger bond than hot glue for certain fabrics. |
| Frame is Bent or Damaged | Gently try to bend it back into shape with pliers. If it’s significantly damaged, it might be best to find a replacement frame. You can often purchase new frames online or at craft stores. |
Remember, practice makes perfect. Your first lampshade might not be flawless, but it will still be a beautiful, custom piece you made yourself!
When to Consider Replacing the Frame
While recovering is often about giving an old shade new life, there are times when the wire frame itself might be beyond repair. If the frame is significantly bent out of shape and you can’t easily straighten it, it will result in a lopsided shade, no matter how well you recover it. Similarly, if the frame is rusty and flaking, or if the welding points are broken, it compromises the structural integrity and safety of the shade.
You can find replacement lampshade frames online from various retailers or at craft supply stores. They come in many standard sizes and shapes. When purchasing a new frame, make sure it matches the size and style of your original shade, or the desired size for your lamp base. A sturdy, well-shaped frame is the foundation for a professional-looking recovered lampshade, so don’t hesitate to invest in a good one if yours is compromised.
Alternative Lampshade Recovery Methods
While the glue-and-wrap method is common, there are other ways to recover a lampshade, depending on the style you’re going for and the type of frame you have. These methods can offer different aesthetics and might be easier for certain projects.
1. Stretched Fabric Method (for Drum Shades or Simple Frames)
This method is akin to stretching a canvas. You’ll need a frame that allows for easy attachment at the top and bottom, often with clips or specific attachment points. Cut your fabric slightly larger than needed. You can use spray adhesive or fabric glue to secure the fabric to the inside of the top and bottom rings, pulling it taut as you go. For a very clean look, some people use a specialized lampshade adhesive tape that adheres to the wire and the fabric.
2. Pleated Fabric Method
This technique involves creating neat pleats in the fabric, which are then glued down along the top and bottom edges and along the struts. This adds a more formal, tailored look. It requires more precision in folding and gluing but can result in a very elegant finish. You might use a thinner fabric for this method, as multiple layers of pleats can become bulky.
3. No-Sew Fabric Wraps
For a quick and easy update, you can use wide ribbon, bias tape, or even strips of fabric that you wrap around the existing shade. This doesn’t involve fully recovering the frame but rather decorating over the existing material. This is a good option if your original shade is structurally sound but just needs a visual refresh, or if you’re looking for a temporary change.
4. Using Lampshade Making Kits
If you want a structured approach and are nervous about getting the fabric perfectly taut, consider a lampshade making kit. These kits often come with a pre-formed frame, adhesive panels, and instructions. You simply cut your fabric to size and adhere it to the panels, then attach the panels to the frame. This is a great way to achieve a professional result with less guesswork.
Each method has its own charm and challenges. The best method for you will depend on your skill level, the desired look, and the type of lampshade frame you have.

Frequently Asked Questions (FAQ)
Q1: How much fabric do I need to recover a lampshade?
You’ll need a piece of fabric that covers the height of the lampshade frame and wraps around its circumference. Measure the height and the bottom circumference, then add a few inches for overlap and hemming. It’s always better to have a little extra fabric than not enough.
Q2: Can I use any type of fabric?
While you can use many fabrics, it’s best to choose medium-weight, stable fabrics like cotton, linen blends, or some polyesters. Very stretchy, sheer, or extremely heavy fabrics can be more challenging to work with and might not drape well or adhere properly. Always check for flammability ratings for safety.
Q3: How do I get the fabric smooth without wrinkles?
Work in small sections, applying glue and pressing the fabric down firmly. Keep the fabric taut as you go. If you notice a wrinkle after it’s dried, you might have to carefully peel back that section and reapply the fabric smoothly. A hairdryer on a low setting can sometimes help relax minor wrinkles, but be cautious with heat.
Q4: What is the best adhesive for lampshade recovery?
Hot glue is popular for its quick drying time and strong bond, especially for attaching trim. Fabric glue or spray adhesive is often better for adhering the main fabric to the frame or internal panels, as it can provide a more even, flexible bond. For a professional finish, some crafters use specialized lampshade adhesives.
Q5: How do I attach the fabric to the struts (the vertical supports)?
Once the fabric is attached to the top and bottom rings, you’ll need to secure it to the struts. Carefully fold the fabric around each strut, creating neat pleats or folds if necessary, and secure them with a small amount of hot glue or fabric glue. Aim for a smooth, even finish on each strut.
Q6: Can I recover a lampshade that has a hardback or plastic frame?
Recovering hardback or plastic lampshades is different. These often have fabric that’s glued to a plastic or styrene backing. If the original fabric is damaged, you might be able to carefully peel it off and glue new fabric onto the backing. However, if the backing itself is damaged, it might be easier to replace the entire shade.
Q7: Where can I find new lampshade frames if mine is broken?
You can find new lampshade frames online from various craft supply websites, Amazon, Etsy, or specialty lighting stores. Craft stores may also carry a selection of basic frames. They come in many sizes and styles, so you can choose one that fits your lamp base and your desired aesthetic.
Conclusion
Recovering a lampshade wire frame is a truly satisfying DIY project that offers immense creative freedom and significant cost savings. By following the steps outlined in this guide, you’ve learned how to assess your frame, choose the perfect fabric, carefully remove old materials, and skillfully apply new fabric and trim. You’ve seen how the right tools and a bit of patience can transform a tired lampshade into a stunning focal point for any room.
Don’t be afraid to experiment with different fabrics, colors, and trims. Your lampshade is a canvas for your personal style, and the possibilities are endless. Whether you’re looking to update your decor, tackle a budget-friendly renovation, or simply enjoy the process of creating something beautiful with your own hands, recovering a lampshade is an achievable and rewarding endeavor. So, go ahead, pick out that perfect fabric, and let your creativity illuminate your home!