How to Remove Light Cover: Proven, Effortless Guide
Quick Summary:
Removing a light cover from a ceiling fan is simple. Usually, it involves twisting the cover counter-clockwise or releasing a few small screws. This guide provides clear, step-by-step instructions and safety tips to help you effortlessly remove your light cover for cleaning or replacement.
Ever looked up at your ceiling fan and thought, “That light fixture could use a good dusting,” but then got stuck wondering how to actually get the cover off? You’re not alone! Many of us have faced this common home improvement puzzle. It can seem a bit daunting, especially when you don’t want to accidentally break anything. But don’t worry! With a few simple tools and a bit of guidance, removing a light cover from your ceiling fan is a straightforward task. We’ll walk you through it, step-by-step, making it easy and safe. Get ready to shine a light on your DIY skills!
Why You Might Need to Remove a Light Cover
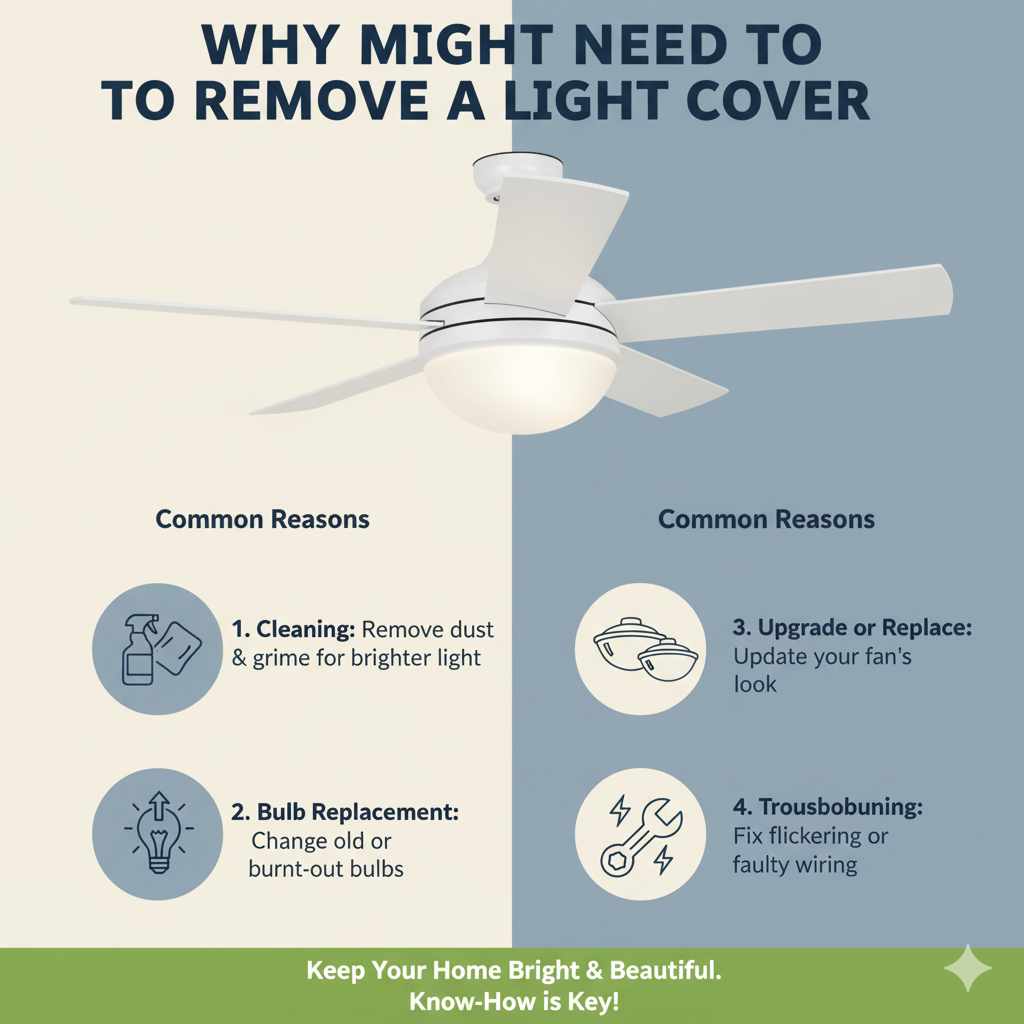
There are several good reasons why you might need to remove your ceiling fan’s light cover. The most common is for cleaning. Over time, dust and grime can build up, dimming the light and making the fixture look a bit dingy. A good cleaning can make your room feel brighter and fresher. You might also need to remove it to change a light bulb that’s hard to reach, or perhaps you’re looking to upgrade your fan’s lighting by replacing the existing cover with a new, stylish one. Sometimes, troubleshooting a flickering light or a faulty connection might require access behind the cover. Whatever your reason, knowing how to safely remove it is a handy skill for any homeowner.
Safety First! Essential Precautions Before You Start
Before we dive into the steps, let’s talk safety. Working with anything electrical, even something as simple as a light fixture, requires a little caution. The most important step is to ensure there’s no power going to the fan. This prevents any accidental shocks. Always remember that safety should be your top priority, making your DIY project a success and keeping you out of harm’s way.
1. Turn Off the Power
This is non-negotiable. Locate your home’s electrical panel (often in a basement, garage, or utility closet). Find the breaker that controls the circuit for your ceiling fan and flip it to the “OFF” position. If your fan has a wall switch, turn that off too, just to be absolutely sure. It’s a good practice to test the fan and light after flipping the breaker to confirm the power is indeed off. Sometimes, labels on the breaker box can be a bit confusing, so a quick test is always wise.
2. Gather Your Tools
You won’t need a workshop full of fancy equipment for this task. Most of the time, you can get by with just a few common household items. Having the right tools makes the job smoother and prevents you from using makeshift solutions that could cause damage.
Here’s a list of what you might need:
- Screwdriver Set: Most ceiling fan light covers are secured with screws. You’ll likely need a Phillips head screwdriver. Some might use small flathead screws. It’s good to have a set with various sizes.
- Ladder or Sturdy Step Stool: Ensure you have a stable platform to reach the fan comfortably and safely. Make sure it’s positioned on a level surface.
- Soft Cloth or Microfiber Towel: For cleaning the cover and the fan once it’s off.
- Gloves (Optional): To keep your hands clean or for a better grip.
- Small Container or Bag: To keep any removed screws safe and organized.
3. Prepare Your Workspace
Clear the area beneath the fan. Move furniture or lay down a drop cloth to protect your floors from any dust or small parts that might fall. This also makes it easier to move around if you need to step back and assess.
How to Remove a Light Cover: Step-by-Step Guide
Now that you’re prepared and have safety covered, let’s get to the main event! The method for removing a light cover can vary slightly depending on the brand and model of your ceiling fan. However, there are two primary ways most covers are attached: by twisting or by screws. We’ll cover both.
Method 1: Twisting Off the Light Cover
Many modern ceiling fans feature a light cover that simply twists off. This is often the easiest method. It’s designed to be user-friendly for quick bulb changes or cleaning.
- Locate the Cover: Identify the glass or plastic shade that encloses the light bulbs.
- Grip the Cover: Gently but firmly grip the edge of the light cover with both hands.
- Twist Counter-Clockwise: Apply a steady, gentle twisting motion in the counter-clockwise direction. You might feel it loosen slightly. If it feels stuck, don’t force it.
- Support the Cover: As you twist, be prepared to support the weight of the cover. Some covers have little tabs or notches that need to align as you twist. Once loosened, it should detach easily.
- Lower Carefully: Once detached, carefully lower the cover. If it’s glass, be extra cautious as it can be fragile.
Pro Tip: If the cover is stubborn, check for any small latches or tabs around the edge that might need to be pressed or held while you twist. Sometimes, a gentle tap with the palm of your hand while twisting can help break a seal caused by dust or dried-on grime.
Method 2: Removing Screws
If your light cover doesn’t twist off, it’s likely secured by screws. These are usually small screws located around the rim of the light fixture, holding the cover in place.
- Locate the Screws: Carefully examine the base of the light cover. Look for small screws, typically three or four, evenly spaced around the perimeter. They might be on the top edge, the bottom edge, or even on the side where the cover meets the fan body.
- Choose the Right Screwdriver: Select the screwdriver that best fits the screws. A Phillips head is most common.
- Unscrew Them: Gently turn each screw counter-clockwise to loosen and remove it. Place the screws immediately into your small container or bag so they don’t get lost.
- Support the Cover: As you remove the last screw, be ready to catch and support the light cover. It might be heavier than you expect, or it could have a mechanism that holds it in place until the final screw is out.
- Lower Carefully: Once all screws are removed, carefully detach and lower the light cover.
Important Note: Some fans have screws that only loosen and don’t fully detach. These are designed to keep the screws attached to the fixture, preventing loss. If this is the case, simply loosen them until the cover can be gently pulled away.
What If My Light Cover is Stuck?
It’s frustrating when a light cover seems determined to stay put! Don’t panic. Here are a few tricks to help loosen a stubborn cover:
- Gentle Tapping: Sometimes, a light, consistent tapping around the edge of the cover with the handle of your screwdriver or the palm of your hand can help dislodge it.
- Check for Hidden Fasteners: Double-check for any clips, tabs, or screws you might have missed. Sometimes they are cleverly disguised or hidden under decorative elements.
- Warm Air (Use with Caution): For glass covers, a very brief application of warm air from a hairdryer (on a low setting, held at a distance) can sometimes help expand the metal fitting slightly, making removal easier. Be extremely careful not to overheat or crack the glass.
- Penetrating Lubricant (Last Resort): For metal components that might be corroded or stuck, a tiny amount of a penetrating lubricant like WD-40 might help. Spray it on the seam where the cover meets the fan, let it sit for a few minutes, and then try twisting or unscrewing again. Make sure to wipe away any excess and avoid getting it on electrical components.
For more detailed information on specific fan models, consulting the manufacturer’s manual or their official website is always a good idea. You can often find PDF versions of manuals online by searching for your fan’s model number. For instance, if you have a Hunter fan, searching “Hunter ceiling fan light kit manual” can yield helpful results from the Hunter Fan support page.
Replacing the Light Cover
Putting the light cover back on is essentially the reverse of removing it. Ensure you have cleaned the inside of the cover and the area where it attaches. Align the cover correctly and then secure it by either twisting it back into place or reinserting and tightening the screws.
For Twist-Off Covers: Align the cover with the base and gently twist clockwise until it feels secure. You might hear or feel a click as it locks into place.
For Screw-On Covers: Hold the cover in place and start by loosely threading one screw. Then, add the other screws, again threading them loosely. Once all screws are in place, go back and tighten them evenly. Don’t overtighten, as this can strip the screws or crack the cover.
Troubleshooting Common Issues
Even with the best intentions, you might run into a hiccup. Here’s a quick look at common problems and how to solve them:
The Light Cover Won’t Go Back On Properly
Cause: Misalignment, debris in the track, or overtightened screws.
Solution: Remove the cover again. Check for any obstructions or bent tabs. Ensure it’s aligned correctly before reattaching. If using screws, tighten them gradually and evenly.
A Screw Won’t Go In or Keeps Falling Out
Cause: Stripped screw threads or a damaged screw hole.
Solution: If the screw is stripped, you might need a slightly larger screw or a thread repair kit. If the hole is damaged, you might need to fill it with wood filler (if applicable) or epoxy before re-drilling, or consider using a slightly longer screw if possible. For plastic components, a small amount of plastic cement can sometimes help.
The Glass Cover Cracked
Cause: Dropped, excessive force, or thermal shock.
Solution: Unfortunately, a cracked glass cover usually needs to be replaced. You can often order replacement parts directly from the manufacturer or find compatible ones from third-party retailers. Always handle glass shades with extreme care.
When to Call a Professional
While removing a light cover is generally a simple DIY task, there are times when it’s best to call in an expert. If you’re dealing with a complex fixture, if you’ve tried all the troubleshooting steps and the cover is still stuck, or if you’re uncomfortable working with electrical components, don’t hesitate to contact a qualified electrician. They have the tools and expertise to handle the situation safely and efficiently. For instance, the Electrical Safety Foundation International (ESFI) offers valuable resources on home electrical safety.
Understanding Different Light Cover Materials
The material of your light cover can influence how you handle it and what tools are best suited for removal and cleaning. Here’s a quick rundown:
| Material | Characteristics | Removal Tips | Cleaning Tips |
|---|---|---|---|
| Glass | Can be clear, frosted, or colored. Often heavier. Prone to breaking if dropped or handled roughly. | Handle with care. Support its weight. Be mindful of sharp edges if it breaks. | Use glass cleaner and a soft cloth. Avoid abrasive cleaners that can scratch. |
| Plastic/Acrylic | Lighter weight, less prone to breaking than glass. Can sometimes yellow or become brittle with age. | Generally easier to handle. Less risk of shattering. | Mild soap and water with a soft cloth. Avoid harsh chemicals or scrub brushes that can scratch. |
| Metal | Often decorative or part of the fan housing. Can sometimes rust or get stuck if not maintained. | May have screws or be integrated into the fan design. Check for hidden fasteners. | Dust regularly. For rust, a metal polish might be needed. |
Maintaining Your Ceiling Fan Light Fixture
Regular maintenance ensures your ceiling fan and its lighting work efficiently and look their best. Here are a few simple tips:
- Dust Regularly: A quick dusting with a microfiber cloth every few weeks can prevent heavy build-up.
- Clean the Cover Periodically: Once or twice a year, remove the cover for a thorough cleaning. This is especially important in kitchens where grease can accumulate.
- Check Bulb Tightness: Ensure light bulbs are screwed in securely, but not overly tight, to prevent flickering.
- Inspect Wiring (If Comfortable): If you’re experienced, occasionally check for any loose wires when the power is off. If unsure, leave this to a professional.
Proper maintenance can extend the life of your ceiling fan and keep your home well-lit and comfortable. For more on ceiling fan maintenance, resources like Energy.gov’s Ceiling Fan page offer excellent advice on energy efficiency and care.

Frequently Asked Questions (FAQ)
Q1: How do I know if my ceiling fan light cover twists off or has screws?
A1: Gently try to twist the cover. If it moves freely (or with some resistance) in a counter-clockwise direction, it’s likely a twist-off type. If it doesn’t budge or feels very rigid, look closely around the edges for small screws.
Q2: Can I use a regular household cleaner on my light cover?
A2: For most glass or plastic covers, a mild dish soap and water solution or a standard glass cleaner is safe. Always test on an inconspicuous area first, and avoid abrasive cleaners that can scratch the surface.
Q3: My light cover is glass. Is it safe to remove it myself?
A3: Yes, it is safe as long as you follow the safety precautions, especially turning off the power. Be extra careful when handling glass, as it can be fragile. Support its weight securely as you remove and replace it.
Q4: What if I lose one of the screws?
A4: Don’t worry! Most ceiling fan light covers use standard small machine screws. You can usually find replacements at a local hardware store. Bring the remaining screw with you if possible to ensure you get the right size and type.
Q5: My fan has a pull chain for the light. Does this affect how I remove the cover?
A5: No, the pull chain typically controls the light’s on/off function and bulb speed. It doesn’t usually affect how the light cover is attached. You still need to turn off the power at the breaker before starting.
Q6: How tight should I make the screws when putting the cover back on?
A6: Tighten the screws until they are snug, but do not overtighten. You want the cover to be secure and not wobble, but excessive force can strip the threads or crack the material of the cover or the fan housing.
Conclusion
There you have it! Removing and replacing a ceiling fan light cover is a manageable DIY task that can make a big difference in the appearance and functionality of your home. By following these simple, step-by-step instructions and prioritizing safety, you can confidently tackle this project. Whether it’s for a much-needed cleaning, a bulb change, or a style refresh, you now have the knowledge to get the job done effortlessly. Remember to always turn off the power, gather your tools, and proceed with care. Happy DIYing!