How to Easily Remove Paint from Ceiling: Expert Tips and Tricks
To remove paint from the ceiling, you’ll need a scraper and paint stripper. Gently scrape off the paint using the scraper, then apply the paint stripper and let it sit for a few minutes before scraping off the softened paint.
Ceilings are often subjected to wear and tear over time, resulting in chipped or peeling paint. Whether you’re renovating your home or simply giving it a fresh look, removing old paint from the ceiling is an essential step. However, knowing the right techniques and tools to use can make the process much easier.
In this guide, we will provide you with simple yet effective methods on how to remove paint from the ceiling, helping you achieve a smooth and clean surface for your painting project. Follow these steps carefully for a successful paint removal process.
1. Prepare The Area
Before you start removing paint from your ceiling, it’s important to properly prepare the area to ensure a smooth and efficient process. This step is crucial to avoid any damage to your furniture, decorations, or other surfaces in the room. Follow these simple steps to prepare the area for paint removal:
Remove Furniture And Decorations
The first thing you need to do is clear the room by removing any furniture or decorations that could get in the way. This will not only prevent any accidental damage to your belongings but also give you ample space to work comfortably. Remember, paint removal can be a messy process, so clearing the room will make it easier to move around without any obstacles.
Cover The Floor And Walls
To protect your floor and walls from any paint splatters or spills, it’s crucial to cover them properly. This will prevent any accidental damage and make the cleanup process much easier. You can use old bedsheets, plastic drop cloths, or painter’s tape and masking paper to cover the surfaces. Make sure the coverings are secure and tightly fitted to avoid any paint seeping through and staining your floor or walls.
If you’re removing paint from walls as well, make sure to cover them separately using the same methods. This will prevent any unintentional smears or drips of paint from compromising the freshly painted ceiling.
In addition to protecting the floor and walls, consider covering any light fixtures or vents that are present in the room. This will prevent any paint particles or debris from getting inside and causing potential damage to the electrical components.
Once you have completed these preparation steps, you’re ready to move on to the next phase of removing the paint from your ceiling. Now that the area is properly set up, you can focus on the task at hand and achieve a clean and paint-free ceiling.

2. Gather The Necessary Tools
Before you embark on removing paint from your ceiling, it’s essential to gather all the tools you’ll need for the job. Having the right equipment at hand will make the process much smoother and more efficient. Here are the tools you should have:
Ladder Or Scaffolding
A sturdy ladder or scaffolding is crucial when working on a ceiling. Ensure that your ladder is stable and firmly planted before climbing up. If needed, consider using scaffolding for added stability and safety.
Paint Scraper Or Putty Knife
A paint scraper or putty knife will be your main tool for scraping away the paint from the ceiling. Choose a scraper or knife with a sharp edge and a comfortable grip for easier and more effective paint removal. Be careful not to damage the surface underneath as you scrape.
Protective Eye Gear And Respirator
Your safety should always come first, especially when dealing with paint removal. Wear protective eye gear to shield your eyes from any paint chips or debris that may fall. Additionally, a respirator or dust mask will help protect your lungs from inhaling potentially harmful fumes or particles.
Drop Cloth Or Plastic Sheeting
Prepare your workspace by covering the area beneath the ceiling with a drop cloth or plastic sheeting. This will catch any paint chips or drips, making the cleanup process much easier afterward.
Paint Stripper Or Solvent
Depending on the type of paint and its adherence to the ceiling, you may need a paint stripper or solvent to aid in the removal process. Choose a stripper or solvent suitable for your specific paint type and follow the instructions carefully.
Stiff Bristle Brush
A stiff bristle brush can be useful for loosening any stubborn paint spots or residue that may be harder to remove with a scraper alone. Use gentle pressure and small circular motions when brushing the ceiling.
Now that you have gathered all the necessary tools, you’re ready to begin removing the paint from your ceiling. Make sure to follow the subsequent steps carefully for the best results.
3. Test The Paint Removal Method
To remove paint from the ceiling, testing the paint removal method is crucial. Follow the steps in this guide to ensure a successful paint removal process.
Once you have identified the type of paint on your ceiling and gathered the necessary tools for paint removal, it’s time to test the paint removal method. Testing the method beforehand will give you an idea of how effective it will be on your specific paint and ceiling surface.
Identify The Type Of Paint
To effectively remove paint from your ceiling, it is important to identify the type of paint used. There are various types of ceiling paint, such as latex, oil-based, or water-based paints. Knowing the type of paint will help you choose the most suitable paint removal method.
One way to identify the type of paint is by checking the label or any information provided by the manufacturer. If that is not available, you can perform a simple test. Take a cotton ball or a soft cloth and soak it in rubbing alcohol. Gently rub the painted surface with the alcohol-soaked cotton ball. If the paint starts to dissolve or comes off on the cloth, it is most likely latex or water-based paint. If there is no reaction, it could be an oil-based paint.
Test The Paint Stripper Or Solvent
Before applying any paint stripper or solvent to your ceiling, it is essential to test it on a small, inconspicuous area. This will help you determine if the product is suitable for your paint and if it causes any damage or discoloration to your ceiling surface.
To perform the test, apply a small amount of the paint stripper or solvent to a hidden area of the ceiling. Follow the instructions provided by the manufacturer and let it sit for the recommended time. After the designated time, gently scrape off the paint using a plastic scraper or a putty knife. If the paint comes off easily without causing any damage or discoloration, then you can proceed with using the paint stripper or solvent for the entire paint removal process.
However, if the paint stripper or solvent causes any damage or discoloration to the ceiling, it is recommended to stop using it and consider alternative methods or seek professional assistance.
Remember to always wear protective gloves and goggles when handling paint strippers or solvents, as they can be harmful if they come into contact with your skin or eyes.
Testing the paint removal method will give you peace of mind and confidence while tackling the paint removal process. By identifying the type of paint and testing the paint stripper or solvent, you can ensure a successful and damage-free paint removal experience.
4. Apply The Paint Stripper Or Solvent
To remove paint from a ceiling, start by applying a paint stripper or solvent, making sure to follow the instructions carefully. This will help loosen the paint for easier removal.
Removing paint from the ceiling can be a daunting task, but with the right tools and techniques, it can be done efficiently. Once you have prepared the area and gathered the necessary supplies, it’s time to apply the paint stripper or solvent. Here’s what you need to do:
Follow The Manufacturer’s Instructions
Before applying the paint stripper or solvent, carefully read and follow the manufacturer’s instructions. Different products may have specific guidelines that need to be followed for safe and effective use. Make sure to wear protective gloves, goggles, and a mask to avoid any adverse reactions or harm.
Apply The Solution To A Small Area
Start by applying a small amount of the paint stripper or solvent to a small area on the ceiling. This will help you determine how effective the product is and if any additional steps need to be taken. Use a brush or sponge to evenly spread the solution on the painted surface.
Let It Sit And Soften The Paint
Allow the paint stripper or solvent to sit on the painted area for the amount of time specified by the manufacturer. This will allow the solution to soften the paint and make it easier to remove. Avoid rushing this step, as proper soaking time can significantly impact the success of the paint removal process.
While the paint stripper or solvent is sitting, you can move on to preparing another section of the ceiling for application. This way, you can work efficiently by alternating between applying the solution and removing the softened paint.
Remember to always ventilate the area properly to avoid inhaling any fumes from the paint stripper or solvent. Once the paint has softened, you can start removing it using a scraper or putty knife. Scrape gently to avoid damaging the ceiling surface, and make sure to dispose of the removed paint properly.
By following these steps and carefully applying the paint stripper or solvent, you’ll be well on your way to effectively removing paint from your ceiling. Just remember to take the necessary precautions and be patient throughout the process.
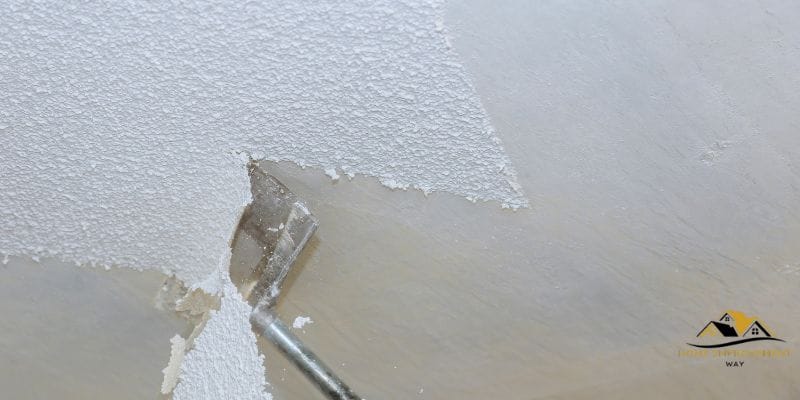
5. Scrape Off The Paint
Removing paint from a ceiling can be a tedious task, but with the right technique, it becomes much easier. One effective method is to scrape off the paint. By using a paint scraper or putty knife, you can gently remove the old paint layer by layer. Here are some essential tips to keep in mind when scraping off the paint from your ceiling.
Use The Paint Scraper Or Putty Knife
To start the process, you will need a paint scraper or putty knife. These tools are specifically designed to remove paint without damaging the underlying surface. Make sure to choose the right size and shape of the scraper or putty knife for the job.
If you’re dealing with a large area, it’s best to use a wide, flat scraper. For smaller sections or tight spaces, a narrower putty knife will work better. Remember to keep the tool sharp, as a dull blade can cause unnecessary damage.
Work In Small Sections
When scraping off the paint, it’s important to work in small sections. By focusing on one area at a time, you can ensure efficient and thorough paint removal. Divide the ceiling into manageable portions and tackle them one by one.
Start by positioning the scraper or putty knife at a slight angle against the painted surface. Apply gentle pressure and scrape the paint away in short, controlled strokes. Continue this process until all the paint in that section is removed.
Be Gentle And Avoid Damaging The Ceiling
While it’s necessary to apply some pressure when scraping off the paint, it’s crucial to be gentle to avoid damaging the ceiling. The objective is to remove the paint, not to create additional problems.
Take your time and use slow, deliberate strokes. Avoid using excessive force or scraping too aggressively, as this could result in scratches, dents, or gouges on the ceiling surface. The aim is to maintain the integrity of the ceiling while removing the unwanted paint.
Remember to take breaks as needed during the process to prevent fatigue. Patience and a light touch are key to successfully scraping off paint without causing any damage.
Conclusion
To recap, removing paint from a ceiling can be a daunting task, but with the right tools and techniques, it is definitely achievable. From carefully scraping off the old paint to using chemical strippers or heat guns, there are various methods to choose from.
However, it is important to prioritize safety by wearing protective gear and ensuring proper ventilation. By following these steps, you can successfully achieve a fresh and clean ceiling free from unwanted paint.