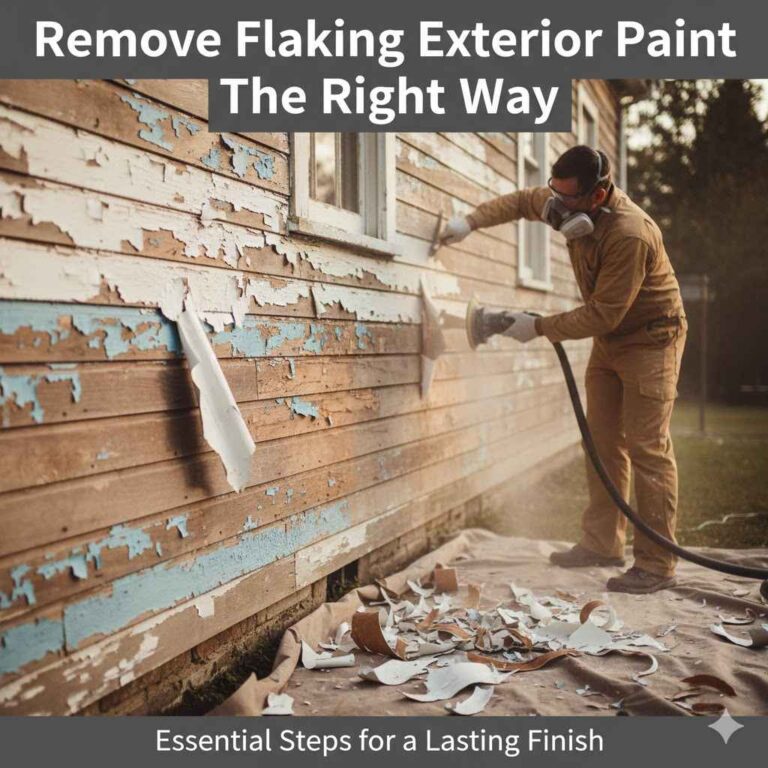
How to Remove Painted Textured Ceilings: Your Safety Guide
Removing a painted textured ceiling can seem tricky, especially if you’ve never done it before. Many people find it tough because of the mess and the potential for problems. But don’t worry! How to Remove Painted Textured Ceilings Safely is a skill anyone can learn. In this guide, we’ll break down the process into easy-to-follow steps. We’ll show you exactly what to do, making it simple and safe for you to transform your space. Let’s get started.
What’s the Deal with Textured Ceilings?
Textured ceilings, often called popcorn ceilings, were really popular for a long time. They were seen as a quick way to hide imperfections and give a room a unique look. The texture is usually created by spraying a mixture of water, adhesive, and materials like paper fibers or even asbestos in older homes. The paint on top can add another layer of complexity. These ceilings can trap dust and are notoriously difficult to clean. Before you begin your project, it’s very important to determine if your ceiling contains asbestos. This means a professional inspection is required. Once you know what you are dealing with, you can begin to consider options for removal.
There are several reasons people choose to get rid of their textured ceilings. Many homeowners find that textured ceilings make the room look dated, and they don’t fit with modern design styles. The uneven surface can also be challenging when it comes to cleaning and decorating. Sometimes, people want to remove them to make their ceilings appear higher and the room feel bigger. Whatever the reason, removing a textured ceiling can significantly upgrade the look and value of a home. Now, let’s explore the important things to consider before you start.
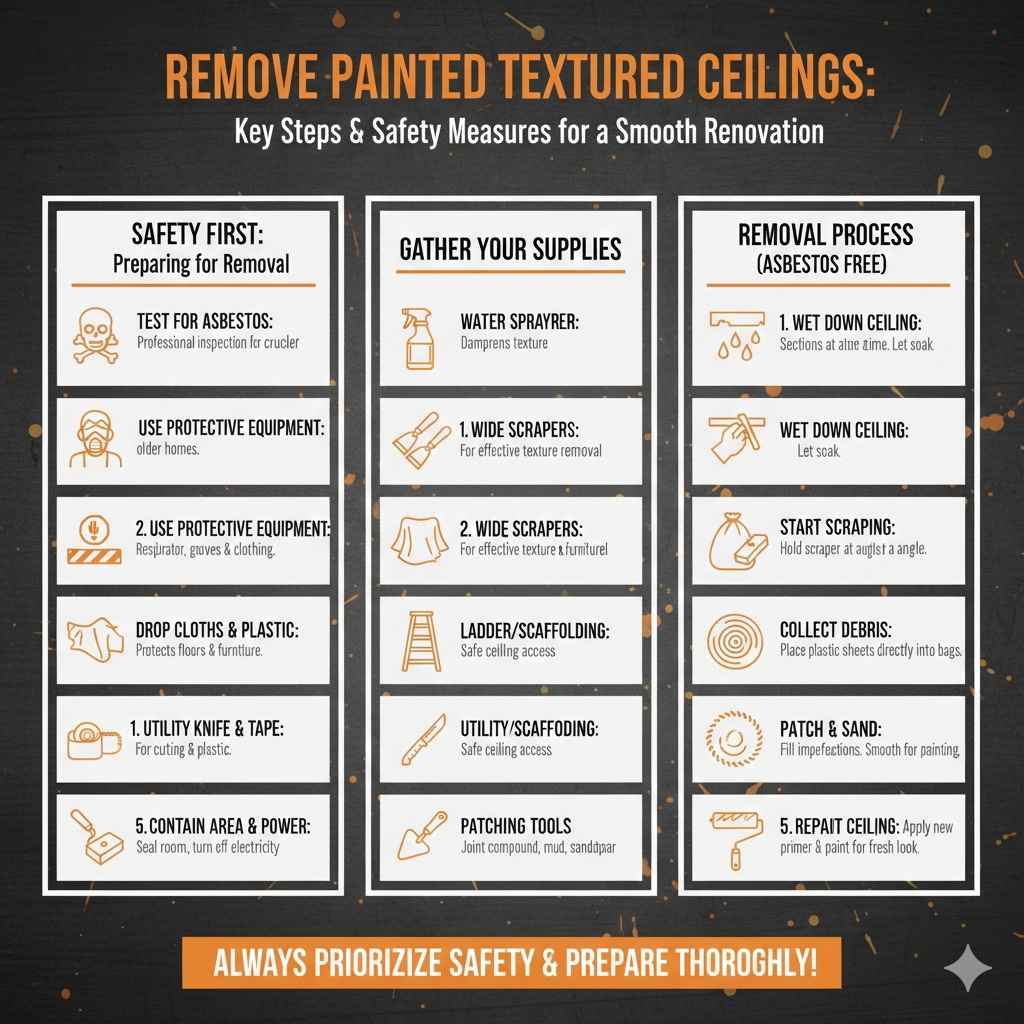
Safety First: Preparing for Removal
Before beginning any work, especially on older homes, you need to ensure your safety. The most important thing is to test for asbestos. This is because many older textured ceilings used asbestos, a material that can cause serious health problems if inhaled. If your ceiling tests positive for asbestos, you will need to hire a professional abatement company. This is not a project you should attempt yourself. If the test comes back negative, you still need to protect yourself from dust and debris.
- Test for Asbestos: Have a sample of your ceiling tested by a certified laboratory to determine if asbestos is present. This is the most important step for safety.
- Personal Protective Equipment (PPE): Wear a respirator, safety glasses, gloves, and protective clothing to avoid exposure to dust.
- Contain the Area: Cover the floor and walls with plastic sheeting and tape to protect them from falling debris. Close off any vents to prevent dust from spreading.
- Turn Off Power: Switch off the power to the room at the circuit breaker to avoid electrical hazards.
- Ventilation: Open windows and use fans to ensure good air circulation throughout the workspace.
Remember, safety is the most important part of any home improvement project. Failing to follow these steps can cause problems. Now, let’s move on to the actual removal process, assuming your test results came back negative for asbestos.
Gathering Your Supplies
Having all the right supplies ready can make the job of removing a textured ceiling much easier. It also ensures the process is smoother and more efficient. The list is not too long, but everything is necessary to ensure the job gets done correctly and with your safety in mind. These tools are available at most hardware stores, so you can easily purchase them before you start.
- Water Sprayer: A garden sprayer or pump sprayer to wet the ceiling.
- Scrapers: Wide-blade putty knives or ceiling scrapers to remove the texture. Consider having a few different sizes.
- Drop Cloths and Plastic Sheeting: To protect floors and furniture.
- Ladder or Scaffolding: To reach the ceiling safely.
- Putty Knife: A small putty knife to work on edges or tight areas.
- Safety Gear: Respirator, safety goggles, gloves, and protective clothing.
- Utility Knife: To cut the plastic sheeting.
- Joint Compound/Drywall Mud: For patching imperfections on the ceiling.
- Sandpaper: To smooth out the ceiling after patching.
Before you begin, arrange all these items nearby. Having everything close makes the job less complicated and gives you fewer reasons to stop. A well-prepared workspace will save you time and make the job more straightforward.
Step-by-Step Guide: How to Remove Painted Textured Ceilings Safely
Now, let’s explore the process of How to Remove Painted Textured Ceilings Safely. The following steps will guide you through the process, making it easier to achieve a clean, smooth ceiling. Every step is important, so follow them carefully. Remember to work carefully to ensure your safety and get the best results.
Prepping the Ceiling and Area
Proper preparation is key to a smooth removal process. This step sets the stage for success. It involves making the work area safe and preparing the textured ceiling for removal. Without this crucial step, the rest of the project is more complicated and may result in an unsatisfactory outcome.
- Protect the Area: Cover the floor, furniture, and walls with plastic sheeting to catch falling debris. Tape the plastic securely to prevent dust from spreading.
- Turn Off Electricity: Switch off the power to the room at the circuit breaker. This is very important for safety.
- Prepare the Ceiling: Use a putty knife to carefully score along the edges where the ceiling meets the walls. This helps prevent damage to the walls.
Don’t skip this preparation step! It might seem like a lot of work, but it protects everything and helps the removal process go more smoothly.
Soaking the Textured Ceiling
Soaking the textured ceiling is a vital step because it makes the texture easier to remove. The water softens the paint and texture, which allows them to be scraped off without excessive force or damage to the underlying drywall. This process makes the job much easier and lowers the chance of problems.
- Water Spraying: Use a garden sprayer to evenly apply water to a small section of the ceiling. Don’t saturate the ceiling; you want it damp, not soaking wet.
- Waiting Time: Let the water soak into the texture for about 15-20 minutes. This gives the water time to work, making the texture easier to remove.
- Testing: Test a small area with a scraper to see if the texture is soft enough. If it’s still hard, re-wet and wait a bit longer.
If you don’t use enough water, the texture will be difficult to remove, and you could damage the ceiling. This crucial step will significantly simplify the scraping process.
Scraping the Textured Ceiling
Scraping the textured ceiling is the main part of the removal process. It requires care and patience to avoid damage to the ceiling. This step can be messy, so it’s important to take your time and work carefully.
- Scraping Technique: Hold your scraper at a slight angle and apply even pressure. Scrape in the direction that feels easiest to remove the texture.
- Working in Sections: Work in small sections, re-wetting each section as needed to keep it damp.
- Careful Around Edges: Use a small putty knife to scrape the edges and corners, where it can be difficult to use a larger scraper.
Taking your time in this phase will protect the underlying ceiling and give you a better final result.
Cleaning Up the Area
After you scrape the textured ceiling, there’s a lot of cleaning to do. This includes removing the loose debris and making sure the area is ready for any repair work. The more carefully you clean up, the better the final outcome will be.
- Sweeping and Vacuuming: Sweep up any loose debris from the floor and use a vacuum with a HEPA filter to remove dust from all surfaces.
- Wiping Surfaces: Wipe down walls, light fixtures, and any other surfaces that may have collected dust.
- Disposing of Waste: Place all debris into a heavy-duty trash bag. Dispose of this waste properly.
Clean up is an important step to ensure a smooth project. Removing all dust and debris from the work area also helps to show the results of your work.
Addressing Ceiling Imperfections
After the texture is removed, you may find imperfections on the ceiling. These imperfections might include small holes, cracks, or uneven areas. This stage is all about repairing any damage and preparing the ceiling for the next step. If you skip this part, your finished ceiling might not look smooth. Taking the time to properly fill and smooth these imperfections improves the final results and appearance of your ceiling.
Repairing Imperfections
Repairing imperfections involves filling in any holes or cracks in the ceiling. The goal is to make the surface even and ready for painting. This takes patience, but the results make the effort worthwhile. Proper repair work is important to achieve a professional finish.
- Filling Holes and Cracks: Use joint compound to fill in any holes or cracks. Apply the compound with a putty knife, making sure to fill the area completely.
- Allowing to Dry: Let the joint compound dry completely according to the manufacturer’s directions. This usually takes a few hours, but it depends on the humidity and temperature of the room.
- Multiple Coats: You may need to apply multiple coats of joint compound to fill deep holes or uneven areas. Apply each layer and let it dry before adding the next one.
Repairing imperfections will make your ceiling look much better and prepare it for painting.
Sanding and Smoothing
Once the joint compound is dry, you will need to sand it to make the surface smooth. This is key to getting a professional-looking finish. This process involves using sandpaper to remove any rough spots or ridges. Proper sanding ensures a smooth, even surface, making the final paint job look excellent.
- Sanding: Use medium-grit sandpaper to sand the repaired areas. Sand in a circular motion to smooth the joint compound.
- Removing Dust: Wipe the ceiling with a damp cloth or sponge to remove sanding dust.
- Repeat: Repeat the sanding and wiping process until the surface is smooth to the touch.
Sanding is a messy process, so make sure to wear a mask and eye protection to avoid breathing in dust. When you are done, your ceiling will be ready for painting.
Finishing Touches
Once you remove the textured ceiling and make the necessary repairs, it’s time for the finishing touches. This involves priming and painting the ceiling. Proper priming prepares the surface for paint, and painting gives your ceiling a fresh, clean look. These last steps transform your ceiling and enhance the overall appearance of the room.
Priming the Ceiling
Priming the ceiling is an important step to make sure the paint adheres properly. It seals the surface and prepares it for the paint. A good primer ensures that the paint goes on smoothly and lasts longer. This crucial step is important for getting the best results.
- Applying Primer: Use a roller to apply a coat of primer to the entire ceiling surface. Work in even strokes, making sure to cover all areas.
- Allowing to Dry: Let the primer dry completely according to the manufacturer’s instructions. This usually takes several hours.
- Check for Imperfections: After the primer dries, inspect the ceiling for any remaining imperfections. You may need to lightly sand any rough spots before painting.
Priming the ceiling ensures your paint job looks great and lasts a long time.
Painting the Ceiling
Painting the ceiling is the final step to improve the look of your room. This is where your hard work starts to pay off. When painting, proper technique is essential to achieve an even and professional finish. It can instantly brighten up a room and give it a fresh, clean look.
- Applying the First Coat: Use a roller to apply the first coat of ceiling paint, working in even strokes. Overlap each stroke slightly to avoid streaks.
- Applying the Second Coat: Let the first coat dry completely, and then apply a second coat. Applying two coats provides better coverage and a more durable finish.
- Allowing to Dry: Let the paint dry completely before removing the drop cloths and furniture.
When you have completed these steps, your ceiling will have a fresh, new look. Remember to follow these steps for the best results.
How to Deal with Challenges
Even with careful planning, things can go wrong. There might be stubborn texture, unexpected damage, or other problems that need to be addressed. By having plans in place, you can address problems and ensure a smooth project.
Dealing with Stubborn Texture
Sometimes, the textured ceiling is very difficult to remove. This might be because of the type of texture, the paint used, or how well the texture was applied. You may need to try different approaches. If you run into this problem, don’t worry. There are ways to soften it and make the removal easier.
- Re-wetting: If the texture is not coming off, re-wet it and allow it to sit longer. Sometimes, the initial soaking time is not enough.
- Change Scrapers: Try different scraper types or sizes. Some scrapers are better for tougher textures.
- Consider a Heat Gun: For very stubborn textures, a heat gun might help loosen the texture. Use it with caution, keeping the heat gun moving to avoid damaging the ceiling.
Remember, patience and persistence are key to working through these challenges.
Handling Unexpected Damage
Removing the texture can sometimes cause unexpected damage to the ceiling. This might include small holes, torn paper, or other issues. Having a plan for these unexpected problems will help you move forward. You want to make sure the ceiling looks great at the end of the project.
- Assessing the Damage: When damage is found, you first need to understand the extent of the damage.
- Repairing the Damage: Fill any holes or cracks with joint compound. Allow it to dry, and sand it smooth.
- Patching Large Areas: For larger areas of damage, you may need to patch the ceiling with new drywall.
With these methods, you can fix any issues and maintain a smooth and beautiful ceiling.
Examples and Case Studies
Learning from the experiences of others can make your project easier. By studying real-life examples, you can pick up helpful tips and tricks. These case studies show how people like you have successfully tackled the job of How to Remove Painted Textured Ceilings Safely and the results they achieved.
Case Study One: The DIY Enthusiast
Sarah, a homeowner, decided to remove the textured ceiling in her living room. She carefully tested for asbestos. After the test came back negative, she gathered her tools and followed the step-by-step instructions. She took her time and paid close attention to safety. Here’s how she did it:
- Prep: She covered the floor and furniture with plastic sheeting.
- Soak: She soaked the ceiling in small sections with a garden sprayer.
- Scrape: She scraped off the texture using a wide scraper.
- Repair: She repaired a few minor imperfections with joint compound.
- Paint: Finally, she primed and painted the ceiling.
The result was a smooth, modern ceiling. Sarah’s work improved the look of her living room.
Case Study Two: The Professional’s Approach
A professional contractor was hired to remove the textured ceiling in a large office building. The contractor used a systematic approach to complete the project efficiently. Because the area was very large, the work had to be completed quickly and safely. The crew:
- Professional Testing: The company contracted a professional asbestos testing service to ensure all safety measures were in place.
- Multiple Workers: The company assigned several workers to the project. They divided the ceiling into sections.
- Power Tools: They used power scrapers to speed up the scraping process.
- High-Quality Results: The crew primed and painted the ceilings, providing a smooth, flawless finish.
The project was finished on time, with a great finish that enhanced the office’s overall appearance. This shows that the process can be successfully applied to commercial settings.
Real-Life Scenario Examples
These examples show how different people have approached similar tasks, along with the results they got. They help provide a picture of what to expect, the challenges, and the potential outcomes. By studying these examples, you can improve your project and ensure success.
- Scenario 1: Homeowner with Asbestos Concerns. A homeowner found asbestos during testing. They followed safety procedures by hiring a professional asbestos removal service. They focused on safety first.
- Scenario 2: Difficult Texture. A homeowner had a difficult texture that would not come off easily. They tried different scrapers and spent extra time soaking the ceiling, and, after additional attempts, they succeeded in their project.
- Scenario 3: Imperfect Results. A homeowner rushed the preparation, which resulted in a project that was not perfect. They went back and added additional preparation work to improve the final results.
These examples give insights and show the various paths people can take when facing such projects.

Frequently Asked Questions
Question: What do I do if my ceiling has asbestos?
Answer: If your ceiling tests positive for asbestos, you must hire a professional asbestos abatement company. Do not attempt to remove it yourself.
Question: How do I protect myself from dust during the removal process?
Answer: Wear a respirator, safety glasses, gloves, and protective clothing. Cover the area with plastic sheeting to contain dust.
Question: How do I remove the texture around light fixtures and other obstacles?
Answer: Use a smaller putty knife or scraper to carefully work around these areas. This helps to prevent damage.
Question: What type of paint should I use on my newly finished ceiling?
Answer: Use a ceiling paint that is designed to minimize splatter and provide a smooth, even finish. Choose a flat or matte sheen.
Question: How long does the entire process take?
Answer: The time varies depending on the size of the room and the difficulty of the texture. Plan for several days, including preparation, removal, repairs, and painting.
Final Thoughts
Now that you’ve explored How to Remove Painted Textured Ceilings Safely, you’ve learned a lot about this home improvement project. You’ve seen the crucial importance of safety, from asbestos testing to using protective gear. You’ve uncovered the detailed steps, from preparing your workspace and soaking the texture to scraping, repairing imperfections, and painting. Remember, this project is not too complicated; it is about taking the time to work through the process.
Removing a textured ceiling might seem like a lot of work. But with the right approach, the result can significantly improve your home. Don’t hesitate to tackle this project. Begin by testing for asbestos. Then, break down each step and take your time. With some patience and focus, you can achieve a smooth, clean ceiling that will transform your space. You’ll be glad you took the time, and you’ll enjoy the results for many years to come! So, roll up your sleeves, gather your supplies, and start making your ceiling look great.