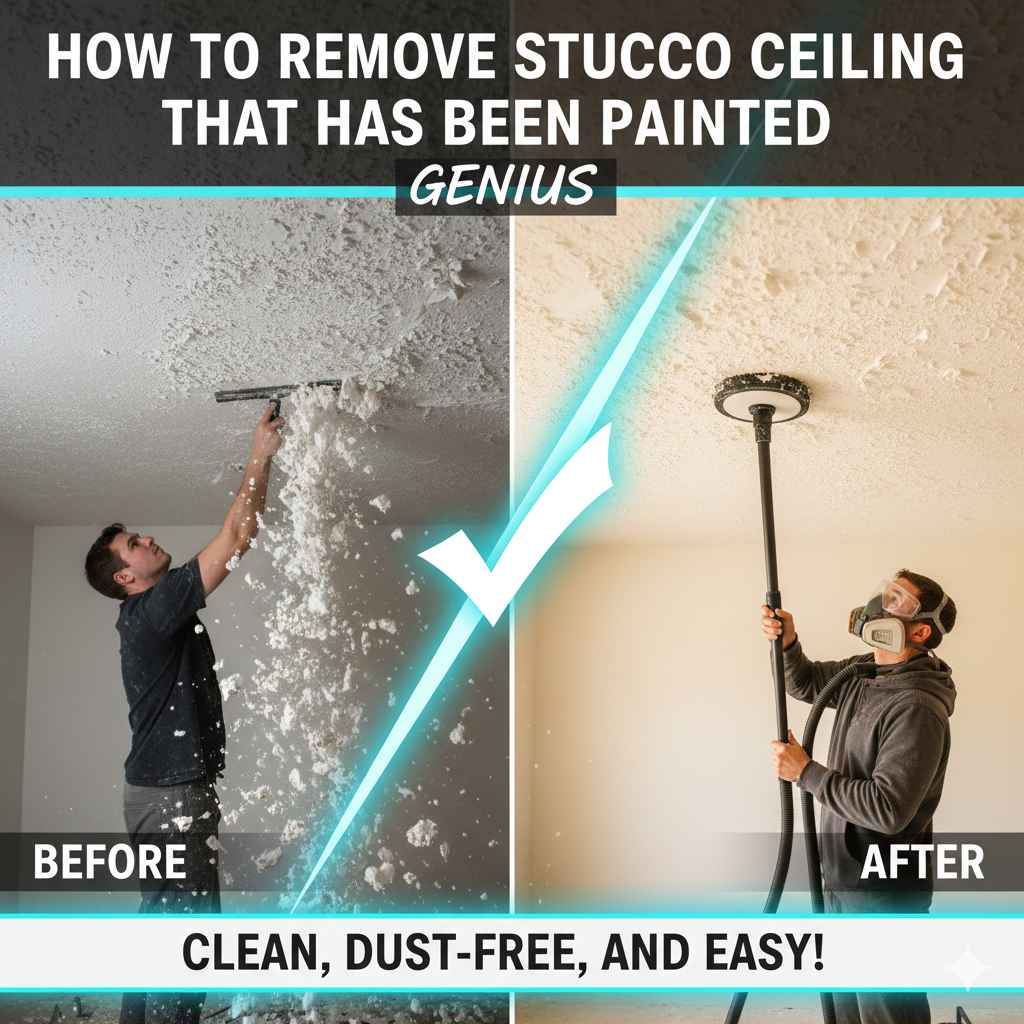
How To Remove Stucco Ceiling That Has Been Painted Genius
Removing a painted stucco or popcorn ceiling is a tough, dusty job, but totally achievable. The key is to first score the painted surface with a tool like a wire brush or scraper. This allows water to penetrate the paint, soften the stucco texture underneath, and make it much easier to scrape away cleanly.
Hello, friends! Md Meraj here. If you’re staring up at a dated stucco ceiling, you’re not alone. Many homeowners dream of a smooth, modern ceiling. But when that stucco has a coat of paint on it, the job can feel impossible. The paint acts like a raincoat, stopping water from soaking in and softening the texture.
Don’t worry, though. It’s not impossible at all! You just need the right approach. I’ve tackled this project many times, and I’m here to walk you through it, step by step. We’ll turn that bumpy, painted ceiling into a beautiful, flat surface. Together, we’ll get this done safely and with great results. Let’s get started!
Before You Begin: A Crucial Safety Warning About Asbestos
Before we touch a single tool, we need to talk about safety. This is the most important part of the entire project. Many homes built before the 1980s used asbestos in their ceiling textures. Asbestos is a dangerous material that can cause serious health problems if its fibers are inhaled.
You cannot tell if a ceiling contains asbestos just by looking at it. The only way to know for sure is to have it tested.
How to Test for Asbestos
- Get a Test Kit: You can buy an asbestos test kit online or at most hardware stores. It’s a small price to pay for peace of mind.
- Collect a Sample: Carefully follow the kit’s instructions. Usually, you’ll put on a mask and gloves, spray a small area of the ceiling with water to prevent dust, and scrape a tiny sample (about a tablespoon) into a sealed bag.
- Send it to a Lab: Mail the sample to the certified lab indicated in the kit. They will analyze it and send you the results.
If your test comes back positive for asbestos, STOP. Do not attempt to remove the ceiling yourself. You must hire a certified asbestos abatement professional. It’s the law in many places and is essential for the safety of you and your family. For more information, you can visit the U.S. Environmental Protection Agency (EPA) website.
If your test is negative, great! You can safely proceed with the steps below.

Gather Your Tools and Materials
Having everything ready before you start makes the job go much smoother. Think of it like gathering your ingredients before cooking. Here’s what you’ll need to have on hand.
Personal Protective Equipment (PPE):
- Safety glasses or goggles
- A dust mask (N95-rated is best)
- Gloves
- An old hat or hood to cover your hair
- Coveralls or old long-sleeved clothes
Room Preparation Supplies:
- Thick plastic sheeting (4-6 mil recommended)
- Rosin paper or cardboard for the floor
- Painter’s tape
- A ladder or sturdy step stool
Stucco Removal Tools:
- Garden pump sprayer
- Warm water and a drop of dish soap
- A stiff wire brush or a ceiling texture scoring tool
- A wide ceiling scraper (a 6-inch drywall knife or a floor scraper works well)
- A mud pan or a 5-gallon bucket to catch the falling stucco
- Contractor-grade trash bags
Ceiling Repair Supplies (for after removal):
- Drywall joint compound (mud)
- Drywall tape (paper or mesh)
- Drywall knives (various sizes: 4-inch, 6-inch, 10-inch)
- Pole sander and sandpaper (120-grit and 150-grit)
- A good quality primer
- Ceiling paint
Step-by-Step: Your Guide to a Smooth Ceiling
Alright, you’ve tested for asbestos and gathered your gear. Now comes the fun part! This process is messy, but seeing that smooth ceiling emerge is incredibly rewarding. Just take it one step at a time.
Step 1: Prepare the Room (The Mess-Proofing Stage)
This is not the step to rush. A little extra time spent here will save you hours of cleanup later. Your goal is to create a “bubble” inside the room to contain all the dust and wet stucco.
- Empty the Room: Remove all furniture, decorations, and rugs. Anything that can’t be removed should be pushed to the center and covered completely.
- Turn Off Power: Go to your circuit breaker and turn off the power to the room. This is crucial for safety, especially around light fixtures and ceiling fans.
- Cover the Floors: Lay down rosin paper or cardboard first to protect against scrapes from your ladder. Then, cover the entire floor with thick plastic sheeting. Run the plastic up the walls by about a foot and tape it securely.
- Drape the Walls: Hang plastic sheeting from the top of the walls, letting it drape down to the floor. Overlap it with the floor plastic and tape all the seams. You want to seal the room off completely.
- Cover Fixtures: Remove any light fixtures or ceiling fans. Cover the electrical boxes with plastic and tape to keep them dry and clean. Don’t forget to cover outlets and light switches.
- Seal the Doorways: Tape plastic over any doorways leading into the room to prevent dust from escaping into the rest of your home.
Step 2: Choose Your Removal Method
Because your ceiling is painted, you can’t just spray it and scrape. You need a way to get water through the paint. This leaves you with a couple of main choices. The wet method is almost always better for painted stucco.
| Method | Description | Pros | Cons |
|---|---|---|---|
| Wet Scraping (Recommended) | Scoring the paint, soaking the stucco underneath, then scraping. | – Much less dust – Easier to scrape – Cleaner removal |
– Messier (wet sludge) – Requires scoring/perforating first – Risk of damaging drywall if too wet |
| Dry Scraping | Forcibly scraping the painted stucco off without water. | – No water mess – Quicker to start |
– Creates extreme amounts of dust – Very difficult and tiring – Likely to gouge the drywall |
For a painted ceiling, the wet method is the way to go. Let’s focus on doing it right.
Step 3: Score the Ceiling Surface
This is the genius trick for painted stucco. You need to create small holes or scratches in the paint so water can get to the stucco texture underneath.
- Using a Scoring Tool: Tools made for removing wallpaper work perfectly. Roll it across the ceiling with gentle pressure. You just want to poke holes in the paint, not dig into the drywall.
- Using a Wire Brush: A stiff wire brush can also work. Vigorously scratch the entire surface of the ceiling. This will create lots of small abrasions for water to enter.
- Using a Scraper: You can also use the corner of your scraper to make light scratches in a cross-hatch pattern across the ceiling.
The more you score the surface, the better the water will soak in, and the easier the next step will be.
Step 4: Soak the Ceiling
Now it’s time to add water. The goal is to get the stucco material wet enough to turn into a soft, oatmeal-like consistency that scrapes off easily.
- Fill Your Sprayer: Mix warm water with a few drops of dish soap in your garden pump sprayer. The soap helps the water penetrate better.
- Spray a Section: Work in small, manageable sections, about 4×4 feet at a time. If you do too much at once, it will dry out before you can scrape it.
- Saturate, Don’t Drown: Spray the section thoroughly. Let it sit for 10-15 minutes. The stucco should start to look darker and feel soft. You may need to apply a second or even third coat of water. Be patient!
- Test a Spot: Gently push your scraper against the texture. If it comes off easily and cleanly, you’re ready to scrape. If it’s still hard, spray more water and wait a few more minutes.
Step 5: Scrape, Scrape, Scrape!
This is where the real transformation happens. It’s physical work, but very satisfying.
- Find the Right Angle: Hold your scraper at a low angle, around 30 degrees to the ceiling. This helps you get under the stucco without digging into the drywall paper underneath.
- Apply Gentle, Even Pressure: Let the tool do the work. Push forward with long, smooth strokes. The softened stucco should peel away in sheets.
- Catch the Mess: Hold a mud pan or the edge of a bucket directly under your scraper to catch most of the falling gunk. This saves your back and reduces the mess on the floor.
- Work in Sections: Scrape the entire section you sprayed before moving on to spray the next one. This keeps the process moving efficiently.
- Round the Corners: It can be helpful to slightly round the corners of your scraper blade with a metal file. This prevents the sharp corners from gouging the ceiling.
After the Stucco is Gone: The Finishing Touches
Getting the stucco off is a huge victory, but you’re not done yet. The surface underneath will likely be a bit rough. Now, we’ll make it perfectly smooth and ready for paint.
Step 1: The Big Cleanup
Before you do any repairs, you need to get rid of the mess. Carefully roll up all the plastic sheeting with the stucco sludge inside. Use contractor bags, as the wet material is heavy. Once the plastic is gone, sweep and vacuum the entire room thoroughly to remove any remaining dust and debris.
Step 2: Repair the Drywall
No matter how careful you are, there will probably be some dings, gouges, or loose drywall tape. This is perfectly normal.
- Fix Gouges: Use a 4-inch or 6-inch drywall knife to apply joint compound over any deep scratches or gouges. Press firmly to fill the void, then scrape the surface clean, leaving it slightly filled.
- Repair Joints: Look for any peeling or bubbling drywall tape at the seams. Scrape it away and apply a new layer of tape, embedding it in a thin layer of joint compound. You can find excellent guides on this process from professionals like The Home Depot.
- Skim Coating: For a truly flawless finish, you may need to apply a “skim coat.” This involves spreading a very thin layer of watered-down joint compound over the entire ceiling with a wide drywall knife or trowel. It fills in all the minor imperfections. This step takes practice, but it’s the secret to a professional-looking ceiling. You may need to apply two or three thin coats, sanding lightly between each.
Step 3: Sanding for a Silky Smooth Finish
Once all your repairs and skim coats are completely dry (usually 24 hours), it’s time to sand. This is the final step to make your ceiling perfectly flat.
- Use a Pole Sander: This tool saves your arms and neck. Attach a piece of 120-grit sandpaper.
- Sand Lightly: Use gentle, overlapping strokes across the entire ceiling. Your goal is to knock down any ridges or high spots, not remove all the compound.
- Check Your Work: Use a bright work light held at a low angle to the ceiling. This will reveal any imperfections you missed. Touch them up with a little more compound, let it dry, and sand again. Finish with a final pass using 150-grit sandpaper for an extra-smooth surface.
- Clean Up Dust: After sanding, wipe the entire ceiling down with a damp cloth or a tack cloth to remove all the fine dust.
Step 4: Prime and Paint
You’re at the finish line! Don’t skip the primer—it’s essential for a beautiful, long-lasting paint job. Primer seals the new joint compound and ensures the paint absorbs evenly.
- Apply Primer: Roll on one coat of a high-quality drywall primer.
- Apply Paint: Once the primer is dry, apply two coats of your chosen ceiling paint. Let the first coat dry completely before applying the second.
Stand back and admire your work. You did it! That old, dated stucco is gone, replaced by a clean, smooth ceiling that brightens up the whole room.
Table: DIY vs. Hiring a Professional
Still on the fence about doing it yourself? Here’s a quick breakdown to help you decide.
| Factor | DIY Approach | Hiring a Pro |
|---|---|---|
| Cost | Low (cost of tools and materials, around $200-$400). | High (typically $1.50 – $3.50 per square foot, plus repairs). |
| Time & Effort | High. This is a multi-day project (2-4 days for a standard room). It’s very physically demanding. | Low. Professionals can often complete the job much faster. |
| Mess & Disruption | High. Your home will be a construction zone for a few days. Cleanup is entirely on you. | Moderate. Professionals are skilled at containing the mess, but some disruption is unavoidable. |
| Skill Level | Beginner to Intermediate. The scraping is straightforward, but drywall finishing requires patience and practice. | Expert. They have the experience to get a perfectly smooth finish quickly. |
| Safety | You are responsible for all safety measures, including asbestos testing and proper PPE usage. | Professionals are licensed, insured, and trained in safety protocols (especially for asbestos). |

Frequently Asked Questions (FAQ)
1. Is it really necessary to soak the ceiling if it’s painted?
Yes, absolutely. The paint creates a barrier that makes dry scraping incredibly difficult and dusty. Scoring the paint and soaking the texture underneath is the single most important trick to making this job manageable. It turns a nightmare task into a straightforward, albeit messy, one.
2. What if my scraper keeps gouging the drywall?
This usually happens for two reasons. First, your scraper angle is too steep. Try holding it flatter against the ceiling (around a 30-degree angle). Second, you might be pushing too hard. Let the soaked texture and the tool do the work. If it continues, try rounding the sharp corners of your scraper blade with a metal file.
3. How long does the stucco need to soak?
This depends on the thickness of the stucco and the type of paint. Generally, you should wait 10-15 minutes after the first spray. If it’s not soft, spray it again and wait another 10 minutes. It’s ready when the material comes off easily without a lot of force. Patience is key here; don’t rush the soaking process.
4. Can I just cover the stucco ceiling with new drywall instead?
Yes, you can. This is a common alternative, especially if the ceiling tests positive for asbestos. It involves screwing new, thin (1/4 or 1/2 inch) sheets of drywall directly over the old stucco. This avoids the mess of removal but adds cost, requires more skill (lifting and finishing drywall), and will lower your ceiling height slightly.
5. My ceiling has multiple layers of paint. Will this method still work?
It will, but it will require more effort. You will need to be more aggressive with your scoring to make sure you get through all the paint layers. You will also likely need to apply water more times and let it soak for longer to penetrate fully. Just keep testing a small spot until it softens up.
6. What’s the best tool for scraping?
A 6-inch stiff drywall knife is a great all-around tool. However, many people find that a dedicated floor scraper with a long handle is more comfortable and effective, as it allows you to stand on the floor for some parts and gives you better leverage. Try both if you can and see what feels best for you.
Conclusion: A Job Well Done
Removing a painted stucco ceiling is without a doubt a challenging DIY project. It’s messy, it’s tiring, and it requires a lot of patience. But it is also one of the most transformative updates you can make to a room. By following these steps—prioritizing safety, preparing your space thoroughly, and using the “score and soak” method—you can absolutely achieve a professional-quality result.
When you’re finished, and you’re rolling that first coat of paint onto a perfectly smooth ceiling, all the hard work will feel worth it. You’ll have not only upgraded your home but also gained valuable new skills and the confidence that comes with tackling a tough job yourself. Take pride in your work, and enjoy your bright, modern new space!