How to Remove Stuck Screws From Wood Easily
It’s frustrating when a screw just won’t budge, especially when you’re working with wood. Beginners often run into this problem because screws can get stuck for many reasons. They might be old, stripped, or just really tight. Trying to force them can make things worse. But don’t worry! This guide will show you simple, step-by-step ways to get those stubborn screws out without damaging your project. We’ll cover easy tricks and simple tools that anyone can use.
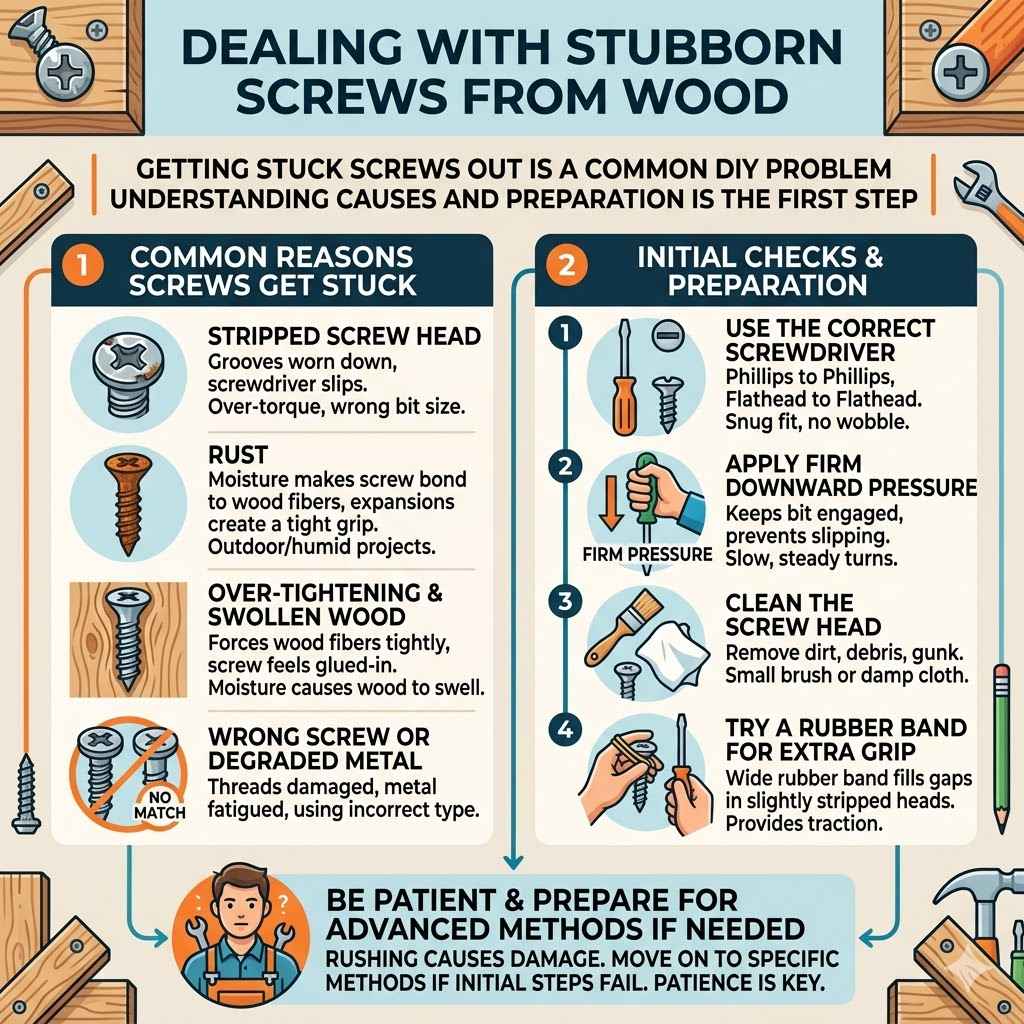
Dealing With Stubborn Screws From Wood
Getting stuck screws out of wood is a common problem that can stop your DIY projects in their tracks. When a screw won’t turn, it can be due to several factors. The screw head might be stripped, meaning the screwdriver can no longer grip it properly. This happens if too much force is used or if the wrong size screwdriver is selected. Sometimes, the wood itself can swell around the screw, creating a tight grip.
Old screws can also rust or become bonded to the wood fibers over time, making them incredibly difficult to remove. For beginners, the idea of removing a stuck screw can seem challenging, leading to anxiety about damaging the wood or the screw even further. This section focuses on recognizing why screws get stuck and the initial steps you can take before trying more advanced methods.
Understanding the root cause is the first step to a successful removal. We will explore common reasons for screws becoming stuck and outline a plan for tackling them, ensuring you can proceed with confidence.
Common Reasons Screws Get Stuck
Screws get stuck in wood for a variety of reasons, and knowing these can help you choose the right removal method. One primary cause is a stripped screw head. This happens when the grooves in the screw head are worn down, usually by using the wrong screwdriver bit or applying too much torque. The screwdriver then slips, failing to grip the screw and preventing you from turning it.
Another common issue is rust. When wood is exposed to moisture, screws can rust. The rust expands, essentially bonding the screw to the wood and making it very difficult to unscrew. This is especially prevalent in outdoor projects or in humid environments.
Over-tightening is also a culprit. If a screw is driven in too forcefully, it can strip the wood fibers around it. This creates a tight, almost glued-in situation that resists turning. In some cases, wood itself can swell due to moisture, causing it to grip the screw more tightly.
Finally, using the wrong type of screw for the job or one that is simply old and degraded can lead to it becoming stuck. The metal may have fatigued, or the threads might be damaged, making removal a struggle.
Initial Checks and Preparation
Before you start trying any fancy techniques, a few simple checks can often do the trick. The most important step is to ensure you are using the correct screwdriver for the screw head. A Phillips head screw needs a Phillips head screwdriver, and a flathead needs a flathead. Using the wrong type will almost certainly strip the head. Make sure the screwdriver bit fits snugly into the screw head without wobbling.
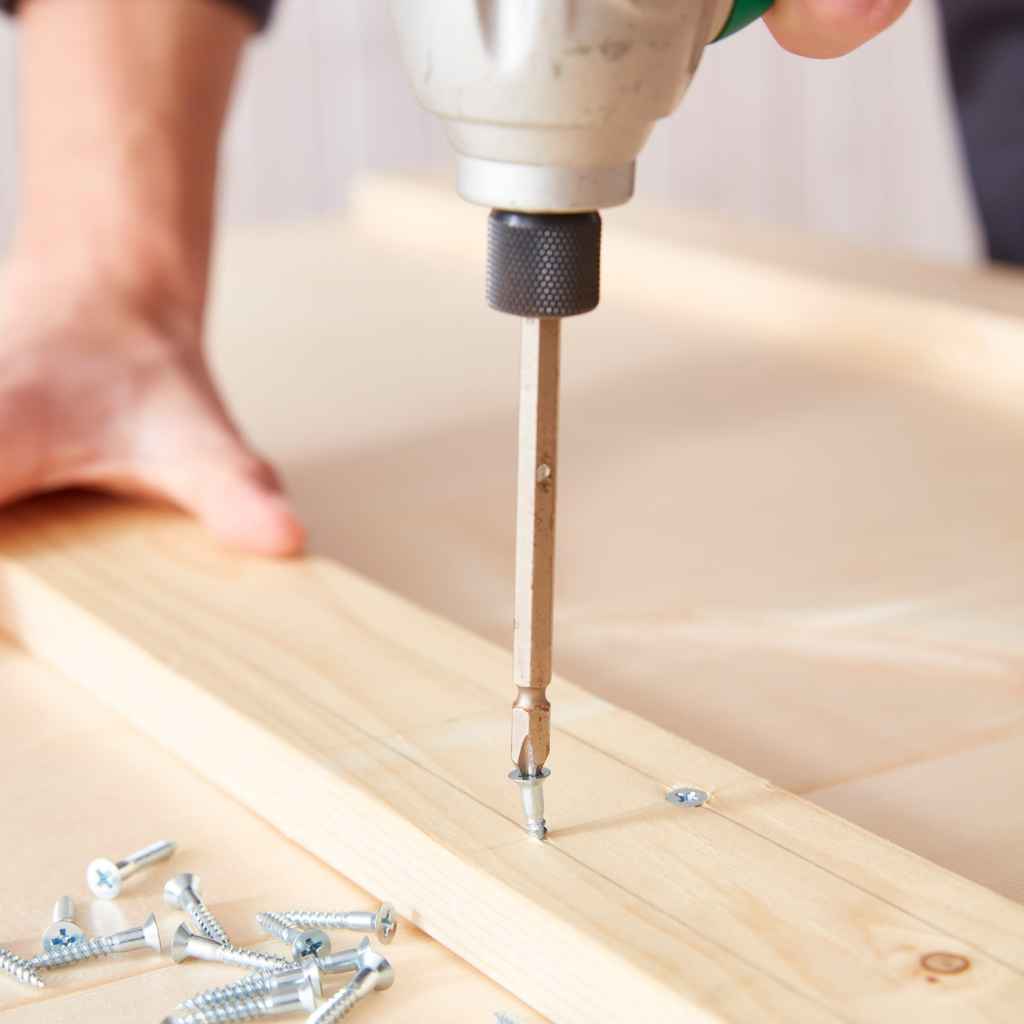
Next, apply firm downward pressure on the screwdriver while you try to turn it. This helps to keep the bit engaged in the screw head and prevents it from slipping. Slow, steady pressure is usually more effective than sudden, jerky movements.
Clean the screw head of any dirt or debris. Sometimes, gunk can prevent the screwdriver from getting a good grip. A small brush or even a damp cloth can help.
If the screw head is slightly damaged but not completely stripped, try using a rubber band. Place a wide rubber band over the screw head, then insert your screwdriver through the rubber band and into the screw. The rubber can fill the gaps in a slightly stripped head, providing extra grip.
If these initial steps don’t work, it’s time to move on to more specific methods. Remember, patience is key. Rushing the process can often lead to more damage and make the problem harder to solve.
Effective Methods for Removing Stuck Screws
When basic attempts fail, there are several effective methods to remove screws that are stubbornly stuck in wood. These methods range from simple household hacks to using specialized tools. Each technique targets different reasons why a screw might be resisting removal, such as a damaged head, rust, or a tight bond with the wood. This section will walk you through these techniques, explaining how they work and when to use them. By the end, you’ll have a toolbox of solutions for almost any stuck screw situation.
Using Pliers and Vice Grips
If the screw head is still protruding enough from the wood, pliers can be a lifesaver. Regular pliers might work for some screws, but locking pliers, also known as vice grips, offer a much stronger grip.
To use them, clamp the vice grips firmly onto the sides of the screw head. Make sure they are as tight as possible. Once locked, slowly twist the pliers counter-clockwise. The locking mechanism allows you to maintain a consistent grip without your hand tiring.
This method is particularly effective when the screwdriver can no longer get a grip because the head is stripped or rounded. The pliers grab the outer edges of the screw head, providing the leverage needed to break the bond between the screw and the wood.
For this to work well, there needs to be enough of the screw head exposed to get a solid hold. If the screw is flush or slightly countersunk, this method might be difficult or impossible. Always try to apply steady, even pressure to avoid breaking off the screw head completely.
The Rubber Band Trick Explained
The rubber band trick is a fantastic, simple solution for screws with slightly stripped heads. It works by adding extra friction and filling the worn-out grooves, allowing your screwdriver to engage more effectively.
Here’s how to do it: Find a wide, sturdy rubber band. Place it flat over the screw head, ensuring it covers the entire head. Then, insert your screwdriver (the correct type and size for the screw, if possible) into the screw head through the rubber band. Apply firm downward pressure. The rubber band will compress into the damaged areas of the screw head, creating a new gripping surface.
Slowly and steadily, try to turn the screwdriver counter-clockwise. The added friction from the rubber band can provide the grip needed to back out the screw.
This method is best for screws that are not severely stripped. If the head is completely rounded off, this might not provide enough grip. It’s a low-cost, easy first step for many slightly damaged screws and often surprisingly effective for DIYers.
Introducing Screw Extractors
Screw extractors, also known as screw removers or easy-outs, are specialized tools designed specifically for removing broken or stripped screws. They are one of the most reliable methods when other techniques fail.
Screw extractors come in sets, usually with different sizes to match various screw diameters. They typically have a tapered, reverse-threaded design.
The process involves drilling a small pilot hole into the center of the stuck screw head. Then, you insert the extractor into the hole. As you turn the extractor counter-clockwise (using a wrench or a drill on a low setting), its reverse threads bite into the screw, gripping it firmly. Continuing to turn allows the extractor to back out the stuck screw.
It’s crucial to select the correct size extractor and drill bit. The pilot hole should be deep enough for the extractor to grip, but not so deep that it goes through the other side of the wood. Using a bit that is too large can damage the surrounding wood. When using a drill, set it to a low speed and use a reverse setting for the extractor.
Leverage with a Flathead Screwdriver
Sometimes, a stuck screw can be freed by creating a new slot in the screw head or by using a flathead screwdriver to pry against an edge.
If the screw head is slightly raised and the Phillips head is stripped, you might be able to use a large, flathead screwdriver. Find a flathead screwdriver that fits snugly into the remaining grooves or can be wedged against the edge of the screw head.
Position the flathead screwdriver so it can act as a lever. Apply firm downward pressure and carefully try to turn the screw counter-clockwise. You’re essentially trying to create a new point of leverage or a new slot.
This method works best on screws that are not completely flush with the wood surface. It can be risky, as applying too much force in the wrong direction can further damage the screw head or the surrounding wood.
If you can’t get enough grip to turn it, you can try to create a new slot. Use a hacksaw or a rotary tool with a cutting disc to carefully cut a new, straight slot across the screw head. This allows you to use a flathead screwdriver to remove it. Be very careful not to cut into the wood.
Advanced Techniques and Tools
When simpler methods prove insufficient, more advanced techniques and specialized tools can tackle even the most stubborn screws. These methods often involve heat, impact, or specialized drilling techniques, offering greater force and precision. Understanding when and how to use these advanced approaches can save your project from damage and ensure successful screw removal. This section explores these powerful techniques, explaining their applications and providing guidance for safe and effective use.
The Power of Heat
Applying heat can be an effective way to remove stuck screws, especially those that are rusted or bonded to the wood due to adhesives or expansion. Heat causes the metal of the screw to expand slightly, and as it cools, it contracts. This expansion and contraction can break the bond holding the screw in place.
You can use a soldering iron or a heat gun for this. Place the tip of the soldering iron directly onto the screw head for a few minutes. For a heat gun, apply heat to the screw head and the immediate surrounding wood for about 30-60 seconds, moving the gun constantly to avoid scorching the wood.
Once heated, let the screw cool for a moment. Then, immediately try to remove it with a screwdriver or pliers. The sudden temperature change and the resulting contraction can help loosen the screw’s grip.
It’s important to be cautious when using heat on wood. Excessive heat can scorch, char, or even ignite the wood. Always have a fire extinguisher or water nearby, and work in a well-ventilated area. This method is best suited for screws that are not deeply embedded and where you can safely apply heat.
Impact Drivers and Chisels
Impact drivers and manual impact drivers are powerful tools that can help loosen stubborn screws. They combine a strong rotational force with a sharp hammer-like impact.
A powered impact driver is used with a drill. When you pull the trigger, it delivers a rapid series of rotational impacts, helping to shock the screw loose. For manual impact drivers, you strike the back of the tool with a hammer, which translates into a powerful rotational impact on the screw.
These tools are particularly effective for screws that are seized due to rust or overtightening. They can often break free screws that regular screwdrivers cannot budge.
For a seized screw, a sharp tap with a chisel can also be effective. Place the tip of a sharp chisel at the edge of the screw head at an angle, facing the direction you want the screw to turn (counter-clockwise). Strike the chisel firmly with a hammer. This can shock the screw loose, allowing it to be turned. This requires care not to damage the wood.
Drilling Out the Screw
When all else fails, or if the screw head is completely destroyed, drilling out the screw is the final resort. This process involves carefully drilling through the center of the screw to remove it.
Start by using a small drill bit to create a pilot hole directly in the center of the screw head. This helps guide a larger drill bit. The size of the drill bit you use will depend on the size of the screw. You want a bit that is slightly smaller than the screw’s shank but large enough to break through the head.
As you drill, go slowly and apply steady pressure. The goal is to drill through the screw head. Once the head is drilled off, you can often remove the piece of wood the screw was holding. The remaining screw shank can then be removed using pliers or by drilling it out completely.
If the shank remains, you might need to use a drill bit that is the same diameter as the screw’s shank and drill it out. This method requires precision to avoid enlarging the hole in the wood beyond what is necessary.
A helpful tip is to use a center punch to mark the exact center of the screw before drilling. This ensures your drill bit stays on target.
Preventing Screws From Getting Stuck
Prevention is always better than cure, and this holds true for screws getting stuck in wood. By adopting good practices during installation, you can significantly reduce the likelihood of encountering problems later. This section offers practical advice on how to install screws correctly to ensure they can be removed easily in the future. Following these guidelines will save you time, frustration, and potential damage to your woodworking projects.
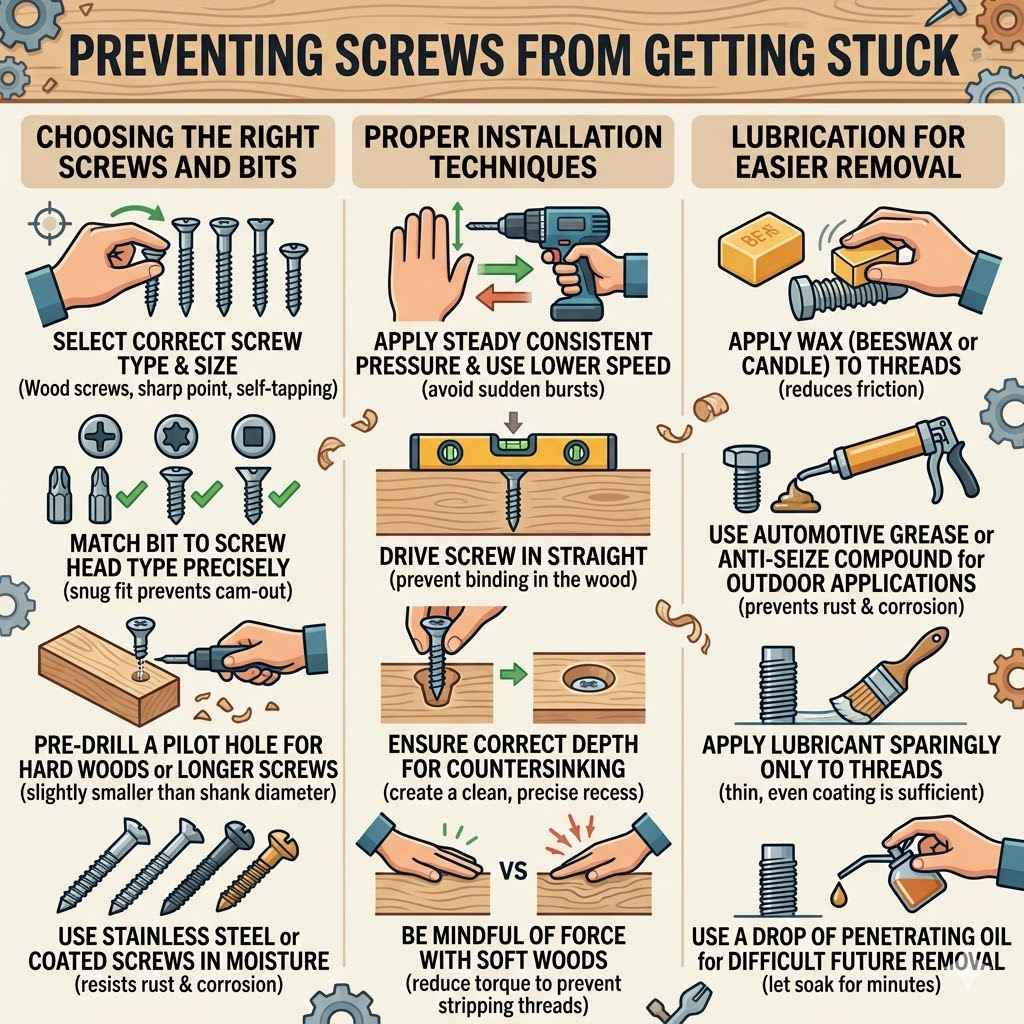
Choosing the Right Screws and Bits
Selecting the correct type and size of screw is fundamental for easy installation and removal. For woodworking, consider using screws with a sharp point and good thread design. Screws with self-tapping features can also reduce the effort needed during installation.
Using the right screwdriver bit is equally important. Always match the bit to the screw head type (e.g., Phillips, Torx, Square Drive). A bit that fits snugly prevents cam-out, which is when the bit slips out of the screw head, stripping it. Investing in a good quality set of screwdriver bits ensures durability and a precise fit.
For particularly challenging woods or longer screws, consider pre-drilling a pilot hole. This hole should be slightly smaller than the screw’s shank diameter. It helps guide the screw, reduces the torque required, and prevents the wood from splitting.
For any screw that might need future removal, especially in outdoor projects or areas prone to moisture, consider using stainless steel or coated screws. These materials resist rust and corrosion, which are major contributors to screws becoming stuck.
Proper Installation Techniques
When driving screws, apply steady, consistent pressure. Avoid sudden bursts of speed, especially when using a power drill. If using a drill, set it to a lower speed and torque setting. Many drills have an adjustable clutch that can be set to prevent over-tightening.
Ensure the screw is driven in straight. A crooked screw can bind in the wood, making it difficult to remove later. If a screw starts to go in crooked, back it out and try again.
For screws that will be countersunk, ensure the pilot hole is of the correct depth. A countersink bit can create a clean recess for the screw head. Driving a screw too deep can strip the wood around it, creating a weak point and making removal harder.
If you are working with soft woods, be mindful of how much force you are using. Softwoods are more prone to stripping around the screw threads. If you feel excessive resistance, it might be time to stop and re-evaluate.
Lubrication for Easier Removal
Applying a lubricant to screws before installation can make future removal much easier. This is especially useful for metal screws in wood, or in situations where the screw might be exposed to moisture.
A small amount of wax, like beeswax or a candle, can be rubbed along the threads of the screw. This reduces friction as the screw goes in and also as it comes out.
For metal screws in outdoor applications, a bit of automotive grease or a specialized anti-seize compound can be applied to the threads. This is particularly effective against rust and corrosion.
When using lubricants, apply them sparingly to the threads only. Excess lubricant can attract dirt and dust, or potentially stain the wood. A thin, even coating is usually sufficient.
A simple trick for screws that you anticipate might be difficult to remove later is to use a drop of penetrating oil. Let it soak in for a few minutes before attempting to screw it in. This can help prevent sticking down the line.
Frequently Asked Questions
Question: What is the best first step to try if a screw is stuck?
Answer: The best first step is to ensure you are using the correct size and type of screwdriver, and then apply firm, steady downward pressure while turning slowly counter-clockwise. Sometimes, placing a wide rubber band over the screw head and then inserting the screwdriver can provide the extra grip needed.
Question: How can I remove a screw with a completely stripped head?
Answer: If the screw head is completely stripped, you will likely need specialized tools. A screw extractor set is designed for this purpose. Alternatively, you can carefully cut a new slot into the screw head using a hacksaw or rotary tool, and then use a flathead screwdriver.
Question: Will heat damage the wood if I use it to remove a stuck screw?
Answer: Yes, heat can damage wood if not used carefully. It can scorch or char the wood. Use heat sparingly, directly on the screw head, and keep the heat source moving.
Have water or a fire extinguisher nearby as a precaution.
Question: Can I use a regular drill to remove a stuck screw?
Answer: A regular drill can be used to remove stuck screws, especially with a screw extractor. You would drill a pilot hole and then use the extractor. For powered impact drivers, they are specifically designed for removing stubborn fasteners and can be very effective.
Question: How can I prevent screws from getting stuck in the future?
Answer: To prevent screws from getting stuck, always use the correct screwdriver bit and apply steady pressure. Pre-drilling pilot holes, using lubricants like wax or anti-seize on the threads, and choosing high-quality, rust-resistant screws for relevant applications are also excellent preventative measures.
Wrap Up
Successfully removing stuck screws from wood is achievable with the right approach. You’ve learned to start with simple techniques like proper screwdriver use and the rubber band trick. For tougher situations, methods involving pliers, screw extractors, and even heat offer reliable solutions. Always remember to prioritize safety and gentle force to avoid damaging your wood. With these methods, you can tackle stubborn fasteners confidently.