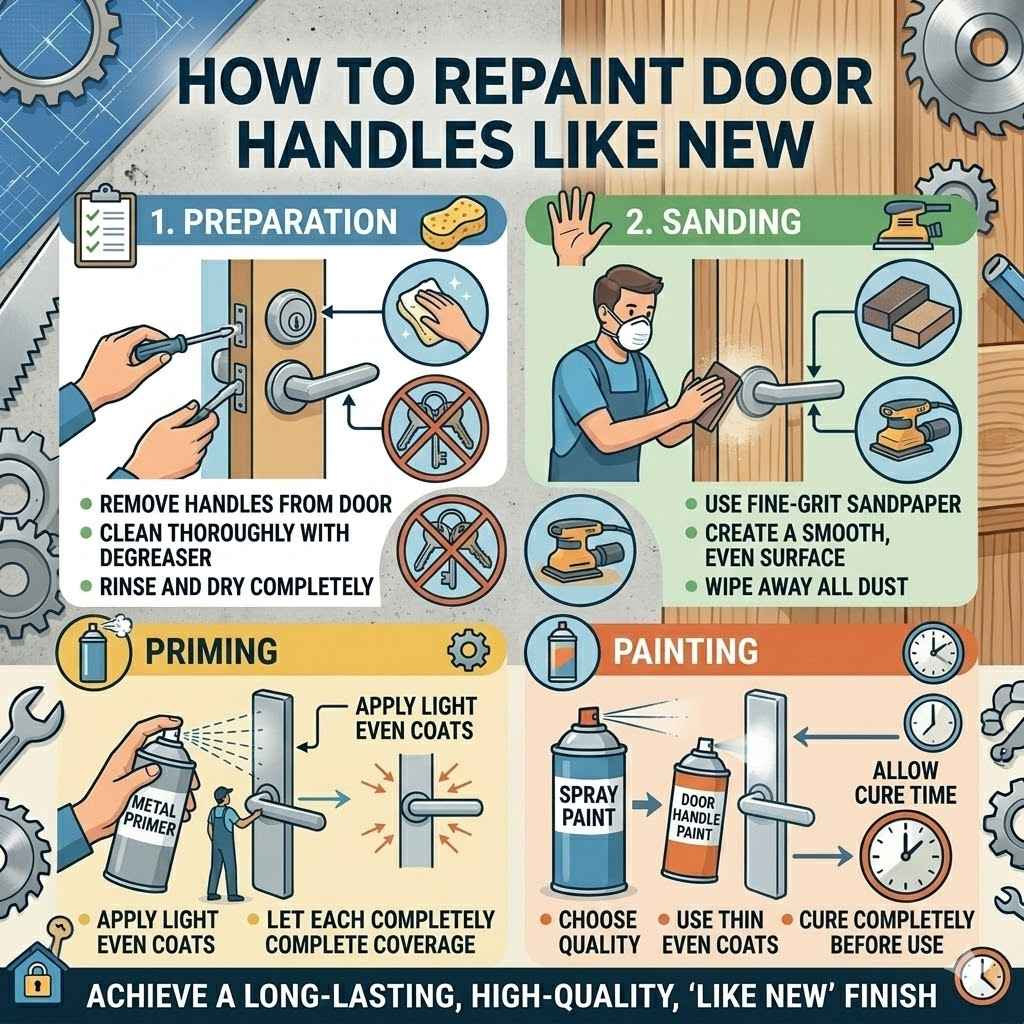
How to Repaint Door Handles Like New
Have your door handles seen better days? Maybe they are scratched up, faded, or just not the right color anymore. Many people find it tricky to get that smooth, factory-fresh finish when trying to repaint door handles themselves.
It can seem like a small job, but getting it perfect can be a challenge for beginners. But don’t worry! This guide will show you exactly how to make your door handles look brand new again with simple steps.
We’ll cover everything you need to know to get a great result.
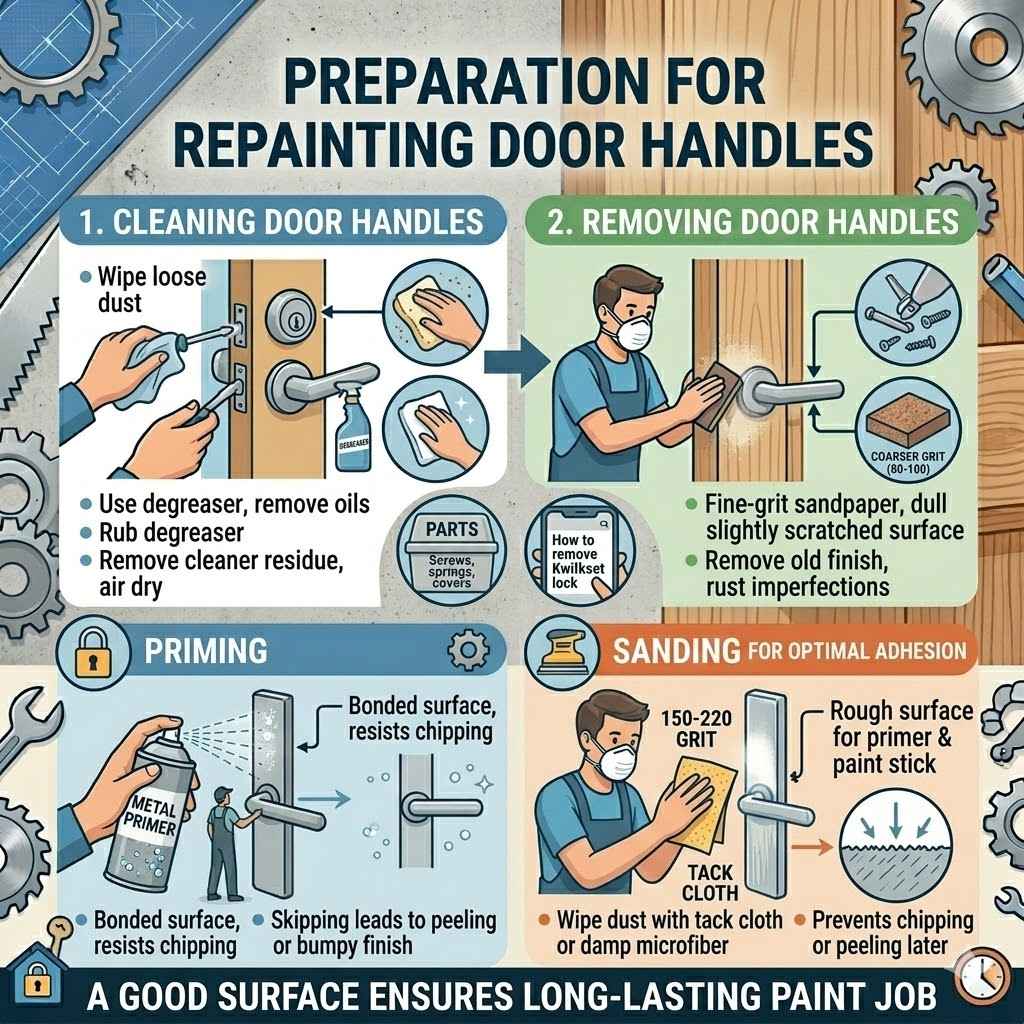
Preparation For Repainting Door Handles
Getting your door handles ready is the most important part of this project. A good surface makes all the difference for how the paint sticks and looks. This section will guide you through cleaning, removing, and preparing the handles so the paint adheres well and lasts a long time.
Skipping these steps can lead to paint peeling or a bumpy finish, making your handles look worse than before.
Cleaning Door Handles Thoroughly
Before you do anything else, you need to clean the door handles very well. Any dirt, grease, or old wax will stop the new paint from sticking properly. You want a clean, smooth surface for the best results.
- Start by wiping down the handles with a damp cloth. This gets rid of loose dust and dirt.
- Next, use a degreaser or a strong household cleaner. Apply it to a clean cloth and rub down the entire handle. Pay close attention to any shiny spots where oil or hand lotion might have built up.
- After degreasing, wipe the handles again with a clean, damp cloth to remove any cleaner residue. Let them air dry completely. Make sure there is absolutely no moisture left before moving on.
Proper cleaning ensures the primer and paint can bond directly to the metal. This creates a durable finish that resists chipping and wear from everyday use. A common mistake is only doing a quick wipe-down, which leaves invisible contaminants on the surface.
This leads to paint adhesion failure down the line, requiring the entire process to be redone.
Removing Door Handles
While you can sometimes paint handles while they are still on the door, taking them off gives you much better access. This allows for a more even coat of paint all around. It also prevents paint from getting onto the door itself.
Most door handles have a small screw on the side or underneath the lever. You will usually need a screwdriver that matches this screw. Some handles might have a decorative cover that needs to be gently pried off first.
Look for small holes or seams where you can insert a flathead screwdriver or a putty knife to carefully pop it loose. Once the cover is off, you’ll see the screws holding the handle assembly together.
Once the screws are removed, the handle parts should separate. You might have a lever on one side, a spindle that goes through the door, and a lever on the other side. It’s a good idea to keep track of all the small parts, like screws and springs, so you can put them back together easily.
A small container or a plastic bag works well for this.
For more complex lock mechanisms, check your door hardware’s manual if you still have it, or look for brand information on the existing hardware. Many interior door handles are designed for straightforward removal. Exterior handles, especially those with deadbolts, can be more involved.
If you’re unsure, taking a picture of the handle and searching online for its model can often provide helpful removal guides.
Sanding For Optimal Adhesion
Once the handles are clean and removed, it’s time to sand them. Sanding creates a slightly rough surface that helps the primer and paint stick better. This is a key step for a long-lasting paint job.
Use fine-grit sandpaper, around 150 to 220 grit. You don’t need to remove a lot of the original finish, just create a dull, slightly scratched surface. Sand all the parts of the handle you plan to paint.
If there’s any old, peeling paint or rust, you might need to use a coarser grit sandpaper first, like 80 or 100 grit, to remove those imperfections.
After sanding, wipe away all the dust with a tack cloth or a slightly damp microfiber cloth. A tack cloth is sticky and picks up even the finest dust particles, ensuring a clean surface for priming. Make sure no sanding dust remains.
This preparation step is crucial for preventing paint from chipping or peeling later. Without proper sanding, the paint has nothing to grip onto, leading to premature wear.
Choosing The Right Paint And Primer
Selecting the correct paint and primer is essential for achieving a durable and attractive finish. Not all paints are suitable for metal surfaces or high-touch areas like door handles. This section will explain the types of paint and primers that work best and why they are important for the longevity of your painted door handles.
Understanding Primer Types
Primer is the foundation of your paint job. It helps the paint adhere to the surface, covers any stains or imperfections, and provides a uniform color base. For metal door handles, choosing the right primer is critical.
- Metal Primer: This type of primer is specifically formulated to bond to metal surfaces. It often contains rust inhibitors, which are important if your handles are metal and might be exposed to moisture. Look for primers labeled “for metal” or “direct-to-metal” (DTM).
- Adhesion Primer: If you’re painting over a very smooth or glossy surface, an adhesion primer can be very helpful. These primers are designed to create a strong bond even on difficult surfaces.
- Spray Primer vs. Brush-On Primer: For intricate shapes like door handles, spray primers often provide a smoother, more even coat than brush-on primers. They can reach into all the nooks and crannies without leaving brush marks.
A good quality metal primer will enhance the durability of your paint job significantly. It prevents rust from forming, which is a common problem for metal hardware. A survey by the National Association of Home Builders found that nearly 60% of homeowners reported issues with metal hardware corrosion over time.
Using a primer designed for metal can prevent this.
When selecting a primer, consider the material of your door handles. If they are brass, steel, or even some types of plastic, a metal primer is usually the best choice. Always read the product label to ensure it is suitable for the type of material you are painting and for use in high-traffic areas.
Selecting The Best Paint For Door Handles
Door handles are touched frequently throughout the day. This means the paint needs to be tough and able to withstand wear and tear. Choosing a durable paint is just as important as picking the right primer.
Enamel Paints: These are generally the best choice for door handles. Enamel paints dry to a hard, durable finish that resists chipping and scratching. They are available in both oil-based and water-based (latex) formulas.
- Oil-Based Enamels: These offer a very hard, durable finish. They level out nicely, meaning fewer brush strokes, and are excellent for metal. However, they have strong fumes, require mineral spirits for cleanup, and take longer to dry.
- Water-Based (Latex) Enamels: Modern water-based enamels have improved dramatically. They are easier to clean up with soap and water, have less odor, and dry faster. Many offer durability comparable to oil-based paints and are a great option for DIYers. Look for high-quality acrylic or hybrid enamel formulas.
Spray Paint: For door handles, spray paint is often the easiest way to get a smooth, even finish. Many spray paints are formulated for metal and include a primer in their formula, though using a separate primer is still recommended for maximum durability. Look for spray paints designed for metal or multi-surface applications.
When choosing a color, think about the overall style of your door and room. You can opt for a classic brushed nickel look, a bold matte black, or a bright, modern metallic finish. The finish—satin, semi-gloss, or gloss—will also affect the final appearance and durability.
Satin and semi-gloss finishes are often preferred for handles as they offer a good balance of appearance and resistance to showing fingerprints.
Color And Finish Considerations
The color and finish you choose for your door handles can significantly impact the look of your space. They are small details, but they play a big role in your home’s aesthetic.
Think about your existing decor. Do you have brushed nickel fixtures elsewhere? Matching this finish can create a cohesive look.
If you want a modern feel, matte black or a dark bronze is very popular. For a more traditional or elegant style, a classic oil-rubbed bronze or polished brass might be ideal.
The sheen or finish of the paint is also important.
- Matte: This finish has no shine. It can hide imperfections well but might show fingerprints more easily and isn’t as durable against scuffs.
- Satin: This offers a low sheen and is a popular choice for hardware. It’s more durable than matte and less prone to showing smudges.
- Semi-Gloss: This has a noticeable shine and is very durable and easy to clean. It’s a classic choice for hardware that stands up well to frequent use.
- Gloss: This provides a highly reflective, shiny finish. It’s the most durable but can highlight any imperfections in the surface.
For door handles, a satin or semi-gloss finish is often recommended. These finishes offer excellent durability and are easy to wipe clean, which is essential for high-traffic hardware. A study on material finishes in high-traffic areas showed that satin and semi-gloss surfaces retained their appearance longer than matte finishes.
Consider using spray paints specifically designed for hardware or metal. These often come in a wide range of finishes and colors, including metallic options that mimic popular hardware finishes like brushed nickel, antique brass, and oil-rubbed bronze.
The Repainting Process Step By Step
Now that your door handles are prepped and you have your materials, it’s time to paint. This process involves applying primer and then your chosen paint in thin, even coats. Following these steps carefully will ensure a professional-looking finish that will last.
Applying Primer
Primer is your first layer of paint. It prepares the surface for the topcoat and ensures the paint adheres properly. For best results, use thin, even coats.
- Shake your primer can well for at least a minute. If using a brush-on primer, stir it gently to mix.
- Apply a thin, even coat of primer to the entire door handle. If using spray primer, hold the can about 8-12 inches away from the handle and use a steady back-and-forth motion. Avoid applying too much primer in one spot, which can cause drips.
- Let the first coat dry completely according to the product instructions. This usually takes about 1-2 hours.
- Once dry, inspect the handle for any missed spots or uneven coverage. Apply a second thin coat if needed.
- After the second coat is dry, lightly sand any rough spots with very fine-grit sandpaper (320 grit or higher) and wipe away dust with a tack cloth. This creates a super smooth surface for the paint.
Using primer is often overlooked, but it’s a critical step. For example, painting directly onto a bare metal surface might seem faster, but the paint is much more likely to chip or scratch off. A good primer acts like a sticky base, creating a surface that paint can grab onto securely.
This makes your painted handles much more durable against daily wear and tear.
A common error is applying primer too thickly, thinking one coat will do. This often leads to drips and an uneven surface. It’s better to apply two thin coats, allowing each to dry fully, for a superior finish.
Applying The Topcoat Of Paint
This is where your door handles start to look like new. Apply the paint in thin, even coats, just like you did with the primer. Patience is key here.
Shake your paint can thoroughly. If using spray paint, begin by applying a light mist coat from about 8-12 inches away. Use a consistent sweeping motion.
Overlap your strokes slightly to avoid missed spots.
Allow each coat to dry completely before applying the next. Drying times will vary depending on the type of paint and the humidity, but typically you’ll want to wait at least 2-4 hours between coats. Applying too many coats too quickly can cause the paint to become soft and prone to damage.
- Apply 2-3 thin coats of your chosen paint. This is better than one thick coat for a smooth, durable finish.
- For spray paint, ensure you are working in a well-ventilated area and protecting your surroundings with drop cloths or newspaper.
- If using a brush-on enamel, use a high-quality synthetic brush for a smooth finish. Brush in the direction of the metal grain if applicable, or use smooth, even strokes.
A study published in the Journal of Coatings Technology found that multiple thin layers of paint provide superior durability and flexibility compared to a single thick layer. This is because each layer cures properly, creating a stronger bond. For door handles, this means fewer chips and scratches over time.
If you notice any drips or uneven areas as you paint, it’s best to let the coat dry completely, then lightly sand the imperfection with very fine sandpaper (320 grit or higher), and then reapply another thin coat of paint. This attention to detail will ensure a professional finish.
Applying A Protective Clear Coat
For an extra layer of durability, consider applying a clear coat over your dried paint. This is especially beneficial for high-traffic items like door handles, as it adds a protective barrier against wear and tear.
Choose a clear coat that is compatible with your paint. Most spray-on polyurethanes or acrylic sealers work well. They come in the same finishes as paint, such as satin, semi-gloss, or gloss, allowing you to match the look of your painted handles.
Apply 1-2 thin coats of the clear coat, following the same technique as applying the paint. Ensure each coat is dry before applying the next. This clear layer helps to seal in the color and protect it from scratches, scuffs, and fingerprints, making your painted handles look like new for much longer.
A clear coat acts as a shield. It absorbs the brunt of the daily friction your door handles experience. This protects the underlying paint color from fading or scratching.
For instance, hardware in busy hotel lobbies often receives a clear topcoat to withstand constant use. Many DIYers skip this step, which can shorten the lifespan of the paint job.
Make sure the paint is completely dry and cured before applying the clear coat. This can sometimes take 24-48 hours, depending on the paint type. Applying clear coat too soon can trap moisture or solvent, leading to a cloudy or peeling finish.
Always check the paint manufacturer’s recommendations for recoating times.
Troubleshooting And Maintenance
Even with the best preparation, sometimes issues can arise. Knowing how to fix common problems and how to maintain your newly painted handles will ensure they stay looking great for a long time. This section covers solutions to frequent challenges and offers tips for keeping your door handles in prime condition.
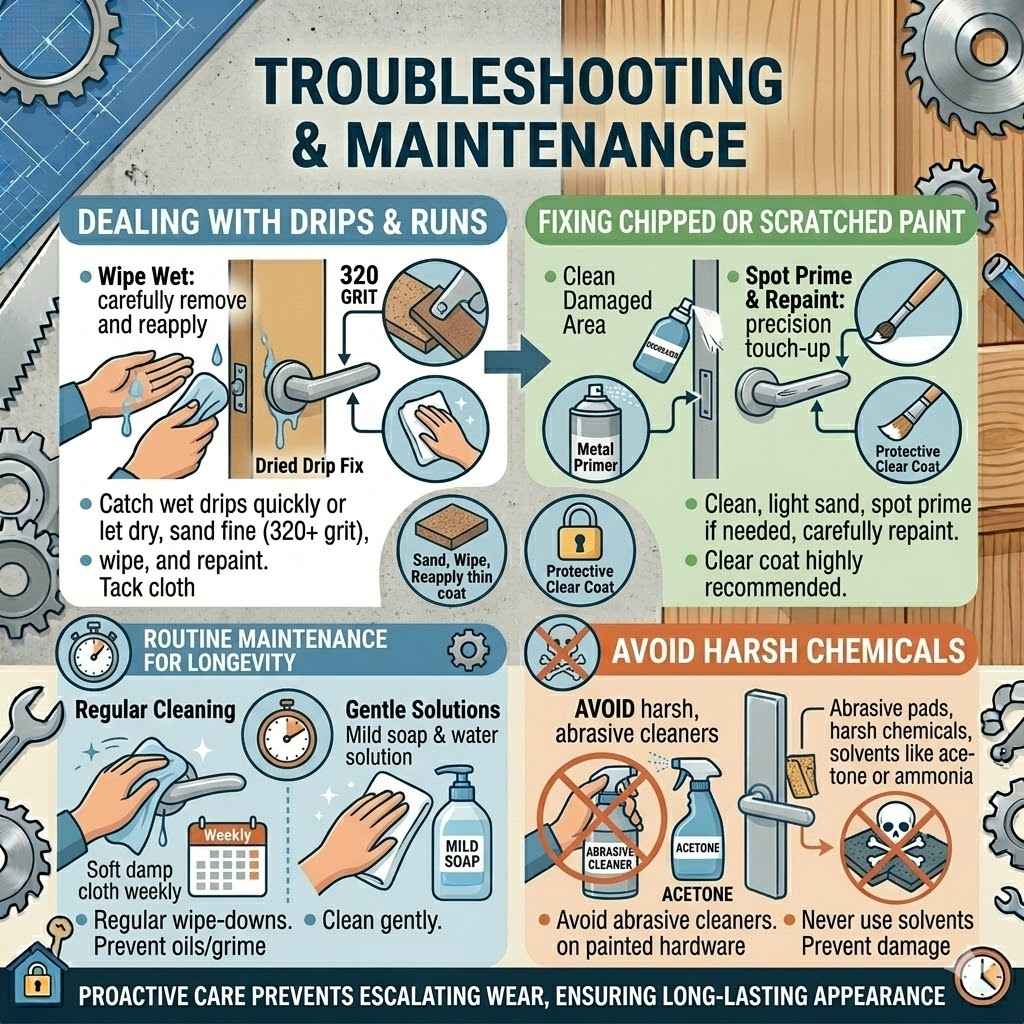
Dealing With Drips And Runs
Drips and runs are common painting problems, especially with spray paints or when applying too much paint at once. If you catch a drip while it’s still wet, you can often carefully wipe it away with a clean cloth and then reapply a thin, even coat to the area.
If the drip has already started to dry, it’s best to let it dry completely. Once dry, you can gently sand down the raised area with very fine-grit sandpaper (320 grit or higher). Be careful not to sand through the paint to the primer or bare metal.
After sanding, wipe away the dust with a tack cloth and apply another thin coat of paint to the smoothed area.
To prevent drips in the future, remember to:
- Shake spray paint cans thoroughly and test spray on scrap material first.
- Hold spray cans at the recommended distance (usually 8-12 inches) and use a steady, even motion.
- Apply paint in thin coats rather than one thick, heavy coat.
- Avoid overworking the paint by applying too many strokes in one area.
If you’re using a brush, load your brush with just enough paint and avoid overloading it. Brush in one direction for a smoother finish and fewer drips.
Fixing Chipped Or Scratched Paint
Chipped or scratched paint on door handles is usually a sign that the paint didn’t adhere well or that the surface wasn’t protected enough. To fix this, you’ll need to do a small touch-up.
Clean the damaged area thoroughly with a degreaser and let it dry completely. Then, lightly sand the edges of the chip or scratch to smooth them out. If the primer is visible, you may need to reapply a thin coat of primer to that spot.
Once the primer is dry, carefully apply a thin coat of your topcoat paint to the damaged area. You might use a small artist’s brush for precision if you’re not using spray paint. Allow the paint to dry thoroughly.
If necessary, apply a second thin coat.
To prevent future chipping and scratching, ensure you used a good metal primer and a durable topcoat. Applying a clear protective coat is also highly recommended, as it adds a sacrificial layer that takes the brunt of the damage, protecting the underlying paint color.
Routine Maintenance For Longevity
Keeping your repainted door handles looking their best is simple with a little regular care. Since door handles are touched frequently, they gather fingerprints and dirt quickly.
- Regular Cleaning: Wipe down your door handles weekly with a soft, damp cloth. This removes dust and prevents the buildup of oils and grime.
- Gentle Cleaning Solutions: If more cleaning is needed, use a mild soap and water solution or a cleaner specifically designed for painted surfaces. Avoid abrasive cleaners, harsh chemicals, or rough scrubbing pads, as these can damage the paint finish.
- Avoid Harsh Chemicals: Never use solvents like acetone or ammonia-based cleaners on painted hardware, as they can break down the paint and clear coat.
- Touch-Ups: Keep a small amount of your touch-up paint handy for minor nicks or scratches that might occur. A quick touch-up can prevent small issues from becoming larger problems.
By following these simple maintenance steps, your door handles will maintain their fresh, like-new appearance for years to come. This proactive approach prevents minor wear from escalating and ensures the longevity of your hard work.
Frequently Asked Questions
Question: How long do repainted door handles typically last?
Answer: With proper preparation, priming, painting, and a protective clear coat, repainted door handles can last anywhere from 3 to 7 years, depending on the quality of materials used and the amount of daily wear they endure.
Question: Can I paint door handles without removing them?
Answer: Yes, you can paint door handles without removing them, but it can be more challenging to achieve a smooth, even finish. Removing them provides better access for thorough cleaning, sanding, and application of paint.
Question: What is the best type of paint for metal door handles?
Answer: Enamel paints, especially high-quality acrylic or hybrid enamels, are best for metal door handles because they dry hard, are durable, and resist chipping. Spray paints designed for metal are also a very popular and effective choice.
Question: Do I need to use a primer on door handles?
Answer: Yes, using a good quality primer, preferably one designed for metal, is highly recommended. Primer ensures better paint adhesion, prevents rust, and creates a uniform surface for the topcoat, leading to a more durable finish.
Question: How many coats of paint should I apply?
Answer: It is best to apply 2 to 3 thin coats of paint rather than one thick coat. This allows each layer to cure properly, resulting in a smoother, more durable, and chip-resistant finish.
Summary
You’ve learned how to repaint door handles like new! By preparing the surface, choosing the right primer and paint, and applying them in thin coats, you can achieve a durable, professional finish. Remember to allow adequate drying time between coats and consider a clear protective layer for extra longevity.
Enjoy your refreshed door hardware!