How to Replace a Patio Door Handle Step by Step
Before you begin, gathering the right tools is essential for a smooth experience. You wouldn’t try to build a house without a hammer, right? The same logic applies to fixing your patio door. Having everything prepared before you start saves time and prevents frustration. Think of it as setting the stage for success. This first step makes the rest of the job far easier to handle.
Essential Tools and Hardware
You’ll need a few common tools and the correct replacement parts. The type of handle on your patio door might vary, but the basic tools stay the same. Identifying these essentials early helps you avoid unnecessary trips to the hardware store mid-project. If you’re missing something, you can always make a quick trip to the store before you start. Always read instructions carefully when selecting the right door handle.
Screwdriver Set: A set with various sizes and types (Phillips head, flathead) is vital. Most patio door handles use Phillips head screws. This is your primary tool. Having a good set assures you can handle any screw size.
Different screwdrivers handle different screws. Phillips head screwdrivers have a cross-shaped tip, which matches screws with a similar indentation. Flathead screwdrivers have a single, flat blade. Using the right screwdriver prevents damaging the screw heads, making removal easier and avoiding stripping the screw. Using the wrong size might damage the screw head.
- Measuring Tape: Helpful for measuring the handle and ensuring a proper fit. It will measure the old and new handle. Knowing the exact measurements helps to select the correct replacement handle.
- A measuring tape allows you to measure your current handle, helping you find a replacement that fits perfectly. It also helps to measure the distance between the screw holes. Taking measurements is not something you should rush or skip. Precision here saves time and trouble down the line.
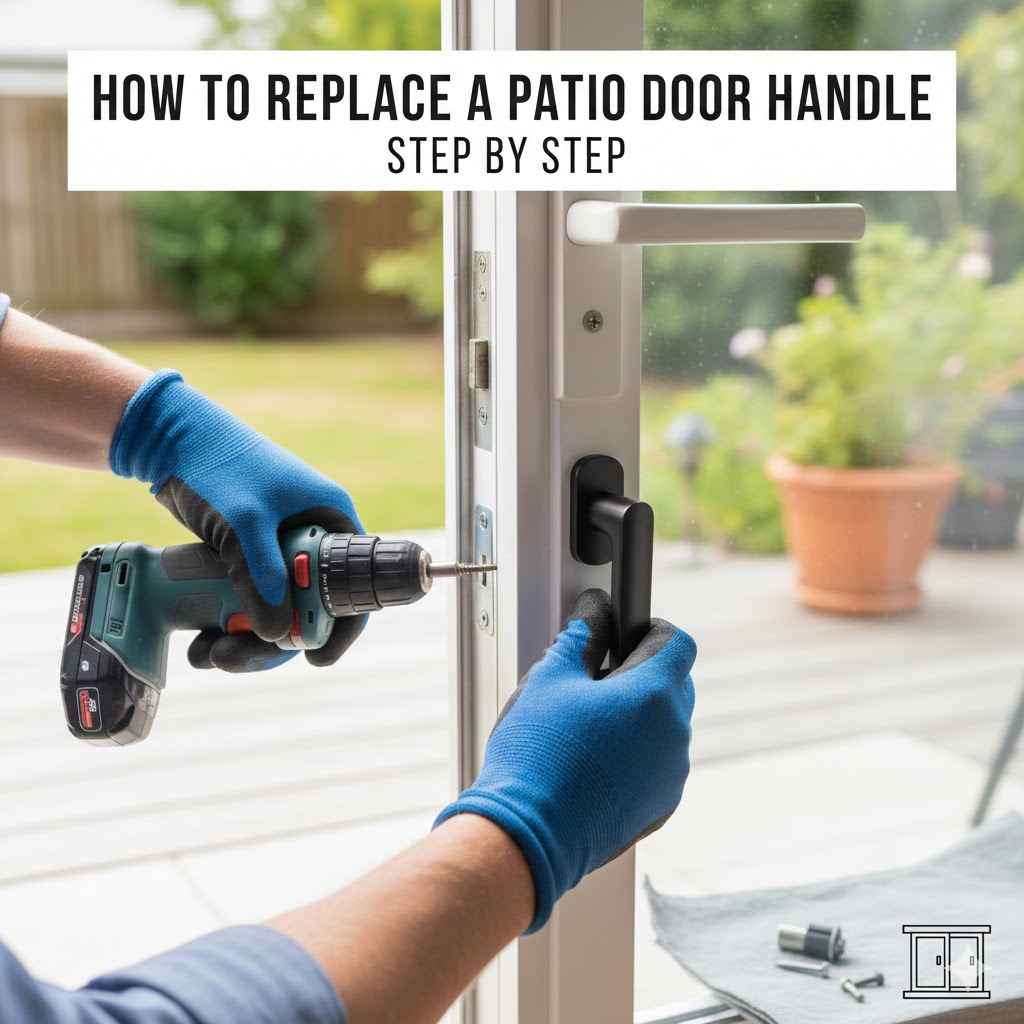
- Gloves: Protect your hands. These are very helpful when removing debris. Wearing gloves can make the job cleaner and safer.
- Gloves protect your hands from sharp edges, dirt, and potential hazards like glass shards. They’re especially important when working on a project you might not be used to. Consider using work gloves that give you a good grip while providing some protection.
- Optional: Lubricant (like WD-40) can help loosen stubborn screws. Sometimes screws get rusted or stuck.
- Lubricant can be a lifesaver. If you encounter a screw that won’t budge, apply a small amount of lubricant. Give it a few minutes to penetrate, and it may make removal much easier. Be mindful to avoid spraying too much lubricant, as it can cause problems.
Taking Out the Old Handle and Prep
With your supplies ready, it’s time to remove the old handle. This step is about carefully taking apart the existing hardware so you can install the new one. Pay attention to how the old handle is put together, as this gives you clues on how to install the new one. This also helps you get ready for the installation of the new hardware.
Removing the Old Handle
The first step is to remove the old patio door handle. Take your time, and don’t force anything. The goal is to remove the handle without causing any damage to the door. Work carefully, and you’ll be fine. Getting started might feel a little scary, but it’s really not hard.
Locate the Screws: Look for screws securing the handle to the door. They’re usually on the inside of the door. The screws hold the handle in place. Find the screws before you start turning any of them.
Screws are usually found on the inside of the door. They might be hidden behind a decorative plate or a cover. Carefully examine the area around the handle to locate them. Use your screwdriver set. Check for screw caps or covers. Sometimes you will need to pry these off with your screwdriver.
Unscrew the Handle: Use the correct screwdriver to unscrew the handle. Turn the screws counter-clockwise. This is to loosen them. Unscrew slowly and carefully. This reduces the risk of stripping the screw heads.
Use the correct screwdriver head. Avoid stripping the screws by applying steady, firm pressure. If a screw is difficult to turn, try using a lubricant. Turn the screws carefully to avoid damaging the door frame or the handle itself. If the screw is rusted, the lubricant helps a lot.
Detach the Handle: Once the screws are out, gently pull the handle away from the door. Sometimes, it may be stuck due to paint or debris. If the handle doesn’t come off easily, double-check that all screws are removed.
When detaching the handle, pull straight out. Avoid twisting or prying, which can damage the door. Check for any clips or latches that hold the handle in place. If it still doesn’t come off, carefully inspect the area for hidden screws. If the handle resists, it may be stuck, and you may need to apply a little force, but be careful.
Inspect the Door: Before installing the new handle, check the door for damage. Look at the screw holes and the surrounding area. Check for any splits or cracks that might require repair.
Before installing the new handle, take a moment to inspect the door. If there’s damage, consider filling the holes with wood filler. If the holes are stripped, you might need to use wood filler. Proper preparation sets the stage for a lasting installation. If the wood is damaged, the new handle will not fit correctly.
Preparing the Door for the New Handle
After you take off the old handle, it is important to prepare the door. This step ensures that the new handle fits correctly and functions properly. Preparing the door involves cleaning the area, checking for damage, and making any needed adjustments. It’s a key part of the process.
Clean the Area: Use a cloth to remove any dirt or debris from the door. This is where the handle will attach. A clean surface helps the new handle sit flush against the door.
A simple wipe-down removes loose debris and ensures a clean surface for the new handle. Wipe away any old paint or rust. A clean surface helps the new handle fit better and keeps the door in good shape. A clean surface also provides better contact for the new screws. This makes the handle more secure.
Check the Screw Holes: Ensure the screw holes are in good condition. You might need to fill them with wood filler if they’re damaged or stripped. Clean screw holes assure a secure fit.
If the screw holes are damaged or stripped, the screws won’t grip properly. Wood filler helps fill in any gaps, creating a solid base for the screws. Allow the wood filler to dry completely before installing the new handle. Properly prepared screw holes are vital for a secure handle. If the screw holes are too wide, the new handle won’t stay in place.
Test the Alignment: Before fully installing the new handle, hold it up to the door and check its alignment. This ensures everything lines up correctly. Test the handle to avoid any surprises.
Make sure the handle fits flush against the door and that the screw holes align. Confirm that the latch mechanism will engage with the strike plate. This checks whether you have the right handle. If the alignment is off, you may need to adjust the screw holes or choose a different handle. It is best to catch any problems now.
Installing the New Patio Door Handle
This is where you bring everything together. Installing the new handle involves putting the pieces together and attaching the handle. Precision is essential, so take your time, and follow each step carefully. It is a very rewarding moment.
Installing the Handle Components
This step involves assembling the handle components on the door. Ensure everything is correctly aligned and secure. Properly installed components make sure the door functions smoothly and the handle is secure. Follow each step.
Position the Handle: Align the new handle with the screw holes on the door. Make sure it sits flush against the door. If you did it correctly, the handle should fit easily.
Position the handle carefully, so it sits flush against the door. Check that the handle is aligned and that the latch engages the strike plate. Correct positioning is essential for the handle to function correctly. If the handle does not align, you might have the wrong handle.
Insert the Screws: Put the screws through the handle and into the screw holes. Start by hand-tightening the screws to avoid cross-threading. Use the right screwdriver and tighten them firmly.
Gently start the screws by hand. This will avoid damaging the screw threads. Tighten the screws until the handle is secure. Do not overtighten, as this could damage the handle or the door. If you find the screws are too hard to turn, use a lubricant.
Test the Latch: Check the latch engages with the strike plate. This ensures the door closes and locks properly. Check the door and make any needed adjustments.
Close and open the door to confirm the latch engages smoothly. If the latch doesn’t line up, you may need to adjust the strike plate or the handle’s position. Proper latch function is essential for security and ease of use. If the latch doesn’t work, it’s useless.
Secure the Handle: Once everything works, fully tighten the screws. Make sure the handle is secure. The handle should not wiggle or feel loose.
Once you are happy, tighten the screws firmly to ensure the handle won’t move. Keep the handle secure. This gives the handle a secure feel. This ensures your handle can withstand regular use. A properly secured handle will last a long time.
Making the Final Adjustments and Finishing Touches
Once the new handle is installed, take some time to fine-tune it. This ensures it functions properly. These final steps might seem minor, but they significantly affect the handle’s performance. Don’t rush.
Check the Operation: Open and close the door multiple times. Check how the handle and latch work. Make sure they move smoothly. Test the handle’s overall operation.
Ensure the handle and latch function correctly. The door should open and close without any friction. It’s best to identify and fix any issues before you’re completely done. If there are any issues, try to fix them now. You may need to readjust the strike plate or tighten the screws.
Lubricate the Moving Parts: Apply lubricant to the handle’s moving parts. This helps to keep it working smoothly. Lubrication keeps the parts working like new.
Apply lubricant to the moving parts. This includes the latch mechanism and any other parts. Use a spray lubricant or a small amount of grease. Lubrication helps reduce friction. It also prolongs the handle’s life. This makes sure everything works smoothly for years.
Test the Lock (if applicable): If the handle has a lock, test it to ensure it functions properly. Confirm that the lock engages and disengages. Test the lock and make sure the key works.
Test the lock to make sure it functions as intended. Confirm the key turns smoothly and that the lock secures the door. If the lock doesn’t work, you’ll want to address the problem right away. If the lock doesn’t work, you may have problems with security.
Clean Up: Remove any leftover debris or fingerprints. Wipe down the handle and the door. Take the time to clean up.
Wipe down the door and the handle with a clean cloth. Clean up any spills or marks. This will leave you with a nice, clean look. This gives you a nice, clean start with your new handle.
Common Problems and Solutions
Replacing a patio door handle is often straightforward, but sometimes, you may run into a few hurdles. These can range from a screw that won’t budge to the handle not aligning correctly. Addressing these common problems with the right tools and strategies can help you complete the project successfully. The key is to stay calm and tackle each issue one step at a time.
Dealing with Stuck Screws
Sometimes, screws can become stubborn. Rust, corrosion, or old paint can cause them to become very difficult to remove. Don’t worry, there are several ways to deal with this challenge. Here are some strategies that can save you time and prevent unnecessary damage.
Use the Right Screwdriver: Make sure you are using the correct size and type of screwdriver. This is the first step. If the screwdriver doesn’t fit the screw head perfectly, it won’t grip and could strip the screw.
Using the correct screwdriver prevents stripping the screw head. If the screw head is damaged, the screwdriver won’t be able to turn the screw. Take some time to choose the correct screwdriver. If the screw head is stripped, you can try using a screw extractor.
Apply Penetrating Oil: Apply penetrating oil to the screw head. Let it sit for a while. This can help loosen a stuck screw. This is very helpful when the screw has rust.
Penetrating oil seeps into the threads of the screw, breaking down rust. Wait for 15–30 minutes to allow the oil to work. After that, try to unscrew the screw again. Be careful not to damage the door.
Use a Screw Extractor: If the screw head is stripped, use a screw extractor. This tool is designed to remove stripped screws. Screw extractors will remove almost any type of stripped screw.
A screw extractor is designed to grip and remove screws with damaged heads. It is usually a two-piece tool. First, you drill a small pilot hole. Then, you insert the extractor and turn it counter-clockwise. Screw extractors require some force. Follow the manufacturer’s instructions for best results.
Apply Heat: Carefully apply heat to the screw. Heat expands the metal. Apply heat very carefully. Make sure you are using heat safely.
Apply heat to the screw with a heat gun or a hair dryer. Apply heat to the screw. Then, try turning the screw. This may loosen it. Use heat with caution and avoid damaging the door or surrounding areas.
Addressing Latch and Alignment Issues
Sometimes the handle doesn’t align perfectly. Here is how to fix it. This often happens. Making sure the latch engages smoothly and correctly is important for security and function. With some adjustments, you can achieve a perfect fit and operation.
Check the Strike Plate: Make sure the strike plate is aligned. Adjust if needed. Proper alignment is key to smooth locking.
The strike plate is the metal piece on the door frame that the latch engages with. Make sure it is correctly aligned with the latch. If the strike plate is misaligned, the latch will have difficulty engaging. You may need to loosen the screws and adjust the strike plate.
Adjust the Handle’s Position: The handle might need slight adjustment. Fine-tune its placement. Move the handle to achieve proper alignment.
If the latch doesn’t engage smoothly, the handle’s position may need adjustment. Slightly loosen the handle screws. Then, gently shift the handle until the latch engages. Test and re-tighten the screws once the alignment is correct.
Lubricate the Latch Mechanism: Lubrication helps. Use a dry lubricant spray. This improves smooth function.
A dry lubricant spray reduces friction in the latch mechanism. Apply it to the latch and strike plate. This improves the ease of operation and helps the handle work smoothly. Lubrication is essential to ensure smooth and reliable locking.
Replace the Strike Plate: In extreme cases, replace the strike plate. If it’s damaged. A new strike plate may be needed for functionality.
If the strike plate is damaged or worn, consider replacing it. A new strike plate ensures the latch engages securely. Replacement is particularly helpful if the existing strike plate is bent or has missing pieces. If the door isn’t working, replace it.
Frequently Asked Questions
Question: What tools do I need to replace a patio door handle?
Answer: You’ll need a screwdriver set, replacement handle, measuring tape, and optionally, gloves and lubricant.
Question: How do I measure for a new patio door handle?
Answer: Measure the screw hole spacing, handle length, and the overall design. Comparing your old handle helps you find the right replacement.
Question: What should I do if the screws are stuck?
Answer: Try using penetrating oil, a screw extractor, or carefully applying heat.
Question: How do I fix a latch that doesn’t engage?
Answer: Check and adjust the strike plate. Also, adjust the handle’s position and lubricate the latch mechanism.
Question: Can I replace a patio door handle myself?
Answer: Yes, with the right tools and guidance, it is a straightforward DIY project.
Final Thoughts
Replacing a patio door handle doesn’t have to be a struggle! Armed with the right tools, knowledge, and a little patience, you can absolutely do it yourself. This post gives you a step-by-step guide. From gathering supplies to troubleshooting common problems, you’ve learned everything you need for a smooth process. You’re now equipped with the information. You can confidently replace your patio door handle, saving money and gaining a sense of accomplishment. Get started today, and enjoy the satisfaction of a job well done!