How to Replace an Exterior Threshold: A Step-by-Step Guide for Homeowners
Hey there! If you’ve noticed a draft sneaking under your door, water seeping in, or maybe your exterior threshold just looks worn out, you’re in the right place. Replacing an exterior threshold might sound like a big job, but I’ve done this a few times myself, and trust me, it’s totally doable with some patience and the right tools. A new threshold can make your entryway look sharp, keep the elements out, and even save you some energy costs. In this guide, I’m going to walk you through everything I’ve learned about replacing an exterior threshold, step by step, so you can tackle this project with confidence. Let’s dive in!
What Is an Exterior Threshold and Why Does It Matter?
So, what exactly is an exterior threshold? It’s that strip at the bottom of your door frame, right where the door meets the floor. Sometimes called a sill or saddle, it’s usually made of wood, aluminum, or composite materials. Its job is to seal the gap under the door, keep out water, air, and bugs, and provide a smooth transition between your home’s interior and the outside world.
I remember the first time I noticed my threshold needed replacing. The wood was splintered, and every time it rained, I’d find a little puddle inside. Not fun! A damaged threshold can let in drafts, raise your energy bills, and even cause water damage to your floors. Replacing it not only fixes these issues but also boosts your home’s curb appeal. Plus, it’s a project you can feel proud of when you’re done.
Tools and Materials You’ll Need
Before we get started, let’s talk about what you’ll need. I’ve learned the hard way that having everything ready makes the job so much smoother. Here’s a list of tools and materials I always gather before diving in:
| Item | Purpose |
|---|---|
| Replacement threshold | The new piece to install; measure your old one to get the right size. |
| Tape measure | To measure the threshold and door frame accurately. |
| Screwdriver (Phillips/flat) | For removing screws from the old threshold. |
| Pry bar | To gently lift the old threshold out. |
| Utility knife | To cut away old caulk or sealant. |
| Hacksaw or reciprocating saw | For cutting the new threshold to fit, if needed. |
| Hammer and chisel | To clean up the area or remove stubborn pieces. |
| Caulk gun and exterior caulk | To seal the new threshold and prevent leaks. |
| Drill and drill bits | For pre-drilling holes for screws. |
| Screws or threshold anchors | To secure the new threshold in place. |
| Sandpaper | To smooth rough edges on wood thresholds. |
| Level | To ensure the threshold sits flat. |
| Safety gear (gloves, goggles) | To protect yourself while working. |
| Paint or sealant (optional) | To protect a wooden threshold from weather. |
Pro tip: I always double-check the size of my door frame before buying a threshold. Measure the width and depth of the existing one, and make sure the new one matches your door’s height and style. If you’re unsure, take a picture and show it to the folks at your local hardware store—they’re usually super helpful.
Step-by-Step Guide to Replacing Your Exterior Threshold
Now, let’s get to the fun part: actually replacing the threshold. I’ll break this down into clear steps based on what’s worked for me. Take your time, and don’t rush—it’s better to do it right than to have to redo it later.
Step 1: Remove the Old Threshold
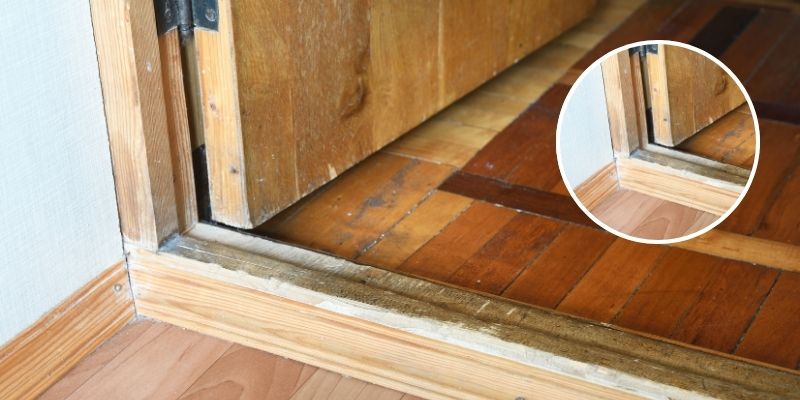
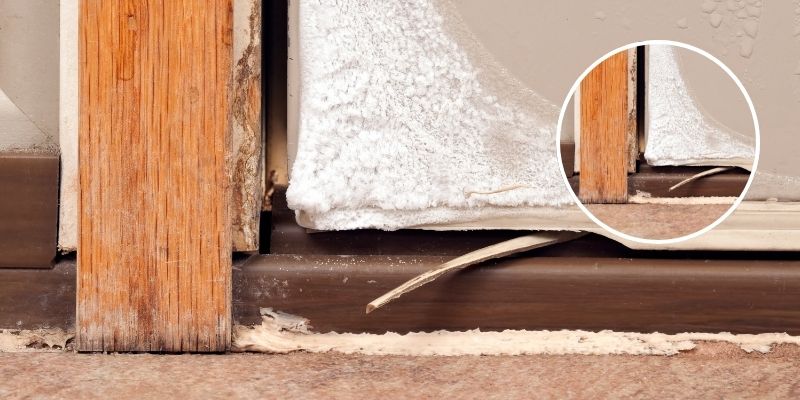
First things first, you need to get rid of the old threshold. Start by closing the door and looking for any screws or nails holding it in place. I usually find screws along the top of the threshold, but some older ones might be nailed down. Use a screwdriver to remove any screws, and if it’s nailed, gently tap a pry bar under the threshold to loosen it.
Once the fasteners are out, wiggle the threshold free. I’ve found that a utility knife is handy for cutting through any old caulk or adhesive that’s stuck to the floor. Be careful not to damage the door frame or the subfloor. If the threshold is stubborn, a hammer and chisel can help pry it loose. When I did this the first time, I was surprised how much gunk had built up underneath—give that area a quick clean while you’re at it.
Step 2: Prepare the Area
With the old threshold gone, you’ll want to prep the area for the new one. I like to use a chisel or sandpaper to smooth out any rough spots or leftover adhesive on the subfloor. Check for any damage, like rot or water stains, especially if your old threshold was letting in moisture. If you spot any issues, you might need to patch the subfloor with wood filler or replace damaged sections before moving on.
Next, use a level to make sure the surface is flat. An uneven base can cause your new threshold to wobble or not seal properly. If it’s off, you can shim the low spots with thin pieces of wood or composite shims. I learned this the hard way when my first replacement didn’t sit right, and I had to start over.
Step 3: Measure and Cut the New Threshold
Now it’s time to get your new threshold ready. Most thresholds come a bit longer than standard door widths, so you’ll likely need to trim it. Measure the width of your door frame carefully—measure twice, cut once, as they say! I use a tape measure to mark the exact length, then cut the threshold with a hacksaw or reciprocating saw.
If your threshold has a specific profile (like a sloped edge for water runoff), make sure you’re cutting from the right end to keep that feature intact. For wooden thresholds, I sand the cut edge to make it smooth. If you’re using a metal or composite threshold, check for burrs and file them down. Test-fit the threshold in the door frame to make sure it sits snugly without forcing it.
Step 4: Install the New Threshold
This is where it starts to feel like progress! Place the new threshold in the door frame and check that it’s level. If it’s not, add shims underneath until it sits flat. I like to open and close the door a few times to make sure it clears the threshold without dragging. The gap should be tight but not so close that the door sticks.
Once you’re happy with the fit, mark where the screw holes will go. Some thresholds come with pre-drilled holes, which makes this easier. If not, use a drill to make pilot holes in the threshold and the subfloor. Then, secure the threshold with screws or anchors. I usually tighten them just enough to hold it firmly without warping the material. Overtightening can crack a wooden threshold, so go easy.
Step 5: Seal the Threshold
To keep water and air out, you’ll need to seal the threshold. Grab your caulk gun and run a bead of exterior-grade caulk along both edges where the threshold meets the door frame and floor. I also add a thin layer under the threshold before screwing it down for extra protection. Smooth the caulk with your finger or a caulk tool for a clean look.
If you’re using a wooden threshold, consider painting or sealing it with a weatherproof finish. I skipped this step once, and my threshold started to warp after a year of rain and snow. Learn from my mistake—protect that wood!
Step 6: Test and Adjust
You’re almost done! Open and close the door a few times to make sure it moves smoothly and seals tightly against the threshold. If you feel a draft or see light coming through, you might need to adjust the door’s weatherstripping or add a door sweep. I had to tweak my door sweep after one install because the new threshold was slightly higher than the old one.
Walk over the threshold to make sure it feels solid and doesn’t flex. If it’s wobbly, check that your screws are tight and the shims are properly placed. Once everything feels right, step back and admire your work!
Common Mistakes to Avoid
I’ve made my fair share of mistakes, so let me save you some trouble. One big one is not measuring carefully enough—cutting a threshold too short is a pain, and you’ll have to start over with a new one. Also, don’t skip the caulk or sealant; it’s what keeps your home protected from the elements. And finally, make sure your tools are in good shape. A dull saw blade or a wobbly screwdriver can make the job harder than it needs to be.
Maintenance Tips for Your New Threshold
Once your threshold is installed, a little care goes a long way. For wooden thresholds, I check mine every year for signs of wear and reapply sealant as needed. Metal or composite thresholds are lower maintenance, but I still clean them regularly to prevent dirt buildup. If you live in an area with heavy rain or snow, inspect the caulk every few months to make sure it’s still intact.
Why I Love This Project
Replacing an exterior threshold is one of those projects that feels so satisfying when it’s done. Not only does it make your home more comfortable and efficient, but it’s also a chance to learn a new skill and save some money by doing it yourself. I remember the first time I finished this job—standing back, seeing my new threshold in place, and knowing I’d fixed that annoying draft. It’s a small win, but it feels big.
Conclusion
There you go! Replacing an exterior threshold isn’t as daunting as it might seem, and with the right tools and a bit of patience, you can transform your entryway in a single afternoon. From keeping out drafts to preventing water damage, a new threshold is a small upgrade with a big impact. I hope this guide has given you the confidence to tackle this project yourself. Grab your tools, take it one step at a time, and soon you’ll be stepping over a threshold you installed with pride. If you run into any hiccups, don’t worry—just take a deep breath and double-check your measurements. You’ve got this!
Frequently Asked Questions
What is an exterior threshold, and why do I need to replace it?
An exterior threshold is the strip at the bottom of your door frame that seals the gap under the door. It keeps out water, air, and pests. You might need to replace it if it’s damaged, worn, or letting in drafts or water.
How long does it take to replace an exterior threshold?
For most DIYers, it takes about 2-4 hours, depending on your experience and the condition of the old threshold. I found it took me about 3 hours my first time, including cleanup.
Can I replace a threshold without removing the door?
Yes, in most cases, you can replace the threshold without removing the door. Just be careful when prying out the old threshold to avoid damaging the door or frame.
What type of threshold should I buy?
Choose a threshold that matches your door’s width and height. Wood is traditional but needs maintenance. Aluminum or composite thresholds are durable and low-maintenance. I went with aluminum for my last project, and it’s held up great.
How do I know if my new threshold is installed correctly?
Check that it’s level, secure, and sealed tightly with caulk. Open and close the door to ensure it moves smoothly and there’s no gap letting in light or air.
What if my threshold is still leaking after replacement?
Double-check your caulk for gaps and make sure the threshold is level. You might also need to adjust or replace the door’s weatherstripping or add a door sweep for a tighter seal.