How To Reset Solar Lights: Proven Guide
Quick Summary:
Resetting solar lights is usually a simple process involving locating the reset button, often a small pinhole, and pressing it for a few seconds with a paperclip or similar tool. This guide provides clear, step-by-step instructions for common solar light issues, ensuring your garden remains beautifully illuminated.
Hello there, fellow home improvers! Md Meraj here, ready to help you tackle another common household puzzle: your solar lights just aren’t cooperating. It’s frustrating when those charming garden lights that used to glow so brightly suddenly go dark or start acting strange. You might be wondering if they’re broken or if it’s time for a costly replacement. But before you head to the store, know this: often, a simple reset is all they need! It’s a quick fix that can bring your garden back to life without spending a dime. We’ll walk through the easiest ways to reset them, so you can get back to enjoying your outdoor space.
Why Do Solar Lights Need Resetting?
Solar lights are fantastic for adding ambiance and safety to your yard without the hassle of wiring or electricity bills. They work by capturing sunlight during the day to charge an internal battery, which then powers the LED bulb at night. However, like any electronic device, they can sometimes get a bit confused or encounter minor glitches. This is where a reset comes in handy. It’s like giving the light a fresh start, clearing out any temporary electronic hiccups that might be preventing it from working correctly.
Several common issues can signal that a reset is needed:
- The light isn’t turning on at all, even after a full day of sunshine.
- The light turns on, but it’s very dim or flickers inconsistently.
- The light stays on all night, instead of shutting off automatically at dawn.
- The light’s behavior seems erratic or unpredictable.
These symptoms don’t necessarily mean your solar lights are beyond repair. A reset can often resolve these problems by reinitializing the light’s internal settings and ensuring it communicates properly with its solar panel and battery.

Understanding Your Solar Light’s Anatomy
Before we dive into the reset process, let’s quickly look at the main parts of a typical solar light. Knowing these will help you locate the reset button and understand how the light functions:
- Solar Panel: This is the dark, usually glass or plastic, surface on top that captures sunlight.
- Battery Compartment: This is where the rechargeable battery is housed. Some models have easily accessible battery compartments, while others are sealed.
- LED Bulb: The light source itself.
- Light Sensor/Photocell: This small component detects ambient light levels, telling the light when to turn on and off.
- On/Off Switch: Many solar lights have a physical switch, often located near the solar panel or battery compartment.
- Reset Button: This is what we’re looking for! It’s usually a tiny, recessed button.
The reset button is typically found either directly on the solar panel itself, under a small cover, or sometimes near the on/off switch. It’s designed to be unobtrusive, which is why it’s often a pinhole.
How to Reset Solar Lights: A Step-by-Step Guide
Resetting your solar lights is usually a straightforward process. The exact method might vary slightly depending on the brand and model, but the core principle remains the same: to interrupt the power flow and clear the unit’s memory.
Step 1: Assess the Situation and Gather Tools
First, take a good look at the solar light. Is it completely dead? Is it dim? Is it staying on during the day? This will help you confirm that a reset is likely the right first step. You’ll need a few simple tools:
- A Paperclip or Similar Thin, Pointed Object: This is essential for pressing the recessed reset button. A straightened paperclip, a toothpick, or a small safety pin can work.
- A Soft Cloth: For cleaning the solar panel.
- Gloves (Optional): If you prefer not to touch the components directly.
Step 2: Ensure the Solar Panel is Clean and Charged
Before attempting a reset, make sure the solar panel is clean. Dust, dirt, and debris can significantly reduce the panel’s efficiency, preventing it from charging the battery properly. Gently wipe the solar panel with a soft, damp cloth. Avoid abrasive cleaners that could scratch the surface.
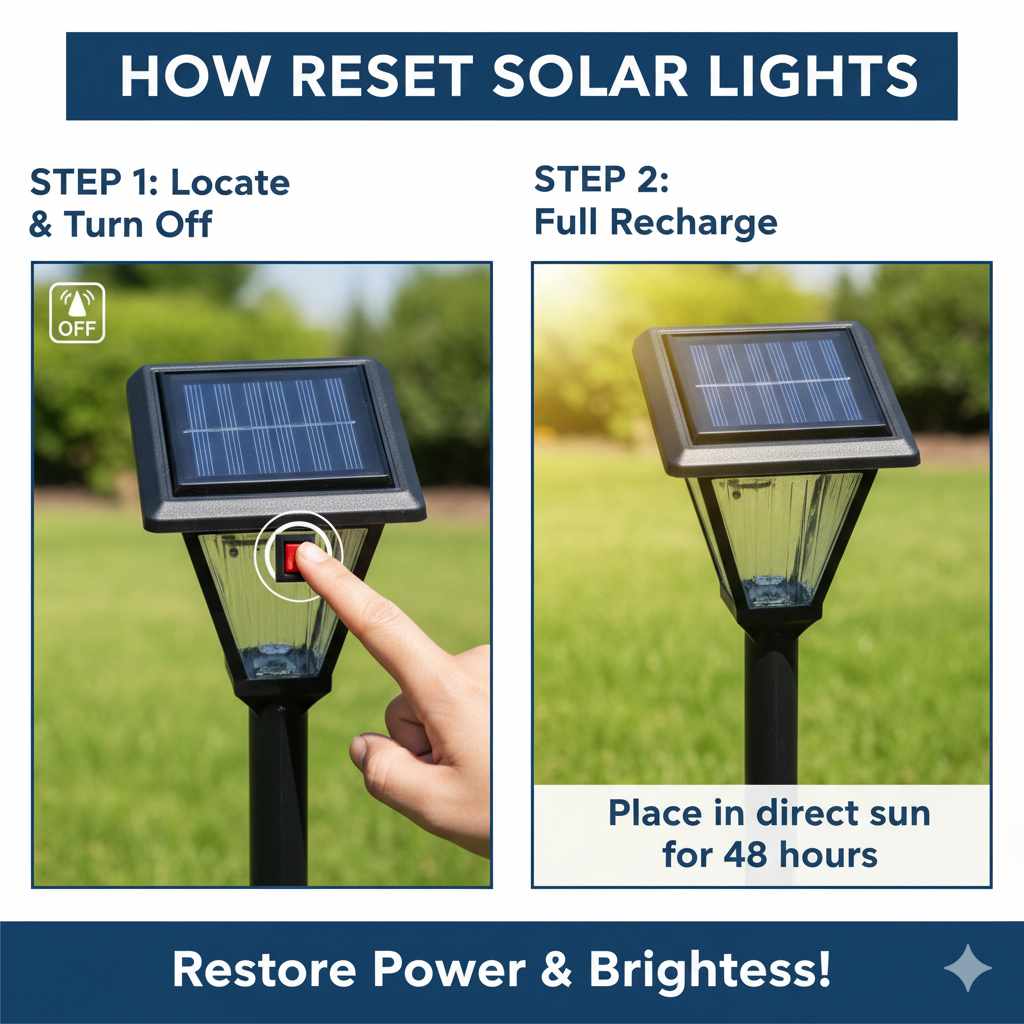
Also, ensure the light has had ample time to charge. For best results, leave the solar light in direct sunlight for at least 8-12 hours. If it’s cloudy or you’ve just received the light, it might simply need more charging time.
Step 3: Locate the Reset Button
This is the crucial step. The reset button is usually a small, circular button, often hidden in a pinhole. Look carefully:
- On the Solar Panel: Many lights have the reset button directly on the solar panel’s surface. It might be a tiny dot or a small indentation.
- Under a Small Cover: Some models have a small rubber or plastic flap that covers the reset button. You might need to gently pry this open.
- Near the On/Off Switch: Occasionally, the reset button is located adjacent to the main power switch.
- On the Underside or Back: If you can’t find it on the top, check the bottom or back of the light housing.
If you’re having trouble finding it, consult your solar light’s manual. If you don’t have the manual, a quick online search for your specific model number plus “reset button location” can often provide the answer.
Step 4: Press the Reset Button
Once you’ve found the reset button, take your paperclip or pointed tool and gently insert the tip into the pinhole. Press and hold the button for about 5-10 seconds. You might feel a slight click, indicating that the button has been pressed.
Important Note: Be gentle! You don’t want to force the paperclip or damage the button or its housing.
Step 5: Turn the Light On (If Necessary)
After pressing the reset button, some solar lights will automatically turn on and enter their normal operating mode. Others might require you to manually turn them back on. Locate the main on/off switch (if your light has one) and ensure it’s set to the “On” position.
Step 6: Test the Light
The best way to test if the reset worked is to cover the solar panel completely. You can use your hand, a piece of opaque tape, or even turn the light upside down. This simulates nighttime conditions and should trigger the light to turn on. If the light illuminates, congratulations – you’ve successfully reset it!
If the light doesn’t turn on immediately, leave it covered for a minute or two, or let it sit in darkness for a few hours to allow the battery to discharge slightly and the sensor to register the dark. Then, try uncovering the panel and covering it again.
Troubleshooting Common Solar Light Issues After Reset
Sometimes, even after a reset, your solar lights might still not behave as expected. Don’t worry, we can troubleshoot!
The Light Still Doesn’t Turn On
If the reset didn’t bring your light back to life, consider these possibilities:
- Battery Issues: The rechargeable battery might be old and no longer holding a charge. Most solar lights use standard AA or AAA NiMH (Nickel-Metal Hydride) rechargeable batteries. You can often replace these yourself. Check your manual for battery type and replacement instructions. For information on battery care and types, resources like the U.S. Department of Energy’s Energy Saver website offer great insights into efficient energy use.
- Damaged Solar Panel: If the solar panel is cracked or severely weathered, it won’t be able to capture enough sunlight.
- Faulty Internal Components: In rare cases, there might be an issue with the internal wiring or the LED itself, which might require replacing the entire unit.
- Inadequate Charging Conditions: Ensure the light is placed where it receives at least 6-8 hours of direct sunlight daily. Shade from trees, buildings, or even tall plants can prevent proper charging.
The Light is Dim or Flickering
This often points to a charging issue or a failing battery:
- Dirty Solar Panel: Re-clean the panel thoroughly.
- Old Battery: A battery that can no longer hold a full charge will result in dim light. Replace the battery.
- Insufficient Sunlight: Is the light getting enough direct sun?
- Loose Battery Connection: If you’ve replaced the battery, ensure it’s inserted correctly with the positive (+) and negative (-) ends making good contact.
The Light Stays On All Night
This usually indicates a problem with the light sensor (photocell):
- Obstructed Sensor: Make sure nothing is covering the sensor, especially during the day.
- Sensor Malfunction: The sensor might be faulty. Sometimes a reset can fix this, but if not, it might be a sign of a deeper issue.
- Environmental Factors: In some rare cases, strong ambient light sources near the sensor at night (like porch lights or streetlights) can trick the sensor into thinking it’s still daytime, preventing the light from turning off.
When to Consider Replacing Your Solar Lights
While resetting and basic troubleshooting can solve many issues, there comes a point when it might be more practical to replace your solar lights. This is generally when:
- The solar panel is visibly damaged (cracked, heavily scratched, or corroded).
- You’ve replaced the battery, and the light still doesn’t work correctly.
- The housing of the light is broken or allows water to seep in.
- The light has simply reached the end of its lifespan after several years of use.
When choosing new solar lights, look for models with good reviews, durable materials (like stainless steel or robust plastic), and adequate wattage for your needs. Investing in slightly higher-quality lights can often mean they last longer and perform more reliably.
Table: Common Solar Light Problems and Solutions
Here’s a quick reference guide to help you diagnose and fix common solar light issues:
| Problem | Possible Cause | Solution |
|---|---|---|
| Light won’t turn on at all. | No charge, dead battery, faulty switch, damaged components. | Clean panel, charge for 12+ hours, replace battery, check switch, reset light. |
| Light is dim or flickers. | Insufficient charging, old battery, dirty panel. | Ensure 6-8 hours direct sun, clean panel, replace battery. |
| Light stays on during the day. | Faulty light sensor, obstruction on sensor. | Check for obstructions, reset light, ensure no strong ambient light nearby. |
| Light doesn’t turn on at night. | Battery not charged, battery faulty, light sensor issue, internal fault. | Charge fully, replace battery, reset light, check for obstructions to sensor. |
| Light turns off too soon. | Battery not holding charge, insufficient charging time. | Replace battery, ensure adequate daily sunlight exposure. |
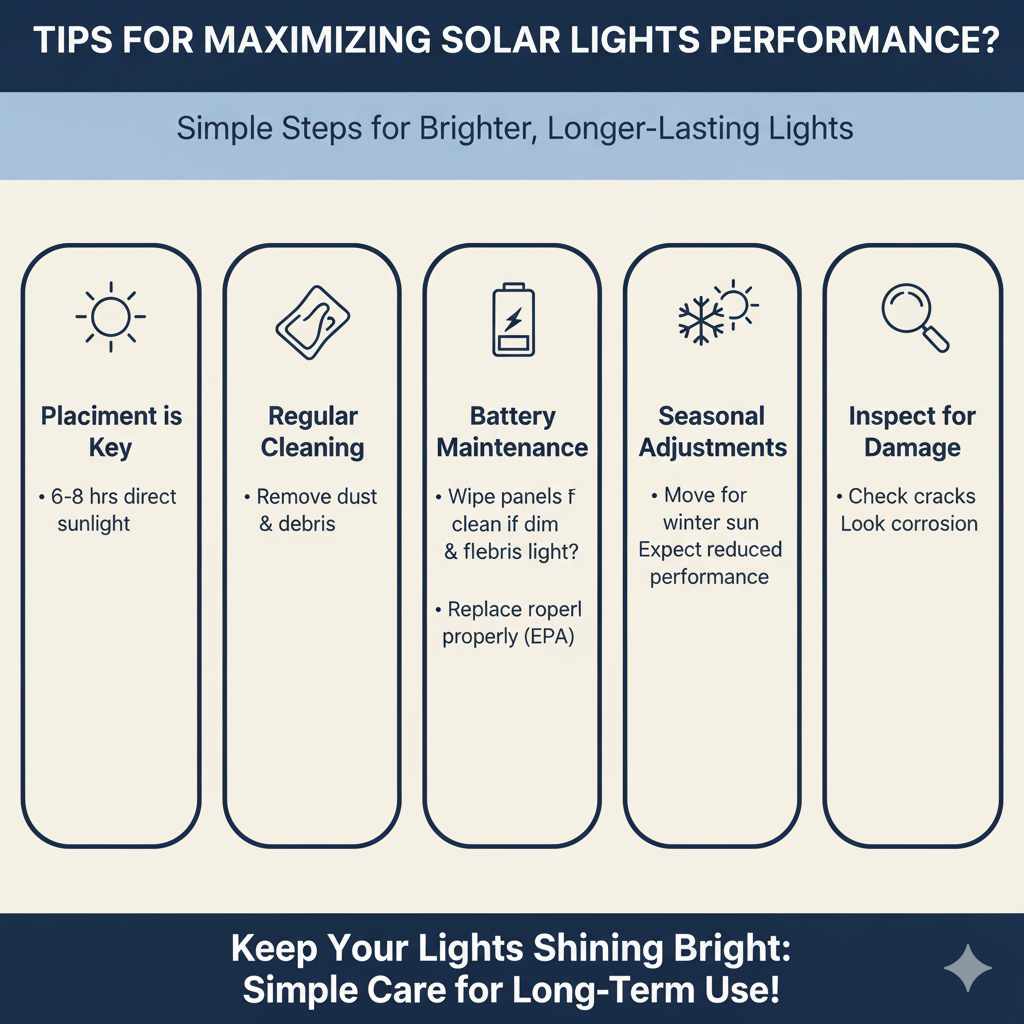
Tips for Maximizing Solar Light Performance
To keep your solar lights working their best for as long as possible, follow these simple tips:
- Placement is Key: Position your solar lights in areas that receive direct sunlight for at least 6-8 hours per day. Avoid placing them under trees, eaves, or where they might be shaded by other objects.
- Regular Cleaning: Wipe down the solar panels regularly with a soft, damp cloth to remove dust, pollen, bird droppings, and other debris. This ensures maximum sunlight absorption.
- Seasonal Adjustments: In winter, days are shorter, and sunlight is less intense. You might need to move your lights to more exposed locations or accept that their performance will be reduced.
- Battery Maintenance: Rechargeable batteries have a lifespan. Typically, they last 1-3 years. If your lights start to dim or fade, consider replacing the batteries. For guidance on battery disposal and recycling, check out resources from the U.S. Environmental Protection Agency (EPA).
- Inspect for Damage: Periodically check your lights for any signs of physical damage, such as cracks in the solar panel or housing, or corrosion on the battery contacts.
Frequently Asked Questions (FAQ) About Resetting Solar Lights
Q1: How often should I reset my solar lights?
A1: You typically only need to reset your solar lights when they aren’t functioning correctly. It’s not a routine maintenance task. If they are working fine, leave them be!
Q2: Can I reset my solar lights if they are built-in or sealed?
A2: Most solar lights designed to be sealed still have a reset button, usually in a pinhole on the solar panel or the underside of the unit. If you can’t find one, you may need to consult the manufacturer’s instructions or contact their support.
Q3: What if I don’t have a paperclip? Can I use something else to reset the button?
A3: Yes, as long as it’s thin, pointed, and non-conductive (to avoid shorting anything), you can use alternatives like a toothpick, a small straightened wire hanger (be careful not to scratch), or a fine-tipped stylus.
Q4: Does resetting my solar lights erase my settings?
A4: For most basic solar lights, there aren’t complex settings to erase. A reset simply reboots the internal electronics, clearing temporary glitches. It doesn’t typically involve custom programming.
Q5: My solar light still isn’t working after resetting. What’s the next step?
A5: The next step is usually to check and potentially replace the rechargeable battery. If that doesn’t work, inspect the solar panel for damage and ensure it’s receiving adequate sunlight. If all else fails, the unit might be faulty.
Q6: Can I use regular batteries in my solar lights?
A6: No, you should only use rechargeable batteries specifically designed for solar lights (usually NiMH or NiCd). Regular alkaline batteries cannot be recharged by the solar panel and may leak or damage the light.
Q7: How do I know if the battery needs replacing?
A7: Signs include the light not lasting through the night, being significantly dimmer than usual, or not turning on at all, even after a full day of charging. If you’ve reset the light and cleaned the panel, and the problem persists, the battery is the most likely culprit.
Conclusion
There you have it! Resetting your solar lights is a simple, effective way to troubleshoot many common issues and get them shining bright again. By following these steps, you can often resolve problems without needing to buy new lights, saving you money and effort. Remember to keep those solar panels clean and ensure they’re getting plenty of sunshine, and your garden will continue to be beautifully lit for many nights to come. If a reset doesn’t do the trick, don’t forget to check your batteries and placement. Happy illuminating!