How to Take down a Light Fixture from Ceiling: Expert Tips
You’re looking up at that outdated light fixture hanging from your ceiling and wondering if it’s time for a change. Whether you’re planning to replace it with a modern design or just need to make a few repairs, knowing how to safely take down a light fixture is crucial.
But where do you start? The good news is you don’t need to be a professional electrician to tackle this task. By following some simple steps, you can remove that fixture without breaking a sweat. Imagine the satisfaction of completing this task on your own, upgrading your space, and even saving some money in the process.
Stick with us as we guide you through the process, ensuring you feel confident and secure every step of the way. Your room’s transformation is just a few easy steps away!
Credit: www.artofmanliness.com
Safety Precautions
Always turn off the electricityat the main switch. This stops any chance of getting shocked. Check the light switch to make sure it is off. Use a voltage tester if possible. It is a good tool to ensure safety. Safety first!
Gather all needed tools before starting the task. Use a screwdriverfor unscrewing fixtures. A sturdy ladder is also important. It helps you reach the ceiling safely. Keep a flashlight nearby. It helps in dark areas. Having tools ready makes the job easier.

Credit: www.youtube.com
Gather Necessary Tools
A Phillips head screwdriver works for most light fixtures. Some might need a flathead screwdriver. Check the screws before starting. A loose screw can fall and get lost.
Wire cutters help with removing light fixtures. They can cut wires safely. Make sure they are sharp and clean. Blunt cutters are hard to use. Be careful not to cut the wrong wire.
Use a ladder or step stool to reach the ceiling. It should be stable and strong. A wobbly ladder is unsafe. Check its height before climbing. Always have a helper nearby for safety.
Assess Fixture Type
Start by turning off the power. Use a screwdriver to remove the screws. Hold the fixture with one hand. Gently pull it down. Disconnect the wires by twisting the caps. Be careful, the wires might be fragile. Lower the fixture to a safe spot.
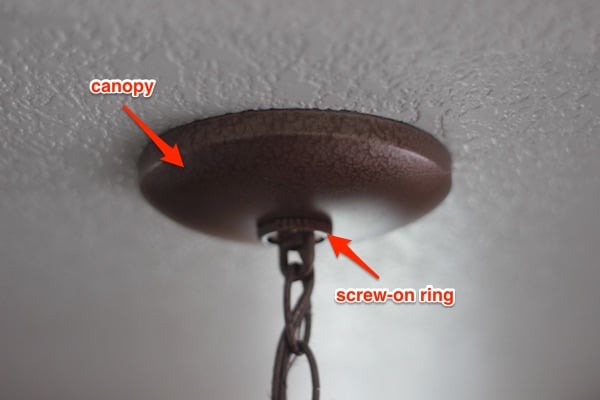
First, switch off the electricity. Unscrew the canopy from the ceiling. Support the pendant with your hand. Detach the wires carefully. Loosen the mounting bracket if needed. Ensure no wires are loose. Place the pendant on a stable surface.
Turn off the power at the main switch. Use a ladder for safety. Remove any decorative parts first. Unscrew the chandelier from its base. Hold it securely with both hands. Twist the wire nuts off. Gently lower the chandelier. Place it on a soft cloth.
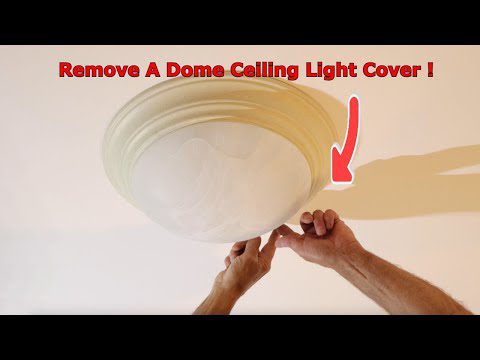
Remove Covering
First, turn off the electricityto the light. Safety first! Make sure the switch is off. Twist each bulb gently to the left. The bulb should come loose. Handle the bulbs carefully to avoid breaking them.
Look for screws or clips holding the shade. Use a screwdriver to loosen screws. If there are clips, gently unhook them. Hold the glass or shade with one hand. This prevents dropping it. Place the shade safely aside.
Detach Fixture
Begin with turning off the power. Find the circuit breaker and switch it off. Use a sturdy ladder to reach the fixture. Look for the screws holding the fixture. Use a screwdriver to remove them. Keep a hand on the fixture while unscrewing. This prevents it from falling. Place the screws in a safe spot.
Once the screws are off, gently lower the fixture. You will see the wires inside. The wires might have wire nuts. Twist off these wire nuts carefully. Hold the fixture with one hand. Use the other hand to disconnect wires. Make sure wires do not touch each other. Place the fixture safely on the ground. Ensure the wires are not exposed.
Handling Old Wiring
Always turn off the power first. Safety is very important. Use a voltage tester. Ensure no power is in the wires. Once safe, use wire nuts. These cap off the exposed wires. This prevents any accidents. Make sure they are tight. Loose caps can be dangerous. You may use electrical tape for added safety. This helps in securing the wires. Ensure no metal is showing. Everything should be covered well.
Inspect the wires closely. Look for any signs of wear. Broken wires can cause problems. They may lead to short circuits. Replace any damaged wires. If unsure, seek help. Electricians can offer guidance. Always prioritize safety. Old wires can be fragile. Handle them with care. Avoid pulling too hard. This can break them further.
Dispose Or Store Fixture
Recycle Materialsis a smart choice for old light fixtures. Many parts of a fixture can be reused. Metal, glass, and plastic are common recyclable parts. Check with your local recycling center for rules. Always remove any bulbs first. Bulbs are usually not recyclable with the fixture. This helps keep the recycling process clean and easy.
Proper Storage Techniquesare important for keeping your fixture safe. Clean the fixture well before storing. Dust and dirt can damage it over time. Use bubble wrap for fragile parts. This keeps them from breaking. Store the fixture in a cool, dry place. Moisture can cause rust or mold. Label the box with the fixture type. This makes finding it easier later.
Inspect Ceiling Area
Look closely at the ceiling. Check for cracks or holes. These can be signs of damage. Make sure there is no water damage. This can cause problems later. Safety is very important. The ceiling must be strong enough to hold a new fixture.
Feel the ceiling for soft spots. These spots can be weak. Press gently to test. Listen for any strange sounds. This may show hidden damage. Look around for wires hanging loose. Wires should be secured.
Clean the area well. Dust can cause problems later. Measure the space for your new fixture. Make sure it will fit. Gather all the tools you need. Read the instructions for the fixture. Plan where to place it.

Credit: www.rowabi.com
Frequently Asked Questions
How Do I Safely Remove A Light Fixture?
First, turn off the power at the circuit breaker. Use a step ladder for stability. Unscrew any visible screws and gently detach the fixture. Ensure wiring is disconnected safely, using pliers if necessary. Safety goggles and gloves are recommended to protect from debris or sharp edges.
What Tools Are Needed To Take Down A Light Fixture?
You’ll need a screwdriver, pliers, and a step ladder. A voltage tester ensures power is off. Safety goggles and gloves protect your eyes and hands. A flashlight helps if lighting is insufficient. Some fixtures may require additional tools like a wrench or wire cutters.
Can I Remove A Light Fixture Myself?
Yes, you can remove a light fixture yourself with caution. Ensure the power is off before starting. Follow safety guidelines and use the right tools. If unsure, consult a professional to avoid risks. It’s important to handle wires carefully and ensure no electrical hazards remain.
How Long Does It Take To Remove A Fixture?
Removing a fixture typically takes 20-30 minutes. Preparation, such as gathering tools and ensuring safety, may add time. Complex fixtures might take longer. Experience can speed up the process. Always prioritize safety, ensuring steps are carefully followed to prevent accidents.
Conclusion
Taking down a light fixture can seem tricky. But it’s manageable with patience and care. Remember to turn off the power first. Safety is crucial. Gather the right tools before starting. Follow steps methodically. Keep screws and small parts safe.
Handle glass and fragile pieces gently. Seek help if unsure. It’s okay to ask a friend. Once removed, clean the area thoroughly. Enjoy your updated space. Whether replacing or simply removing, you now know the basics. So, tackle your ceiling project confidently.
Your home can shine in new ways. Happy DIY-ing!