Why Proper Kayak Tie-Down Matters
Let’s start with the basics. Tying down two kayaks on your roof rack isn’t just about getting them from point A to point B. It’s about keeping them secure so they don’t fly off on the highway, damage your car, or worse, cause an accident. I learned this the hard way when I didn’t tighten my straps enough on my first trip. Halfway down the road, I saw one kayak shifting in my rearview mirror. My heart sank! A loose kayak can also get scratched or dented, and nobody wants to paddle a beat-up boat. Doing it right protects your gear, your car, and everyone on the road. Plus, it gives you peace of mind so you can focus on the fun ahead.
What You’ll Need to Tie Down Two Kayaks
Before you start, gather the right gear. I’ve found that having the proper tools makes all the difference. Here’s what you need:
- Roof Rack: A sturdy rack designed for your car. I use a Thule rack, but Yakima or factory-installed racks work too. Make sure it’s rated for the weight of two kayaks (usually 50–100 pounds each).
- Kayak Cradles or Pads: These cushion your kayaks and keep them stable. I prefer J-style cradles because they hold kayaks on their side, saving space for two boats.
- Tie-Down Straps: Get four cam buckle straps, each at least 12–15 feet long. I use NRS straps because they’re strong and easy to tighten. Avoid ratchet straps—they can over-tighten and crack your kayaks.
- Bow and Stern Lines: These ropes anchor the front and back of each kayak to your car. I use ¼-inch nylon ropes, about 10 feet each.
- Padding or Pool Noodles: Optional, but great for protecting your kayaks if you’re using a basic rack.
- Twist Ties or Bungee Cords: Handy for securing loose strap ends so they don’t flap in the wind.
- Ladder or Step Stool: If your car is tall, like my SUV, this helps you reach the roof safely.
I spent about $200 on straps, cradles, and ropes when I started, but you can find budget options at stores like REI or even Amazon. Double-check that everything is in good shape—no frayed straps or rusty buckles.
Preparing Your Car and Roof Rack
Before you load those kayaks, set up your car. I always start by cleaning my roof rack to remove dirt or grit that could scratch the kayaks. If you’re using cradles, attach them to the crossbars now. Space them about 24–30 inches apart to fit two kayaks side by side. My J-cradles bolt on easily, but foam pads just slide onto the bars. Make sure everything is tight—I once had a cradle shift because I didn’t check the bolts, and it was a hassle to fix mid-trip.
Park your car on flat ground for easy loading. If you’re using a high vehicle, like my Jeep, keep that ladder nearby. I also lower my car’s antenna and tuck in the side mirrors to avoid snagging straps. Lay out your straps and ropes so they’re ready to go. Trust me, it’s annoying to hunt for a strap when you’ve got a kayak balanced on your roof!
Loading Two Kayaks on the Roof Rack
Now, let’s get those kayaks up there. This part can feel tricky, but I’ve got a system that works. If you have a buddy, great—two people make it easier. If you’re solo, like I often am, it’s still doable.
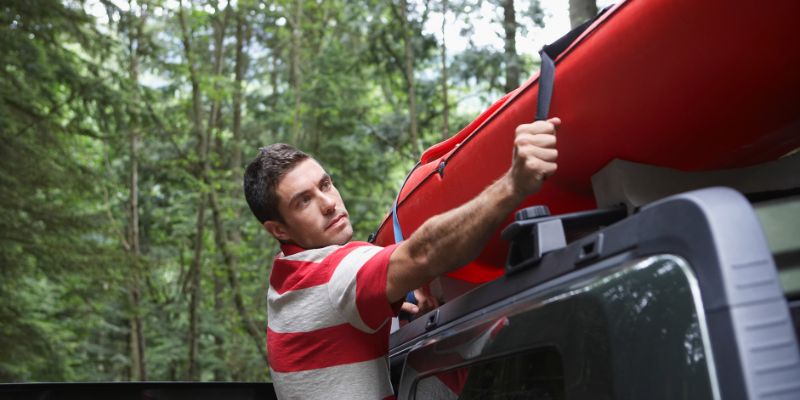
Step 1: Lift the First Kayak
Stand at the rear of your car. Grab the first kayak by its handles or cockpit, keeping your knees bent to avoid straining your back. I learned this after tweaking my back on my first try! Lift the kayak’s bow (front) onto the rear crossbar or cradle. Slide it forward until it’s centered on the rack. If you’re using J-cradles, tilt the kayak on its side so the hull faces out. For foam pads, place it hull-down (bottom facing the roof). Check that it’s balanced and not overhanging too much on either side.
Step 2: Load the Second Kayak
Repeat the process for the second kayak. Place it next to the first, leaving a small gap (about 2–4 inches) to avoid scratching. If you’re using J-cradles, the kayaks will face opposite directions to fit snugly. I once crammed them too close, and they rubbed against each other, leaving scuffs. With foam pads, stack them hull-down side by side, but make sure your rack is wide enough—most standard racks (48–60 inches) can handle it. If your rack is narrow, consider stacking them, but that’s trickier and needs extra straps.
Step 3: Check the Weight
Two kayaks can weigh 100–200 pounds, so confirm your rack’s weight limit (check your car’s manual). My Thule rack handles 165 pounds, which is plenty for my 60-pound kayaks. If you’re close to the limit, double-check all bolts and straps. I always give the kayaks a gentle shake to make sure they’re stable before tying them down.
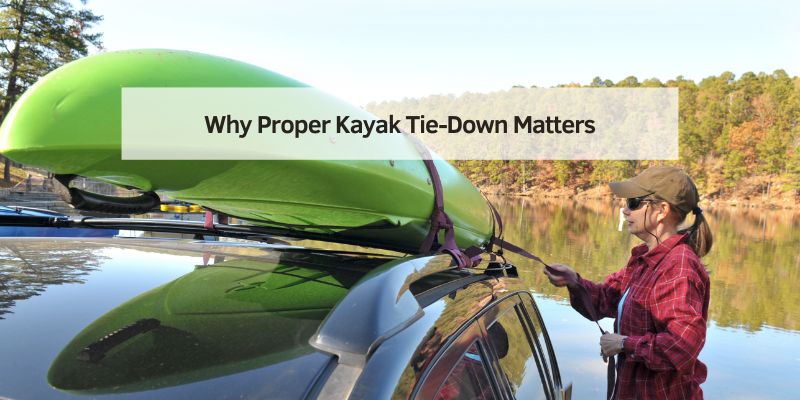
Tying Down the Kayaks with Straps
Here’s where the magic happens—securing those kayaks so they don’t budge. I use a two-strap system for each kayak, plus bow and stern lines for extra safety.
Step 1: Secure the First Kayak with Cam Straps
Take a 15-foot cam strap and toss it over the first kayak, making sure it’s not twisted. Thread the strap under the crossbar on one side, pull it across the kayak, and thread it under the crossbar on the other side. Buckle the strap and pull tight, but not so hard you dent the kayak. I aim for firm, not crushing—think snug hug, not bear squeeze. Repeat with a second strap on the front crossbar. Tug both straps to ensure they’re even. I once skipped this check, and one side was looser, making the kayak wobble.
Step 2: Tie Down the Second Kayak
Do the same for the second kayak, using two more cam straps. Make sure the straps don’t overlap or tangle with the first kayak’s straps—it keeps things neat and secure. I use different-colored straps (blue for one kayak, red for the other) to avoid confusion. Tighten both straps and give the kayak a wiggle to test stability.
Step 3: Secure Loose Strap Ends
Flapping straps are annoying and dangerous. I tuck the loose ends into the buckles or use twist ties to keep them in place. Once, a loose strap slapped my windshield for 20 miles—lesson learned! You can also use bungee cords to bundle excess strap length.
Here’s a quick table to summarize the strap setup:
| Kayak | Straps Needed | Placement | Tips |
|---|---|---|---|
| Kayak 1 | 2 cam straps | One on the front crossbar, one on rear | Tighten evenly; don’t over-crush the hull. |
| Kayak 2 | 2 cam straps | One on the front crossbar, one on the rear | Use different colors to avoid mix-ups. |
| Loose Ends | Twist ties/bungees | One on the front crossbar, one on the rear | Prevents flapping or tangling. |
Adding Bow and Stern Lines
Cam straps hold the kayaks side to side, but bow and stern lines keep them from sliding forward or backward. This step is critical, especially for highway driving. I skipped it once and regretted it when I hit a hard brake, and the kayaks shifted an inch.
Step 1: Tie the Bow Lines
Take a 10-foot rope and find the front grab loop or handle on the first kayak. Thread the rope through and tie a secure knot (I use a bowline—it’s strong and easy to untie). Run the other end to a secure point on your car, like the tow hook or bumper anchor (check your manual for safe spots). Pull the rope tight and tie it off with another bowline. Repeat for the second kayak. I make a V-shape with the ropes to keep both kayaks centered.
Step 2: Tie the Stern Lines
Do the same at the back. Use the kayak’s rear grab loops and tie the ropes to your car’s rear tow hook or hitch. Keep the ropes snug but not so tight that they bend the kayak. I check that the lines don’t drag on the ground or touch hot exhaust parts.
Step 3: Double-Check Tension
Walk around your car and tug each line. They should feel firm, like a guitar string. I give the kayaks a gentle push to mimic wind or braking. If anything moves, tighten the straps or ropes.
Testing Your Setup Before Driving
Before you hit the road, test your work. I always do a short drive around my neighborhood at low speed (20–30 mph). Listen for creaks or rattles and watch for shifting in your mirrors. If anything feels off, pull over and tighten. On my first trip, I heard a weird hum from a loose strap—stopping to fix it saved me a headache. Check that your kayaks don’t block your view or tail lights, and make sure all ropes are clear of the wheels.
Driving Tips with Two Kayaks on Your Roof
Driving with two kayaks changes how your car handles. I noticed my SUV felt top-heavy at first, so here are some tips:
- Keep Speed Low: Stick to 65 mph or less. Wind resistance increases with speed, and kayaks can catch air like sails. I stay in the right lane to avoid pressure from faster traffic.
- Avoid Sharp Turns: Take corners slowly to prevent swaying. I learned this when I turned too fast, and the kayaks leaned scarily.
- Check Regularly: Stop every 30–60 minutes to inspect straps and ropes. I stop at gas stations to give everything a quick tug.
- Watch the Weather: Windy days make kayaks harder to control. I check forecasts and avoid driving in gusts over 20 mph.
- Mind Height: Kayaks add height to your car. I forgot this once and nearly hit a low bridge. Measure your car’s new height and watch for clearance signs.
Unloading and Storing Your Kayaks
When you reach the water, unloading is the reverse of loading. Untie the bow and stern lines first, then loosen the cam straps. Slide each kayak off carefully, using a buddy if possible. I store my straps and ropes in a dry bag to keep them tangle-free. Once home, clean your kayaks and store them out of the sun to prevent UV damage. I hang mine in my garage using wall mounts—it saves space and keeps them safe.
Common Mistakes to Avoid
I’ve made plenty of mistakes, so let me save you some trouble:
- Over-Tightening Straps: Too much force can crack your kayak’s hull. Tighten just enough to hold it firm.
- Skipping Bow/Stern Lines: These are your backup if the straps fail. I thought they were optional until a strap loosened mid-trip.
- Using Old Straps: Frayed straps can snap. I replace mine every 2–3 years or if they look worn.
- Loading Unevenly: Off-center kayaks can tip or strain your rack. I use a tape measure to keep them balanced.
- Ignoring Weight Limits: Overloading your rack can damage your car. I always check my manual before loading.
My Personal Experience: Lessons Learned
When I started kayaking, I thought tying down two boats would be a breeze. Wrong! My first trip was a mess—loose straps, shifting kayaks, and a near-miss with a low bridge. I spent hours watching YouTube tutorials and practicing in my driveway. Now, I can load and tie down two kayaks in 20 minutes flat. My biggest lesson? Take your time and double-check everything. It’s better to spend an extra 10 minutes than risk a disaster on the road. I also learned to invest in quality gear—cheap straps and foam pads didn’t cut it for long hauls.
Conclusion
Tying down two kayaks on a roof rack might seem daunting, but it’s totally doable with the right steps and gear. I’ve gone from a nervous rookie to a confident kayaker, hauling my boats across states for epic adventures. By setting up your rack properly, using quality straps and ropes, and double-checking your work, you’ll keep your kayaks secure and your mind at ease.
Whether you’re headed to a quiet lake or a rushing river, the effort you put into tying down your kayaks sets the stage for a safe, fun trip. So, load up, hit the road, and paddle on! You’ve got this, and I’m cheering you on for your next water-bound adventure.
FAQs
Can I tie down two kayaks without a roof rack?
It’s tough and not recommended. A roof rack distributes weight evenly and keeps kayaks stable. Without one, you risk damaging your car or kayaks. I tried it once with foam pads and regretted it.
How long does it take to tie down two kayaks?
About 20–30 minutes once you get the hang of it. My first time took an hour, but practice makes it faster.
Do I need bow and stern lines?
Yes, they’re critical for safety. They keep kayaks from sliding during sudden stops or high winds. I never skip them now.
What if my roof rack is too narrow for two kayaks?
You can stack them with stacking cradles or use a wider rack. I upgraded my rack to a 60-inch one to fit both comfortably.
Can I use ratchet straps instead of cam straps?
Avoid ratchet straps—they’re too strong and can crack your kayaks. Cam straps are gentler and easier to adjust. I switched to cam straps after damaging a kayak.
How do I know if my kayaks are secure?
Give them a firm shake before driving. If they don’t move, you’re good. I also do a short test drive to check for noises or shifts.