How to Tie Down a Motorcycle: A Step-by-Step Guide
Hey there! So, you’re ready to hit the road with your motorcycle, but first, you need to get it safely loaded onto a trailer or truck. Trust me, figuring out how to tie down a motorcycle can feel daunting at first. I remember my first time hauling my Harley to a rally—I was sweating bullets, worried it might tip over or get damaged. After plenty of practice and a few lessons learned, I’ve nailed down a foolproof method to secure a bike.
In this guide, I’m sharing everything I’ve learned about tying down a motorcycle, step by step, to make sure your ride stays safe and steady. Whether you’re a weekend rider, a cross-country adventurer, or just moving your bike across town, this article will help you do it right. Let’s get rolling!
Why Tying Down a Motorcycle Properly Matters
Let’s start with the basics. Tying down a motorcycle isn’t just about strapping it to a trailer and calling it a day. If you don’t do it right, your bike could shift, fall, or get damaged during transport. I’ve seen horror stories at bike meets—scratched paint, bent handlebars, or worse, a totaled bike. A properly secured motorcycle stays stable, protects your investment, and keeps everyone on the road safe.
When I started riding, I underestimated how much a bike can move during transport. Even a short trip can jostle it if the straps aren’t tight or placed correctly. Plus, a loose bike could damage your trailer or truck bed. Taking the time to tie it down properly saves you headaches and keeps your pride and joy in pristine condition.
Tools and Equipment You’ll Need
Before you start, gather the right gear. When I tie down my bike, I make sure I have everything ready to avoid last-minute trips to the hardware store. Here’s what I use:
| Item | Purpose |
|---|---|
| Ratchet straps (4) | To secure the bike to the trailer or truck bed. |
| Soft loops | To protect the bike’s handlebars or frame from strap damage. |
| Wheel chock | To keep the front wheel stable and prevent rolling. |
| Canyon dancer or bar harness | To safely attach straps to the handlebars. |
| Tie-down anchors | Secure points on the trailer or truck bed to hook straps. |
| Blanket or padding | To protect the bike’s paint from scratches or rubbing. |
| Bungee cords (optional) | To secure loose straps or accessories. |
I always use heavy-duty ratchet straps with a working load limit (WLL) of at least 1,500 pounds each. My 2-inch wide straps are perfect for my 600-pound Harley. Soft loops and a canyon dancer are game-changers—they prevent scratches and make strapping easier. If your trailer doesn’t have built-in anchors, get some bolt-on ones for a solid hold.
Choosing the Right Trailer or Truck Bed
Not all trailers or truck beds are created equal. When I first hauled my bike, I used a friend’s flatbed trailer, and it worked fine, but I’ve since upgraded to a dedicated motorcycle trailer. Here’s what I consider when choosing:
- Size: The trailer or truck bed should be long and wide enough for your bike. My trailer is 8 feet long, which fits my bike with room to spare.
- Weight Capacity: Check the trailer’s weight rating. My bike weighs about 600 pounds, so I use a trailer rated for 2,000 pounds to be safe.
- Anchor Points: Look for strong, built-in tie-down points. I added extra D-ring anchors to my trailer for flexibility.
- Surface: A non-slip surface, like wood or textured metal, helps keep the bike stable. I avoid slick aluminum trailers unless they have grip strips.
- Ramp: A sturdy ramp makes loading easier. My foldable ramp is lightweight but strong enough for my bike.
If you’re using a truck bed, make sure it’s clean and free of debris. I put down a rubber mat to prevent slipping and protect my bike’s tires.
Preparing Your Motorcycle for Transport
Before you tie down your bike, you need to prep it. I learned this the hard way when I forgot to secure my mirrors once—they got loose and scratched my tank. Here’s my prep checklist:
- Turn Off the Fuel: I close the fuel valve to prevent leaks, especially on carbureted bikes.
- Check the Tires: Make sure they’re properly inflated to handle the load. I check mine with a gauge before every trip.
- Secure Loose Parts: Fold in mirrors, remove saddlebags, or tie down accessories. I use bungee cords for small items.
- Shift to Neutral: This makes it easier to roll the bike onto the trailer. I double-check before loading.
- Clean the Bike: A clean bike lets you spot any new scratches or damage after transport. I give mine a quick wipe-down.
- Protect the Paint: I drape a blanket over the tank and fairings to prevent strap rub or scratches.
Taking these steps ensures your bike is ready to load and minimizes the risk of damage. It only takes a few minutes but saves a lot of trouble.
Step-by-Step Guide to Tying Down a Motorcycle
Now, let’s get to the main event—tying down your motorcycle! I’ll walk you through my process, step by step, just like I showed my buddy when he bought his first bike. Follow these steps, and your bike will stay rock-solid.
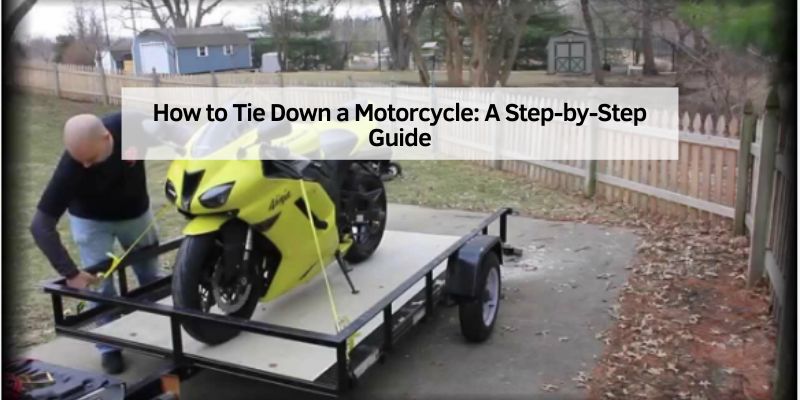
Step 1: Load the Motorcycle
Roll your bike onto the trailer or truck bed using a ramp. I always have a friend spot me to keep the bike balanced. If you’re alone, go slow and keep your hands on the brakes. Position the bike in the center of the trailer, with the front wheel in a wheel chock if you have one. My chock keeps the bike upright while I strap it.
Step 2: Attach Soft Loops or Canyon Dancer
To protect your handlebars, attach soft loops or a canyon dancer. For soft loops, I loop them around the handlebars near the grips, avoiding the controls. If I’m using a canyon dancer, I slide it over the grips and secure it to the bar ends. Both options give you safe attachment points for the straps without scratching your bike.
Step 3: Attach Front Straps
Take two ratchet straps and hook one end of each to anchor points on the trailer, ideally near the front corners. I use D-rings bolted to the trailer floor. Attach the other end to the soft loops or canyon dancer on the handlebars—one strap per side. Pull the straps snug by hand, but don’t ratchet yet. The goal is to compress the front suspension slightly, about 25% of its travel.
Step 4: Tighten the Front Straps
Now, ratchet the front straps to tighten them. I alternate sides, cranking each strap a few clicks at a time to keep the bike centered. The bike should stay upright without you holding it, and the front wheel should stay in the chock or against the trailer’s front edge. Don’t overtighten—you don’t want to bottom out the suspension or stress the forks.
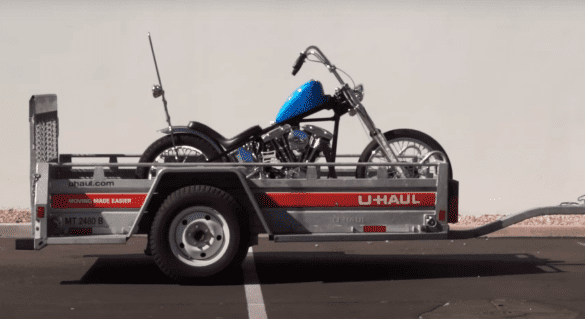
Step 5: Attach Rear Straps
Take two more ratchet straps and hook them to anchor points near the rear of the trailer. I attach the other ends to the bike’s rear frame or swingarm, avoiding the exhaust or chain. If your bike has passenger pegs, those can work too. Pull the straps snug by hand to stabilize the rear wheel.
Step 6: Tighten the Rear Straps
Ratchet the rear straps, again alternating sides to keep the bike balanced. I tighten them until the rear suspension compresses slightly, matching the front. The bike should feel locked in place, with no wobble or movement when you push it gently.
Step 7: Check Everything
Walk around the bike and tug on each strap to ensure they’re tight. I also shake the bike lightly to confirm it’s stable. Check that the hooks are secure and the straps aren’t rubbing against sharp edges or painted surfaces. If anything looks off, adjust it now.
Step 8: Secure Loose Ends
Tuck or tie down the loose ends of the straps so they don’t flap during transport. I use bungee cords or zip ties to keep them neat. Double-check that the bike is in neutral, the kickstand is up, and any accessories are secured.
Common Mistakes to Avoid
I’ve made my share of mistakes tying down motorcycles, so let me save you some trouble. Here are the big ones to watch out for:
- Using Cheap Straps: I once used bargain-bin straps, and one snapped mid-trip. Stick to heavy-duty ratchet straps with a high WLL.
- Strapping to Weak Points: Don’t attach straps to handlebar controls, mirrors, or plastic parts. I scratched my grips doing this early on.
- Overtightening: Compressing the suspension too much can damage your forks or shocks. I aim for 25–30% compression.
- Skipping Soft Loops: Straps directly on handlebars can scratch or bend them. I always use soft loops or a canyon dancer.
- Uneven Tension: Tightening one side more than the other can tilt the bike. I alternate sides to keep it balanced.
Tips for Safe Motorcycle Transport
Tying down your bike is just part of the process—safe transport is the goal. Here’s what I do to ensure a smooth trip:
- Check Straps Regularly: I stop after 10–20 miles to recheck strap tension. Vibrations can loosen them slightly.
- Drive smoothly: Avoid sudden stops or sharp turns. I drive like I’m carrying a newborn to keep the bike steady.
- Protect Against Weather: If it’s raining, I cover my bike with a waterproof tarp, securing it with bungee cords.
- Use Padding: I place padding under straps where they touch the bike to prevent rub marks.
- Know Your Route: Plan for smooth roads if possible. I avoid gravel or bumpy routes when hauling my bike.
Choosing the Right Straps and Accessories
The gear you use makes a big difference. When I upgraded my tie-down setup, hauling became so much easier. Here’s what I look for:
- Ratchet Straps: I use 2-inch-wide straps with a 3,333-pound WLL. Keeper or Rhino USA brands are my go-to.
- Soft Loops: Get heavy-duty ones that won’t tear. I have a set of four that I’ve used for years.
- Canyon Dancer: This is great for sportbikes or bikes with clip-ons. I got one for my friend’s Ducati, and it’s a lifesaver.
- Wheel Chock: A removable chock is versatile for trailers or truck beds. My Pit Bull choke is rock-solid.
- Anchors: Bolt-on D-rings are cheap and strong. I added four to my trailer for extra options.
Investing in quality gear saves time and protects your bike. I spent about $100 on my setup, and it’s been worth every penny.
Maintaining Your Tie-Down Gear
To keep your straps and accessories in top shape, a little maintenance goes a long way. Here’s my routine:
- Inspect Straps: Before each use, I check for frays, cuts, or weak stitching. I tossed a strap last year after it got worn.
- Clean Straps: If they’re dirty, I wash them with soap and water, then air-dry. Never use a dryer—it weakens the fibers.
- Lubricate Ratchets: A quick spray of silicone lubricant keeps the ratchet mechanism smooth. I do this every few months.
- Store Properly: I keep my gear in a dry toolbox to prevent rust or mildew. Sunlight can fade straps, so avoid leaving them outside.
Troubleshooting Common Tie-Down Issues
Sometimes, things don’t go perfectly. Here’s how I handle common problems:
- Straps Loosen: If straps slacken during transport, they weren’t tight enough. I re-ratchet and check the tension more often.
- Bike Tilts: Uneven strap tension or a weak anchor point can cause this. I re-tighten straps evenly and check anchors.
- Straps Rub Paint: If straps are rubbing, add padding or adjust their position. I caught this early on my tank and saved the paint.
- Wheel Chock Slips: Ensure the chock is bolted or secured to the trailer. I use extra straps if needed.
Why Motorcycle Tie-Downs Are a Must for Riders
If you ride, you’ll need to transport your bike at some point—whether for a rally, a shop visit, or a move. I’ve hauled my Harley to Sturgis, my dirt bike to trails, and my friend’s cruiser to a mechanic. Ratchet straps and proper tie-downs make it possible. They’re affordable, easy to use, and essential for any rider who values their bike.
I keep a tie-down kit in my truck at all times. It’s saved me when I’ve had to tow a buddy’s bike or move my own unexpectedly. Once you master tying down a motorcycle, you’ll feel confident taking your bike anywhere.
Conclusion
Tying down a motorcycle doesn’t have to be stressful. With the right gear, a solid process, and a little practice, you can secure your bike like a pro. I’ve shared every step I use, from loading the bike to tightening the straps, plus tips to avoid common mistakes. Whether you’re hauling a sportbike, a cruiser, or a dirt bike, this guide will keep your ride safe and sound.
I hope this has given you the know-how to tie down your motorcycle with confidence. Grab your straps, double-check your anchors, and hit the road knowing your bike is locked in tight. Thanks for reading, and safe travels!
FAQs
How many straps do I need to tie down a motorcycle?
You need at least four ratchet straps—two for the front and two for the rear—to keep the bike stable.
Can I tie down a motorcycle without a wheel chock?
Yes, but a wheel chock makes it easier and safer. Without one, use extra straps to secure the front wheel.
What kind of straps are best for tying down a motorcycle?
Use 2-inch-wide ratchet straps with a working load limit of at least 1,500 pounds. Add soft loops to protect the bike.
How tight should the straps be?
Tighten until the suspension compresses about 25–30%. Don’t overtighten, as it can damage the forks or shocks.
How do I prevent straps from scratching my motorcycle?
Use soft loops or a canyon dancer on the handlebars and add padding where straps touch painted surfaces.