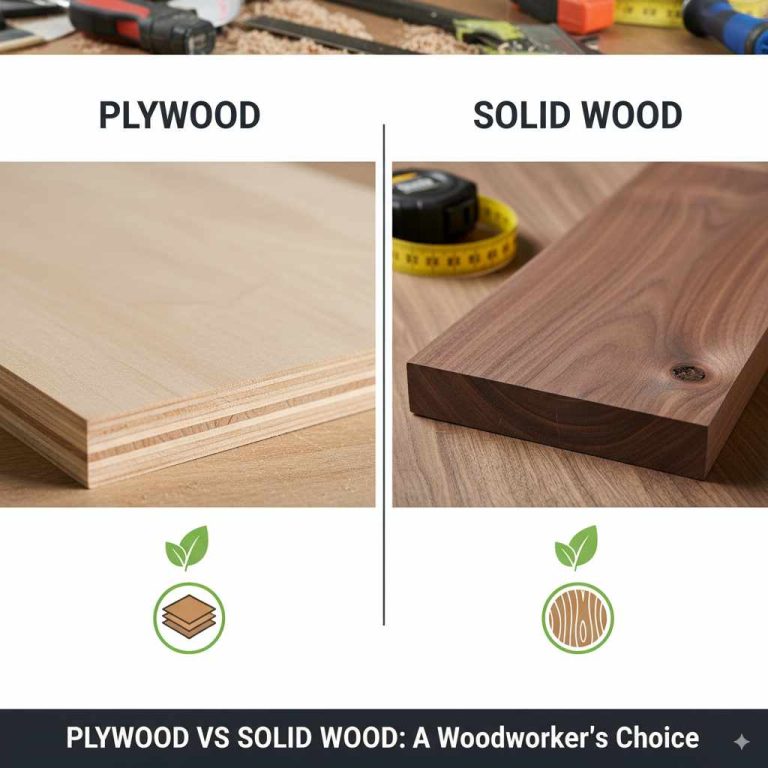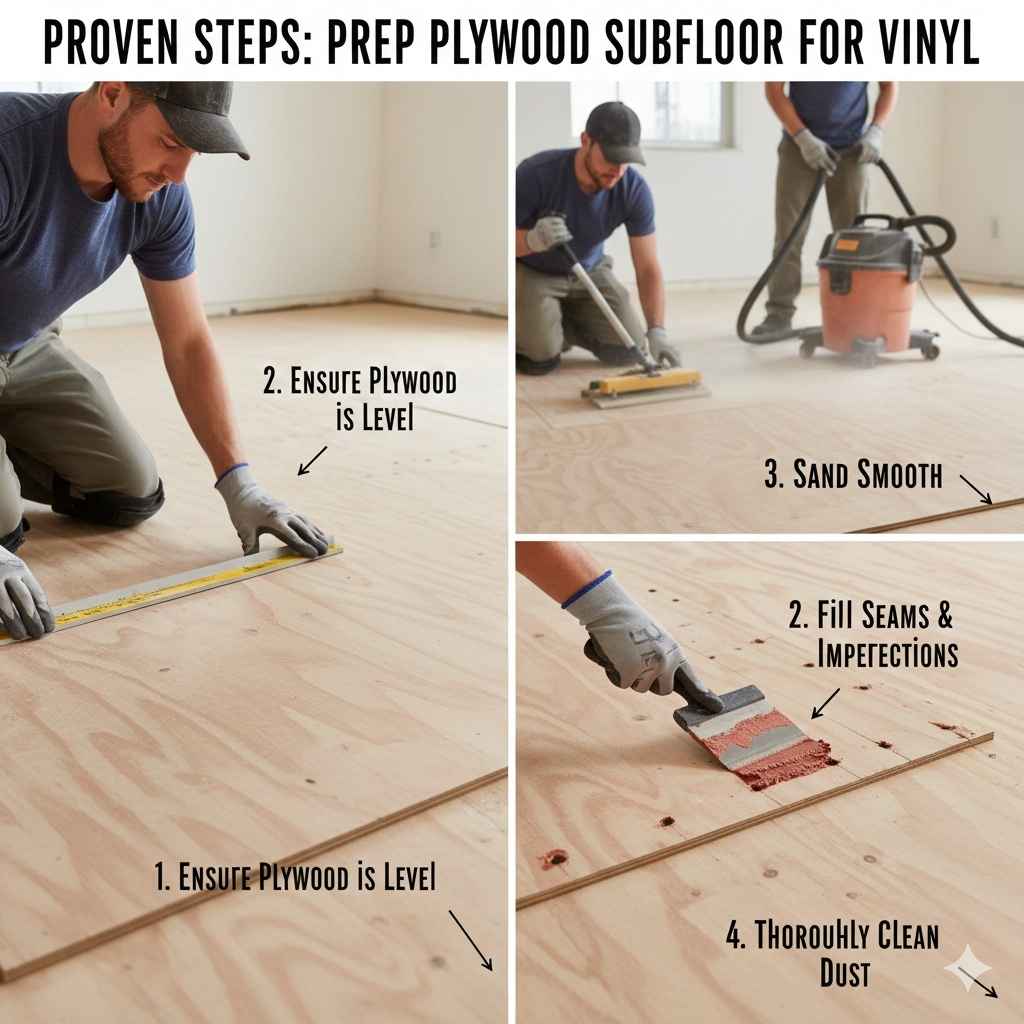
Proven Steps: Prep Plywood Subfloor For Vinyl
To prep a plywood subfloor for vinyl flooring, you must first clean thoroughly, then check for loose fasteners or squeaks, sand down high spots, and finally, apply a leveling compound or appropriate underlayment if needed. A smooth, stable surface is the secret to long-lasting luxury vinyl plank (LVP) or sheet vinyl.
Welcome, DIY friend! Laying down new vinyl flooring is a fantastic way to brighten up any room. But here’s the secret the pros know: the final look depends almost entirely on what’s underneath. A bumpy, dusty, or uneven plywood subfloor will show right through that beautiful new vinyl, leading to frustration later on. Don’t worry, that’s why I’m here. We are going to take your existing plywood subfloor from questionable to perfect, step-by-step. Getting this prep right builds your confidence and guarantees a beautiful, durable floor that lasts for years.
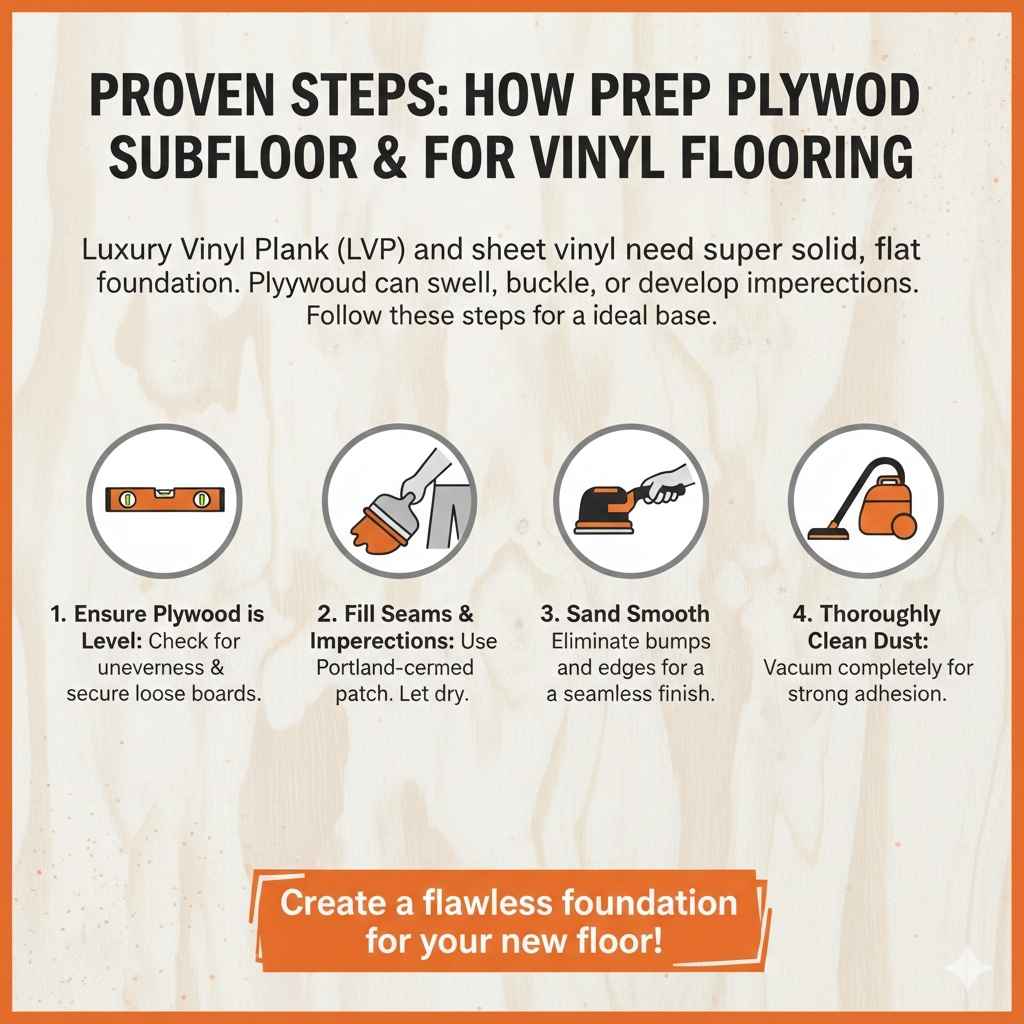
Proven Steps: How to Prep Plywood Subfloor for Vinyl Flooring
Luxury Vinyl Plank (LVP) and sheet vinyl are popular choices because they are flexible and forgiving—but they aren’t magic. They need a super solid, flat foundation. Plywood is common, but over time, it can swell, buckle, or develop imperfections. Follow these proven steps, and you’ll create the ideal base for your new floor.
Why Subfloor Preparation Is Non-Negotiable for Vinyl
Vinyl flooring, especially click-lock LVP, requires a very flat surface. Think about it: vinyl is thin! Any small bump, nail head, or crack in the plywood underneath will telegraph (show through) to the top surface. This is called “telegraphing” and it ruins the look of your expensive new floor.
A well-prepped subfloor also ensures your vinyl locks together correctly (if using LVP) and prevents premature wear. If you skip these crucial steps, you risk costly repairs down the road. We want strong results right out of the gate!
What You’ll Need: Essential Tools and Materials
Before we start tinkering, let’s gather our gear. Having the right tools makes the job go smoothly and safely. Think of this as gathering your trusted workshop buddies!
Tools List
- Shop Vacuum (a high-powered one is best)
- Random Orbit Sander or Belt Sander (for flattening high spots)
- Sanding Discs (80-grit to start, maybe 120-grit for finishing)
- Pry bar and Hammer
- Drill/Driver with screw bits
- Putty Knife or Floor Scraper
- Moisture Meter (highly recommended!)
- Safety Gear: Safety glasses, dust mask/respirator, gloves
Materials List
- Exterior Grade Screws (preferably flat-head deck screws)
- High-Quality Self-Leveling Underlayment (SLU) or patching compound
- Floor Patch or Wood Filler
- Appropriate Subfloor Sealer/Primer (check SLU instructions)
Step 1: Clear the Area and Inspect the Subfloor
We start with a clean slate. This initial phase is all about inspection. You can’t fix what you can’t see!
A. Empty and Clean Everything
Remove all furniture, baseboards, transition strips, and any existing flooring down to the bare plywood. Use that shop vacuum aggressively! Every speck of dirt, grit, or old adhesive needs to go. Dust left behind can cause your new vinyl to slide or prevent adhesive from properly bonding.
B. Check for Moisture (The Silent Killer)
This is perhaps the most critical, yet often overlooked, step. Plywood exposed to excessive moisture will warp, soften, and fail. If moisture is trapped underneath the vinyl, it will eventually cause mold, mildew, or cause the vinyl to lift or bubble.
Use a reliable moisture meter designed for flooring or concrete readings (though you’ll be testing wood). Aim for wood moisture content below 12% for most vinyl installations, though always check your specific vinyl manufacturer’s requirements. For reference, wood moisture content in a typical home often hovers between 6% and 9% when stable, but vinyl often allows slightly higher content. Check resources like the U.S. Forest Service Forest Products Laboratory for deep dives into wood science if you are curious.
If moisture levels are high, stop! You must address the moisture source (a leak, humidity, etc.) before proceeding, or your new vinyl floor will fail. Covering up a moisture problem guarantees a huge headache later.
Step 2: Secure Loose Plywood and Fix Squeaks
Wobbly plywood is a major structural issue that must be corrected. Vinyl planks cannot bridge large gaps or flexing sections.
A. Locate and Fasten Loose Areas
Walk the entire floor area while listening intently. When you hear a creak or feel a soft spot, mark it immediately with a piece of chalk or a pencil.
- Driving out the Nails: Old plywood floors were often installed using nails. Nails loosen over time, causing squeaks. Use a pry bar to carefully lift the plywood slightly over the offending nail head.
- Replacing with Screws: Drive in new, dedicated subfloor screws—preferably 1 5/8″ or 2″ exterior-grade, flat-head deck screws—about 6 inches from the loose nail location. Sink the screw heads just below the surface of the plywood (flush or slightly recessed). Do NOT countersink them deeply, as that creates a valley that the vinyl will sink into.
- Tightening Existing Screws: If you have existing screws that feel slightly loose, simply drive them in another half-turn until snug.
B. Checking Seams and Edges
Inspect where one sheet of plywood meets another. If one edge is higher than the adjacent edge (this is called height differential or lippage), you need to address this now.
| Height Differential | Recommended Fix |
|---|---|
| Less than 1/32 inch (very minor) | Sanding or patching compound |
| 1/32 inch to 1/8 inch (noticeable ridge) | Feathered patching compound or sanding (if sanding removes the high side) |
| Over 1/8 inch (significant step) | Requires sanding down the high side or installing a transition piece/backer board |
Step 3: Smoothing Out Imperfections (Sanding and Filling)
This step ensures the flatness required for vinyl installation. Remember, we are aiming for a near-perfect plane.
A. Sanding Down High Spots and Bumps
If you have high spots caused by slightly proud nail/screw heads, overdriven staples, or where two pieces of plywood meet unevenly, sanding is the answer. Renting a large floor sander can be overkill for small areas; often, a random orbit sander with a heavier grit works perfectly well.
- Start Coarse: Use 80-grit sandpaper to knock down any significant high points. Be cautious not to sand too deeply into the surrounding plywood.
- Finish Smooth: Once the major high points are addressed, switch to a finer grit (100 or 120-grit) to smooth the surface texture left by the coarser paper.
- Vacuum Constantly: Sanding creates a lot of dust. Stop every few minutes to vacuum up the sawdust. Dust particles trapped under vinyl are a major cause of failure.
B. Filling Holes, Gaps, and Seams
Every divot left by an old nail hole or a small gap between plywood sheets must be filled.
- Small Holes (Nail Pops): Use a standard wood filler or patching compound. Press it firmly into the hole with a putty knife, overfilling slightly.
- Larger Gaps and Seams: For the seams between plywood sheets, use a high-quality, flexible wood filler or patching compound designed to handle movement. Ensure the product is suitable for an underlayment application. For LVP installed without glue, some manufacturers specifically state that filling seams is required because movement can cause the locking mechanism to fail.
Pro Tip from Meraj: When filling, ensure the patch dries completely according to the manufacturer’s instructions before moving on. If you patch over wet filler, it will shrink and create a low spot later!
Step 4: Flattening Major Low Spots and Leveling the Floor
Even after securing and sanding, you might find that the overall floor plane is low in the middle or has dips that violate the maximum allowable variance for vinyl flooring installation.
Understanding Flatness Requirements
Vinyl manufacturers are very specific about how flat your subfloor must be. For most LVP products, the standard is no more than a 3/16 inch variation over a 10-foot span. For sheet vinyl, it might be even stricter.
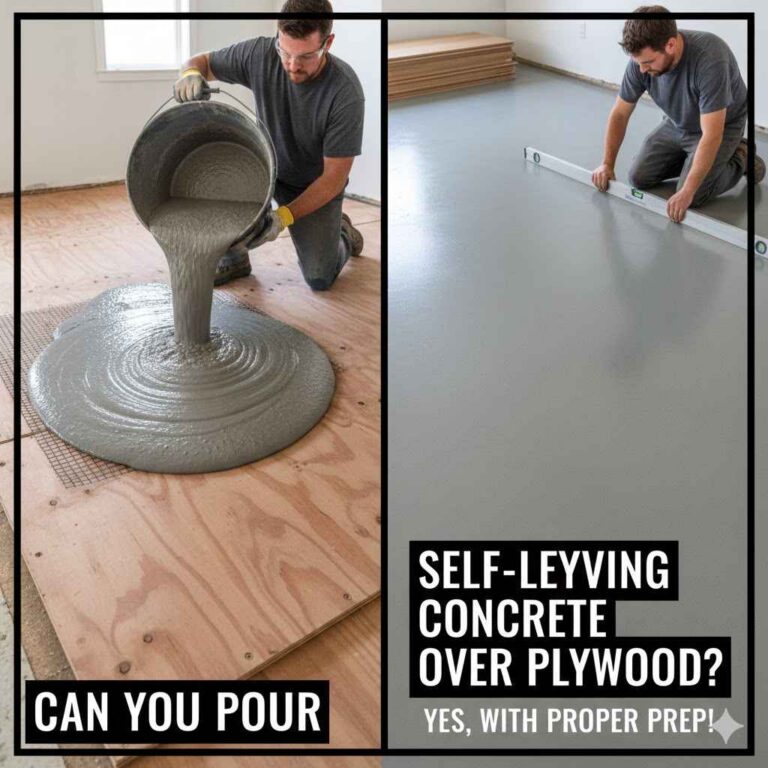
The most reliable way to achieve this high level of flatness over a large area is using a self-leveling underlayment (SLU).
Using Self-Leveling Underlayment (SLU)
SLU is a cement-based product mixed with water that flows out, seeking its own level. It creates a pristine, rock-hard surface perfect for vinyl.
SLU Preparation Steps
- Final Clean: Vacuum the entire floor again. Do not skip this. Any remaining dust will stop the SLU from bonding properly.
- Seal the Plywood: Plywood is porous and will suck the moisture out of the SLU too fast, leading to cracks or weak spots. You MUST use a primer specifically designed to seal plywood before pouring SLU. Follow the primer’s instructions for drying time.
- Damming: Since SLU is essentially wet cement that flows, you must create barriers. Use foam tape or wooden strips to block off doorways and vents so the liquid doesn’t run into other rooms or HVAC systems.
- Mixing and Pouring: Mix the SLU according to the package directions—usually with a paddle mixer attached to a heavy-duty drill. Mix only what you can pour and spread within the working time (usually 15–30 minutes). Pour the mixture in thin ribbons across the floor.
- Spreading and De-airing: Immediately use a notched trowel to help spread the liquid evenly. Then, use a gauge rake or smoothing tool to ensure the correct depth. Immediately after spreading, use a “spiked roller” to roll over the wet compound. This releases air bubbles trapped during mixing, ensuring a completely solid finish.
Allow the SLU to cure completely. This can take 24–72 hours depending on humidity and thickness. The cured SLU surface is the best possible base for vinyl.
Step 5: Dealing with Overly Flexible or Thin Plywood
Sometimes the issue isn’t surface imperfections, but the plywood itself being too thin or weak for the span, causing too much flex.
When to Add a Second Layer
If you determine your existing plywood is thin (like 1/2-inch material over long joists) or if it feels bouncy even after securing every nail, you may need to “double-layer” or “overlay” it.
To do this, you add a new layer of high-quality underlayment-grade plywood or OSB (Oriented Strand Board) over the top of the existing layer.
Rules for Overlaying Plywood
- Use Staggered Seams: The seams of the new layer MUST NOT line up with the seams of the old layer. Stagger them like brickwork to maximize stability.
- Screw Pattern: Use the same screw technique as before, but increase the density of the screws, placing one every 6 to 8 inches along all edges and into the field (middle). This effectively sandwiches the two layers together into one rigid sheet.
- Thickness: A 1/4-inch or 3/8-inch layer of new plywood or specialized vinyl underlayment is usually sufficient to stiffen the entire system without adding too much overall height.
Safety Note: Check local building codes (International Code Council materials often set the standard) regarding minimum subfloor thickness requirements for different flooring types, especially if you are near an exterior wall or using thicker LVP.
Step 6: The Final Polish and Verification
We are nearing the finish line! This final check ensures that all the hard work you put in translates into a perfect installation.
A. Final Vacuuming
Vacuum the entire floor surface one last time. You cannot vacuum enough. Any lingering debris will compromise the final installation.
B. The Straightedge Test
Take a long, perfectly straight tool—a 6-foot level or a long aluminum straightedge works best. Lay it across the floor in multiple directions: lengthwise, widthwise, and diagonally.
If you can see daylight or feel a gap between the straightedge and the subfloor surface, you have a dip that needs attention, likely with patching compound or SLU.
C. Final Surface Prep for Adhesives (If Using Glue-Down Vinyl)
If you are installing glued-down sheet vinyl or glue-down LVP, the surface must be receptive to the adhesive. Sanded plywood is usually fine, but sometimes an encapsulating primer is necessary, especially over old, heavily sealed, or patched surfaces. This seals any residual dust and provides the perfect bonding profile for your chosen flooring adhesive.
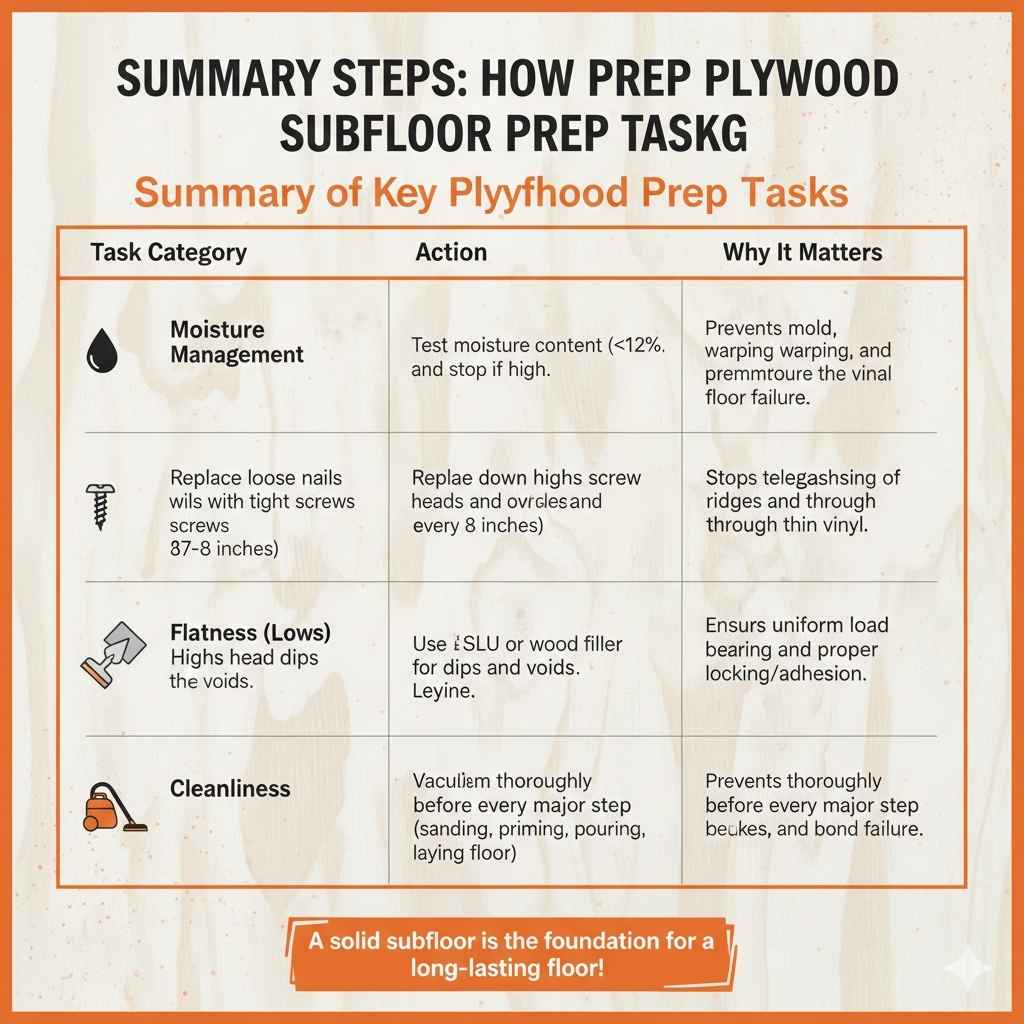
Summary of Key Plywood Subfloor Prep Tasks
| Task Category | Action | Why It Matters |
|---|---|---|
| Moisture Management | Test moisture content (<12%) and stop if high. | Prevents mold, warping, and premature floor failure. |
| Stability | Replace loose nails with tight screws (every 6-8 inches). | Eliminates squeaks and movement under the vinyl. |
| Flatness (Highs) | Sand down high screw heads and overlapping seams. | Stops telegraphing of ridges through thin vinyl. |
| Flatness (Lows) | Use SLU or wood filler for dips and voids. | Ensures uniform load bearing and proper locking/adhesion. |
| Cleanliness | Vacuum thoroughly before every major step (sanding, priming, pouring, laying floor). | Prevents shifting, squeaks, and bond failure. |
Frequently Asked Questions (FAQ) About Plywood Subfloor Prep for Vinyl
Q1: Can I install luxury vinyl plank directly over 1/2-inch plywood?
A: Yes, often you can, but only if the 1/2-inch plywood is securely fastened and spans joists correctly (usually 16 inches on center or less). If it feels bouncy or exceeds the 3/16 inch variation rule over 10 feet, you must add a layer of thicker material or use self-leveling compound.
Q2: Do I have to fill every single nail hole?
A: Absolutely. Even small nail holes create valleys. When you roll your vinyl over it, the locking mechanism of LVP can snap, or the small depression will show through the surface. Fill them all!
Q3: Is it okay if my plywood seams meet perfectly flush?
A: While a perfect flush seam is ideal, most vinyl installers still recommend using a flexible filler or a high-quality underlayment over the seams just in case of minor expansion/contraction, especially with glue-down installations.
Q4: Can I use wood filler on the subfloor for vinyl?
A: You can use wood filler for small nail holes, but for larger gaps (over 1/8 inch) or significant dips, use a specialized cementitious floor patch or a vinyl-specific filler, as they are often less prone to shrinking when dry.
Q5: How long does the plywood subfloor need to dry after cleaning before I can install vinyl?
A: If you only cleaned and sanded, the wood should be ready immediately, provided you hit your target moisture content (usually under 12%). If you used SLU or patches, you must wait until those products are 100% cured, which can take days. Always check the specific product label.
Q6: What kind of screws should I use to secure the plywood?
A: Use square-drive or star-drive, flat-head wood or deck screws, about 1 5/8 inches long. Crucially, the screw head must sit flush with or slightly below the plywood surface, but never creating a deep dimple.
Conclusion: Building Your Confidence, One Step at a Time
Preparing a plywood subfloor for vinyl flooring might seem tedious, especially when you just want to see that new floor down, but remember this: 90% of flooring failures are due to poor preparation.
By taking the time to meticulously clean, screw down every loose section, sand the highs, and address any dips with filler or self-leveling compound, you are not just doing an extra chore—you are guaranteeing the longevity and beauty of your investment. You have learned the insider steps that separate a temporary fix from a professional, lasting installation. You’ve got the skills, you have the steps, and now you have the confidence. Go tackle that subfloor; your beautiful new vinyl floor is waiting!