Proven Wait: Paint Pressure Treated Wood
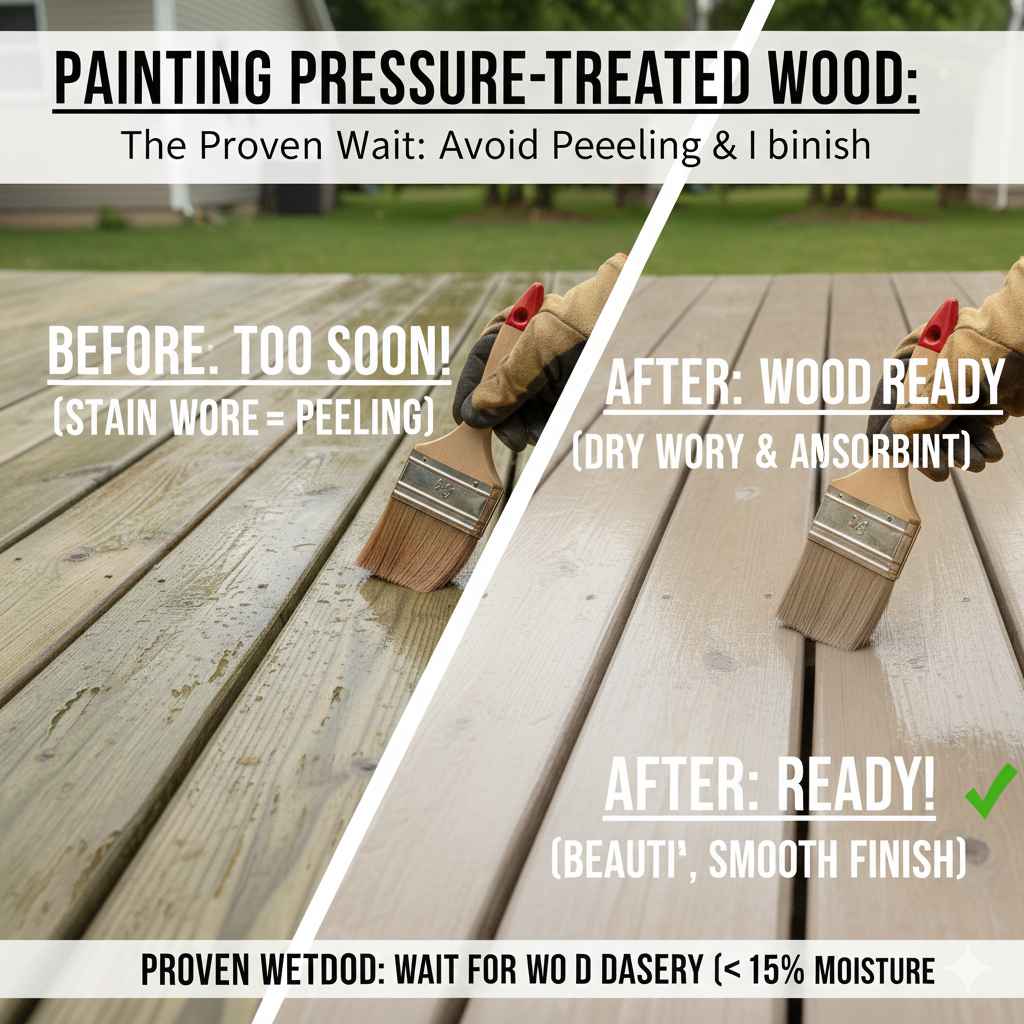
Proven Wait: Paint Pressure Treated Wood is typically necessary for 3 to 6 months after purchase and installation. You must wait until the wood is completely dry—usually tested by the “water bead test”—before applying any stain or paint for the best, longest-lasting finish.
Hello there! I’m Md Meraj, and if you’ve ever finished installing a beautiful new deck or fence using pressure-treated lumber, you’ve probably asked, “When can I finally paint this?” Waiting feels like the hardest part of any project! If you rush it, your beautiful new paint job might peel off next spring, leaving you frustrated. Don’t worry, this is one of the most common sticking points for DIYers. The secret isn’t just about a number of days; it’s about dryness. We are going to walk through exactly how to test your wood and the simple steps needed to get a finish that lasts for years. Let’s turn that waiting game into a successful prep plan!
Why You Absolutely Must Wait Before Painting Pressure Treated Wood
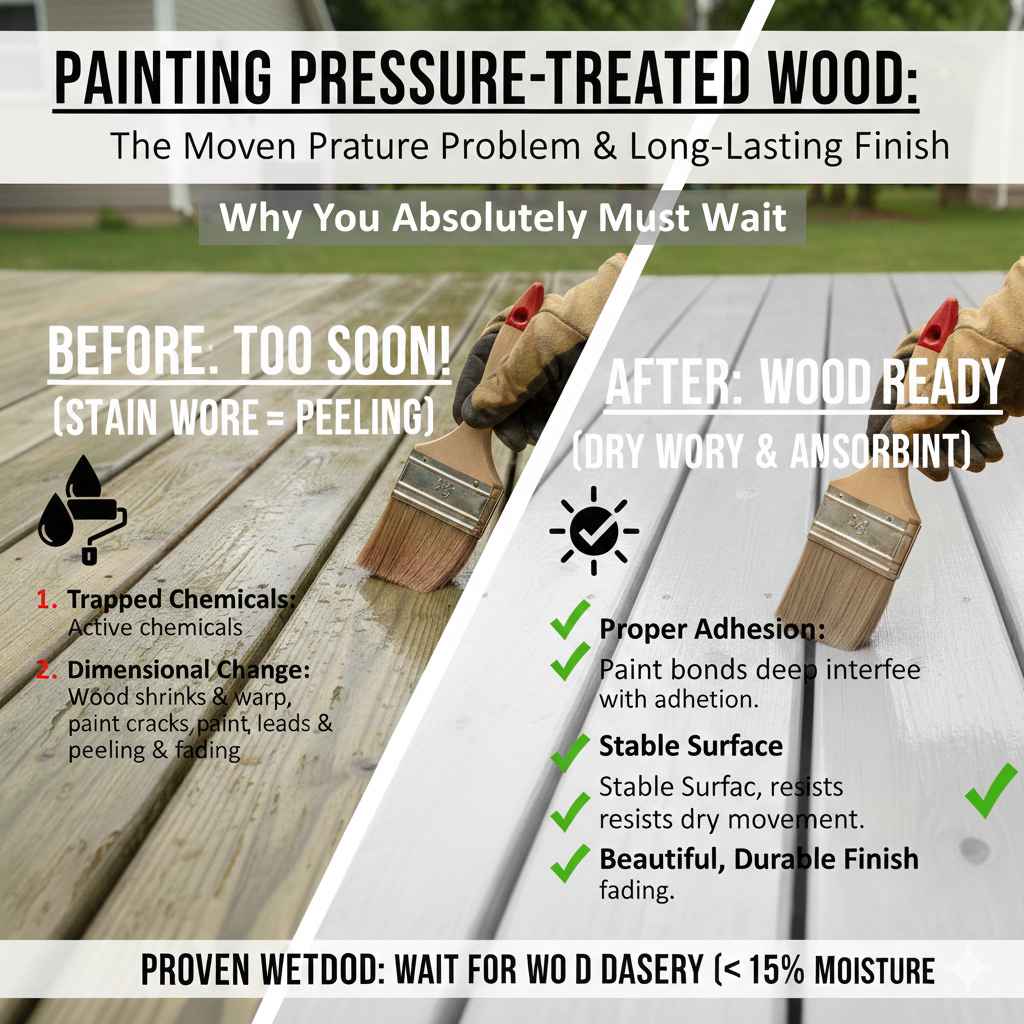
Pressure-treated wood is amazing—it resists rot and insects thanks to chemicals forced deep into the fibers. However, when this wood leaves the lumberyard, it’s usually packed with moisture from the treatment process. Trying to paint or stain wet wood is a recipe for disaster.
The Moisture Problem: Trapped Beneath the Surface
Think of that wet wood like a sponge. When you put paint on a wet sponge, what happens when the sponge tries to dry? The paint film bubbles, cracks, or peels right off because the moisture underneath has nowhere to go but up.
1. Trapped Chemicals: Freshly treated wood still has active chemicals near the surface. These chemicals can interfere with the adhesion of paint or stain.
2. Dimensional Change: As the wood slowly dries out over months, it shrinks, twists, or warps slightly. If you paint it when it’s wet, the paint film will break when the wood moves.
3. Poor Adhesion: Paint needs a dry, porous surface to grip firmly. Wet wood simply won’t allow the paint or stain to soak in properly.
So, the waiting period is actually a crucial, necessary step for long-term success, not just an annoying delay!
How Long is the “Magic Waiting Period”? (The Official Guidance)
There isn’t one single magic date carved in stone. The required wait time depends on a few major factors. Generally, you need the wood to dry out significantly.
General Wait Times: A Quick Guide
Most manufacturers and industry experts suggest the following timelines for standard residential use:
| Installation Location | Typical Wait Time Before Painting | Key Consideration |
|---|---|---|
| Outdoor Decks & Fences (Sunny Exposure) | 3 to 4 Months | Excellent airflow speeds up drying. |
| Covered Porches or Overhangs | 5 to 6 Months | Less direct sun means slower drying. |
| Structures Near Ground or Water | 6+ Months | High ground moisture retention. |
It’s important to note that if you live in a very humid climate, like the Pacific Northwest or the Deep South, that drying process might take even longer than suggested here. Always trust the wood’s feel over the calendar!
The Simple Test: How to Know When Your Wood is Truly Ready
Forget the calendar for a moment. The most reliable way to know if your wood is ready for paint is by performing the “Water Bead Test.” This is a quick, no-fuss method that professionals use to check surface dryness.
The Water Bead Test: Your Go/No-Go Signal
This test checks whether the wood fibers are dry enough to accept a finish.
- Gather Supplies: You only need a clear glass of water and a sunny day.
- Drip the Water: Take a few drops of water from your glass and let them fall onto the wood surface where you plan to paint.
- Observe Immediately: Watch closely for about 10 to 15 minutes.
-
Interpreting the Results:
- If the water beads up (sits on the surface like tiny marbles): Great news! The wood is still too saturated, and the chemicals are repelling the water. You need to wait longer.
- If the water soaks in and darkens the wood within 10 minutes: Success! The wood is dry enough to accept a finish. The surface is porous and ready for priming and painting.
If the wood fails the test, simply check again next week. Patience now saves you hours of redoing work later.
Accelerating the Dry Time: Helping Your Wood Dry Faster (Safely)
While you can’t rush the chemical curing process completely, you can certainly speed up the moisture evaporation if you are eager to get painting. Remember, the goal is to increase airflow and sun exposure.
Tips for Faster Drying:
Use these techniques during the waiting period to help your project dry more evenly and quickly. Always prioritize safety when working with tools and elevated structures.
- Maximize Airflow: If you have a deck, ensure there is good space underneath. If you can, slightly lift any wood touching the ground. For fences, make sure there is space between the slats.
- Sun Exposure is Key: Position the wood or structure where it gets direct sunlight for the majority of the day. Darker wood absorbs heat better, which speeds evaporation.
- Use Fans (Carefully): On very humid or rainy days, running large industrial fans directed at the wood surface can help move moist air away. Do not use heat guns, as high heat can sometimes negatively affect the treatment chemicals or cause quick surface drying while the interior remains wet.
- Keep Debris Away: Ensure leaves, grass clippings, and mulch are not piled up against the base of posts or framing, as these hold moisture against the wood.
For more in-depth information on lumber care and moisture content, checking resources from organizations like the American Wood Council (AWC) can provide valuable structural guidelines. The American Wood Council website offers excellent educational material on wood handling.
The Essential Pre-Painting Prep Work: Beyond Just Waiting
Waiting gets the wood dry, but dryness alone won’t guarantee a perfect paint job. Pressure-treated wood often has a fuzzy, slightly rough surface after weathering a bit, and sometimes residual chemicals sit right on top. You need a proper clean before anything else touches the surface.
Step 1: Cleaning the Wood Surface
A simple rinse isn’t enough. You need to remove surface grime, mildew spores, and any loose wood fibers.
Cleaning Materials You Will Need:
- Deck or Wood Cleaner (oxygen bleach-based cleaners are often recommended for PT wood)
- Stiff-bristle brush (natural or nylon bristles; avoid wire brushes)
- Garden hose with a spray nozzle
- Safety gear: Gloves and eye protection
The Cleaning Process:
- Mix your wood cleaner according to the directions. Work in small sections so the cleaner doesn’t dry on the wood.
- Scrub the wood firmly using the grain. This lifts dirt and opens the pores slightly for better adhesion later.
- Rinse the area thoroughly with clean water from your hose until no soap residue remains.
- Allow the wood to dry completely again (repeat the water bead test if necessary—a thorough rinse adds moisture back in!).
Step 2: Light Sanding for Smoothness and Adhesion
Even after cleaning, the wood surface can be fuzzy from cleaning or initial weathering. Sanding smooths this out and gives the primer something solid to grab onto.
For most deck boards or fencing, a medium-grit sandpaper (like 80-grit) or a pole sander works wonders. You are not trying to make it perfectly smooth like furniture; you are just knocking down the highest rough spots.
Step 3: Choosing the Right Primer (This is Non-Negotiable!)
This is the single most important step when painting pressure-treated wood—you must use a primer specifically designed for this material.
Standard exterior primers are not formulated to handle the chemical composition (like Alkaline materials) present in PT lumber. If you skip primer, your topcoat is very likely to fail quickly.
Primer Selection Criteria:
- Must say “For Pressure Treated Wood” on the label.
- Look for alkyd-based (oil-based) or specialized bonding primers. These offer the best adhesion to chemically-treated surfaces.
- If you use a solid stain or paint that claims “Stain & Sealer in One,” double-check if it explicitly mentions suitability for new PT wood. If in doubt, always prime!
Choosing the Right Paint for Long-Lasting Results
Once primed, you have more flexibility with your topcoat, but outdoor projects demand durable paint designed to withstand sun, rain, and foot traffic (for decks).
Paint Types Best Suited for Exterior PT Wood:
| Paint Type | Best For | Notes |
|---|---|---|
| 100% Acrylic Exterior Latex | Fences, Siding, Railings | Breathable, flexible, good color retention. Excellent general choice. |
| Oil-Based Alkyd (Modified) | High-traffic decks (as topcoat) | Very durable, but less breathable and yellows over time. Must use an oil-based primer. |
| Solid Color Stain | Wood Grain Visibility Desired | More forgiving on rough surfaces than full paint; penetrates better. |
A Note on Deck Safety and VOCs
When painting a deck floor that gets a lot of sun and wear, consider low-VOC (Volatile Organic Compound) acrylic formulas. They tend to handle temperature expansion and contraction better than older formulas. Always check the manufacturer’s recommendations for the type of pressure treatment used in your wood, as modern treatments (like ACQ) interact differently than older ones (like CCA). You can find guidance on understanding modern wood treatments on websites like the EPA’s page on Wood Preservatives.
The Final Application: Painting Step-by-Step
You’ve waited, you’ve cleaned, you’ve primed. Now, let’s paint with confidence!
Tools Needed for Application:
- Primer (as selected above)
- Topcoat Paint (as selected above)
- High-quality natural or synthetic bristle brushes (avoid cheap brushes that shed)
- Paint rollers (high-quality 3/8″ nap for smooth surfaces, 1/2″ nap for rough surfaces)
- Paint trays and liners
- Painter’s tape (for clean edges, if needed)
Painting Procedure:
- Check the Weather: Ensure you have at least two full days of dry weather ahead. Paint needs time to cure without rain or heavy dew. Ideal temperatures are usually between 50°F and 85°F.
- Apply the Primer: Using a brush or roller, apply a thin, even coat of your specialized primer. For deck boards, roll in the direction of the grain. Do not let the primer pool in cracks or end grains.
- Follow Drying Times: Allow the primer to dry completely according to the can’s instructions. For oil-based primers, this might be 24 hours; for latex primers, it could be 2–4 hours. Do not try to speed this up excessively.
- Apply the First Coat of Paint: Apply your topcoat just like the primer—thin and even. Work quickly if using rollers to maintain a wet edge, which prevents lap marks.
- Wait for the Second Coat: Most exterior jobs require two full coats for maximum protection and color depth. Wait the specified recoat time (often 4 to 12 hours). Check the wood one last time with the water bead test if you are unsure about the dryness between coats.
- Final Cure: Even after the paint feels dry to the touch, it takes several days, sometimes weeks, for the paint to fully harden (cure). Be gentle with high-traffic areas like deck floors during the first week.
Troubleshooting Common Painting Issues on PT Wood
Sometimes even with all the right steps, homeowners run into little snags. Here are quick fixes for common frustrations.
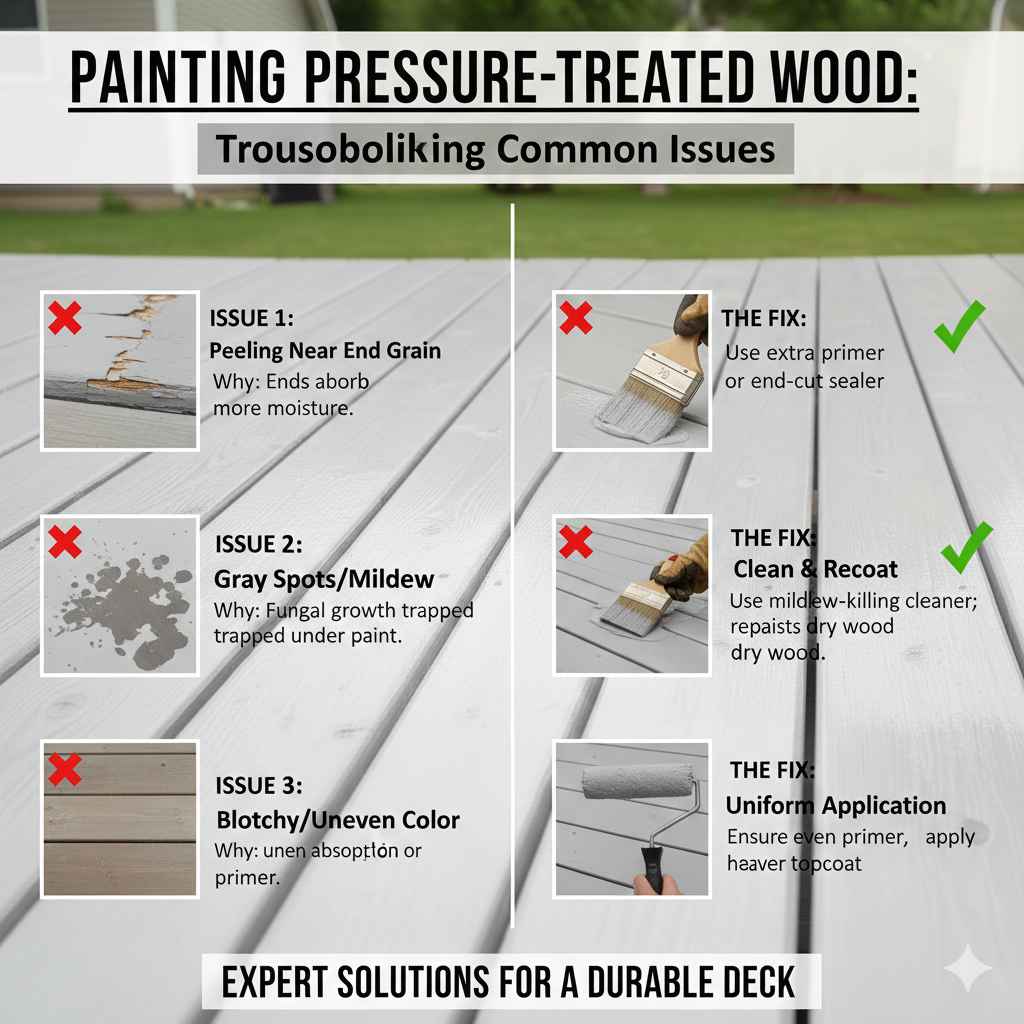
Issue 1: The Paint is Peeling Near the End Grain
Why it happens: End grains (the exposed cut ends of the boards) wick up moisture much faster than the face of the wood. They are almost always the first spot to fail.
The Fix: When prepping, give end grains extra attention. Use a heavy coat of specialized primer on the ends, or use a clear wood sealer designed to block moisture specifically on those cuts before applying the main primer.
Issue 2: Gray Spots Appearing Through the Paint
Why it happens: This is usually mildew or fungal growth that started before you painted, or algae forming on the surface moisture. The PT chemicals sometimes don’t kill all organic material.
The Fix: You need to clean again! Use a cleaner specifically labeled for killing mildew (often containing a small amount of chlorine bleach or an oxygenated cleaner). Scrub well, rinse thoroughly, and let it dry for several days before attempting to prime and paint those spots again.
Issue 3: Paint Looks Blotchy or Unevenly Colored
Why it happens: This is classic sign of uneven absorption—some areas were drier than others when painted, or the primer wasn’t uniform.
The Fix: If you are using a thinner paint or stain, you might need a third coat. If using a solid paint, ensure you used a uniform coat of primer across the whole surface, and try applying the topcoat more heavily, ensuring you cover the entire section before moving on.
Frequently Asked Questions (FAQ) for Painting Pressure Treated Wood
Q1: Can I use a wood sealer instead of paint on new pressure-treated wood?
A: Yes, sealers (especially oil-based penetrating sealers) are often more forgiving than paint on newly treated wood because they penetrate rather than form a film on the surface. However, you still need to wait until the wood passes the water bead test.
Q2: Does the color of the wood (like greenish tint) mean it’s too wet?
A: Yes, the greenish or brownish tint indicates the preservative chemicals are still very active and the wood is carrying significant moisture from the treatment plant. Wait until the wood fades to a grayish or silvery color for the best drying results.
Q3: How important is the primer if I use high-quality exterior paint?
A: The primer is crucial. High-quality paint needs a good anchor. On pressure-treated wood, the primer bonds chemically and physically to the surface preservatives, ensuring the expensive topcoat doesn’t lift off in sheets later.
Q4: If I plan to use solid stain instead of paint, do I still need to wait 3–6 months?
A: You still need to wait for significant drying. While solid stains have a better ability to adhere than clear sealers, if the wood is too saturated, the stain will simply bubble or refuse to penetrate evenly. Always test with water first.
Q5: Can I speed up the drying time using a pressure washer?
A: You can use a very light pressure wash setting for cleaning (after the initial wait period), but using high pressure can damage the wood fibers (fuzzing/splintering) and drive moisture deeper into the board. It’s better for cleaning than for drying.
Q6: What should I do if it rains right after I finish painting?
A: Check the paint can for recoat/rain protection time. Most modern exterior acrylics can handle light rain after a few hours. If it’s a heavy downpour within the first hour, unfortunately, you may have to scrape and repaint that section after it fully dries out again.
Conclusion: Confidence in Your Waiting Game
Finishing any project takes patience, and painting pressure-treated wood demands a little extra thoughtfulness upfront. By prioritizing the drying time—aiming for that sweet spot of three to six months—and verifying it with the simple water bead test, you set yourself up for success. Remember: a successful paint job on PT wood relies on three things: 1. Waiting until it’s dry, 2. Cleaning the surface thoroughly, and 3. Using the right specialized primer. Follow these dependable steps, and you won’t just have a painted fence or deck; you’ll have a beautifully finished, long-lasting surface that you tackled confidently, right in your own driveway. Happy building (and painting)!