Removing Scratches From Hardwood Floors Without Sanding: Genius Solutions
Quick Summary: Yes, you can effectively remove minor scratches from hardwood floors without sanding! Simple DIY solutions using household items, specialized repair kits, and touch-up products can restore your floor’s beauty quickly and affordably. These methods are perfect for beginners wanting to refresh their floors with minimal effort and cost.
Hey there, fellow home improvers! Md Meraj here. We all love the warmth and beauty of hardwood floors, but those inevitable scratches can be a real headache. It’s frustrating to see a lovely floor marred by a small scuff or a deeper gouge. The thought of sanding can seem overwhelming, messy, and expensive, especially for minor damage. But what if I told you there are clever, easy ways to tackle those scratches without ever needing a sander? You can bring back that polished look with simple solutions you might already have at home or can easily find. Get ready to be amazed at how simple it can be to refresh your beautiful floors!
Hardwood floors add so much charm and value to a home. But even with the best care, everyday life can leave its mark in the form of scratches. Seeing those marks can be disheartening, but don’t despair! You don’t always need a noisy, dusty sander to bring back your floor’s shine. Many common scratches can be fixed with simple, affordable, and beginner-friendly methods. Today, we’re going to explore some brilliant ways to tackle those scratches, keeping your floors looking beautiful without the hassle of major renovation.
Understanding Hardwood Floor Scratches
Before we dive into solutions, it helps to know what kind of scratch you’re dealing with. Scratches on hardwood floors generally fall into a few categories, and this helps determine the best repair method:
- Surface Scratches (Clear Coat Scratches): These are the most common and easiest to fix. They only affect the top protective layer of the finish (like polyurethane or varnish) and haven’t reached the wood itself. They often look like light scuffs or dull marks.
- Deeper Scratches: These go through the finish and into the wood itself, sometimes leaving a visible dent or line in the wood grain. These are more challenging to fix without sanding but can often be improved.
- Gouges: These are significant indentations or chips in the wood. They usually require more intensive repair, often involving wood filler and potentially sanding for a perfect finish.
For this guide, we’ll focus on methods suitable for surface scratches and some less severe deeper scratches, all achievable without sanding.

DIY Solutions Using Household Items
Sometimes, the simplest solutions are hiding right in your kitchen or pantry! These methods are fantastic for very light surface scratches and scuffs. Always remember to test these in an inconspicuous spot first.
1. Walnuts or Pecans for Light Scratches
This might sound unusual, but the natural oils in nuts can help mask minor scratches and scuffs on hardwood floors. It works best on lighter wood tones.
How to do it:
- Choose a walnut or pecan.
- Gently rub the nutmeat over the scratch in a circular motion.
- The oils from the nut will fill in and darken the scratch, making it less noticeable.
- After rubbing, buff the area with a soft, clean cloth.
Pros: Extremely easy, inexpensive, natural, readily available.
Cons: Only effective for very light scratches and scuffs; may not last long; can leave a slight oily residue if overdone.
2. Mayonnaise for Minor Scuffs
The oil and fat in mayonnaise can help to condition the wood and disguise minor scuffs. This is a temporary fix but can work in a pinch.
How to do it:
- Apply a small dab of full-fat mayonnaise directly to the scuff mark.
- Let it sit for a few hours or even overnight.
- Wipe it away with a damp cloth, then dry the area thoroughly.
Pros: Easy to try, uses a common household item.
Cons: Messy, temporary, might not work on all finishes, risk of mold if not dried properly.
3. Toothpaste (Non-Gel, White Paste) for Superficial Scuffs
Mildly abrasive, white paste toothpaste can act as a very gentle polish for superficial scuffs on the finish of your floor. Be very careful not to scrub too hard, as you could damage the finish further.
How to do it:
- Choose a plain white, non-gel toothpaste.
- Apply a small amount directly to a soft cloth.
- Gently rub the toothpaste over the scuff mark in a circular motion.
- Wipe clean with a slightly damp cloth and dry immediately.
Pros: Accessible, can help buff out light scuffs.
Cons: Risk of dulling or scratching the finish if you use too much pressure or the wrong type of toothpaste; very limited effectiveness.
4. Oil-Based Soap or Cleaner
Some wood floor cleaners are oil-based and can help to nourish the wood and blend minor scratches. This is more of a restorative maintenance task that can help disguise minor imperfections.
How to do it:
- Follow the manufacturer’s instructions for your chosen oil-based wood floor cleaner.
- Typically, you’ll apply a small amount to a cloth and wipe down the affected area.
- Buff gently.
Pros: Cleans and conditions the floor, can improve overall appearance and hide minor wear.
Cons: Not a targeted scratch repair; effectiveness varies by product and scratch severity.
Specialized Wood Floor Repair Kits and Products
For more reliable and targeted repairs, commercial products are often the best bet. These are designed specifically for hardwood floors and come in various forms to match your floor’s color and finish.
1. Wood Repair Markers and Touch-Up Pens
These are like colored markers or crayons that allow you to color in scratches. They are excellent for filling in the color lost from a scratch.
How to do it:
- Clean the scratched area thoroughly.
- Choose a marker or crayon that closely matches your floor’s color. Many kits come with multiple shades or can be blended.
- Lightly color over the scratch, following the wood grain.
- Wipe away any excess color with a clean, soft cloth immediately.
- For markers, you might want to follow up with a clear coat touch-up pen to seal the color.
Pros: Inexpensive, easy to use, quick, wide range of colors available, good for matching specific wood tones.
Cons: Best for scratches that haven’t removed much finish; can look unnatural if the color match isn’t perfect; may wear off over time with heavy traffic.
2. Wood Filler Putty and Paste
For slightly deeper scratches or small gouges where some wood material is missing, wood filler putty or paste can be used. These come in various colors or can be stained.
How to do it:
- Clean the scratch and remove any loose wood splinters.
- Select a wood filler that matches your floor color or a stainable/paintable version.
- Using a putty knife, press the filler firmly into the scratch or gouge.
- Smooth the surface level with the surrounding floor.
- Allow it to dry completely according to the product instructions.
- For stainable fillers, once dry, you may need to lightly sand the filler (not the surrounding floor) to match the sheen, then apply a matching stain or clear coat. This step is crucial for a seamless look.
Pros: Fills deeper imperfections, provides a solid repair, can be stained to match.
Cons: Requires a bit more precision; matching the sheen after filling can be tricky; might require a light sanding of the filler itself.
3. Commercial Scratch Repair Kits
Many brands offer comprehensive kits that include a combination of markers, fillers, waxes, and clear coats specifically designed for hardwood floors. These are often the most effective non-sanding solution for a variety of scratch types.
How to do it:
- Read the kit’s instructions carefully.
- Clean the damaged area.
- Use the provided tools and materials (e.g., filler sticks, color pens, wax sticks) to fill and color the scratch.
- Follow the steps to blend the repair with the existing finish, which might involve buffing or applying a clear sealant.
Pros: Designed for the job, often includes multiple options for different scratch depths, can provide a professional-looking finish.
Cons: Can be more expensive than individual items; color matching is still key to success.
Important Considerations and Tips for Success
No matter which method you choose, a few key principles will help you achieve the best results and protect your beautiful floors.
1. Cleanliness is Key
Always start by thoroughly cleaning the scratched area. Dust, dirt, or grime can get trapped in the scratch and make the repair look messy or even cause further damage when you try to fill it.
- Use a vacuum with a soft brush attachment or a dry microfiber mop.
- For a gentle clean, a slightly damp cloth with a wood-floor-specific cleaner is usually sufficient.
- Ensure the area is completely dry before attempting any repair.
2. Color Matching is Crucial
The success of most scratch repair methods hinges on how well you match the color and sheen of your floor. Take a good look at your floor in natural light.
- Note the undertones of your wood (e.g., red, yellow, brown).
- If using a kit, test different shades on a scrap piece of wood or an inconspicuous area if possible.
- For markers and crayons, start with a lighter shade if you’re unsure – you can always add more, but it’s hard to take away.
3. Test in an Inconspicuous Area
This is perhaps the most important tip for any DIY project involving your home’s finishes. Before applying any product or technique to a visible scratch, test it on a hidden spot.
- This could be inside a closet, under a rug, or in a corner that doesn’t get much foot traffic.
- This allows you to see how the product interacts with your floor’s finish and color without risking visible damage.
4. Work With the Grain
When applying fillers, markers, or even rubbing with nuts, always follow the direction of the wood grain. This helps the repair blend in more naturally and look less obvious.
5. Less is More
It’s easier to add more product than to remove excess. Apply repair materials sparingly at first. You can always go back and add a bit more if needed. Overapplying can lead to sticky residue or an uneven finish.
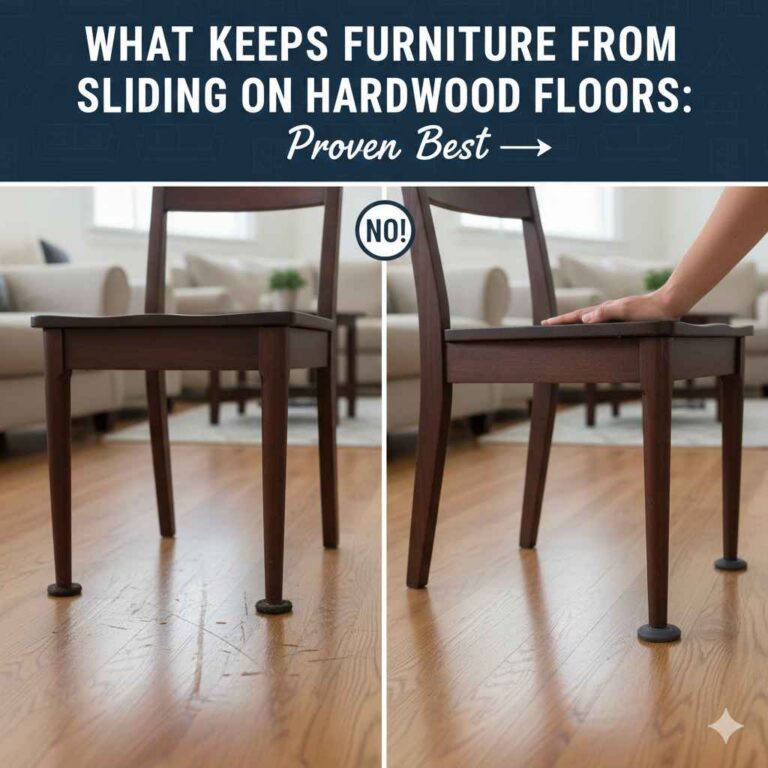
6. Protect Your Floors from Future Scratches
Prevention is always better than cure! Once your floors are looking great, take steps to keep them that way:
- Place felt pads on the legs of all furniture.
- Use doormats at all entrances to trap dirt and grit.
- Avoid wearing high heels or cleats indoors.
- Trim pet nails regularly.
- Clean up spills immediately.
Comparing Non-Sanding Repair Methods
To help you choose the best approach, here’s a quick comparison of the methods discussed:
| Method | Best For | Ease of Use (Beginner) | Cost | Effectiveness | Longevity |
|---|---|---|---|---|---|
| Walnut/Pecan | Very light surface scuffs | Very Easy | Very Low | Low (temporary mask) | Short-term |
| Mayonnaise | Minor scuffs | Easy | Very Low | Low (temporary mask) | Short-term |
| Toothpaste | Superficial scuffs on finish | Moderate (requires care) | Very Low | Low to Moderate | Short-term |
| Wood Repair Markers/Pens | Surface scratches, color loss | Easy | Low to Moderate | Moderate to High | Moderate |
| Wood Filler Putty/Paste | Deeper scratches, small gouges | Moderate (requires precision) | Moderate | High (if matched well) | Moderate to High |
| Commercial Repair Kits | Various scratch depths | Easy to Moderate | Moderate to High | High | Moderate to High |
When to Call a Professional
While these DIY solutions are fantastic for minor to moderate scratches, there are times when it’s best to call in the pros. If you have:
- Very deep gouges that have significantly damaged the wood.
- Extensive scratching across large areas of your floor.
- Water damage or discoloration that affects the wood.
- A very old or delicate floor finish that you’re afraid to damage.
- You’ve tried DIY methods and aren’t getting the results you want.
A professional refinisher can assess the damage and determine if sanding and refinishing are necessary or if more advanced repair techniques are required. They have the tools and expertise to restore your floor to its former glory.

Frequently Asked Questions
Can I really fix scratches without sanding?
Absolutely! For most light to moderate surface scratches, you can use various non-sanding methods. These range from simple household remedies to specific repair products designed for this purpose. Sanding is typically reserved for deep scratches or when refinishing the entire floor.
What types of scratches can be fixed without sanding?
Surface-level scratches, scuffs, and minor abrasions that haven’t penetrated the wood’s finish are usually fixable. Deeper gouges that have removed finish or dented the wood might be harder to completely hide without sanding, but many methods can still significantly improve their appearance.
Are these DIY methods safe for my hardwood floors?
Yes, when done correctly and with the right products, these methods are safe. It’s always a good idea to test any product or method on an inconspicuous area first to ensure it doesn’t alter the finish in an undesirable way.
How do I know which method to use?
Consider the depth and severity of the scratch. For very light scuffs, household items might work. For slightly deeper scratches or to match your floor’s color, repair kits or touch-up pens are often best. Always start with the least invasive method.
Will these methods make my floor look uneven?
When done properly, these methods aim to blend the repair with the existing finish, making it look seamless. The key is to match the color and sheen as closely as possible. Overapplication or using the wrong product can sometimes lead to unevenness, so following instructions is crucial.
How long do these repairs typically last?
The longevity depends on the method used and the amount of foot traffic the area receives. Properly applied touch-up pens and repair kits can last for a considerable time, often years, especially if the area is maintained and protected from further damage.
Where can I find more information on hardwood floor care?
Reputable sources like the National Wood Flooring Association (NWFA) offer excellent resources on hardwood floor maintenance, care, and repair. Many reputable flooring manufacturers also provide detailed care guides on their websites.
Conclusion
You don’t have to live with unsightly scratches on your beautiful hardwood floors! As we’ve seen, there are numerous effective and beginner-friendly ways to tackle most common scratches without the need for messy, complicated sanding. From using simple household items for minor scuffs to employing specialized repair kits for deeper marks, you have the power to refresh and restore your floors. Remember to always clean the area, test your chosen method in a hidden spot, and work carefully and patiently. With these genius solutions, you can confidently maintain the charm and beauty of your hardwood floors, making them a source of pride for years to come. Happy fixing!