Transition Ideas: How to Combine Tile and Wood Flooring Like a Pro (The Essential Guide)
To combine tile and wood flooring seamlessly, use specialized transition strips like T-molding or threshold strips, or opt for a subtle grout line or a slight height change managed with a reducer strip. Proper alignment and adhesive choice are key for a beautiful, lasting finish that prevents trips.
Mixing tile and wood flooring in one space, like where a kitchen meets a living room, looks amazing. It adds texture and defines areas perfectly. However, the actual meeting point—the transition—can feel tricky. You worry about uneven floors, ugly gaps, or tripping hazards. Don’t let this stop you! Combining these two popular materials is easier than you think when you know the right methods.
I’m Md Meraj, and I’ve guided countless homeowners through these exact scenarios. We will break down the simplest, safest, and prettiest ways to join your tile and wood floors. You’ll learn about the best materials and techniques so you can confidently tackle this project. Let’s make that seam look intentional and beautiful!
Why Combining Tile and Wood Flooring is a Design Win
Using tile and wood together isn’t just practical; it’s a fantastic design choice. Tile handles wet, high-traffic areas like entryways and kitchens, while wood brings warmth to dining or living spaces. This combination lets you zone your open-concept rooms without building full walls.
However, the challenge always comes down to the transition. Tile is often thicker than engineered wood, and even solid hardwood can sit at a different height. Managing this difference is what makes or breaks the look. We need solutions that bridge this gap smoothly and safely.

Understanding the Core Challenge: Height Differences
Before choosing a transition strip, you must know the exact height difference between your two finished floors. This is the most crucial step for safety and aesthetics.
Most wood flooring (especially engineered hardwood or laminate) is thinner than ceramic or porcelain tile. A standard tile installation, including the mortar bed (thin-set), can often be 1/4 inch to 3/8 inch taller than a standard wood floor.
How to Measure the Height Difference Accurately
Grab a few simple tools—no fancy laser levels required! Accuracy here ensures your transition piece fits perfectly.
- Measure the Tile Edge: Place a straight edge (like a long level or a flat piece of wood) across the top edge of the tile and the subfloor next to it. Use a thin feeler gauge or a thin piece of cardboard to gauge the gap between the straight edge and the subfloor beneath the tile. This gives you the height of the tile system.
- Measure the Wood Edge: Do the same on the wood side. Measure from the top of the finished wood plank down to the subfloor.
- Calculate: Subtract the lower measurement from the higher measurement. For example, if the tile system is 3/8 inch high, and the wood is 5/16 inch high, your difference is 1/16 inch. This tiny difference is important for selecting the right reducer strip.
For official guidance on subfloor preparation, you can always refer to standards set by organizations like the National Wood Flooring Association (NWFA), which detail proper subfloor flatness before installation.
Essential Transition Ideas for Tile and Wood
There are several tried-and-true methods for bridging the gap. Your choice depends on the height difference, the desired look (seamless vs. defined), and whether you are installing a floating floor (like laminate or some engineered wood) or a nailed-down floor.
1. T-Molding (The Standard Choice)
T-molding is the go-to for floating floors (laminate, click-lock engineered wood) where you need an expansion gap between the wood planks and the wall/tile. The “T” shape fits into a small channel or track installed at the seam.
- Best For: Equal or nearly equal floor heights (within 1/8 inch difference).
- Look: Creates a clean, slightly raised line separating the two materials.
- Installation: Requires a metal or plastic track to be screwed down into the subfloor along the seam before the molding piece snaps in.
2. Threshold/Reducer Strips (For Height Differences)
When the wood floor is significantly lower than the tile, a reducer strip is your best friend. This piece is sloped, gently guiding you from the higher tile down to the lower wood floor.
- Best For: Situations where the wood floor is lower than the tile (a height difference of up to 3/4 inch, depending on the strip).
- Look: Smooth, gradual slope. Very safe for high-traffic areas.
- Installation: Usually glued or nailed down directly over the seam, often requiring a small groove cut into one of the flooring edges for the base of the strip to sit in.
3. Carpet Transition Strips (When Wood is Engineered or Laminate)
Though designed primarily for carpet, a small, low-profile transition strip (sometimes called a “threshold”) can work if your wood floor is floating and sits slightly lower than the tile. These are often secured using adhesive only.
4. The Flush Transition (The Advanced Look)
This is the holy grail for a seamless look, often called a “flush mount” or “equal-height transition.” It requires precision work on both floors.
- Best For: When the height difference is minimal (1/16 inch or less) or when using tile that can be ground down slightly (not usually recommended for beginners).
- Technique: You might use a very thin piece of metal inlay or a thin strip of coordinating wood set flush with both surfaces, often hidden beneath a very small piece of base shoe molding later on. This is difficult to achieve perfectly without professional leveling equipment.
To ensure longevity, especially in areas subject to moisture like kitchens, always check that the transition strip material complements the installation method of the wood floor (i.e., don’t glue down a strip over a floating floor unless the strip is designed for that purpose).
Step-by-Step Guide: Installing a Standard T-Molding Transition
This method is excellent for joining tile to laminate or engineered wood that meets at the same height in a doorway or open area.
Tools and Materials Needed
| Tool/Material | Purpose |
|---|---|
| T-Molding Strip (Metal or Plastic) | The decorative cover piece. |
| Transition Track/Rail | The base piece screwed to the subfloor. |
| Power Drill/Driver | For securing the track. |
| Miter Saw or Chop Saw | For precise, square cuts on the molding. |
| Measuring Tape & Pencil | For marking the exact cut line. |
| Level | To ensure the track is laid flat. |
| Appropriate Screws/Anchors | To attach the track to the subfloor (wood joists or concrete). |
The Installation Process
- Prepare the Gap: Ensure the gap between the end of the tile and the beginning of the wood floor is clean, level, and matches the width required by your chosen T-molding system. Most systems require a 1/4 to 3/8-inch gap to allow for wood expansion.
- Install the Track: Lay the metal or plastic track piece down precisely where the two floors meet. Mark the screw holes through the track onto the subfloor. If you are over a concrete slab, you may need masonry bits and anchors. If you are over wood joists, drill pilot holes first.
- Secure the Track: Using your drill, secure the track firmly to the subfloor. Use a level to check that the track is sitting flat against the floor on both sides. It must not rock or rise up.
- Cut the Molding: Measure the distance precisely where the T-molding needs to run. Using your miter saw set to a 90-degree angle (square cut), cut the T-molding to length. If you are running it across a doorway, you will need two separate pieces meeting in the middle.
- Install the Molding: Carefully slide the T-molding piece down onto the track. Most modern systems use a light tap with a rubber mallet or a piece of scrap wood to gently snap the molding into the track locks. Ensure the molding sits evenly on both the tile and the wood edge.
Designing for Different Height Gaps: Reducer Strips Explained
When you have a noticeable height difference—say, the tile is 3/8 inch higher than the wood—you must use a reducer to prevent tripping. Reducers are shaped like a ramp or a gentle wedge.
Choosing the Right Reducer
Reducers are categorized by the height difference they cover. They are often made from matching wood species or high-quality vinyl/aluminum made to look like wood.
- 1/4-inch Reducer: For small dips.
- 3/8-inch Reducer: Very common when dealing with standard tile thicknesses.
- 1/2-inch or 3/4-inch Reducer: Used for very thick tile installations or deeper subfloor variations.
Pro Tip: If your height difference is too great (over 3/4 inch), it is safer and usually required by warranty to build up the lower floor using a self-leveling compound or an underlayment board before installing the wood flooring. Never use a reducer that creates an angle steeper than a gentle slope, as this violates safety standards (per guidance from the International Residential Code sections related to floor transitions).
Installing a Wood Reducer Strip
- Preparation: Ensure the edges of the tile and wood are clean and level on the subfloor side (the underside of the reducer should meet both floors evenly).
- Apply Adhesive: Use a strong construction adhesive (like a polyurethane construction sealant) rated for flooring transitions. Apply a generous bead along the entire length of the subfloor where the reducer will sit.
- Positioning: Place the reducer strip onto the adhesive, ensuring the high side butts tightly against the tile edge and the low side rests perfectly on the wood surface.
- Securing (Optional but Recommended): For extra holding power, especially in heavy traffic, you can use very small, color-matched finishing nails or brads along the length of the reducer, driving them through the wood section of the strip into the subfloor. Be very careful not to nail through the existing wood floor planks!
- Cure Time: Allow the adhesive to cure completely (usually 24–48 hours, check the manufacturer’s instructions) before heavy traffic passes over the transition.
Aesthetic Options: Making the Transition Look Intentional
The transition doesn’t have to be just a functional strip; it can be a beautiful design feature.
1. The Border Tile Technique (The Designer Look)
If you are planning the renovation ahead of time, you can use the tile itself to create the transition.
- Instead of running the wood all the way to the tile line, stop the wood short (perhaps 2–3 inches).
- Install a decorative border row of tile (a contrasting color, a mosaic, or even smaller-format tile) along that 2–3 inch gap.
- Then, install your main tile field up to that border.
- The wood flooring can now butt up against this decorative tile border, often requiring only a very small, thin metal inlay or simple wood trim (quarter round) to cover the final expansion gap between the wood and the decorative tile row. This looks custom and professional.
2. Using Contrasting Materials
Sometimes, fighting the transition makes it look worse. Embrace it by using a material that complements both the tile and the wood.
For example, if you have grey slate tile and warm oak floors, using a dark bronze or matte black aluminum transition strip can tie into other hardware in the room (like cabinet pulls or light fixtures), making the line look deliberate.
3. Grout as the Buffer (For Minimal Differences)
If the heights are nearly identical, some experienced installers use a wider grout line where the wood ends, essentially treating the final edge of the wood as if it were a very thin, linear tile.
Note on Safety: This method is controversial and generally not recommended for DIYers. The wood will expand and contract differently than the grout, leading to cracks or premature failure of the grout line. Only consider this if your wood floor is fully glued down and you are confident in its minimal movement.
Safety First: Preventing Trips and Wear
The biggest risk when combining tile and wood is creating a sudden vertical change that causes someone to trip. Always prioritize safety over the absolute sleekest look.
Key Safety Checks
- Height Rule: Generally, no transition should create a height difference greater than 1/4 inch without a gradual slope (reducer). Anything over 1/4 inch must slope gradually (per many local building codes).
- Secure Fastening: Ensure your transition strip, track, or molding is completely secured to the subfloor. Loose transitions are major tripping hazards.
- Expansion Gaps: Never forget that wood flooring needs space to expand and contract with humidity changes. If you butt wood tightly against tile or use too much adhesive on a floating floor transition, the wood may buckle, causing a dangerous bulge.
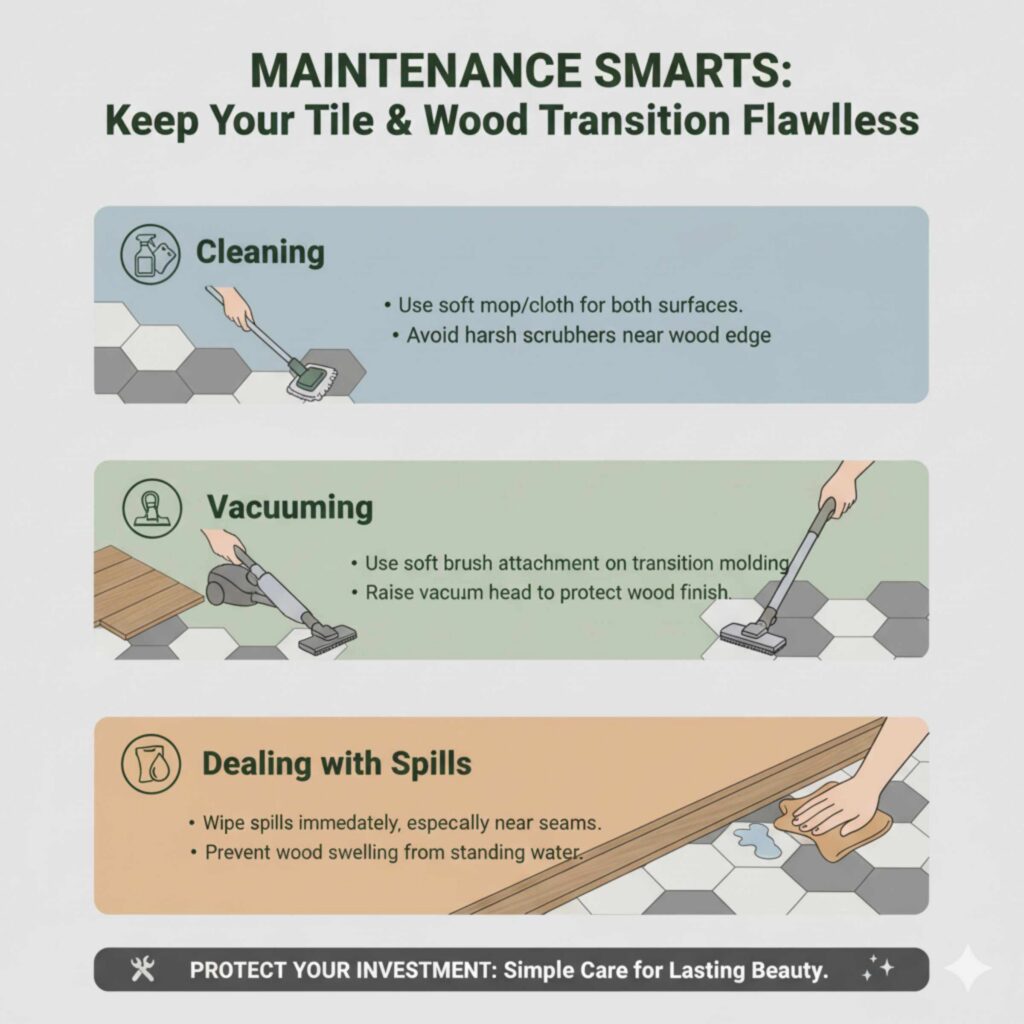
Maintenance Tips for Your New Transition Zone
Once your beautiful transition is installed, keeping it looking good is easy if you follow a few simple rules.
- Cleaning: Use a soft mop or cloth for the tile and wood transition area. Avoid harsh abrasive scrubbers near the edge of the wood, as this can dull the finish right where traffic concentrates.
- Vacuuming: When vacuuming, use a soft brush attachment for the transition piece itself. If using a stick vacuum with a spinning beater bar, raise the head height slightly so it doesn’t dig into the molding or scratch the adjacent wood floor.
- Dealing with Spills: If water sits for long periods on a wood reducer strip, it can cause the wood to swell slightly. Wipe up spills immediately, especially near the grout line or seams.
Frequently Asked Questions (FAQ) for DIY Homeowners
Q1: Can I use quarter round molding to cover the gap between tile and wood?
A: Quarter round is designed to cover the small expansion gap between the baseboard and the floor, not the transition between two different floor types. While you can sometimes use it creatively if the wood is slightly lower, it doesn’t provide the structural support or smooth slope needed for a safe, durable transition over a significant height difference.
Q2: Do I need to remove the existing flooring to install a transition strip?
A: If you are installing a T-molding track, you usually need access to the subfloor to screw it down. If you are using a simple adhesive reducer strip, you might be able to adhere it directly to the existing, clean, and stable subfloor right at the seam. However, if either floor is lifting or unstable, you must repair or replace that section first.
Q3: Should the transition strip match the tile or the wood flooring?
A: In most cases, it’s best to match the transition strip to the wood flooring, especially if the wood continues into adjacent rooms. This creates visual flow and makes the transition feel less abrupt. However, in modern or industrial designs, using a neutral metal transition (aluminum, bronze, or black) that complements both materials can look intentional and stylish.
Q4: Can I install the transition strip before installing the wood flooring?
A: Generally, no. Transition strips—especially T-molding—are installed after both the tile and wood floors are fully installed. This ensures accurate placement, proper expansion gaps for the wood, and a snug fit. Installing transitions too early often leads to alignment problems or damaged pieces during flooring installation.
Q5: How wide should a transition strip be for comfort and safety?
A: Most standard transition strips are 1½ to 2 inches wide, which is sufficient for safety and durability. For larger height differences or high-traffic areas, slightly wider reducer strips provide a gentler slope and reduce tripping risk. The key is ensuring the transition feels smooth underfoot rather than abrupt.
Conclusion: Seamless Transitions Make All the Difference
Combining tile and wood flooring doesn’t have to be intimidating. When done correctly, the transition between these two materials becomes a design feature—not a flaw. The key is understanding height differences, choosing the right transition method, and installing everything with precision and patience.
Whether you use a classic T-molding, a safety-focused reducer strip, or a custom designer transition, the goal is the same: a smooth, secure, and intentional connection between surfaces. Measure carefully, respect expansion gaps, and never rush the installation process.
With the techniques in this guide, you can confidently blend tile and wood like a pro—creating a space that’s not only beautiful but also safe, durable, and built to last. Take your time, plan ahead, and enjoy the transformation of your home one seamless transition at a time!