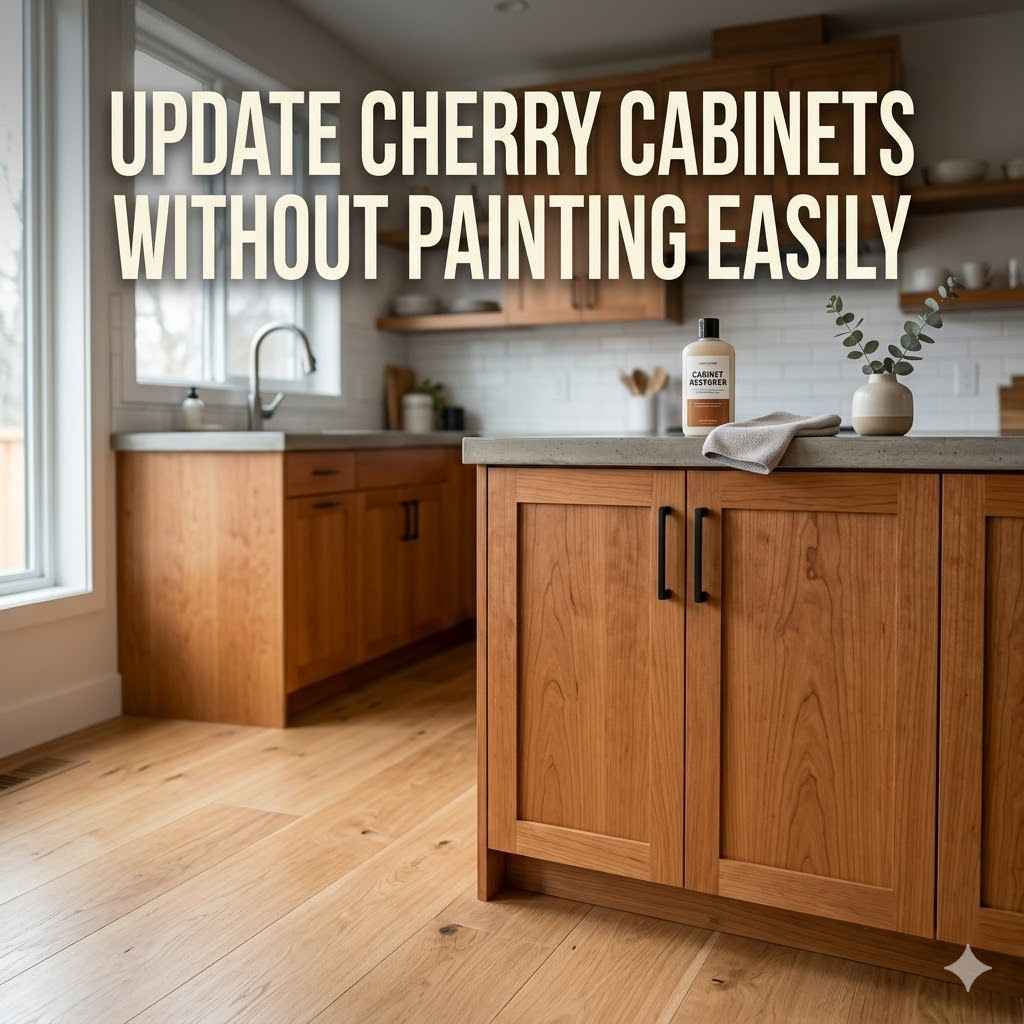
Update Cherry Cabinets Without Painting Easily
Updating your kitchen cabinets can make a big difference, but many people worry about painting. It can seem tricky, especially if you’re new to DIY projects. You might be wondering if there’s an easier way to refresh your cherry cabinets without the mess and hassle of paint.
Good news! There are simple methods that work wonderfully. This guide will show you exactly how to make your cabinets look new again, step by step.
Refresh Cherry Cabinets Without Paint
Giving your cherry cabinets a facelift without picking up a paintbrush is a common desire for many homeowners. The rich, warm tones of cherry wood can sometimes feel a bit dated or just not fit a new kitchen style. Many people assume painting is the only way to change their look.
However, painting can be time-consuming, requires careful preparation, and can sometimes lead to chipping or peeling if not done perfectly. For beginners, the thought of sanding, priming, and applying multiple coats of paint can be overwhelming. This section explores easy, effective ways to update cherry cabinets that bypass the painting process entirely, focusing on cleaning, polishing, and simple hardware swaps for a noticeable transformation.
We will cover how to bring out the natural beauty of your cherry wood or give it a slightly different hue with minimal effort.
Deep Cleaning for a Fresh Start
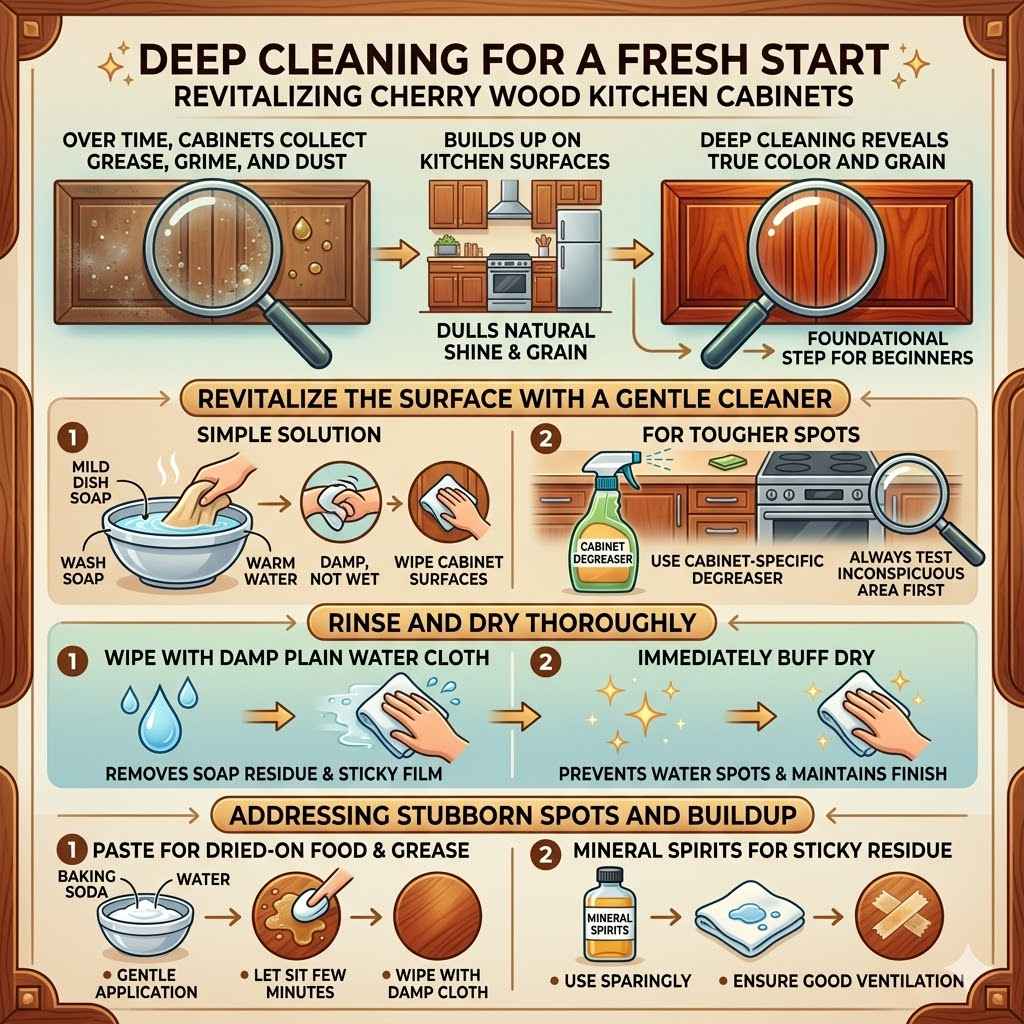
Before any update, a thorough cleaning is key. Over time, cabinets collect grease, grime, and dust, especially in the kitchen. This buildup can dull the wood’s natural shine and make any surface treatment look less appealing.
Deep cleaning removes these layers, revealing the true color and grain of the cherry wood underneath. It’s a foundational step that can make a surprising difference on its own. For beginners, this is the most accessible and impactful first move.
Revitalize the Surface With a Gentle Cleaner
A simple solution of mild dish soap and warm water is often all you need. Dip a soft cloth into the soapy water, wring it out well so it’s damp, not wet, and wipe down the cabinet surfaces. For tougher spots, like around handles or cooktops, a degreaser specifically designed for kitchen cabinets can be very helpful. Always test any cleaner on an inconspicuous area first to ensure it doesn’t damage the finish.
Rinse and Dry Thoroughly
After cleaning with soap or a degreaser, it’s important to wipe down the cabinets again with a clean cloth dampened with plain water. This removes any soap residue that could leave a sticky film. Immediately follow up with a dry, soft cloth to buff the cabinets dry. This prevents water spots and helps maintain the cabinet’s finish, making them look cleaner and brighter.
Addressing Stubborn Spots and Buildup
Kitchen cabinets often face challenges like splatters from cooking or sticky fingerprints. For dried-on food or grease, a paste made of baking soda and water can work wonders. Apply it gently, let it sit for a few minutes, then wipe it away with a damp cloth. For any sticky residue, a bit of mineral spirits on a cloth can often dissolve it, but use this sparingly and ensure good ventilation.
Enhancing the Natural Beauty of Cherry Wood
Cherry wood has a beautiful, natural warmth. Sometimes, all it needs is a little boost to bring out its best features. Polishes and conditioners can restore shine, enrich the color, and protect the wood.
This is a fantastic option for those who love the existing look of their cherry cabinets but want them to look more vibrant and cared for. It’s a low-effort, high-reward method that even the most novice DIYer can master.
Wood Polishes for Color and Shine
There are many wood polishes on the market. Some are clear, designed to add shine, while others contain a slight tint to deepen or enhance the wood’s natural color. For cherry cabinets, a polish with a warm undertone can be particularly effective at bringing out the reddish-brown hues. Apply the polish according to the product instructions, usually with a soft cloth, and then buff it to a high sheen. This process not only makes your cabinets look better but also adds a protective layer.
Restoring the Finish with Oil-Based Conditioners
Oil-based conditioners, like tung oil or linseed oil, can penetrate the wood and nourish it, making it look richer and more alive. These products can help to fill in minor scratches and revive a dull finish. Apply a thin coat with a brush or cloth, let it soak in for a while, and then wipe off any excess. This method brings out the deep, natural beauty of cherry wood, giving it a lustrous appearance without altering its color dramatically.
Understanding Different Wood Finishes
Cherry cabinets can come with various finishes, such as polyurethane, varnish, or lacquer. The type of finish can affect how well a polish or conditioner works. Generally, most modern finishes are durable and can benefit from a good quality wood polish. If your cabinets have an old or damaged finish, a light sanding might be needed before applying a new treatment, but for simple updates, cleaning and polishing are often enough.
Hardware Updates for a Modern Look
One of the quickest and most impactful ways to update any cabinet, including cherry wood ones, is by changing the hardware. Knobs and pulls are like the jewelry for your cabinets. Swapping out old, dated hardware for something modern and stylish can instantly change the entire feel of your kitchen.
This is a project that requires minimal skill and can be completed in just a few hours.
Choosing New Knobs and Pulls
Hardware comes in countless styles, finishes, and sizes. For cherry cabinets, you have a lot of flexibility. Brushed nickel, matte black, or even brass hardware can create different looks. Consider the overall style of your kitchen. Sleek, minimalist hardware can give a contemporary feel, while more ornate designs might suit a traditional kitchen. Measure the distance between the screw holes on your existing pulls to ensure your new ones will fit.
The Simple Process of Swapping Hardware
This is the easiest update. You will typically only need a screwdriver. Open the cabinet door or drawer and locate the screws on the back of the existing knob or pull. Unscrew them, and the hardware will come off. Then, simply place your new hardware in position and screw it in from the back. It’s that simple! If you are changing from knobs to pulls, or vice versa, you might need to fill old holes and drill new ones, but many modern hardware sets come with adjustable mounting screws to fit different hole spacings.
Impactful Hardware Trends
Current trends favor matte black for a bold contrast against wood tones, brushed gold or brass for a touch of elegance, and brushed nickel or stainless steel for a clean, modern look. Geometric shapes and unique textures are also popular. Don’t be afraid to mix and match if your kitchen has both doors and drawers; you can use pulls on drawers and coordinating knobs on doors for a designer look. This small change can make your cherry cabinets feel brand new.
Using Stains and Glazes for a Color Shift
If you want to change the color of your cherry cabinets without painting, stains and glazes are excellent options. Stains penetrate the wood and change its color, while glazes add a layer of color over an existing finish, often settling into crevices to highlight details. These techniques offer a way to deepen the wood’s tone, add a different hue, or create an aged look.
They require a bit more care than polishing but are still very manageable for a beginner.
Understanding Wood Stains
Wood stains come in a vast array of colors, from light to dark, and can dramatically alter the appearance of cherry wood. You can darken cherry cabinets with a dark walnut or espresso stain, or give them a more reddish tone with a cherry stain. For beginners, gel stains are often recommended because they are thicker and easier to control than liquid stains. They sit more on the surface, making them less likely to soak in too deeply and become hard to manage.
How to Apply Stain to Cherry Cabinets
Preparation is key when staining. After thoroughly cleaning, you might need to lightly sand the cabinets to open the wood pores, especially if they have a heavy seal coat. Wipe off all dust. Apply the stain with a foam brush or rag, working in the direction of the wood grain. Apply evenly and wipe off excess stain with a clean rag. The longer you leave the stain on, the darker the color will be. Allow it to dry completely, usually 24-48 hours, before applying a protective topcoat like polyurethane.
Exploring the Use of Glazes
Glazes add a decorative layer and can be used over an existing finish or a new stain. They are often used to create an antique or distressed look. A glaze is typically a thinned-down paint or stain applied to the cabinet surface and then wiped away, leaving pigment in the grooves and details. This can make the wood grain pop or add subtle shading. For cherry cabinets, a darker glaze can add depth and an aged character, making them look more traditional or rustic. Glazing is a forgiving process as you can wipe it off if you make a mistake before it dries.
Applying a Clear Protective Topcoat
After applying a stain or glaze, or even after a deep clean and polish, a protective topcoat is essential. This layer shields your cabinets from moisture, stains, and daily wear and tear, ensuring your beautiful update lasts for years. It also adds a final sheen, enhancing the overall look.
Choosing the right topcoat and applying it correctly is crucial for durability and appearance.
Types of Protective Topcoats
Polyurethane is a popular choice for cabinets because it’s durable and water-resistant. It comes in oil-based and water-based formulas. Oil-based polyurethanes offer a slightly warmer, amber tone that can complement cherry wood nicely and are very durable. Water-based polyurethanes dry faster and are typically clear, with less odor, making them easier for beginners to use. Other options include varnishes or lacquer, but polyurethane is generally the most user-friendly and accessible.
The Application Process for a Smooth Finish
Surface preparation is vital. Ensure your cabinets are clean, dry, and dust-free. If you’ve applied stain or glaze, wait for it to cure fully according to the product instructions. Use a high-quality synthetic brush for water-based polyurethanes or a natural bristle brush for oil-based ones. Apply thin, even coats, brushing in the direction of the wood grain. Avoid over-brushing. Allow each coat to dry thoroughly as per the manufacturer’s instructions, and lightly sand with very fine-grit sandpaper (220 grit or higher) between coats for maximum smoothness.
Achieving a Professional Look
Applying multiple thin coats is better than one thick coat. This builds up durability and allows for a smoother finish. Most projects will require 2-3 coats. For cabinet doors, it’s often best to remove them and lay them flat to apply the topcoat, preventing drips. Ensure good ventilation when working with any topcoat, especially oil-based products. Patience is key; allowing adequate drying time between coats will result in a superior, long-lasting finish that protects your updated cherry cabinets.
Case Study Cherry Cabinet Transformation
Sarah wanted to update her 1990s kitchen but was on a tight budget and dreaded painting. Her cherry cabinets were functional but had lost their shine and felt a bit dark. She decided to try an update without painting.
First, she thoroughly cleaned them with a degreaser, which revealed a warmer tone beneath the accumulated kitchen grease. Next, she used a gel stain in a slightly darker, richer walnut shade. She found the gel stain easy to apply and control, wiping away excess to achieve a deep, even color.
After the stain cured, she applied three coats of a water-based polyurethane for protection. Finally, she swapped out her old brass knobs for sleek, matte black pulls. The transformation was dramatic.
Her kitchen felt more modern and inviting, and the cherry cabinets now had a beautiful, deep color that complemented her new countertops. The entire project cost under $300 and took a weekend.
Sample Scenario Kitchen Update
- Sarah’s Kitchen Before: Cherry cabinets looked dull and slightly orangey-red. Hardware was dated brass.
- Step 1 Cleaning: Used a kitchen degreaser and microfiber cloths to remove grease and grime. This alone brightened them considerably.
- Step 2 Staining: Opted for a gel stain in a dark walnut color. Applied with a foam brush, working with the grain, and wiped off excess to control the depth of color.
- Step 3 Topcoat: Applied two thin coats of water-based polyurethane to seal and protect the stained surface. Allowed ample drying time between coats.
- Step 4 Hardware:
- Kitchen After: Cabinets had a rich, deep walnut tone. The new hardware gave a modern, sophisticated look. The kitchen felt updated and refreshed without a single drop of paint.
Update Cherry Cabinets Without Painting: A Beginner’s Guide
This section serves as a comprehensive guide for anyone looking to Update Cherry Cabinets Without Painting Easily. It covers all the essential steps and considerations for refreshing your kitchen’s look using methods that bypass traditional painting. We will explore detailed techniques for cleaning, enhancing the natural beauty of cherry wood, updating hardware, and even safely applying stains or glazes for a color transformation.
The focus remains on simple, accessible methods suitable for beginners, ensuring a successful and satisfying DIY experience. This guide aims to demystify the process and provide clear, actionable advice to achieve beautiful results without the typical challenges associated with painting.
The Importance of Proper Cabinet Preparation
Proper preparation is the bedrock of any successful cabinet update, especially when avoiding paint. Even without painting, surfaces need to be clean and ready to accept new treatments. This ensures that polishes, stains, glazes, and topcoats adhere properly and look their best.
Skipping preparation can lead to uneven results, premature wear, or a finish that doesn’t last. For beginners, understanding these preparatory steps is crucial for achieving professional-looking outcomes.
Gathering Your Supplies
Before you start, make sure you have everything you need. This includes cleaning supplies (mild soap, degreaser, soft cloths, water), any chosen enhancement products (polishes, oils, stains, glazes), topcoats (polyurethane), hardware (knobs, pulls), screwdrivers, and possibly fine-grit sandpaper. Having all items ready in advance streamlines the process and prevents interruptions.
Removing Hardware and Doors
For the most thorough job, it’s best to remove cabinet doors and drawer fronts from their frames. This allows you to work on a flat surface, ensuring even application of any product. Label each door and drawer front with masking tape and a marker so you know exactly where it goes back. Also, remove all knobs and pulls.
Cleaning and Degreasing
This is arguably the most critical preparatory step. Kitchen cabinets accumulate a film of grease and grime over time, especially around stovetops and sinks. Use a good quality kitchen degreaser or a solution of warm water and mild dish soap. Wipe down all surfaces thoroughly. For stubborn spots, a paste of baking soda and water can be gently scrubbed. Rinse with a clean, damp cloth and dry completely with a soft towel.
Light Sanding for Better Adhesion
If you are applying a stain or glaze, or even if your cabinets have a very old or damaged finish, a light sanding is often recommended. Use fine-grit sandpaper (around 220 grit). The goal is not to remove the old finish but to lightly scuff the surface, creating microscopic grooves that allow the new product to adhere better. After sanding, wipe down all surfaces with a tack cloth or a slightly damp cloth to remove all dust.
Exploring Different Stain Options for Cherry Wood
Stains offer a fantastic way to alter the color of cherry cabinets without resorting to opaque paint. Cherry wood’s natural color is warm, with reddish undertones that can range from light pinkish-brown to a deeper reddish-brown as it ages. Understanding how different stains interact with cherry is key to achieving your desired look.
The type of stain and its application method can significantly influence the final appearance.
Understanding Stain Types: Oil vs. Water vs. Gel
Oil-based stains penetrate deeply into the wood, offering rich, long-lasting color. They tend to darken the wood and bring out its warmth. Water-based stains dry faster and offer a wider range of colors, often with brighter tones. They can sometimes raise the wood grain, requiring more careful sanding. Gel stains are a popular choice for DIYers because they are thicker, more like a liquid in consistency. They sit more on the surface, making them easier to control and less prone to blotching, especially on hardwoods like cherry. For beginners, gel stains are highly recommended for their ease of use.
Choosing the Right Stain Color
When choosing a stain color for cherry cabinets, consider your overall kitchen design. Darker stains like walnut, espresso, or ebony can create a dramatic, modern look and hide imperfections well. Lighter stains, like natural oak or even a diluted white wash, can give a more airy, Scandinavian feel. If you want to enhance the natural red tones of cherry, a more reddish-brown stain can work beautifully. Always test your chosen stain on a scrap piece of wood or an inconspicuous area of the cabinet to see how it looks.
Techniques for Even Stain Application
Achieving an even stain application is crucial. After cleaning and possibly light sanding, ensure the wood is dust-free. Apply the stain with a high-quality foam brush or a lint-free rag, working in the direction of the wood grain. Apply a generous, even coat. For gel stains, you can apply it and then wipe it back with a clean rag to achieve the desired depth of color. The key is to work in small sections, wiping off the excess stain before it dries to prevent lap marks.
Applying Glazes to Add Depth and Character
Glazing is an advanced technique that can add a professional touch and significant character to your cherry cabinets. It’s not about changing the base color of the wood but rather enhancing its existing features or adding an antique, aged effect. Glazes are semi-transparent coats that settle into the wood grain, moldings, and carved details, creating shadows and highlights.
This method is excellent for achieving a more traditional or farmhouse look.
What is a Glaze and How It Works
A glaze is essentially a colored coating that is applied over an existing finish or stain. It is typically a thin, pigmented liquid that is then wiped off, leaving the pigment in the recesses and low-lying areas of the wood surface. This process emphasizes the wood’s natural texture and any decorative details on the cabinets. Glazes can be water-based or oil-based.
Choosing a Glaze Color
The color of the glaze is important. For cherry cabinets, a dark brown, umber, or even black glaze can create a beautiful contrast against the natural wood tones, adding depth and a rustic feel. Lighter glazes, like cream or white, can be used to achieve a more distressed or vintage look. The key is to select a color that complements your existing cabinet color and your kitchen’s overall style.
Application Process for Glazing
After preparing and cleaning your cabinets, and applying any base color or stain if desired, you are ready to glaze. Apply the glaze using a foam brush or a rag, working in small sections. Then, using a clean, lint-free rag or a sponge, wipe off the excess glaze. The amount you wipe away will determine how much color is left behind. For a more pronounced effect, let the glaze dry slightly before wiping. You can use a toothbrush or small brush to get glaze into nooks and crannies. Once you are happy with the look, allow the glaze to dry completely according to the manufacturer’s instructions, then apply a protective topcoat.
Updating Hardware: The Easiest Transformative Step
Changing the hardware is often the first and most impactful step for homeowners looking to update their kitchen cabinets without painting. It’s a simple process that yields dramatic visual results. The right hardware can make dated cherry cabinets look completely new and stylish, aligning them with modern kitchen trends.
This is an excellent project for beginners as it requires minimal tools and skill.
Hardware Styles for Cherry Cabinets
Cherry wood’s warm, reddish hue pairs well with a variety of hardware finishes. For a modern look, consider matte black, brushed nickel, or stainless steel. For a more luxurious feel, brushed brass or gold can add warmth and sophistication. If you prefer a classic look, oil-rubbed bronze or antique brass might be suitable. When selecting hardware, think about the scale of your cabinets and the overall kitchen aesthetic.
Knobs Versus Pulls
Knobs are typically used on cabinet doors, while pulls are generally used on drawers. However, you can use knobs on both or pulls on both, depending on your preference and the style. Pulls offer more leverage and are often preferred for drawers. When choosing, consider the size of the cabinet face. Larger cabinets might benefit from longer pulls, while smaller doors can use elegant knobs. Ensure the mounting screws of your new hardware match the hole spacing of your existing hardware, or be prepared to drill new holes.
DIY Installation Tips
Installing new hardware is straightforward. You’ll usually only need a screwdriver. For knobs, unscrew the old one from the back and screw on the new one. For pulls, remove the screws from the back of the drawer or door and attach the new pull. If you are changing from knobs to pulls, or vice versa, you may need to fill the old holes with wood filler and then drill new pilot holes. However, many hardware sets are designed to accommodate standard hole spacings, making the switch seamless.
Understanding Wood Polishes and Conditioners
Sometimes, cherry cabinets don’t need a drastic change in color; they just need to look their best. Wood polishes and conditioners are designed to restore the luster and health of the wood finish. They clean away light grime, fill in minor scratches, and protect the surface, making your cabinets look revitalized and cared for.
This is a great option if you love the natural look of your cherry cabinets but want to enhance their shine and protect them.
Benefits of Using Wood Polishes
Wood polishes are formulated to clean and shine wood surfaces. They can remove dust, fingerprints, and light smudges, bringing back the original glow of the cabinet finish. Many polishes also contain conditioners that nourish the wood. Some tinted polishes can subtly enhance the wood’s color, making it appear richer and deeper, which is particularly effective for warming up cherry wood tones.
How Conditioners Nourish Cherry Wood
Over time, wood finishes can dry out, leading to a dull appearance and increased susceptibility to damage. Wood conditioners, often oil-based, penetrate the wood to replenish lost moisture and oils. This helps to keep the wood supple and prevents cracking. For cherry wood, which naturally has a beautiful grain, conditioning can make the grain more prominent and give the cabinets a soft, satiny sheen.
Application and Maintenance
When applying a polish or conditioner, start by cleaning the cabinets thoroughly. Then, apply the product with a soft, lint-free cloth, working in the direction of the wood grain. Use a small amount of product at a time. After allowing it to sit for a few minutes, buff the surface with a clean, dry cloth until it shines. Regular dusting and occasional polishing will keep your cherry cabinets looking their best for years to come.
When to Consider a Clear Protective Topcoat
A clear protective topcoat is essential for the longevity and durability of any cabinet finish, especially when you’ve applied stains, glazes, or even just polished the existing finish. It acts as a barrier against moisture, food splatters, and everyday wear and tear. Without a good topcoat, your efforts to update your cherry cabinets might not last as long as you’d hope.
This step ensures your beautiful results are protected.
The Role of Topcoats in Cabinet Durability
Topcoats are the final layer of defense for your cabinets. They are designed to be hard-wearing and resistant to common kitchen hazards like spills, heat, and abrasion. For cherry cabinets that are frequently used, a robust topcoat is critical to prevent staining, water damage, and scuffs. It also contributes to the overall sheen of the finish, whether you prefer a matte, satin, or high-gloss look.
Choosing the Right Topcoat for Your Project
Polyurethane is the most common and effective topcoat for kitchen cabinets. It is known for its durability and resistance to water and chemicals. You can choose between water-based and oil-based polyurethane. Water-based polyurethanes dry clear, are low in odor, and clean up easily with water, making them beginner-friendly. Oil-based polyurethanes typically offer a slightly warmer, amber tone that can enhance the rich color of cherry wood and are known for their extreme durability.
Application Best Practices for a Flawless Finish
Applying a topcoat requires patience and attention to detail. Ensure your cabinets are clean, dry, and dust-free. Apply thin, even coats using a high-quality brush or foam applicator, working in the direction of the wood grain. Avoid applying too much product at once, as this can lead to drips and unevenness. Allow each coat to dry completely as recommended by the manufacturer, and lightly sand with very fine-grit sandpaper (220 or higher) between coats to ensure optimal adhesion and a smooth finish. Two to three coats are usually sufficient for excellent protection.
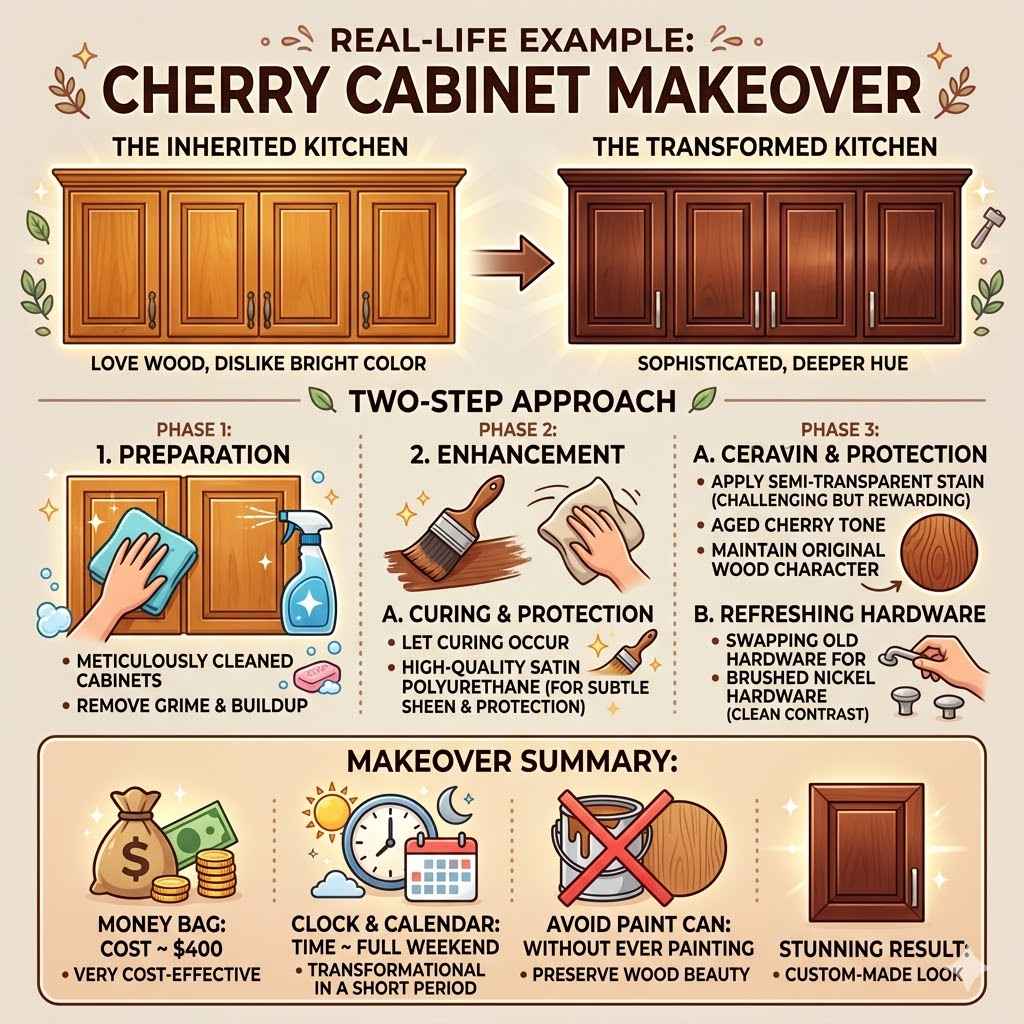
Real-Life Example Cherry Cabinet Makeover
Mark and Lisa inherited a house with honey-toned cherry cabinets in the kitchen. They loved the wood but found the color a bit too bright and dated for their taste. Painting was an option they disliked due to the effort and potential for chipping.
Instead, they opted for a two-step approach. First, they meticulously cleaned the cabinets. Then, they used a challenging but rewarding process: a semi-transparent stain that leaned towards a deeper, more aged cherry tone.
They applied it carefully, wiping away excess to maintain some of the original wood’s character. After letting it cure, they applied several coats of a high-quality satin polyurethane for a subtle sheen and protection. The result was stunning; the cabinets now had a sophisticated, deeper hue that looked custom-made.
They also updated the hardware to brushed nickel, which provided a clean contrast. This makeover cost them around $400 and took them a full weekend, transforming their kitchen’s aesthetic significantly without ever touching a paint can.
Frequently Asked Questions
Question: How do I remove grease from cherry cabinets?
Answer: For general grease, a solution of warm water and mild dish soap works well. For tougher grease, use a kitchen degreaser specifically designed for cabinets, or a paste of baking soda and water. Always wipe down with a clean, damp cloth afterwards to remove residue, and then dry thoroughly.
Question: Can I use a wax finish on my cherry cabinets?
Answer: Wax can offer a beautiful soft sheen and some protection, but it’s generally less durable than polyurethane, especially in a kitchen environment. It might be suitable for low-traffic cabinets, but for most kitchens, a polyurethane topcoat is recommended for better longevity.
Question: How often should I polish my cherry cabinets?
Answer: If you use a wood polish, it can be done every few months or as needed when the cabinets start to look dull. If you use a conditioner, it might be needed less often, perhaps once or twice a year, depending on your climate and cabinet usage.
Question: What’s the best way to handle imperfections like scratches before staining?
Answer: For minor scratches, you can often use a wood repair crayon or putty that matches the stained color of your cabinets. If you are staining, the stain itself can help to camouflage very fine scratches. For deeper scratches, you might need to use a wood filler and then sand it smooth before staining.
Question: Do I need to seal stained cabinets?
Answer: Yes, absolutely. Stains color the wood but do not offer protection. A protective topcoat like polyurethane is essential to shield the stain and the wood from moisture, stains, and daily wear and tear, ensuring your updated cabinets last for years.
Summary
Updating cherry cabinets without painting is achievable and rewarding. You can refresh their look by deep cleaning, polishing, changing hardware, or applying stains and glazes. These methods offer a less messy and often simpler alternative to painting.
With careful preparation and the right products, your cabinets will look beautiful and feel brand new.