What Happens If You Apply Stain When It’s Too Cold: Fatal
Applying stain when it’s too cold is a fatal mistake for your project. The stain won’t absorb properly, leading to a blotchy, uneven finish that never fully dries. It can remain sticky, peel off easily, and fail to protect the wood, forcing you to strip it all off and start over.
Hello, friends! Md Meraj here. I know that feeling well. You’ve spent hours sanding a piece of furniture or a deck, and you’re so close to the finish line. The weather forecast looks a little chilly, but you think, “What’s the harm?” You just want to get the project done. But when it comes to wood stain, a little chill can cause a huge headache.
Applying stain in the cold is one of the most common and frustrating mistakes I see. It can turn your beautiful project into a sticky, blotchy mess. But don’t worry! I’m here to walk you through why temperature is so important and what you can do to get that perfect finish every time. Let’s make sure your hard work pays off!
Why Temperature Is Your Most Important Tool for Staining
Think of wood stain like a sponge and water. When a sponge is warm and flexible, it soaks up water easily. But if you freeze that sponge, it becomes hard and won’t absorb a single drop. Wood works in a very similar way.
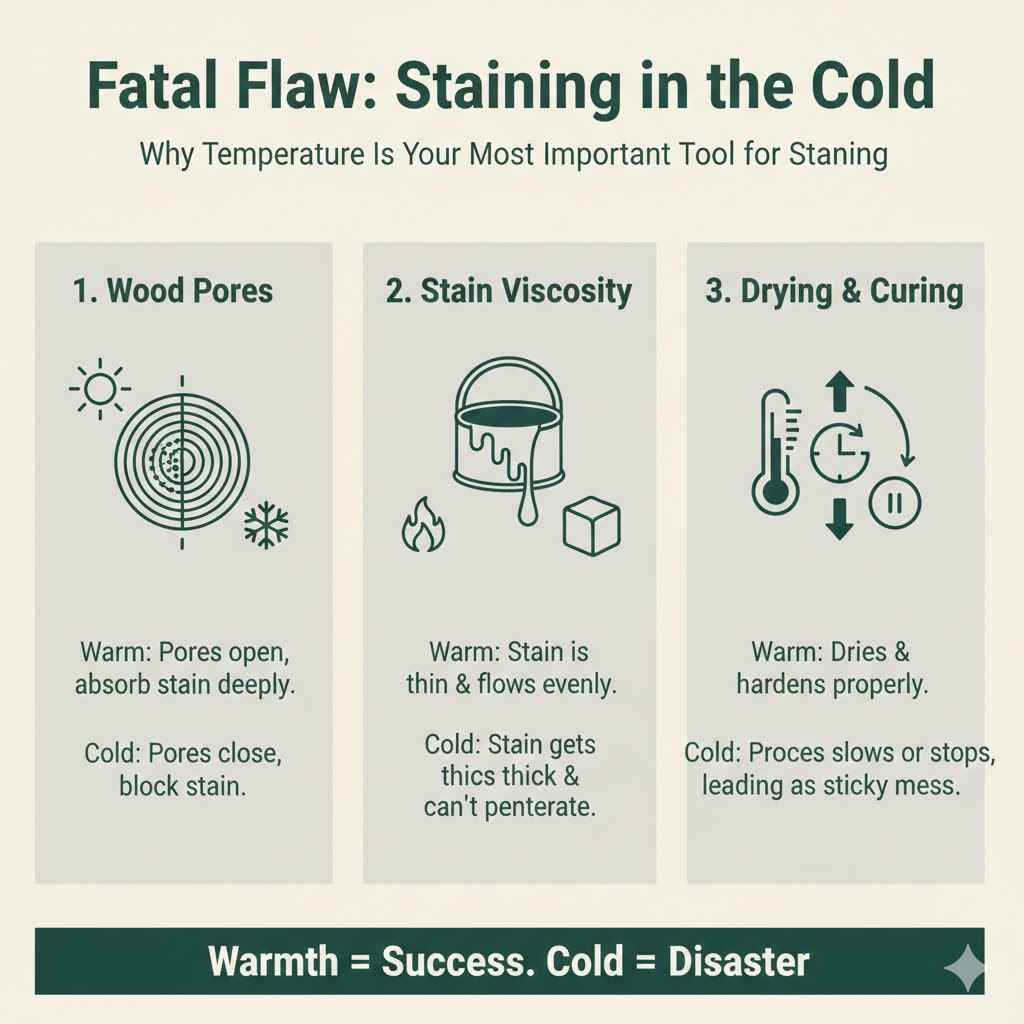
Wood is full of tiny pores. For a beautiful, rich color, the stain needs to soak deep into these pores. Temperature plays the main role in this process:
- Wood Pores: In warm weather, the wood’s pores are open and receptive. They welcome the stain, allowing it to penetrate deeply and evenly. When it gets cold, these pores tighten up and close, blocking the stain from getting in.
- Stain Viscosity: “Viscosity” is just a fancy word for thickness. Oil-based stains, in particular, get thick and syrupy in the cold, almost like honey. A thick, sluggish stain can’t flow into the wood grain. It just sits on the surface.
- Drying and Curing: Staining is a chemical process. The solvents in the stain need to evaporate for it to dry, and the binders need to “cure” or harden to protect the wood. Cold temperatures slow this process down dramatically, sometimes stopping it altogether.
In short, warmth helps the wood, the stain, and the drying process all work together as a team. Cold weather makes them fight each other, and your project always loses that fight.
The “Fatal” Problems You’ll Face Staining in the Cold
I use the word “fatal” because staining in the cold can truly kill a project, forcing you to undo all your hard work. It’s not just a small mistake; it creates a cascade of problems that are very difficult to fix. Here’s exactly what you can expect.
Uneven, Blotchy Color
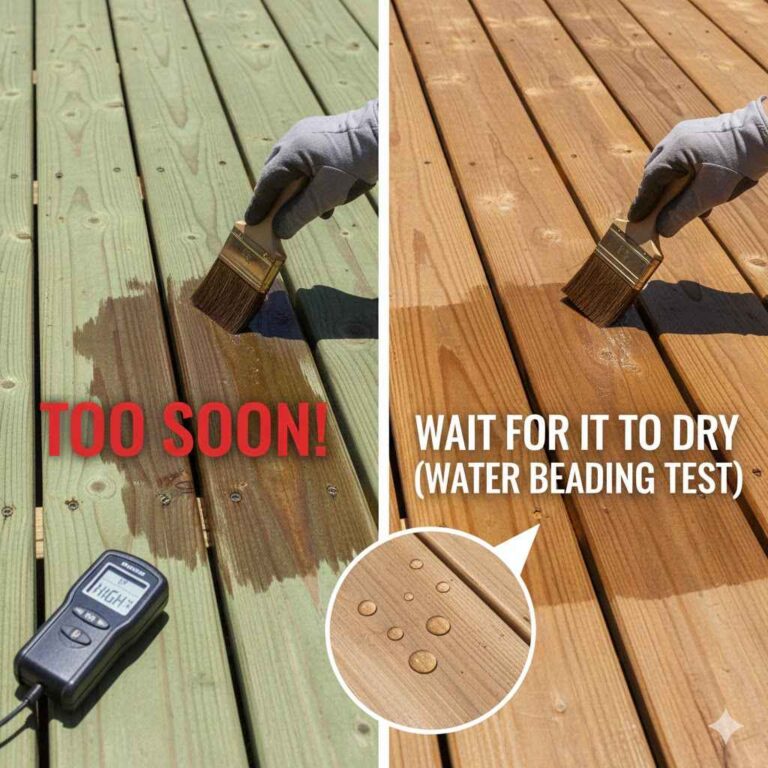
This is the most immediate and obvious problem. Because the cold wood pores are tight and the stain is too thick, the stain can’t absorb evenly. Some spots might absorb a tiny bit of color, while others absorb none at all. The result is a messy, streaky, and blotchy finish. Instead of enhancing the wood grain, it hides it under an ugly, inconsistent coat. You’ll see dark patches next to light patches, and no amount of wiping will fix it.
The Stain Never Dries (The Sticky Mess)
Have you ever touched a stained project days later, only to find it’s still tacky? Cold weather is the number one cause. The solvents in the stain need to evaporate for it to dry properly. Cold air can’t hold much moisture, so evaporation slows to a crawl. The stain just sits there, a sticky film on the surface. This tacky surface attracts dust, dirt, pet hair, and fingerprints, ruining the smooth finish you worked so hard to prepare.
Weak Adhesion and Peeling
A proper stain job forms a bond with the wood fibers. When applied in the cold, the stain doesn’t penetrate; it just dries (if it ever does) into a weak film on top of the wood. It has no grip. This means that a few weeks or months down the line, the stain will start to flake, chip, and peel away. This is especially true for outdoor projects like decks and fences, where exposure to sun and rain will quickly destroy a poorly applied finish.
Poor Wood Protection
Beyond looking good, stain is meant to protect your wood from moisture and UV damage. A stain that hasn’t penetrated or cured correctly offers zero protection. It’s like wearing a raincoat with giant holes in it. Moisture can still get into the wood, leading to rot, mold, and warping. The wood is left vulnerable, and the entire staining effort was for nothing.
Finding the “Goldilocks Zone”: The Ideal Temperature for Staining
So, what’s the right temperature? You’re looking for the “Goldilocks Zone”—not too hot, not too cold, but just right. For almost all wood stains, this perfect range is between 50°F and 90°F (10°C to 32°C).
However, the absolute best, most reliable results happen when you stick to a smaller window: between 65°F and 75°F (18°C to 24°C). In this range, the stain flows perfectly, the wood absorbs it evenly, and it dries at the ideal rate.
It’s also critical to remember two things:
- Surface Temperature Matters: The temperature of the wood itself is just as important as the air temperature. If you move a piece of furniture from a cold garage into a warm room, you must let the wood acclimate for several hours until it is no longer cold to the touch.
- The 24-Hour Rule: The temperature needs to stay within the ideal range for a full 24 hours after you apply the stain. A sudden temperature drop overnight can halt the curing process and lead to the same sticky, blotchy problems.
Different types of stain can have slightly different requirements. Always check the can for the manufacturer’s specific advice, but here is a general guide:
| Stain Type | Ideal Temperature Range | Notes |
|---|---|---|
| Oil-Based Stain | 50°F – 90°F (10°C – 32°C) | Very sensitive to cold. Becomes thick and dries extremely slowly below 50°F. |
| Water-Based Stain | 50°F – 90°F (10°C – 32°C) | Less fussy than oil-based but can freeze in cold temperatures. Dries very fast in heat or direct sun. |
| Gel Stain | 60°F – 80°F (15°C – 27°C) | Thicker by nature, it becomes almost unusable in the cold. Needs warmth to spread evenly. |
How to Know If It’s Too Cold: Simple Checks for DIYers
Feeling confident? Great! Before you open that can of stain, let’s run through a quick, foolproof checklist to make sure the conditions are perfect.
1. Check the Can First (Your Project Bible)
The single most important source of information is printed right on the label of your stain can. The manufacturer knows their product best. Look for the “Application” or “Directions” section. It will clearly state the required temperature and humidity range. If the weather doesn’t meet those requirements, don’t risk it.
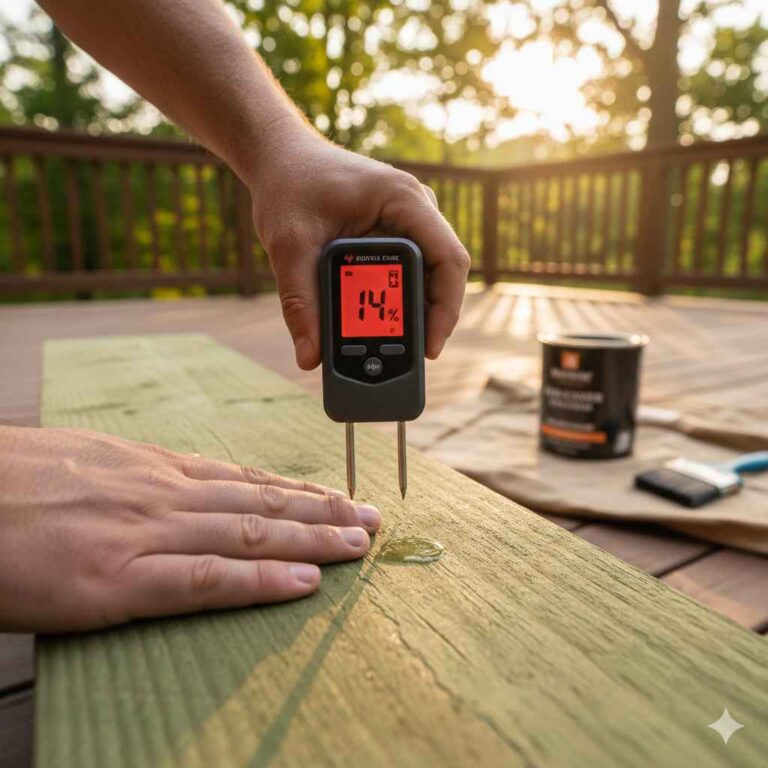
2. Use a Simple Thermometer
Don’t just guess what the temperature is. Use a thermometer to check both the air temperature and, if possible, the surface temperature of the wood. An inexpensive infrared thermometer is a fantastic tool for this, allowing you to get an instant reading of the wood’s surface. Remember, if the wood itself is below 50°F, it’s too cold, even if the air feels warmer.
3. Watch the Weather Forecast for 48 Hours
Check the forecast for the next two days. You need a consistent window of good weather. Look for a period where the temperature will remain above 50°F (10°C) not just while you’re working, but for at least 24 hours afterward. Pay close attention to the overnight low! It’s that nighttime dip in temperature that ruins many projects.
Oops! I Already Stained in the Cold. Here’s How to Fix It.
Okay, so maybe you’re reading this article a little too late, and you’re staring at a sticky, streaky mess. Don’t panic. It’s frustrating, but it might be fixable. Here’s what to do, step by step.
-
Step 1: Stop and Assess the Damage.
Do not apply another coat of stain! This will only make the problem worse. Move the project to a warmer area if possible, like a heated garage or basement, with good ventilation. Let it sit for 24-48 hours to see if the warmth helps the stain dry and cure. -
Step 2: Try to Remove Excess Stain.
If the stain is still tacky after warming it up, it’s because too much unabsorbed stain is sitting on the surface. Dampen a clean, lint-free rag with mineral spirits (for oil-based stains) or water (for some water-based stains—check the can). Gently wipe the surface to remove the excess, sticky stain. Use light pressure and switch to a clean part of the rag often. This may lift some color, but the goal is to get rid of the tackiness. -
Step 3: Wait and See.
After wiping it down, leave the piece in a warm, well-ventilated space for another few days. Sometimes, this is enough to allow the remaining stain to finally cure. If it dries to a hard, even finish, you got lucky! You can then proceed with your topcoat. -
Step 4: The Last Resort: Strip and Start Over.
If the finish is still blotchy, sticky, or uneven after all of that, I’m sorry to say you’ll need to strip it off and start again. It’s a lot of work, but it’s the only way to guarantee a good result. Use a chemical stripper that is safe for your project and work area. The U.S. Environmental Protection Agency (EPA) has excellent guidance on choosing safer strippers. Follow the product’s directions carefully, sand the wood smooth again, and this time, wait for a warm day!
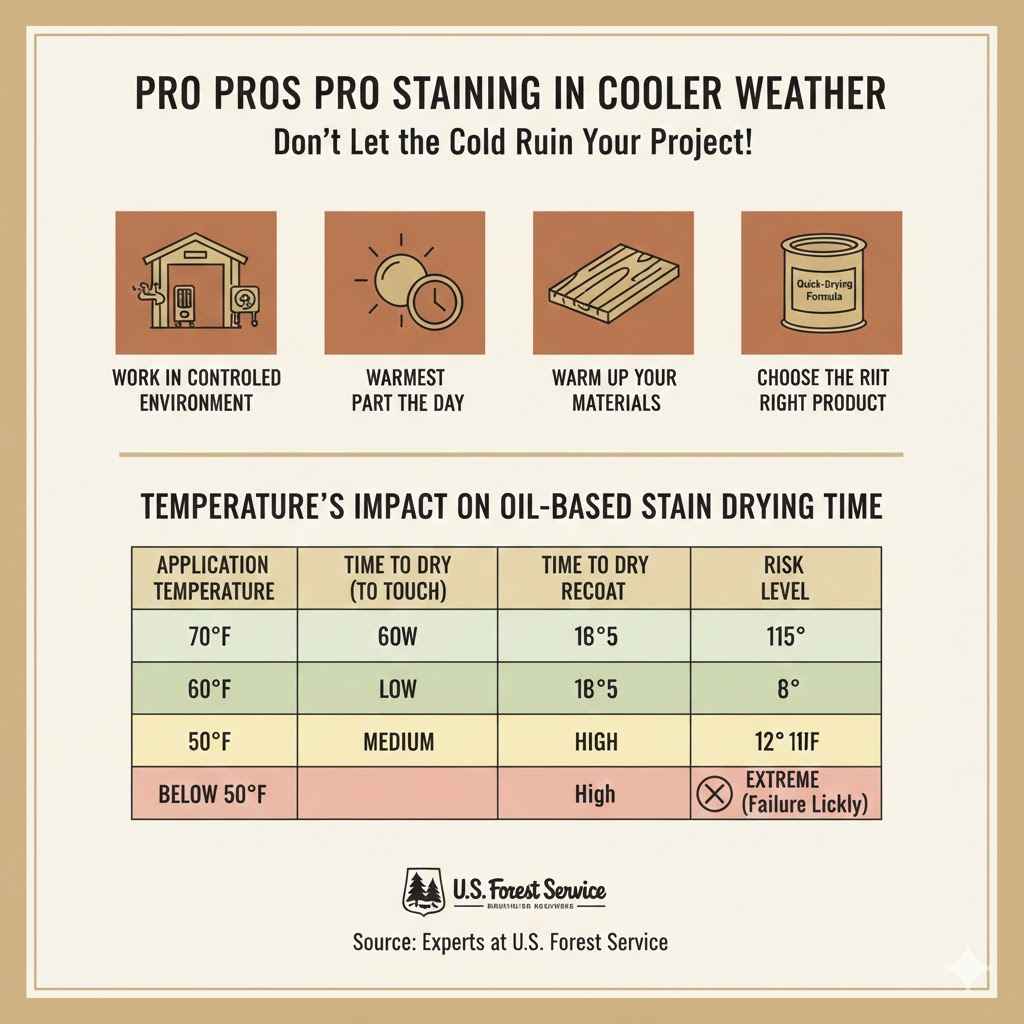
Pro Tips for Staining in Cooler (But Not Freezing) Weather
Sometimes, waiting for the perfect 70°F day just isn’t an option. If you absolutely must stain when temperatures are on the cooler side (e.g., in the low 50s), here are some tips to improve your chances of success.
- Work in a Controlled Environment: If possible, move your project into a heated garage, workshop, or basement. Using a space heater can help maintain a stable temperature. Just ensure the area is extremely well-ventilated, as stain fumes are hazardous.
- Stain During the Warmest Part of the Day: Plan your work between 10 a.m. and 2 p.m., when the sun is at its highest and temperatures are at their peak. This gives the stain a few crucial hours of warmth to start penetrating and drying.
- Warm Up Your Materials: Bring both your wood and your can of stain indoors 24 hours before you begin. Storing them at room temperature will ensure they are not cold when you start applying. Cold stain is thick stain.
- Choose the Right Product: Some manufacturers offer “quick-drying” stain formulas that are slightly more forgiving in cooler temperatures. Read the labels carefully to find one that might work for your conditions.
Here’s a look at how temperature can affect the drying time of a typical oil-based stain. As you can see, a small drop in temperature can have a huge impact!
| Application Temperature | Estimated Time to Dry (to touch) | Estimated Time to Recoat | Risk Level |
|---|---|---|---|
| 70°F (21°C) | 2-4 hours | 6-8 hours | Low (Ideal) |
| 60°F (15°C) | 6-8 hours | 12-16 hours | Medium |
| 50°F (10°C) | 12-24 hours | 24-48 hours | High |
| Below 50°F (10°C) | 48+ hours (or never) | Not Recommended | Extreme (Failure Likely) |
For more detailed information on how environmental conditions affect coatings, the experts at the U.S. Forest Service provide excellent technical guides on finishing wood, confirming the critical role of temperature.
FAQ: Your Cold-Weather Staining Questions Answered
Can I use a hairdryer or heat gun to speed up drying?
Please don’t! This is a very common mistake. Applying direct, concentrated heat can cause the stain to dry too quickly on the surface, trapping wet solvents underneath. This results in a wrinkly, cracked, or cloudy finish. It also creates a serious fire hazard with flammable oil-based stains. Slow, gentle air circulation from a fan in a warm room is a much safer and more effective method.
What’s the absolute minimum temperature for staining?
The absolute rock-bottom minimum for most stains is 50°F (10°C). However, working at this temperature is very risky and requires perfect conditions (low humidity, sunny day, no overnight drops). For a stress-free project with great results, I strongly recommend staying above 60°F (15°C).
Does humidity matter as much as temperature?
Yes, it does! High humidity is just as bad as cold weather. Humid air is already full of water, which means the solvents in the stain have nowhere to evaporate. This will dramatically slow down drying time. The ideal humidity level for staining is between 40% and 70%.
How long do I need the temperature to stay warm after staining?
You need the temperature to remain above the minimum recommended level (usually 50°F / 10°C) for at least a full 24 to 48 hours. The initial curing process is the most critical. A sudden drop in temperature overnight can halt this process and lead to a sticky finish, even if it was warm when you applied it.
What happens if it gets cold overnight after I stain?
If the temperature drops below 50°F a few hours after you’ve applied the stain, the drying and curing process will stop. The stain will likely become tacky. The best course of action is to move the piece to a warmer environment as soon as possible to allow the curing to resume. If it remains sticky for more than a couple of days, you may need to wipe it down with mineral spirits as described in the repair section above.
Is water-based or oil-based stain better for cooler temperatures?
Neither is “good” for cold weather, but they fail in different ways. Oil-based stain becomes very thick and has extreme difficulty drying. Water-based stain can be damaged by freezing temperatures, and the water in it will evaporate too slowly in cold air. If you must work in cooler conditions (above 50°F), a water-based stain might dry slightly faster, but you are still taking a big risk.
Will a second coat of stain fix a blotchy first coat from cold?
No, this will only make it worse. Adding more stain on top of an unabsorbed, uncured layer will create an even thicker, stickier, and more blotchy mess. The only way to fix a bad first coat is to address the absorption and drying issue first, which often means you have to remove it.
Your Patience Will Be Rewarded
I know how eager you can be to finish a project you’ve poured your heart into. But when it comes to wood staining, patience truly is the most valuable tool in your workshop. Fighting against the weather will only lead to frustration and double the work. By waiting for the right conditions—a warm day with low humidity—you are guaranteeing that your stain will go on smoothly, the color will be rich and even, and the finish will be durable for years to come.
Respect the temperature rules on the can, trust the process, and your projects will look professional every single time. You’ve got this! Happy woodworking.