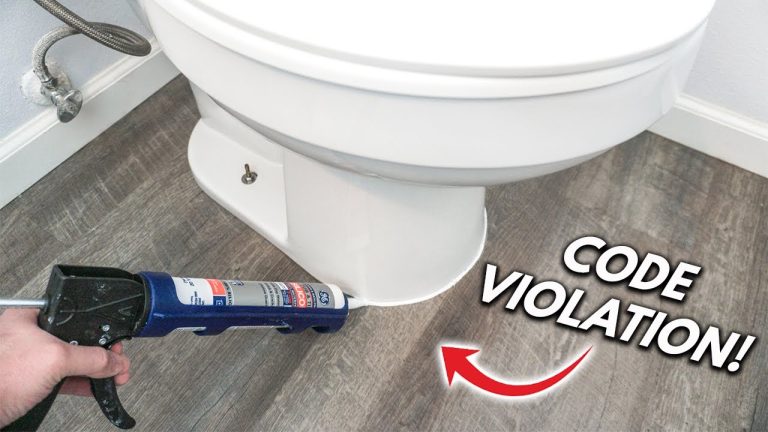
What Is the Overflow Tube in a Toilet: A Guide for Car Enthusiasts
Hey there! As a car enthusiast who’s spent countless hours under the hood of my trusty Ford Mustang, tweaking carburetors and polishing chrome, I love diving into the mechanics of things. But sometimes, the puzzles I tackle aren’t in the garage—they’re in my bathroom. A while back, I noticed my toilet was acting up, making weird noises and not flushing right. That’s when I started wondering, “What is the overflow tube in a toilet?”
It sounded like a car part, like a radiator overflow, so I got curious. I rolled up my sleeves, popped the tank lid, and learned all about this little tube that’s a big deal in keeping your toilet running smoothly. Whether you’re a gearhead like me or just someone who wants to understand their plumbing, I’m excited to share what I’ve discovered. So, grab a seat, maybe a cold drink, and let me walk you through the overflow tube’s role, how it works, and why it matters, with a touch of automotive flair. Let’s dive in!
What Exactly Is the Overflow Tube?
Imagine your toilet tank as the engine of your bathroom—lots of parts working together to get the job done. The overflow tube is like a safety valve in that engine. It’s a tall, open-ended plastic or metal tube standing in the middle of the tank, usually part of the flush valve assembly. I first spotted it when I lifted my toilet tank lid to fix a running toilet. It’s hard to miss—about 4-6 inches tall, sticking up like a smokestack.
The overflow tube has two main jobs. First, it acts as a drain to catch extra water if the tank overfills, like a car’s overflow tank catching excess coolant. Second, it’s a pathway for water during a flush, helping the toilet bowl refill. It’s a simple part, but it’s crucial, like a fuel filter in your car—small but keeps everything running right. Learning this made me appreciate how even basic plumbing has a clever design, just like a well-built engine.
Why Does a Toilet Need an Overflow Tube?
When I started poking around my toilet tank, I wondered why it even needed an overflow tube. Turns out, it’s all about safety and efficiency, like a car’s backup systems. Without an overflow tube, excess water from a malfunction, like a stuck fill valve, would spill out of the tank, flooding your bathroom. I had a close call once when my fill valve jammed, and the overflow tube saved me from a soggy floor by sending extra water down the bowl.
The tube also helps during flushing. After the tank empties, a small amount of water flows through the overflow tube to refill the bowl, keeping it ready for the next use. It’s like how a car’s cooling system circulates fluid to keep the engine at the right temperature. Without it, you’d have a dry bowl or a flooded bathroom, neither of which is fun. For us car folks, it’s cool to see how a toilet’s got its fail-safe, like a car’s pressure relief valve.
How Does the Overflow Tube Work?
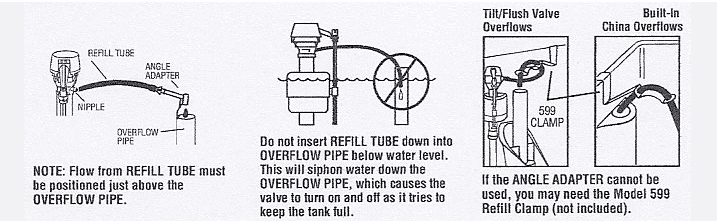
Understanding how the overflow tube works was like figuring out a car’s fuel system for me. Let’s break it down. The overflow tube is connected to the flush valve, which sits at the bottom of the tank. When you flush, the flapper (a rubber seal) lifts, letting water rush from the tank to the bowl through the flush valve. The overflow tube is right there, ready to catch any extra water.
If the fill valve (the part that refills the tank) doesn’t shut off properly, water rises above the tube’s top. Instead of spilling over the tank’s edge, it flows down the tube and into the bowl, like excess coolant draining into a car’s overflow reservoir. During a flush, a small tube called the refill tube (clipped to the overflow tube) sends a trickle of water down the tube to refill the bowl. I noticed this when I saw water dribbling into the bowl after a flush—it’s the overflow tube doing its thing.
One time, I had a running toilet because the refill tube was loose, spraying water everywhere. Fixing it was like tightening a loose hose clamp on a car—simple but satisfying. The overflow tube’s design is straightforward but genius, keeping your toilet balanced like a well-tuned engine.
Signs of an Overflow Tube Problem
Just like a car gives you warning signs—a weird noise or a dashboard light—your toilet’s overflow tube can show trouble. Here’s what I’ve learned to watch for:
- Running Toilet: If water keeps trickling into the bowl, the overflow tube might be too low, letting water spill over, like a car’s overflow tank leaking.
- Water Spilling Outside: If water leaks from the tank onto the floor, the tube could be cracked or too short. I had this when an old tube split, like a cracked radiator hose.
- Weak Flush: If the flush is sluggish, the tube might be clogged or misaligned, like a car’s clogged fuel line.
- No Bowl Refill: If the bowl stays dry after flushing, the refill tube might be detached from the overflow tube, like a disconnected vacuum hose.
- Gurgling Noises: Odd sounds can mean air in the system, often tied to a faulty overflow tube, like air in a car’s cooling system.
I caught a cracked tube in my guest bathroom because I heard gurgling after flushes. Replacing it was easy, like swapping a worn car part, and it fixed the noise.
Tools and Materials for Overflow Tube Fixes
Fixing an overflow tube issue is like doing a basic car repair—you need a few tools and parts. I keep these in my garage, ready for action:
- Adjustable Wrench: To loosen or tighten the flush valve nut, like using a wrench on a car’s bolts.
- Screwdriver: For removing clips or adjusting parts, like tweaking a car’s interior.
- Replacement Overflow Tube: If the tube’s cracked, I get a universal flush valve kit (about $15 at Home Depot).
- Plumber’s Tape: To seal connections, like using thread sealant on a car’s fittings.
- Bucket and Towels: To catch water, like a drip pan under a car during an oil change.
- Cleaning Brush: To scrub the tank, like cleaning a car’s engine bay.
- Gloves: To keep hands clean, like wearing gloves for greasy car work.
I spent about $20 on a flush valve kit when I replaced a cracked tube, and it came with everything I needed. You can find supplies at Home Depot, Lowe’s, or even Amazon.
How to Inspect and Fix the Overflow Tube
When I suspect an overflow tube issue, I approach it like diagnosing a car problem—check the basics first, then dig deeper. Here’s how I inspect and fix it:
- Turn Off the Water: I shut off the valve behind the toilet, like turning off a car’s ignition before working. I also flushed to empty the tank.
- Lift the Tank Lid: I pop off the lid and set it on a towel, like opening a car’s hood to check the engine.
- Check the Tube’s Height: The tube’s top should be about an inch below the tank’s overflow hole or handle. If it’s too low, water spills over. I replaced a short tube once, like swapping a car’s undersized part.
- Look for Cracks: I run my fingers along the tube for splits, like checking a car’s hose for leaks. A cracked tube needs replacing.
- Test the Refill Tube: I clip the refill tube to the overflow tube’s top, ensuring it sends water down, like routing a car’s fuel line correctly.
- Clean the Tube: If it’s clogged, I scrub with a brush, like cleaning a car’s air filter.
- Replace if Needed: If the tube’s damaged, I unscrew the flush valve, swap it with a new one, and tighten it with a wrench, like installing a new car part.
One time, I fixed a running toilet by reclipping a loose refill tube—took five minutes, like tightening a car’s battery cable.
Step-by-Step Guide to Replacing an Overflow Tube
If the overflow tube is cracked or too short, I replace it, like swapping a car’s radiator hose. Here’s my step-by-step process:
Step 1: Gather Supplies
I grab a flush valve kit, wrench, screwdriver, plumber’s tape, bucket, and towels. It’s like prepping for a car repair—everything in one place.
Step 2: Shut Off the Water and Empty the Tank
I turn off the water valve and flush to drain the tank, like draining a car’s coolant. I soak up leftover water with a towel.
Step 3: Remove Old Flush Valve
I disconnect the chain and refill tube, then unscrew the flush valve nut under the tank with a wrench. It’s like removing a car’s oil pan bolt—careful but straightforward. I pull out the old valve and tube.
Step 4: Install New Flush Valve
I slide the new flush valve (with overflow tube) into the tank’s hole, using the rubber gasket to seal it, like a car’s O-ring. I tighten the nut underneath, wrapping threads with plumber’s tape for a snug fit.
Step 5: Reconnect Parts
I clip the refill tube to the new overflow tube and attach the flapper chain, adjusting it so it’s not too tight, like setting a car’s throttle cable. I check the tube’s height—it should be just below the overflow hole.
Step 6: Test the System
I turn the water on, let the tank fill, and flush. I watch for leaks and ensure the bowl refills, like test-driving a car after a repair. If it runs, I adjust the flapper or tube.
Step 7: Clean Up
I wipe the tank and floor, like detailing a car after a mod, and put the lid back on. Done!
I replaced a cracked tube in my main bathroom, and it took about 30 minutes. It felt like swapping a car part—challenging but rewarding.
Common Overflow Tube Issues and Fixes
Here’s what I’ve run into with overflow tubes and how I fixed them:
- Cracked Tube: Water leaked into the bowl constantly. I replaced the flush valve, like swapping a car’s leaky hose.
- Tube Too Short: Water spilled over, causing a running toilet. I installed a taller tube, like upgrading a car’s part for a better fit.
- Clogged Tube: Debris blocked the tube, weakening flushes. I cleaned it with a brush, like clearing a car’s fuel line.
- Loose Refill Tube: Water sprayed instead of refilling the bowl. I reclipped it, like securing a car’s loose wire.
- Misaligned Flush Valve: The tube leaned, causing leaks. I tightened the nut, like aligning a car’s wheel.
Comparison Table: Overflow Tube Problems and Solutions
Here’s a table I made to compare issues and fixes:
| Issue | Symptoms | Fix | Tools Needed | Difficulty |
|---|---|---|---|---|
| Cracked Tube | Constant running, leaks | Install a taller tube | Wrench, screwdriver | Moderate |
| Tube Too Short | Running toilet, overflow | Clean with a brush | Wrench, new valve | Moderate |
| Clogged Tube | Weak flush, gurgling | Tighten vthe alve nut | Brush, gloves | Easy |
| Loose Refill Tube | No bowl refill, spray | Reclip tube | None | Easy |
| Misaligned Valve | Leaks, poor flush | Tighten valve nut | Wrench | Easy |
How This Ties to the Automotive Lifestyle
As car enthusiasts, we love figuring out how things work, whether it’s a V8 engine or a toilet tank. The overflow tube reminds me of a car’s overflow system—simple but vital for keeping things in check. Fixing it uses the same skills I hone in the garage: diagnosing problems, using tools, and testing fixes. I’ve tackled toilet issues at home, at friends’ houses, and even at a car show venue’s restroom, approaching each like a car repair, methodical and confident.
A working toilet means I can focus on my automotive passions, like wrenching on my Mustang or planning a road trip. It’s also practical—nobody wants a plumbing issue when they’re hosting a car meet or detailing their ride. Plus, saving money on plumber bills leaves more cash for car parts, like that new exhaust I’ve been eyeing.
Maintaining Your Toilet’s Overflow Tube
To keep the overflow tube in top shape, I do regular maintenance, like servicing my car:
- Check Monthly: I lift the tank lid to inspect for cracks or loose parts, like checking a car’s belts.
- Clean the Tank: I scrub the tank yearly to prevent clogs, like cleaning a car’s engine bay.
- Test the Flush: I flush occasionally to ensure smooth operation, like testing a car’s systems.
- Adjust the Refill Tube: I make sure it’s clipped properly, like securing a car’s hoses.
- Replace Worn Parts: If the flapper or valve looks worn, I swap it, like replacing a car’s spark plugs.
My Journey with Overflow Tubes
When I first noticed my toilet running, I was clueless about plumbing, like my early days working on cars. I lifted the tank lid, saw the overflow tube, and thought it looked like a car’s coolant reservoir. After some trial and error, I fixed a loose refill tube and felt like I’d just tuned my engine. That sparked my curiosity, and I’ve since replaced tubes, adjusted valves, and helped car buddies with their toilets.
Each fix builds my confidence, like mastering a new car repair. I love sharing these tips at car meets, where we swap stories about DIY wins, whether it’s a rebuilt carburetor or a fixed toilet. It’s all about the thrill of solving problems with your own hands.
Where to Find Parts and Help
If you need parts or guidance, here’s where I look:
- Home Depot: For flush valve kits, tools, and plumber’s tape. I got my kit there for $15.
- Lowe’s: Great for toilet parts and cleaning supplies. I grab the brushes there.
- Amazon: Perfect for deals on universal kits, with fast shipping. I found a valve for $12.
- Local Hardware Stores: For advice and small items, like a good auto parts shop.
- YouTube Tutorials: For visual guides, like watching car repair videos.
Tips for Success
Here are my top tips, learned from experience:
- Work Dry: Empty the tank before fixing to avoid spills, like draining a car’s oil first.
- Check Fitment: Ensure the new door part fits your toilet model, like verifying a car part’s compatibility.
- Tighten Carefully: Don’t overtighten nuts, like torquing a car’s bolts just right.
- Test Thoroughly: Flush multiple times to check for issues, like test-driving a car.
- Keep Spares: I stock extra parts, like a spare flapper, for quick fixes, like keeping spare fuses.
Conclusion
Learning about the overflow tube in a toilet has been a surprisingly fun ride, like uncovering a hidden gem in my Mustang’s engine bay. This little tube is a big player in keeping your bathroom trouble-free, catching excess water, and ensuring smooth flushes. For us car enthusiasts, fixing it is another chance to use our DIY skills, save money, and keep our homes as reliable as our rides. Whether you’re adjusting a refill tube, replacing a cracked one, or just checking your tank, you’ve got the know-how to tackle it with the same grit you bring to the garage.
So, pop that tank lid, grab your tools, and get your toilet running like a finely tuned engine. You’ll be back to wrenching, cruising, or hosting car meets in no time, with a bathroom that’s ready for anything. Let’s keep the good vibes flowing—on the road and at home!
FAQs
What does the overflow tube do in a toilet?
It catches extra water if the tank overfills and helps refill the bowl after a flush. I think of it like a car’s overflow tank for coolant.
How do I know if my overflow tube is broken?
Look for a running toilet, leaks, or gurgling noises. I found a crack in mine when I saw water trickling into the bowl nonstop.
Can I fix an overflow tube myself?
Yes, most fixes are easy, like adjusting or replacing it. I swapped a tube in 30 minutes, like changing a car part.
What tools do I need to fix an overflow tube?
A wrench, a screwdriver, a replacement valve, and towels. I use the same tools as for car repairs, plus a $15 valve kit.
Why does my toilet keep running?
The overflow tube might be too low or cracked, letting water spill. I fixed mine by replacing a short tube, like upgrading a car’s part.
How can I prevent overflow tube problems?
Check the tube monthly, clean the tank, and ensure the refill tube is clipped. It’s like maintaining a car to avoid breakdowns.