What Paint & Epoxy Remover Does to Plastic
Have you ever wondered what happens when you use a strong cleaner on plastic? Specifically, what paint & epoxy remover does to plastic can be a puzzle for many beginners. These powerful removers are great for tough messes, but they can also damage softer materials like plastic if you’re not careful.
Don’t worry, it’s not as complicated as it seems. We’ll walk through it step by step so you can understand how to protect your plastic items. Let’s find out exactly what happens and how to avoid unwanted surprises.
Understanding Paint & Epoxy Remover on Plastic
This section looks at how paint and epoxy removers interact with different types of plastic. We will explore why some plastics react differently than others. Understanding these interactions is key to using these strong cleaners safely.
This knowledge helps prevent common mistakes that can ruin your projects or items. We will also touch upon the science behind these reactions, making it easy to grasp.
How Solvents Affect Plastic
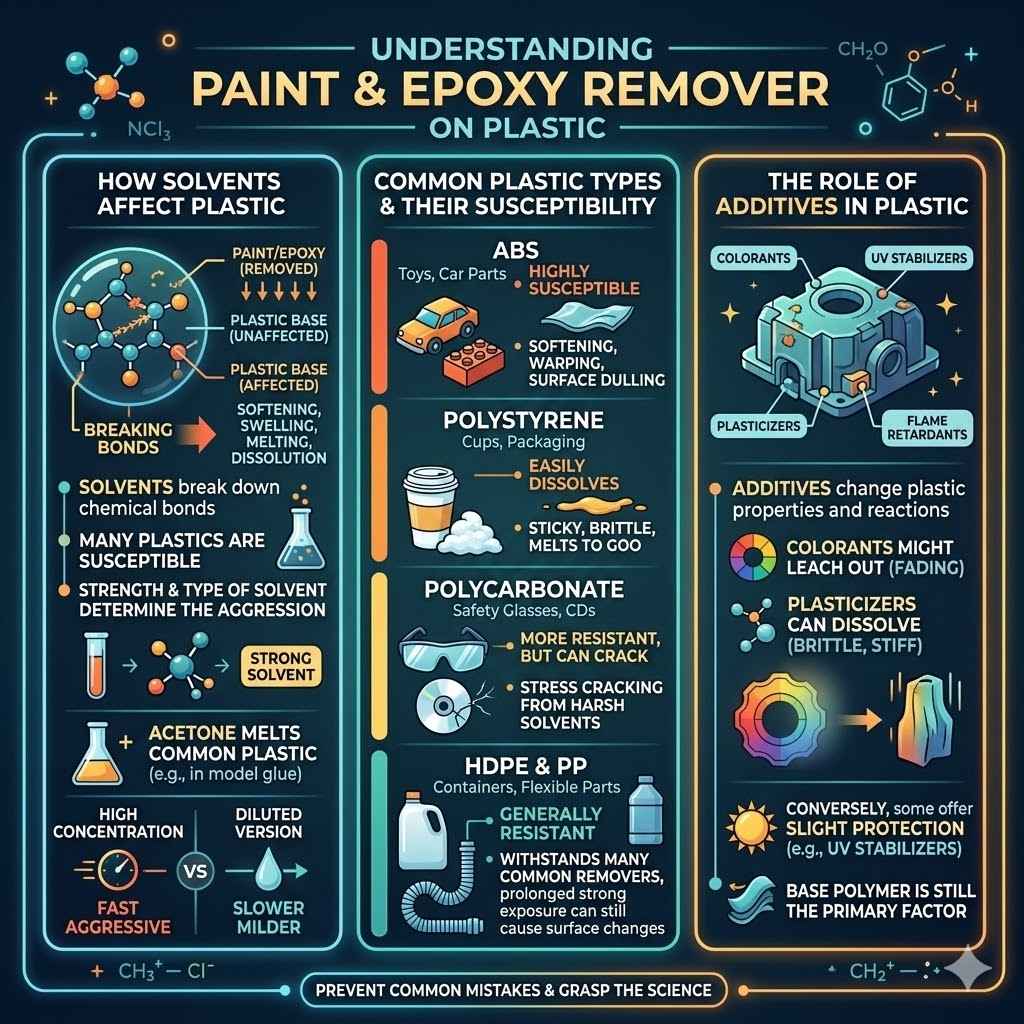
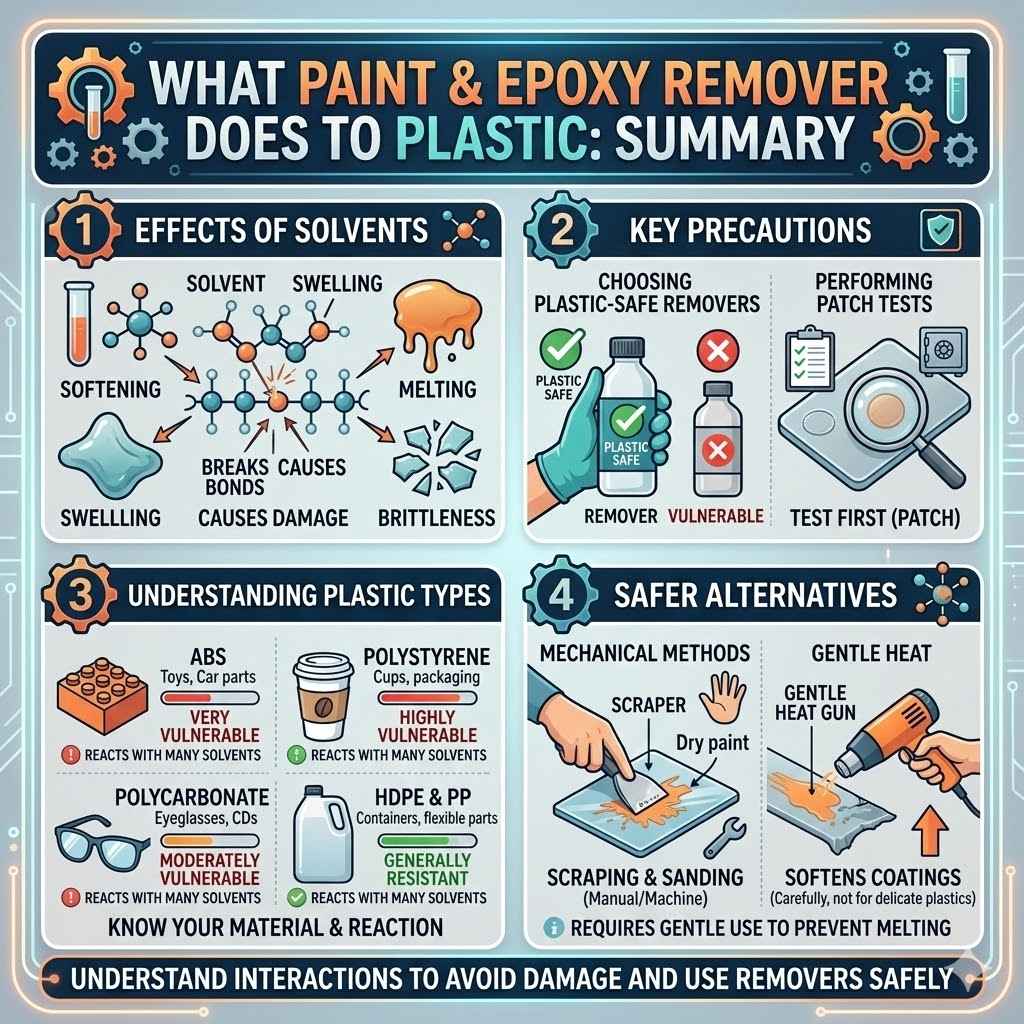
Solvents are the active ingredients in most paint and epoxy removers. They work by breaking down the chemical bonds that hold paints and epoxies together. This process allows the removed substances to be wiped away easily.
However, many plastics are also made of chemicals that can be affected by these same solvents. The strength and type of solvent determine how aggressively it attacks the plastic.
Different plastics have different chemical structures. Some, like high-density polyethylene (HDPE) or polypropylene, are more resistant to solvents. Others, such as polystyrene or ABS (acrylonitrile butadiene styrene), are much more vulnerable.
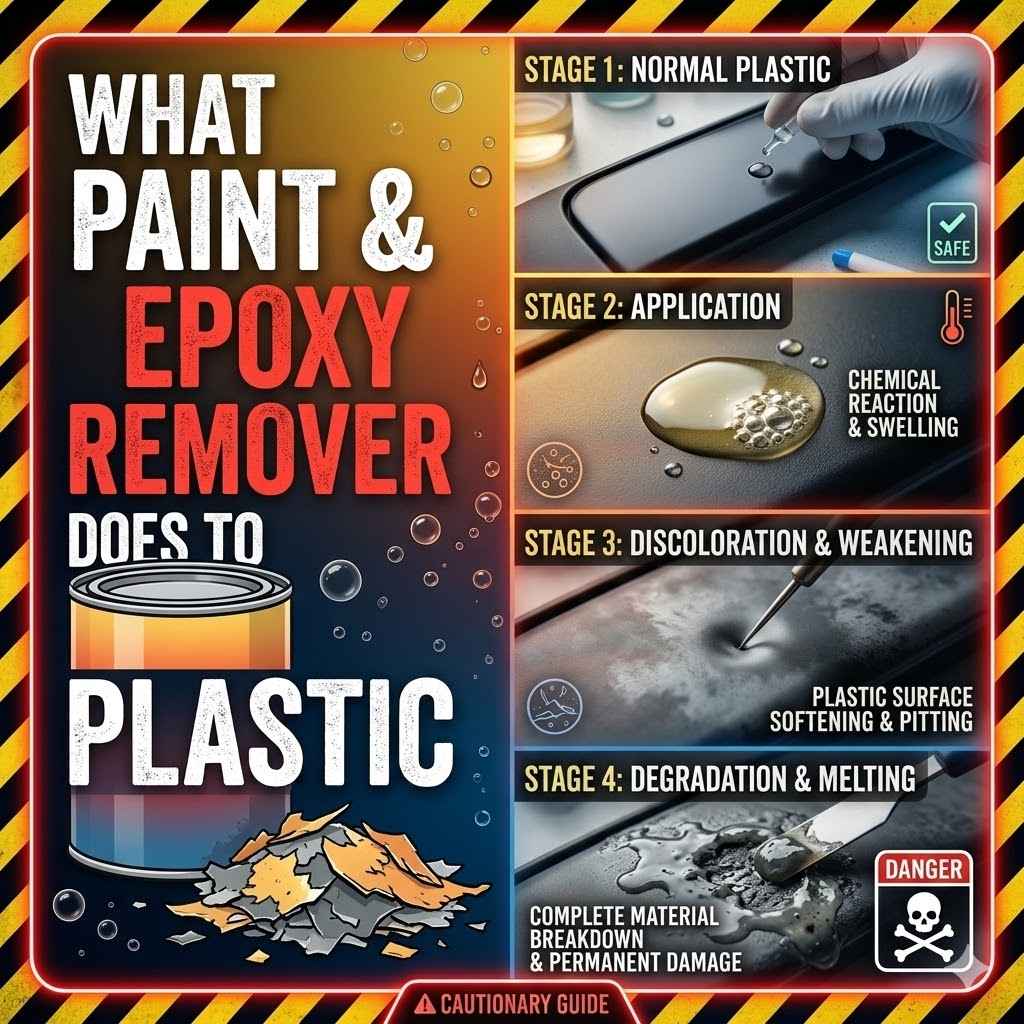
When a strong solvent comes into contact with a vulnerable plastic, it can cause a range of effects. These effects can include softening, swelling, melting, or even complete dissolution of the plastic material.
For instance, acetone, a common solvent, is known to melt many types of plastic. This is why it’s often used in glues for plastic models – it actually welds the pieces together by slightly melting the surfaces. Other removers might use different chemicals like methylene chloride or N-methyl-2-pyrrolidone (NMP), which have varying degrees of impact.
The concentration of the solvent also plays a big role. A highly concentrated remover will act much faster and more aggressively than a diluted version. Manufacturers often balance the effectiveness of the remover with the risk of damage to common surfaces.
However, when dealing with specific plastic types, this balance can be tricky.
Common Plastic Types and Their Susceptibility
Not all plastics are created equal when it comes to chemical resistance. Some are quite tough, while others are easily damaged. Knowing the plastic type you’re dealing with is half the battle.
ABS (Acrylonitrile Butadiene Styrene) is a very common plastic found in toys, car parts, and appliance casings. It is highly susceptible to many paint and epoxy removers, especially those containing strong solvents like acetone or MEK (methyl ethyl ketone). Contact can lead to softening, warping, and a dulling of the surface. Even mild exposure can cause a loss of gloss.
Polystyrene is another common plastic, often used for disposable cups, packaging, and model kits. Like ABS, it dissolves quite easily in many solvents. Exposure to paint removers can cause it to become sticky, brittle, or even melt into a goo-like substance. This is why you should always test removers in an inconspicuous spot first.
Polycarbonate is a strong and clear plastic used in things like safety glasses and CDs. While more resistant than ABS or polystyrene, it can still be attacked by certain harsh solvents. It may become stressed and crack, especially if there are any existing tiny fissures or imperfections. This phenomenon is known as solvent stress cracking.
HDPE (High-Density Polyethylene) and PP (Polypropylene) are generally more resistant to common paint and epoxy removers. These are often used for containers and flexible parts. While they can withstand many common chemicals, prolonged exposure to very strong or specialized solvents might still cause some surface changes or slight softening.
The Role of Additives in Plastic
Plastics aren’t just pure polymers. Manufacturers add many other substances to change their properties. These additives can include colorants, UV stabilizers, plasticizers, and flame retardants.
These additives can significantly affect how a plastic reacts to removers. For example, some colorants might leach out when exposed to solvents, causing the plastic to fade or change color. Plasticizers, added to make plastic more flexible, can also be dissolved by certain chemicals, making the plastic stiff and brittle.
Conversely, some additives might offer a degree of protection. UV stabilizers, for instance, can sometimes create a thin barrier that slightly slows down solvent penetration. However, relying on these additives for protection is usually not enough, especially with aggressive removers.
The base polymer of the plastic is still the primary factor determining its susceptibility.
Visualizing the Damage: What You Might See
When paint and epoxy removers encounter plastic, the results can be visually striking, and often not in a good way. It’s helpful to know what to look for so you can act quickly or take preventative measures.
Surface Changes and Discoloration
One of the first signs that a remover is affecting plastic is a change in its surface appearance. The glossy finish on many plastics can become dull, chalky, or cloudy. This happens because the solvent is slightly etching or melting the very top layer of the plastic.
Discoloration is another common issue. Some removers can react with pigments in the plastic, causing them to fade or bleed. You might see white streaks or blotches on darker plastics, or the color might simply lighten overall.
In some cases, the plastic itself might turn yellow or brown from chemical reactions. This is especially true if the remover contains harsh chemicals like methylene chloride.
For example, imagine trying to remove old paint from a vintage plastic toy. If the remover is too strong, the toy’s original color might fade unevenly, leaving patchy lighter areas. Or, the plastic might develop a hazy film that can’t be wiped away.
This visual damage is often permanent.
Softening Swelling and Melting
Beyond surface changes, removers can fundamentally alter the plastic’s structure. Softening is a common intermediate step. The plastic loses its rigidity and may feel rubbery or pliable.
This makes it easier to accidentally dent or deform the object.
Swelling occurs when the solvent is absorbed into the plastic matrix, causing it to expand. This can warp the shape of the object. A straight edge might become curved, or a flat surface might bulge.
The degree of swelling depends on the plastic type and the remover used.
Melting is the most severe outcome. In this case, the solvent breaks down the plastic’s structure so completely that it loses its solid form. It can become a sticky mess or even drip away.
This is irreversible and effectively destroys the plastic item. This is more likely to happen with plastics like polystyrene or when using very aggressive solvents for extended periods.
Brittleness and Cracking
While some plastics soften, others can become brittle. This might seem counterintuitive, but it’s a result of the solvent interacting with the plastic’s internal structure. Certain solvents can leach out plasticizers or cause cross-linking of polymer chains in ways that make the material less flexible.
When a plastic becomes brittle, it’s much more prone to cracking or breaking. Even minor pressure or stress can cause it to shatter. This is a particular concern for parts that need to withstand any kind of load or impact.
A real-world example is trying to clean a plastic car headlight with a harsh solvent. If the solvent makes the polycarbonate brittle, the headlight could develop stress cracks, especially around mounting points, or even break if hit by a small stone while driving. This kind of damage is not only unsightly but can also compromise the function of the part.
Safe Removal Techniques and Precautions
Dealing with paint and epoxy on plastic requires a gentle approach. The goal is to remove the unwanted coating without damaging the underlying material. This involves choosing the right products and using them carefully.
Choosing the Right Remover
Not all removers are created equal, and some are much gentler than others. For plastics, it’s crucial to opt for removers specifically labeled as “safe for plastics” or “plastic-friendly.” These products often use milder solvents or alternative chemical agents that are less likely to degrade plastic.
Read the product labels carefully. Look for ingredients that are known to be less aggressive. For instance, removers based on d-limonene (derived from citrus) or soybean oil are often good choices for sensitive materials.
Avoid removers that list strong solvents like acetone, MEK, methylene chloride, or xylene prominently.
If you’re unsure, it’s always best to err on the side of caution. Start with the mildest possible option. Sometimes, a bit more time and patience with a gentler remover can achieve the same results as a harsh chemical with less risk.
Patch Testing is Essential
Before applying any remover to a large or visible area of your plastic item, always perform a patch test. Find an inconspicuous spot on the object, such as the bottom, inside edge, or a hidden corner.
Apply a small amount of the remover to this test area. Use a cotton swab or a soft cloth. Let it sit for the time recommended by the product instructions, or slightly longer if you want to test its full potential.
Then, wipe it away and carefully inspect the plastic.
Look for any signs of damage: changes in color, dullness, softening, swelling, or any stickiness. If the test area shows any negative effects, the remover is too strong for that particular type of plastic. You will need to find a milder product or a different removal method altogether.
A patch test can save you from ruining an entire item.
Application and Removal Methods
Once you’ve confirmed the remover is safe through a patch test, you can proceed with caution.
Apply the remover sparingly. Use a brush, cloth, or sponge to apply only a thin layer directly onto the paint or epoxy you want to remove. Avoid letting the remover pool or drip onto surrounding plastic areas.
Allow the remover to work for the minimum time recommended on the label. Over-exposure is a common cause of plastic damage. Set a timer if necessary.
Gently scrape or wipe away the softened paint or epoxy. Use a plastic scraper, a soft cloth, or a non-abrasive sponge. Avoid using metal tools, as they can easily scratch or gouge the plastic.
If the paint or epoxy doesn’t come off easily, resist the urge to use more force or to leave the remover on longer than directed. Instead, consider applying a second, thin coat and trying again. Sometimes, multiple light applications are more effective and safer than one aggressive attempt.
What Happens If Plastic Is Damaged
If you discover that the paint and epoxy remover has damaged your plastic, the situation can be tricky. The extent of the damage will determine if and how it can be fixed.
Minor surface dulling or haziness might sometimes be buffed out with a plastic polish or a very fine abrasive compound, but this is not always successful and can further thin the plastic.
Swelling and warping can sometimes be reversed if caught very early and the plastic is gently heated, but this is difficult to do without causing more damage. However, once plastic has melted or significantly degraded, it is usually impossible to restore its original form or integrity. In such cases, the item may be beyond repair.
Prevention through careful product selection and testing is always the best strategy.
Alternatives to Harsh Removers
When you’re working with plastic, it’s wise to have alternative methods in mind for removing paint and epoxy. These alternatives are often gentler and less likely to cause harm to the underlying material.
Mechanical Removal Techniques
Sometimes, the best way to remove something is to simply remove it physically. Mechanical removal involves using tools to scrape, sand, or otherwise abrade the unwanted material away.
For cured epoxy, this might involve carefully chipping away at it with a plastic scraper or even a sharp hobby knife, taking care not to cut into the plastic itself. For paint, light sanding with fine-grit sandpaper can be effective. Start with a higher grit number (e.g., 320 or 400) and gradually move to finer grits (e.g., 600, 800, 1000) if needed, especially if you plan to polish the plastic afterward.
It’s crucial to be extremely gentle when using these methods on plastic. Too much pressure can easily scratch, gouge, or wear down the plastic surface. Always work in one direction if sanding, and consider using a sanding block to maintain an even pressure.
For example, removing dried acrylic paint from a plastic model can be done by gently scraping with a plastic tool. If that doesn’t work, very fine wet-sanding with 800-grit paper followed by polishing can restore the finish. The key is to use the least aggressive method that gets the job done.
Heat Application Methods
Gentle heat can sometimes soften paint or epoxy enough to make it easier to remove without harsh chemicals. A hairdryer on a low to medium setting is often sufficient.
Hold the hairdryer at a consistent distance from the surface, moving it constantly to avoid overheating any one spot. As the paint or epoxy softens, you can try to gently scrape it away with a plastic scraper or wipe it off with a soft cloth.
Be very cautious with heat, as excessive temperatures can warp, melt, or discolor many types of plastic. Test the heat on an inconspicuous area first to gauge the plastic’s reaction. This method is generally best for removing thin layers of paint.
For stubborn epoxy, heat might not be enough.
Soaking in Mild Solutions
For some types of paint or dried glue, soaking the plastic item in a mild solution can help loosen the bond. This is particularly effective for water-based paints or some adhesives.
Warm water with a bit of dish soap can work wonders for latex or acrylic paints. For more stubborn residues, you might try soaking in rubbing alcohol (isopropyl alcohol), but always test this on a hidden area first, as some plastics can be affected by alcohol. Denatured alcohol or mineral spirits are stronger but carry more risk to plastic.
The soaking time will depend on the material and the residue. Check periodically to see if the paint or epoxy is loosening. Once it’s softened, you can often wipe it away with a soft cloth.
Rinse the plastic thoroughly with clean water afterward to remove any residual solution.
When to Call in the Professionals
In some situations, the risk of damaging valuable plastic items might be too high, or the task of removing paint or epoxy might be too complex for DIY methods. This is when seeking professional help is a good idea.
Specialized restoration services or companies that deal with material cleaning might have access to proprietary solutions or equipment that are highly effective and safe for delicate materials. They often have extensive experience identifying different plastic types and understanding their reactions to various cleaning agents.
If you have an antique plastic item, a rare collectible, or a component with high functional or monetary value, consulting a professional is often the wisest course of action. They can assess the damage and recommend the best, safest approach. While it might cost more upfront, it can prevent potentially costly mistakes and preserve the item.
Case Studies and Examples
Looking at real-world scenarios can provide a clearer picture of what paint and epoxy removers can do to plastic. These examples highlight both successful and unsuccessful attempts at removal.
Case Study 1: Restoring a Vintage Toy
A collector found a beloved childhood toy, a plastic robot, covered in layers of old paint. The goal was to restore it to its original condition. The collector decided to use a common paint stripper from a hardware store, containing methylene chloride.
Initially, the paint seemed to lift easily. However, after just a few minutes, the plastic beneath started to show a dull, chalky appearance. The collector, not realizing the severity, continued and ended up with a robot whose original vibrant plastic was severely discolored and pitted.
The strong solvent had not only removed the paint but also chemically altered the ABS plastic of the toy, making it permanently damaged.
A more cautious approach with a plastic-safe stripper, or even mechanical removal like gentle scraping and sanding, might have preserved the toy’s original material. This case shows how a powerful remover can cause irreversible damage to plastic.
Case Study 2: Removing Epoxy from a Polycarbonate Lens
Someone accidentally got some epoxy on a polycarbonate camera lens. Worried about scratching the lens, they tried to use a general-purpose epoxy remover. This remover contained strong solvents designed for metal and plastic surfaces, but not specifically for delicate polycarbonate.
After applying the remover, the epoxy started to soften, but the polycarbonate lens began to cloud and develop a milky haze. The solvents also caused microscopic stress cracks to appear on the lens surface, which became visible when light hit it at certain angles. While the epoxy was eventually removed, the lens was rendered unusable due to the damage to the polycarbonate.
A better approach would have been to use a specialized lens cleaner or gently scrape the hardened epoxy with a plastic tool, followed by polishing with a plastic lens polish. This highlights the importance of using products designed for the specific material.
Scenario: Cleaning Acrylic Art Pieces
Imagine you are an artist who has used acrylic paints on various plastic surfaces for your sculptures. Some areas might have dried paint drips or unwanted marks that need to be removed.
- Identify the Plastic Type: First, determine if the plastic is acrylic (PMMA), polystyrene, or another type. This is crucial for choosing the right method.
- Test Mild Solutions: Start by trying to wipe the dried acrylic paint with a damp cloth. If that doesn’t work, try a solution of warm water and dish soap. For more stubborn spots, test rubbing alcohol (isopropyl alcohol) on an inconspicuous area.
- Gentle Mechanical Removal: If mild solutions aren’t enough, carefully use a plastic scraper or a razor blade held at a very shallow angle to gently lift the dried paint. Work slowly and avoid digging into the plastic.
- Consider Specialized Cleaners: If the paint is very tough, look for acrylic paint removers specifically formulated to be safe for plastics. Always patch test before full application.
- Final Polish: After removing the paint, if the surface is slightly dulled, a plastic polish can often restore its original shine.
What Paint & Epoxy Remover Does to Plastic Summary
This article has explored the effects of paint and epoxy removers on plastic. We’ve seen how solvents can cause softening, swelling, melting, or brittleness. Choosing plastic-safe removers and performing patch tests are key precautions.
Mechanical methods and gentle heat offer safer alternatives for removal. Understanding plastic types and their reactions ensures you avoid damage.
Frequently Asked Questions
Question: Can all paint removers damage plastic?
Answer: No, not all paint removers will damage plastic. However, many common, strong removers contain aggressive solvents that can easily degrade or melt certain types of plastic. It’s important to choose removers specifically labeled as safe for plastics and to test them first.
Question: What is the safest way to remove paint from plastic?
Answer: The safest way is to use a paint remover specifically designed for plastics. If that’s not available, try gentle mechanical methods like scraping with a plastic tool, very light sanding with fine grit sandpaper, or using mild soap and water. Always test any method on a small, hidden area first.
Question: Will acetone melt plastic?
Answer: Yes, acetone is a powerful solvent that can melt many common types of plastic, including polystyrene and ABS. It is often used in adhesives to fuse plastic pieces together. You should avoid using acetone on most plastic items unless you intend to dissolve them.
Question: How can I tell what type of plastic an object is made from?
Answer: Often, plastic items have a recycling symbol with a number on the bottom or inside. This number indicates the type of plastic. If there is no marking, you may need to do some research based on the object’s appearance and function, or consult the manufacturer if possible.
Question: What should I do if a remover damages my plastic item?
Answer: If the damage is minor, like dulling, you might be able to buff it out with a plastic polish. For more severe damage like melting or warping, repair might be impossible. In such cases, it’s best to prevent future damage by always testing removers in an inconspicuous area before widespread use.
Conclusion
Paint and epoxy removers can react strongly with plastic, causing damage like dulling, softening, melting, or cracking. Always select removers labeled as safe for plastics. Perform a patch test on a hidden spot before full application.
Gentle scraping, sanding, or mild cleaners are often better alternatives. Knowing your plastic type is crucial.