What Paint to Use on Wood Furniture Without Sanding: Proven
For painting wood furniture without sanding, use a high-adhesion paint like chalk paint or mineral paint. These paints are designed to stick to surfaces with minimal prep. Alternatively, applying a bonding primer allows you to use almost any regular latex or acrylic paint on top, giving you more color and finish options without the messy work of sanding.
Hello, I’m Md Meraj, and I’m here to help you make your home projects simple and successful. Have you ever looked at an old dresser or a dated side table and thought, “I’d love to paint that, but I just don’t want to deal with all that sanding?” You’re not alone! Sanding is dusty, time-consuming, and often feels like the biggest hurdle to starting a fun furniture makeover.
The good news is that you can get a beautiful, lasting finish on wood furniture without ever picking up a piece of sandpaper. It’s all about choosing the right products and following a few key steps. In this guide, I’ll show you exactly what paints to use and how to do it. Let’s turn that old piece into something you love, the easy way!
Why Sanding Is Usually Recommended (And Why We Love to Skip It)
Before we dive into the no-sand solutions, it helps to understand why sanding is so common in furniture painting. Traditionally, sanding does two important things:
- It creates “tooth”: Sanding roughs up a smooth or glossy surface, creating tiny grooves for the primer and paint to grab onto. This mechanical grip helps the paint adhere properly and prevents it from peeling or chipping off later.
- It smooths imperfections: It helps even out scratches, dents, and remove old, flaky paint, giving you a perfectly smooth canvas to work with.
But let’s be honest. Sanding is a messy, labor-intensive job. It creates a cloud of dust that gets everywhere, requires tools like sanders or just a lot of elbow grease, and adds hours to a project. For many DIY-ers, it’s the one step that makes them put off a project indefinitely. Fortunately, modern paint technology has given us fantastic ways to get great adhesion without all that work.
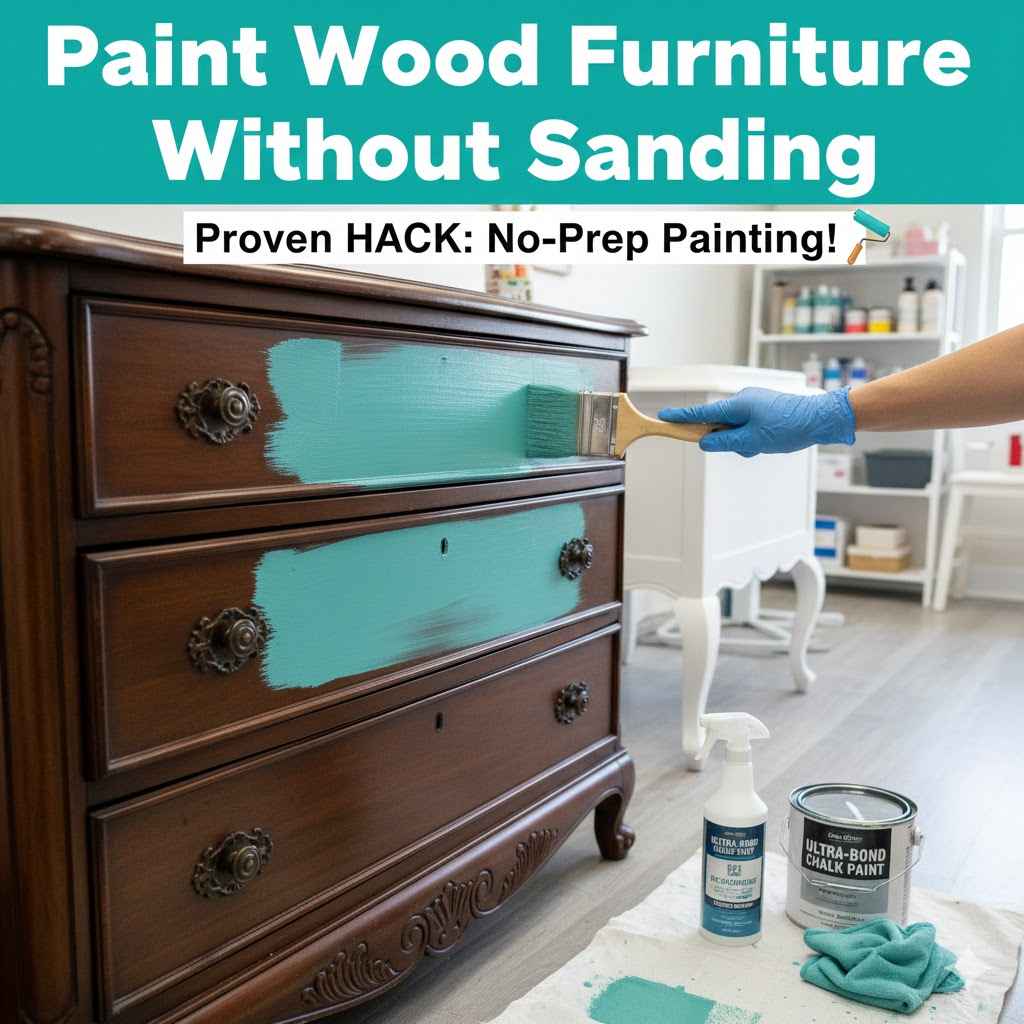
The secret to painting wood without sanding lies in using a paint specifically formulated to stick to tricky surfaces. These paints have superior adhesion properties, allowing them to bond chemically to the furniture’s surface. Here are your best options.
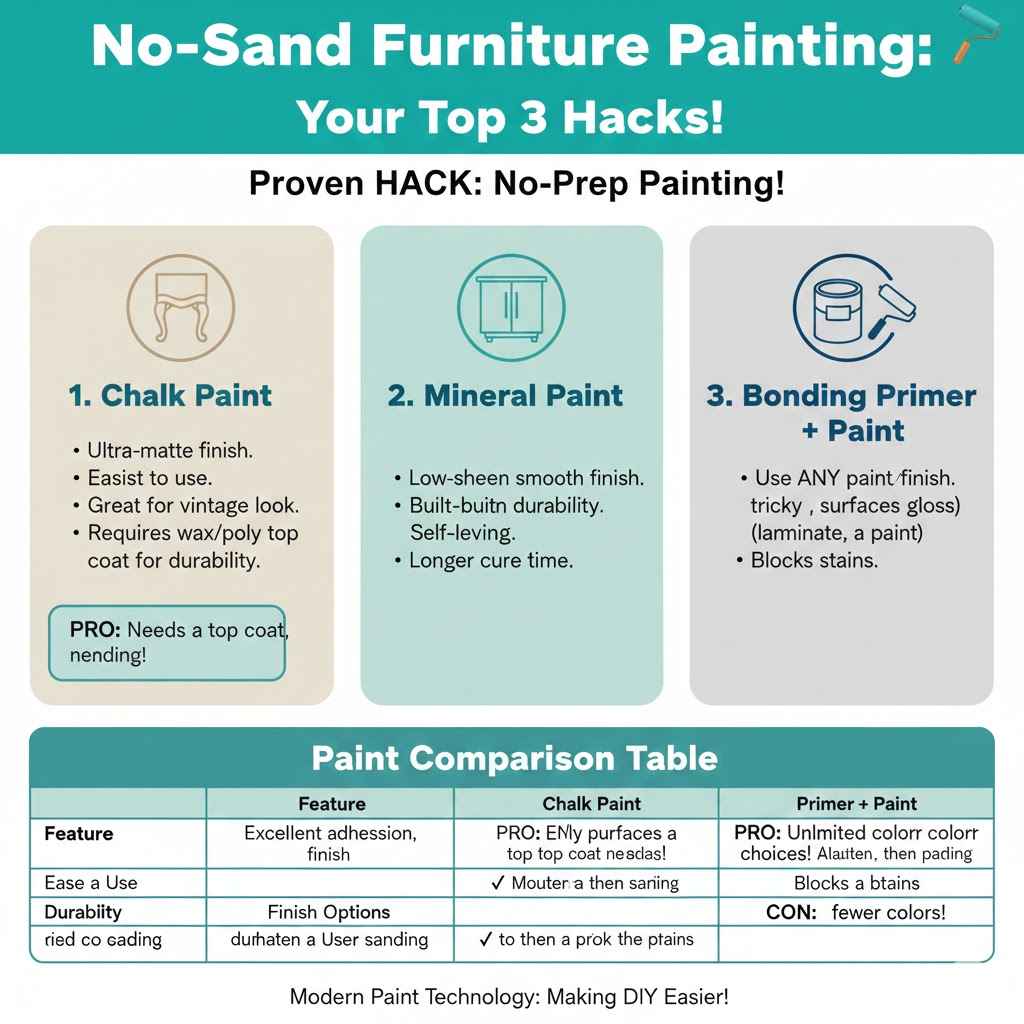
1. Chalk Paint
Chalk paint is probably the most famous “no-sand” paint, and for good reason. It was created by Annie Sloan specifically for this purpose. It has a unique, chalky, ultra-matte finish and is incredibly easy for beginners to use.
How It Works: Chalk paint contains calcium carbonate, which gives it its thick consistency and incredible sticking power. It can go over almost any surface—wood, varnish, laminate, and even metal—with very little prep work.
Pros of Chalk Paint:
- Minimal Prep: Just clean the piece thoroughly and you’re ready to paint.
- Excellent Adhesion: It sticks to glossy and sealed surfaces with ease.
- Forgiving Application: Brush strokes often disappear as it dries, and it’s easy to create a distressed or vintage look.
- Quick Drying: It typically dries to the touch in under an hour.
Cons of Chalk Paint:
- Requires a Top Coat: Because it’s porous, chalk paint must be sealed with wax or a water-based polyurethane to protect it from stains and scratches. This adds an extra step.
- Matte Finish Only: If you want a satin or glossy look, you’ll have to achieve it with your top coat, as the paint itself is very flat.
- Can Be Pricey: Boutique brands can be more expensive per quart than standard latex paint.
2. Mineral Paint
Think of mineral paint as the sophisticated cousin of chalk paint. It offers many of the same no-sand benefits but with a few key differences. It’s made from natural ingredients and uses a mineral base (like clay or limestone) with a strong acrylic binder.
How It Works: The acrylic binder in mineral paint gives it fantastic adhesion and creates a much more durable finish right out of the can. It dries to a smooth, low-sheen finish that feels more like a traditional paint.
Pros of Mineral Paint:
- Built-in Durability: Most mineral paints have a built-in top coat, so you don’t need to seal them for light-to-medium use pieces.
- Beautiful Finish: It provides a smooth, elegant, low-sheen finish without much effort.
- Self-Leveling: It tends to level out as it dries, which helps minimize the appearance of brush strokes.
- Great Adhesion: Like chalk paint, it sticks well to most surfaces after a good cleaning.
Cons of Mineral Paint:
- Longer Cure Time: While it dries quickly, it can take up to 30 days to fully cure and reach maximum hardness.
- Top Coat Needed for High-Traffic Pieces: For kitchen tables or cabinets, you’ll still want to add an extra top coat for maximum protection.
3. The Secret Weapon: Bonding Primer
What if you have your heart set on a specific color from a major brand like Benjamin Moore or Sherwin-Williams? You can still skip the sanding! The key is to use a special type of primer called a bonding primer.
A bonding primer is a high-adhesion primer designed to stick to hard-to-paint surfaces like glass, tile, PVC, and high-gloss finishes. It acts as the perfect middleman between your slick furniture surface and your chosen top coat of paint.
How It Works: Instead of relying on a rough surface for a mechanical grip, bonding primers create a powerful chemical bond with the surface. Once the primer is on and cured, you have a perfectly prepped surface that will accept almost any type of paint—latex, acrylic, you name it.
Popular Types of Bonding Primers:
- Water-Based: Products like INSL-X Stix or Kilz Adhesion are easy to use, low-odor, and clean up with water. They are perfect for most interior furniture projects.
- Shellac-Based: Zinsser B-I-N is a shellac-based primer that is legendary for its ability to block stains, odors, and stick to anything. It dries very fast but has a strong smell, so use it in a well-ventilated area. You can learn more about its uses from the official Zinsser product guide.
When to Use a Bonding Primer:
- When you want to use a specific color or sheen of regular paint.
- On extremely slick or glossy surfaces like laminate or factory-finished furniture.
- When painting over a dark color with a very light one.
- To block tough stains or wood bleed-through from tannins in woods like mahogany or oak.
Paint Comparison Table
To help you decide, here’s a quick comparison of your no-sand options:
| Feature | Chalk Paint | Mineral Paint | Bonding Primer + Regular Paint |
|---|---|---|---|
| Ease of Use | Easiest – Very forgiving | Easy – Self-leveling | Moderate – Two-step process (prime, then paint) |
| Prep Work | Clean only | Clean only | Clean thoroughly |
| Durability | Low without a top coat; Good with a top coat | Good to Excellent (built-in top coat) | Excellent (depends on the quality of the top coat paint) |
| Finish Options | Ultra-matte (can be made satin with top coat) | Low-sheen / Eggshell | Any finish you want (matte, satin, semi-gloss, etc.) |
| Color Options | Limited to brand’s palette | Limited to brand’s palette | Virtually unlimited |
| Best For… | Beginners, distressed/vintage looks, quick projects. | A durable, smooth finish with fewer steps. | Specific color matching, high-gloss surfaces, ultimate durability. |
Step-by-Step Guide: How to Paint Furniture Without Sanding
Ready to get started? Following these steps will ensure a professional-looking, durable finish that lasts for years. Remember, “no sanding” doesn’t mean “no prep.” Proper cleaning is the most important step!
Step 1: Gather Your Supplies
Having everything ready will make the process smooth and enjoyable. You’ll need:
Your chosen paint (Chalk, Mineral, or Primer + Paint)
A high-quality synthetic paintbrush
A small foam roller (for flat surfaces like tabletops)
Cleaner/Degreaser (TSP substitute or a 50/50 mix of denatured alcohol and water works well)
Clean, lint-free cloths or shop towels
Wood filler and a putty knife (for any repairs)
Painter’s tape (for protecting hardware or glass)
A protective top coat (if using chalk paint or for high-traffic pieces)
Drop cloths to protect your workspace
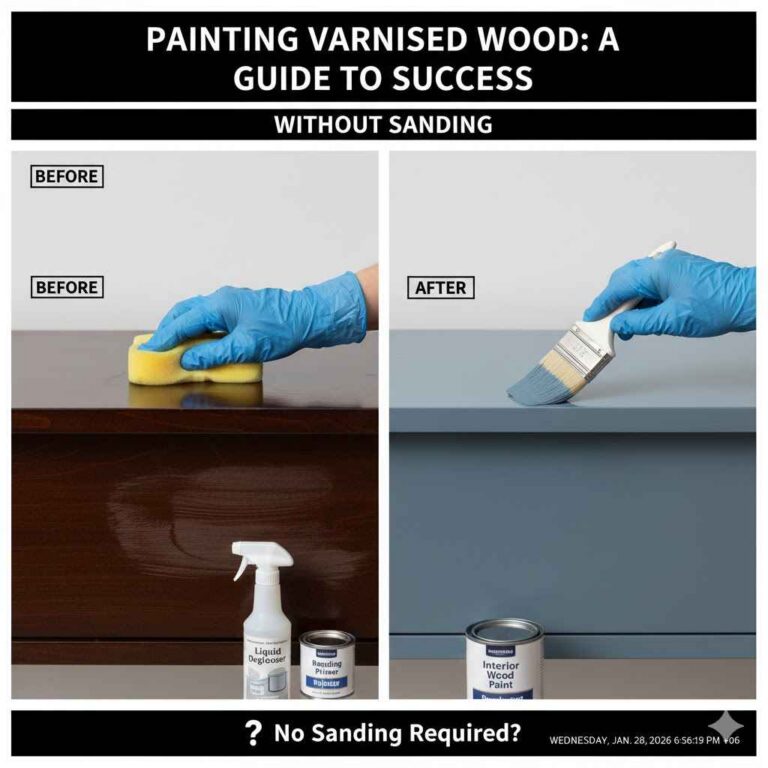
Step 2: Clean the Furniture Thoroughly
This is the most critical step for paint adhesion. Over the years, furniture collects dust, grease, and residue from cleaning products. Your paint needs a perfectly clean surface to bond to. Use a degreasing cleaner like TSP (Trisodium Phosphate) or a TSP substitute. Scrub the entire piece, getting into all the corners and details. Wipe it down with a clean, damp cloth to remove any cleaner residue, then let it dry completely. For guidance on safely cleaning wood, the Penn State Extension offers excellent tips.
Step 3: Make Minor Repairs
Inspect the piece for any deep scratches, gouges, or holes. Use wood filler and a putty knife to fill them in. Apply the filler, let it dry according to the manufacturer’s instructions, and then lightly sand just the filled spot smooth. Wipe away the dust before moving on.
Step 4: Apply Bonding Primer (If Using)
If your furniture is extremely glossy, made of laminate, or if you’re using regular paint, now is the time to prime. Apply one thin, even coat of your bonding primer with a brush or roller. Don’t worry if the coverage looks a bit patchy—the goal is adhesion, not perfect opacity. Let it dry completely as directed on the can. This is usually just an hour or two.
Step 5: Apply Your Paint
Now for the fun part! Stir your paint well. Apply your first coat in thin, even layers. A good technique is to work in the direction of the wood grain. Using a high-quality brush will minimize brush strokes.
For large, flat areas like tabletops or drawer fronts, use a small foam roller for an ultra-smooth finish.
Don’t overload your brush or roller. It’s better to apply two thin coats than one thick, gloppy one.
Let the first coat dry completely (check the can for recoat times). Most no-sand paints dry quickly, but be patient.
Apply a second coat for full, even coverage. Some very dark or bright colors might need a third thin coat.
Step 6: Apply a Protective Top Coat (If Needed)
If you used chalk paint, this step is mandatory. If you used mineral paint on a high-traffic item like a dining table or dresser top, it’s highly recommended. A water-based polycrylic is a great choice. It goes on clear, doesn’t yellow, and provides excellent protection. Apply 2-3 thin coats with a synthetic brush, letting it dry between coats as directed.
Step 7: Let It Cure
This is different from drying. A piece of furniture can be dry to the touch in a few hours, but it takes much longer to “cure.” Curing is the process where the paint fully hardens and becomes durable. This can take anywhere from 7 to 30 days, depending on the paint and the environment. Be gentle with your newly painted piece during this time. Avoid placing heavy items on it or cleaning it aggressively.
When You Absolutely MUST Sand
While no-sand painting is a fantastic option for most projects, there are a few situations where sanding is unavoidable for a good result.
| Problem | Why You Must Sand |
|---|---|
| Peeling or Flaking Paint | Painting over an unstable surface is a recipe for failure. The new paint will just peel off along with the old paint. You must sand or scrape away all the loose material first. If the furniture was painted before 1978, be sure to test for lead. The Environmental Protection Agency (EPA) has important safety guidelines for this. |
| Deep Scratches or Gouges | Paint won’t fill deep damage. These areas need to be filled with wood filler and then sanded smooth to be level with the surrounding surface. |
| Heavy, Uneven Texture | If the existing finish has a thick, bumpy texture (like a heavy varnish with drips), you’ll need to sand it down to create a smooth foundation for your new paint. |
Frequently Asked Questions (FAQ)
1. Can I really paint over a glossy, lacquered finish without sanding?
Yes, absolutely! This is where a bonding primer is your best friend. After a thorough cleaning and degreasing, apply one coat of a high-quality bonding primer like Zinsser B-I-N or INSL-X Stix. It will stick to the glossy finish and create a perfect surface for your paint to adhere to.
2. Do I need to clean the furniture if it already looks clean?
Yes, always. Invisible oils from hands, furniture polish residue, and household grime can prevent paint from sticking properly, even if you can’t see them. This is the single most important prep step for a no-sand project. A good degreasing is non-negotiable.
3. What is the most durable paint to use without sanding?
For standalone durability, mineral paint is often the winner because it has a built-in top coat and cures to a very hard finish. However, the most durable system overall is a bonding primer followed by a high-quality enamel paint (like a cabinet and trim enamel) and a protective top coat. This combination is tough enough for kitchen cabinets and tabletops.
4. How long does no-sand paint take to fully cure?
It varies by brand, but you should plan for a full cure time of 21-30 days. The paint will be dry to the touch in a few hours and ready for a second coat shortly after, but it needs that extra time to harden completely. Be gentle with the piece for the first month.
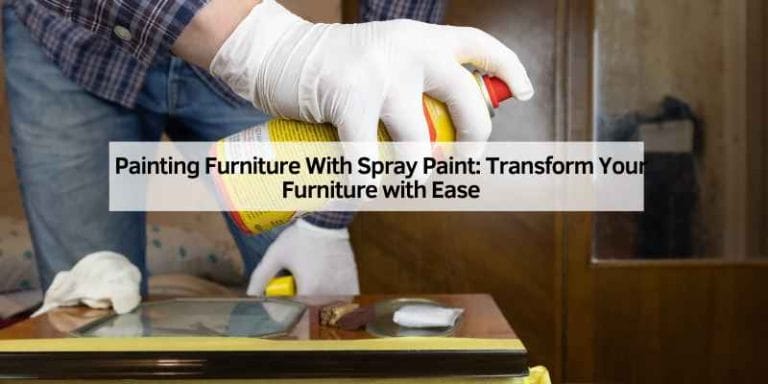
5. Can I use spray paint on wood furniture without sanding?
Yes, you can, by following a similar process. Use a spray-can version of a bonding primer first. After cleaning the piece, apply a light coat of the spray primer. Once dry, you can use your favorite brand of spray paint. Applying several thin coats will give you a much smoother finish than one heavy coat.
6. What’s the best brush to use to avoid brush strokes?
A high-quality, soft-bristled synthetic brush is your best choice for a smooth finish with water-based paints like chalk, mineral, or latex. Brands like Purdy or Wooster make excellent synthetic brushes. For flat surfaces, a small foam roller will give you an almost spray-like finish.
7. Is chalk paint durable enough for a kitchen table?
On its own, no. But when properly sealed, it can be! To make a chalk-painted kitchen table durable, you need to apply at least three coats of a high-performance, water-based polyurethane top coat. Wax finishes are not durable enough for a surface that gets heavy use and frequent cleaning.
Your Beautiful “New” Furniture Awaits
Giving an old piece of wood furniture a new life doesn’t have to start with the dreaded task of sanding. By choosing the right product—whether it’s the simplicity of chalk paint, the durability of mineral paint, or the versatility of a bonding primer—you can achieve a stunning, professional-quality finish with far less work.
The key to success is in the preparation. A truly clean surface is the foundation for a lasting paint job. Take your time with the cleaning step, choose your paint with confidence, and allow it to cure properly. Soon, you’ll be admiring a beautiful piece of furniture that you transformed yourself, and you’ll be looking around for your next easy, no-sand project!