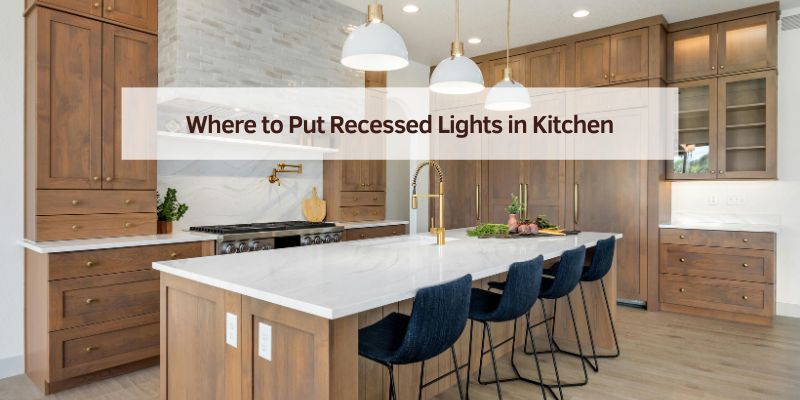
Where to Put Recessed Lights in Kitchen
Hey there! So, you’re thinking about adding recessed lights to your kitchen, and you want to get it just right. I totally get it—nothing transforms a space like good lighting, and as a car enthusiast, I’m all about precision, whether it’s tuning an engine or lighting up my kitchen. When I decided to upgrade my kitchen’s lighting, figuring out where to put recessed lights was a bit like mapping out a custom car mod. It took some trial and error, a lot of measuring, and a few chats with electrician friends to nail it. Now, my kitchen feels bright, functional, and stylish, like a showroom-ready ride.
In this article, I’m sharing everything I’ve learned about placing recessed lights in a kitchen. From spacing to layout ideas, I’ll break it down in simple steps so you can create a space that’s both practical and inviting. Whether you’re a DIYer or planning to hire a pro, let’s dive in and light up your kitchen the right way!
Why Recessed Lights Are Perfect for Kitchens
When I started planning my kitchen upgrade, recessed lights caught my eye. They’re sleek, modern, and don’t clutter the ceiling like bulky fixtures. In a kitchen, where you’re chopping veggies, cooking, or just hanging out, they provide clean, even light without casting weird shadows. It’s like having daylight on demand, which is a game-changer when I’m prepping meals or working on small projects at the counter.
Recessed lights also blend into any style. My kitchen leans modern with stainless steel appliances, but these lights would work just as well in a cozy farmhouse setup. They’re versatile, low-maintenance, and can be dimmable, which I love for setting the mood during dinner parties. But the big question is: where do you put them? Let’s figure that out together.
Understanding Your Kitchen’s Lighting Needs
Before I grabbed a ladder and started cutting holes, I took a step back to think about how I use my kitchen. Every kitchen is different, and the way you cook or entertain shapes where your lights should go. My kitchen is a hub for everything—meal prep, coffee chats, even sketching car designs at the island. I needed bright light for tasks but also softer options for relaxing.
Think about your kitchen’s zones. The main ones are task areas (like the sink, stove, and counters), ambient areas (for general lighting), and accent areas (like your island or dining nook). I learned that recessed lights work best for task and ambient lighting, while pendants or under-cabinet lights can handle accents. Mapping out these zones helped me decide where to focus my lights. Grab a notebook and jot down how you use your space—it’s like planning a car’s wiring before you start installing.
General Guidelines for Recessed Light Placement
When I first looked into recessed lighting, I was overwhelmed by all the “rules.” But after some research and a bit of experimenting, I found a few simple guidelines that work for most kitchens. These are my go-tos, and they’ll give you a solid starting point.
For general lighting, space your recessed lights about 4 to 6 feet apart. This depends on your ceiling height—my 8-foot ceiling needed lights every 5 feet to avoid dark spots. If your ceiling is higher, like 10 feet, you might space them closer to 4 feet for brighter coverage.
The size of the light matters too. I used 6-inch recessed lights for most of my kitchen because they’re standard and give good coverage. For smaller areas, like above my sink, I went with 4-inch lights. Smaller lights are great for focused tasks, while larger ones spread light better for general use.
Another tip: keep lights 2 to 3 feet away from walls. I made the mistake of placing one too close to a wall, and it created a weird shadow. Think of it like aligning your car’s headlights—you want the beam to spread evenly, not hit a wall.
Lighting the Kitchen Island
My kitchen island is the heart of the space, where I prep meals, eat breakfast, or show off my latest car sketches to friends. Lighting it properly was a priority. I learned that recessed lights can work for islands, but you need to plan carefully to avoid glare or uneven light.
For my 6-foot island, I placed two 6-inch recessed lights about 3 feet apart, centered above the island. This gives bright, even light for tasks like chopping or mixing. If your island is longer, like 8 feet, you might need three lights, spaced 2 to 3 feet apart. For smaller islands, one light might do the trick, especially if you pair it with pendants.
Position the lights so they’re directly above the island’s surface, not the edges. I measured twice to make sure mine were centered, kind of like aligning a car’s wheels for perfect balance. If your island doubles as a dining area, consider dimmable lights. I added a dimmer switch, and it’s awesome for switching from bright prep mode to cozy dinner vibes.
Illuminating Task Areas
Task lighting is where recessed lights really shine (pun intended). In my kitchen, I spend a lot of time at the sink, stove, and counters, so I made sure these spots were well-lit. Bad lighting while washing dishes or cooking is like trying to change a spark plug in the dark—frustrating and messy.
For the sink, I placed a single 4-inch recessed light directly overhead. It’s focused and bright, perfect for scrubbing pots. Above my stove, I used two 4-inch lights, one on each side, to avoid shadows while I’m stirring or flipping. For countertops, I spaced 6-inch lights every 4 feet along the perimeter, about 12 inches from the cabinets. This lights up the whole workspace without glaring in my eyes.
One trick I learned: angle the lights if your fixtures allow it. My sink light is slightly tilted to hit the basin, which cuts down on glare. It’s like adjusting your car’s fog lights to hit the road just right.
Creating Ambient Lighting
Ambient lighting is the background glow that makes your kitchen feel welcoming. I wanted my kitchen to feel warm and open, even when I wasn’t cooking. Recessed lights are great for this, but you need to spread them out evenly to avoid a “spotlight” effect.
I placed 6-inch recessed lights in a grid pattern across my kitchen ceiling, about 5 feet apart. This creates a soft, even glow that fills the room. For my 12×12-foot kitchen, I used six lights total—three rows of two. If your kitchen is larger, you might need more, but the 4-to-6-foot spacing rule works for most spaces.
To keep things cozy, I used warm white bulbs (around 2700K). They mimic the glow of old-school incandescent bulbs, which feels homey without being too yellow. I also installed a dimmer for the ambient lights, so I can lower the brightness when I’m just chilling with a coffee. It’s like fine-tuning your car’s suspension for a smooth ride.
Avoiding Common Placement Mistakes
I’ll be honest—I made a few rookie mistakes when I first installed my recessed lights. Let me save you some headaches by sharing what I learned.
Don’t place lights directly above where you stand. I had one right over my stove, and it blinded me every time I looked up. Move them slightly forward, like 12 inches from where you’ll be working, to keep the light on your task, not in your eyes.
Don’t skimp on lights to save money. I thought four lights would be enough for my kitchen, but it left dark corners. Adding two more made all the difference. It’s like underestimating how much horsepower you need—go for enough power to get the job done.
Don’t ignore your ceiling height. My friend with a 10-foot ceiling tried using my 5-foot spacing, and his kitchen looked dim. Higher ceilings need closer spacing or larger lights to spread the glow. Measure your ceiling and adjust accordingly.
Finally, don’t forget about other light sources. I paired my recessed lights with under-cabinet LEDs for extra task lighting and a pendant over the island for style. It’s like layering accessories on a car—each piece adds to the overall look.
Choosing the Right Bulbs for Recessed Lights
Picking the right bulbs for your recessed lights is just as important as where you put them. I experimented with a few options before finding what works best for my kitchen.
Go for LED bulbs—they’re energy-efficient, last forever, and come in tons of styles. I use 60-watt equivalent LEDs (about 800 lumens) for my 6-inch lights and 40-watt equivalent (around 450 lumens) for the 4-inch ones. They’re bright enough for tasks but not harsh.
Color temperature matters a lot. I chose 2700K warm white bulbs for a cozy feel, but 3000K (soft white) is great for a slightly brighter, modern vibe. Avoid anything above 4000K—it’s too cool and makes your kitchen feel like a garage (unless that’s your goal!).
Beam angle is another thing to consider. I used wide-beam bulbs (120 degrees) for ambient lighting and narrower beams (40-60 degrees) for task areas like the sink. It’s like choosing the right headlight pattern for your car—wide for city driving, focused for highways.
Make sure your bulbs are dimmable if you’re using a dimmer switch. I bought non-dimmable LEDs by mistake once, and it was a bummer. Check the packaging to be sure.
Planning for Electrical and Installation
Installing recessed lights isn’t a quick weekend project unless you’re an electrical wizard. I’m handy with cars, but wiring was a bit out of my comfort zone, so I called in a pro for part of the job. Here’s what I learned about the process.
First, check your electrical setup. My kitchen didn’t have enough circuits for new lights, so my electrician added a dedicated one. This prevents overloads, like when you’re running the microwave, blender, and lights all at once.
Plan your layout on paper before cutting holes. I sketched my kitchen, marked where each light would go, and measured twice. It’s like laying out a car’s exhaust system—you don’t want to cut until you’re sure.
If you’re DIYing, use a stud finder and a hole saw to cut clean openings. I watched my electrician do this and was glad I didn’t try it alone—ceilings are tricky. Make sure you have access to the attic or crawlspace for wiring, or it gets complicated fast.
Hire a licensed electrician if you’re not confident. My guy charged about $600 for six lights, including wiring and installation. It was worth it for peace of mind, like paying a pro to rebuild your engine.
Table: Recessed Light Placement Guide
Here’s a quick table I put together based on my experience. It sums up where to put recessed lights in different kitchen areas.
| Area | Light Size | Spacing | Distance from Edge | Tips |
|---|---|---|---|---|
| Kitchen Island | 6-inch | 2-3 feet apart | Angle light to hit the basin | Use dimmable lights for versatility |
| Sink | 4-inch | Single light | Directly overhead | 12 inches from the stove |
| Stove | 4-inch | 2 lights, 2 feet apart | 12 inches from the cabinets | Avoid shadows while cooking |
| Countertops | 6-inch | 4 feet apart | Use warm white bulbs for a cozy feel | Wide-beam bulbs for even coverage |
| General Ambient | 6-inch | 4-6 feet apart | 2-3 feet from walls | Use warm white bulbs for cozy feel |

My Journey with Kitchen Recessed Lighting
When I moved into my house, the kitchen had one sad, dated fixture that made everything look dingy. As a car guy, I’m used to upgrading things, so I decided recessed lights were the way to go. I started by sketching my kitchen and playing with layouts, but my first attempt was a mess—too few lights, bad spacing, and one right above my stove that blinded me.
After some research and a call to my electrician buddy, I redid the layout with six lights, proper spacing, and dimmable LEDs. Now, my kitchen feels like a pro workspace during the day and a cozy hangout at night. It’s one of my favorite home upgrades, right up there with my car’s new sound system. Seeing it come together was so satisfying, and I’m excited to help you do the same.
Conclusion
Figuring out where to put recessed lights in your kitchen might seem daunting, but it’s totally doable with a little planning. I’ve been through the process, from sketching layouts to flipping the switch on my new lights, and it’s one of the best upgrades I’ve made. By focusing on your kitchen’s zones—island, task areas, and ambient spaces—you can create a setup that’s both functional and stylish.
Space your lights carefully, choose the right bulbs, and don’t be afraid to call a pro if you need help. When you’re done, your kitchen will feel like a brand-new space, ready for everything from late-night snacks to big family dinners. So, grab a tape measure, start planning, and get ready to light up your kitchen like a show car at a rally. You’ve got this!
FAQ
How many recessed lights do I need for my kitchen?
It depends on your kitchen’s size. For my 12×12-foot kitchen, I used six 6-inch lights spaced 5 feet apart. Larger kitchens might need eight or more. Plan for 4-6 feet between lights.
Can I install recessed lights myself?
If you’re handy with wiring, maybe. I did some prep, but hired an electrician for safety. It’s tricky if you don’t have attic access or electrical experience.
What size recessed lights are best for a kitchen?
I used 6-inch lights for general and island lighting and 4-inch lights for tasks like the sink. Six-inch is standard, but 4-inch works for focused spots.
Should recessed lights be dimmable?
Yes, I love my dimmable lights. They let me switch from bright for cooking to soft for chilling. Just make sure your bulbs and switch are compatible.
How far from the wall should recessed lights be?
I keep mine 2 to 3 feet from walls to avoid shadows. Too close, and you get weird patches of light, like I did with one early mistake.