Will Wood Stain on Shelves Bleed Onto Clothes? Pro Advice
Many folks worry about wood stain bleeding onto their clothes when they put them on shelves. This is a common worry, especially for people new to DIY projects or home organizing. It can feel tricky to know for sure if your freshly stained shelves are safe for your favorite sweaters.
But don’t fret! We’re here to make it super simple. We’ll walk you through exactly what you need to do to make sure Will Wood Stain on Shelves Bleed Onto Clothes?
Pro Advice is a worry of the past. Let’s get your shelves ready without any color mishaps.
Protecting Clothes From Wood Stain Bleeding
This section talks about how to stop wood stain from getting on your clothes when they touch shelves. We’ll explore why this happens and the best ways to prevent it. It’s all about making sure your stored items stay clean and your shelves look great.
Understanding Wood Stain and Color Transfer
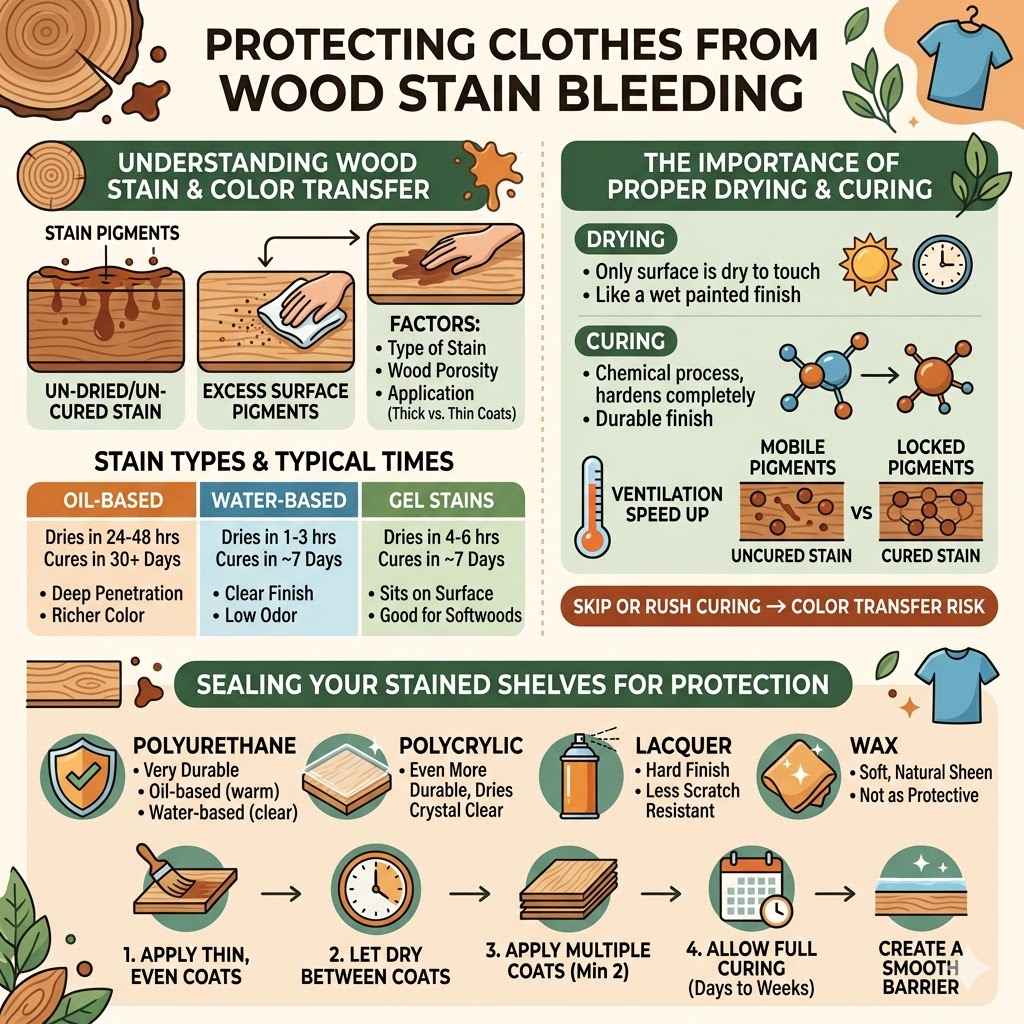
Wood stain is used to change the color of wood and bring out its natural beauty. It’s made of pigments or dyes that soak into the wood’s surface. Sometimes, if the stain isn’t fully dried or cured, it can transfer onto other things that touch it.
This is the main reason people ask, “Will wood stain on shelves bleed onto clothes?”
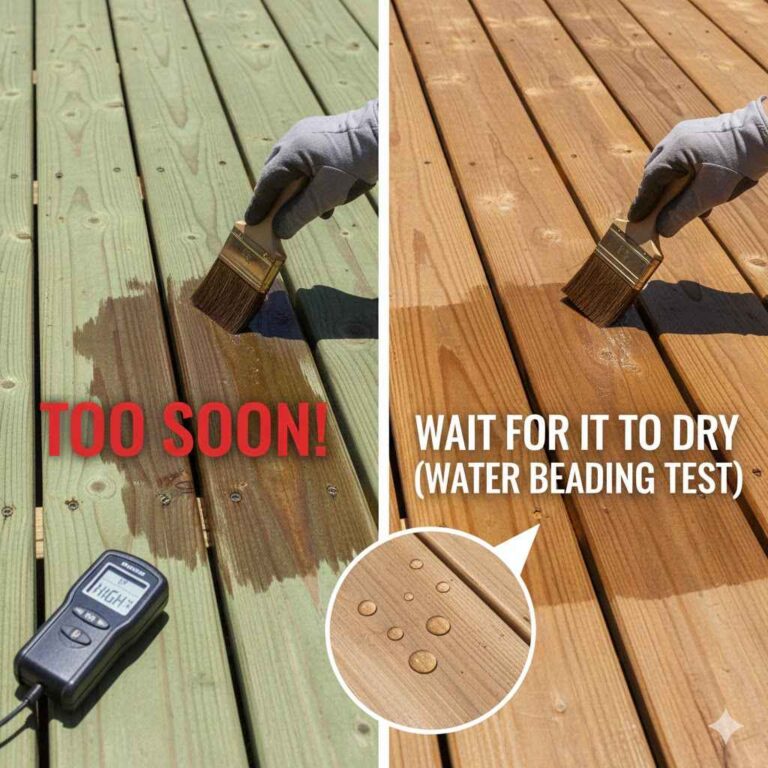
Factors like the type of stain used, how it was applied, and the wood itself play a big role. Oil-based stains often take longer to dry than water-based ones. Also, if you apply too much stain, it might not penetrate the wood evenly.
This excess can sit on the surface, ready to rub off.
Even after the stain feels dry, it might not be fully cured. Curing is a chemical process that hardens the stain. This can take days or even weeks.
Until it’s fully cured, there’s a chance of color transfer. This is why patience is key when staining furniture.
- Stain Types and Drying Times:
- Oil-Based Stains: These tend to penetrate deeper into the wood and can take 24-48 hours to dry to the touch. Full curing can take 30 days or more.
- Water-Based Stains: These dry much faster, often within 1-3 hours. However, they might not offer the same depth of color as oil-based stains. Curing usually takes about 7 days.
- Gel Stains: These sit more on the surface and can be good for tricky wood types. They typically dry within 4-6 hours and cure in about 7 days.
The way you apply the stain also matters. Applying thin, even coats is better than thick, gloppy ones. Too much stain can lead to pooling, which increases the risk of bleeding.
Always wipe off excess stain thoroughly with a clean cloth after applying.
The type of wood also influences how stain behaves. Hardwoods like oak or maple absorb stain more evenly than softwoods like pine. Pine has more natural oils and grain variations that can sometimes lead to blotchiness and uneven staining.
Using a pre-stain wood conditioner can help softwoods absorb stain more uniformly.
The Importance of Proper Drying and Curing
Drying and curing are two different but equally important steps after staining your shelves. Drying means the surface of the stain is no longer wet to the touch. Curing is when the stain hardens completely through a chemical process.
It’s like the difference between a wet paint finish and a fully hardened, durable finish.
When you ask “Will wood stain on shelves bleed onto clothes?”, the answer often hinges on this crucial curing period. If the stain is only dry to the touch but not fully cured, the pigments are still somewhat mobile. Any pressure or friction, like clothes rubbing against it, can lift these pigments and cause them to transfer.
Skipping or rushing the curing process is a common mistake. People want to use their shelves quickly. However, this can lead to ruined clothes and stained shelves.
It’s best to let your shelves cure in a well-ventilated area, away from direct sunlight and extreme temperatures, which can affect curing time.
Proper ventilation is key. It helps the solvents in the stain evaporate, speeding up both drying and curing. If you’re working in a humid environment, drying and curing can take longer.
It’s better to wait a little longer to be sure than to risk damaging your items.
Think of it like baking a cake. You can’t take it out of the oven too early, or it will be gooey in the middle. The same applies to wood stain.
It needs time to set and harden all the way through.
Some people use fans to help with airflow, which is a good idea. However, don’t point fans directly at the wet stain, as this can cause uneven drying or create ripples in the finish.
To test if your stain is fully cured, you can gently rub a clean white cloth over a discreet area. If any color comes off, it’s not ready. Continue to wait and test periodically.
Sealing Your Stained Shelves for Protection
Once your wood stain has fully dried and cured, the next vital step to prevent color transfer is applying a protective topcoat or sealant. This is the ultimate barrier between your clothes and the stained wood. Without a good sealant, even a fully cured stain might still have a slight risk of rubbing off over time, especially with repeated contact.
A topcoat does more than just seal the stain; it also adds durability and protects the wood from moisture and wear. There are several types of sealants, each with its own pros and cons. Choosing the right one depends on how you’ll use the shelves and the look you want to achieve.
Common sealants include polyurethane, polycrylic, lacquer, and wax. Polyurethane is very durable and comes in oil-based and water-based formulas. Oil-based poly offers excellent protection and a warm amber tone, but it has strong fumes and takes longer to dry.
Water-based poly dries clear and quickly with low odor, making it a popular choice for indoor projects.
Polycrylic is similar to water-based polyurethane but is even more durable and dries crystal clear, making it ideal for lighter wood stains where you want to maintain the original color. Lacquer provides a very hard finish but is less resistant to scratching than polyurethane. Wax finishes offer a soft, natural sheen but are not as protective and require reapplication.
Applying the sealant in thin, even coats is crucial, just like with the stain. Follow the manufacturer’s instructions for drying times between coats. Most sealants require at least two coats for adequate protection, and some may require more depending on the expected wear and tear.
Allowing the sealant to fully cure, not just dry, is just as important as letting the stain cure. This can take several days to a couple of weeks. Until the sealant is fully cured, it’s still vulnerable to damage and can potentially transfer its own color if it contains any pigments, though most clear sealants do not.
For shelves that will hold clothes, choosing a durable, clear sealant like polyurethane or polycrylic is highly recommended. This will create a smooth, protective surface that is easy to clean and highly unlikely to transfer color onto your garments.
Real-Life Example: The Attic Storage Project
Sarah wanted to organize her attic and decided to build simple wooden shelves. She stained them a rich walnut color. After letting the stain dry for 24 hours, she immediately started placing her neatly folded sweaters and shirts on them.
Within a week, she noticed faint brown smudges on the shoulders and sleeves of some of her lighter-colored clothes. She realized the stain hadn’t fully cured and had transferred. She had to carefully wash all affected clothes and then restain the shelves, this time waiting a full week for the stain to cure and then applying three coats of water-based polyurethane.
After the polyurethane dried and cured for another week, she tested it by pressing a white cloth against the shelf for a minute; no color transferred. Her clothes remained pristine after that.
Sample Scenario: Heirloom Blankets on Display
Mark was building shelves to display his family’s heirloom blankets. He chose a light oak stain to enhance the wood grain. He was very concerned about the blankets being damaged.
After staining, he allowed the shelves to dry for two full days. Then, he applied four thin coats of clear water-based polycrylic, letting each coat dry for four hours before applying the next. He then let the shelves sit for ten days to fully cure before carefully placing the blankets.
Not a single fiber of the blankets was discolored, and the shelves looked beautiful and felt smooth to the touch.
Common Mistakes to Avoid When Staining Shelves
This part focuses on the common errors people make when they stain shelves. Knowing these mistakes can help you steer clear of them and get great results, ensuring your shelves are beautiful and won’t damage your clothes.
Rushing the Drying Process
One of the biggest mistakes people make is not allowing the wood stain to dry completely. When a stain feels dry to the touch, it doesn’t mean it’s ready for the next step or for use. Wood stain needs time for the solvents to evaporate and the pigments to settle properly.
If you apply a topcoat too soon, it can trap the wet stain underneath. This can lead to a cloudy finish, peeling, or the stain not hardening correctly. For the question “Will wood stain on shelves bleed onto clothes?”, rushing drying is a direct cause of it.
Even if you don’t plan to put clothes on the shelves right away, improper drying can cause issues later. The stain might continue to rub off over time. It’s essential to follow the manufacturer’s recommended drying times.
These are usually listed on the stain can.
Factors like humidity and temperature can affect drying times. In humid conditions, water-based stains can take longer. Oil-based stains are generally more sensitive to temperature and can dry slower in cooler environments.
To test if a stain is dry, lightly touch an inconspicuous area with your finger. If any color transfers to your finger, it’s not dry enough. Always err on the side of caution and wait a little longer if you’re unsure.
For example, if a can says “dries in 2-4 hours,” it might be safe to apply a second coat after 4 hours. However, for shelves that will hold clothes, it’s wise to wait at least 12-24 hours for the initial drying before considering a topcoat.
Consider the environment where your shelves are located. If they are in a damp basement, drying will take much longer. Good airflow helps speed up drying, but direct fans can sometimes cause unevenness.
The key takeaway is to be patient. The extra waiting time ensures a much better and more durable finish, preventing problems down the line.
Skipping the Sealer or Topcoat
Another common oversight is believing that once the wood stain is dry, the job is done. Many people skip applying a protective sealer or topcoat altogether. This is a critical mistake, especially when the shelves will be in contact with fabrics like clothes.
A sealer acts as a barrier. It locks the stain into the wood and prevents it from transferring onto other surfaces. Without this barrier, even fully cured stain has a higher chance of rubbing off, especially with friction from clothes being placed on and removed from the shelves.
Think of the topcoat as a shield for your stain. It not only prevents color transfer but also protects the wood from spills, scratches, and general wear and tear. This means your shelves will look better for longer and remain functional without damaging your belongings.
There are various types of sealers, such as polyurethane, polycrylic, lacquer, and varnish. Each offers a different level of durability and sheen. For shelves that will hold clothes, a durable clear coat like polyurethane or polycrylic is generally recommended.
When choosing a sealer, consider its compatibility with your wood stain. Most water-based stains work well with water-based sealers (like polycrylic), and oil-based stains are often paired with oil-based sealers (like polyurethane). However, many modern sealers are designed to work over most stain types.
Always read the product label carefully. It will tell you how to apply the sealer, how long to wait between coats, and the recommended curing time. Rushing the application or curing of the sealer can lead to the same problems as rushing the stain.
Applying at least two to three thin coats of sealer is usually necessary for good protection. This builds up a strong, even surface. Each coat should be allowed to dry fully according to the manufacturer’s instructions before the next coat is applied.
The final cure time for sealers is also very important. It can take up to a month for some oil-based polyurethanes to fully cure, although they are usually dry to the touch much sooner. During this period, the finish is still hardening.
Applying Stain Too Thickly
Applying wood stain too thickly is another mistake that can lead to a host of problems, including color transfer onto clothes. When stain is applied in heavy, uneven coats, it doesn’t penetrate the wood properly. Instead, it tends to sit on the surface.
This excess stain can take much longer to dry. It can also result in an uneven, blotchy finish. The pooled stain is the part most likely to transfer onto fabric.
It’s like having a sticky coating on your shelves.
The best practice is to apply stain in thin, even coats. Use a brush or rag to apply the stain to a small section of the shelf at a time. Work with the grain of the wood.
This ensures the stain penetrates evenly and helps achieve a uniform color.
After applying the stain, it’s crucial to wipe off any excess with a clean, lint-free cloth. This step is called “wiping back.” Wiping back removes the stain that hasn’t been absorbed by the wood, leaving behind a smooth, even color.
If you’re using a gel stain, you might apply it a bit differently, as gel stains sit more on the surface. However, even with gel stains, thin applications and proper wiping are key. Always read the instructions for the specific stain you are using.
Too much stain can also make it harder for subsequent coats of sealer to adhere properly. This can compromise the durability of the finish and increase the risk of future problems.
The goal is to achieve a rich color that enhances the wood grain, not a thick, painted-on look. Thin coats and proper wiping are the secrets to a professional-looking stain job that is less likely to cause color transfer.
Consider this: If you pour water on a table, it beads up. If you spill oil, it spreads out. Stain applied too thickly acts more like the oil, likely to transfer.
Stain absorbed into the wood, sealed, is more like the water – it stays put.
Real-Life Example: The Garage Shelving Mishap
John decided to build some sturdy shelves in his garage for storing tools and paint. He bought a dark mahogany stain and, wanting to get the job done quickly, applied it very liberally with a roller, thinking more stain meant a richer color. He let it dry for only 12 hours before placing some old tarps on them.
The next day, the tarps were streaked with dark brown. He had to scrape off the excess, reapply the stain in thin coats, wipe it back, and then wait 48 hours before applying a durable sealer. The mistake of applying the stain too thickly directly led to the color bleeding onto the tarps.
Sample Scenario: Kids’ Craft Supplies Shelf
Maria was making shelves for her children’s craft supplies. She chose a bright blue wood stain. She accidentally applied it too thickly in some areas, leaving puddles of excess.
She wiped it back, but not thoroughly enough in the thicker spots. She let it dry for 24 hours and then applied a coat of clear sealant. A week later, when her daughter’s new white t-shirt brushed against the shelf, it got a blue smudge.
Maria learned that thorough wiping after stain application is as important as the staining itself to prevent bleed-through.
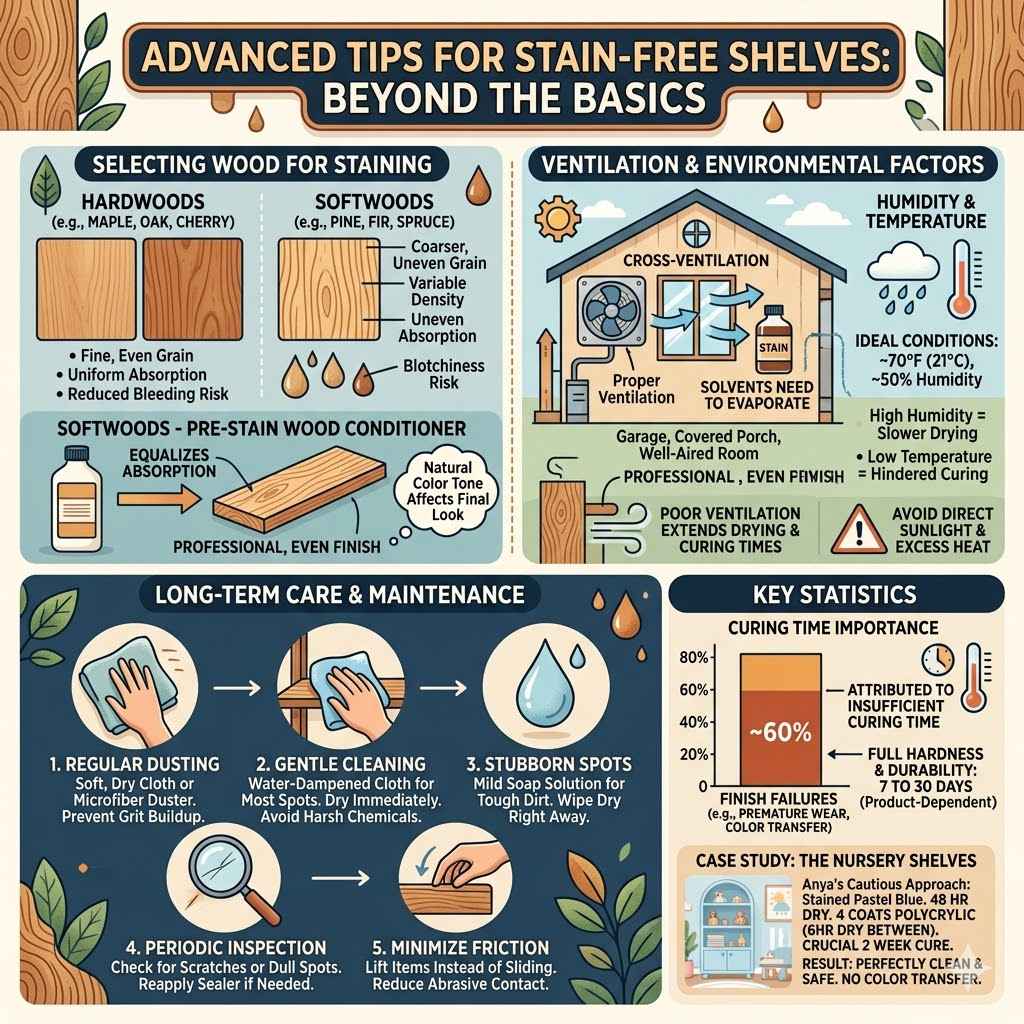
Advanced Tips for Stain-Free Shelves
This section offers some extra advice to make sure your shelves are absolutely stain-free and safe for your clothes. These tips go a bit beyond the basics to give you peace of mind.
Choosing the Right Wood for Staining
The type of wood you choose for your shelves can significantly impact how well the stain adheres and how likely it is to bleed. Different woods have different densities, grain patterns, and natural oils, all of which affect stain absorption.
Hardwoods like maple, oak, and cherry are dense and have fine, even grains. They tend to absorb stain uniformly, resulting in a smooth, consistent color. This even absorption reduces the chances of excess stain pooling on the surface.
Softwoods like pine, fir, and spruce have coarser grains and more variations in density. They can sometimes absorb stain unevenly, leading to blotchiness. This is because some areas might soak up more stain than others.
This unevenness can increase the risk of surface stain that can bleed.
If you’re working with a softwood like pine, using a pre-stain wood conditioner is highly recommended. A conditioner helps to equalize the absorption of the stain. It essentially seals the wood pores slightly, preventing the stain from penetrating too deeply in some areas while allowing it to soak in more evenly in others.
You can buy pre-stain conditioners at most hardware stores. Apply it according to the manufacturer’s instructions before applying the stain. This step is crucial for achieving a professional and even finish, especially on pine.
It makes the staining process much more predictable.
When considering your wood choice, think about the desired final look and the effort you’re willing to put in. Hardwoods might be more expensive but offer a smoother staining experience. Softwoods are more budget-friendly but may require extra steps like conditioning to achieve a flawless finish.
The wood’s natural color also plays a role. Some woods have a warm tone that can affect the final appearance of the stain. Always test your stain on a scrap piece of the same wood first to see how the color turns out.
Ventilation and Environmental Factors
The environment in which you stain and seal your shelves plays a crucial role in the drying and curing process. Proper ventilation is not just about comfort; it’s essential for a good finish and a stain-free result.
Wood stain contains solvents that need to evaporate. This evaporation process is how the stain dries and cures. In a poorly ventilated area, these solvents linger, significantly extending the drying and curing times.
This prolonged wetness increases the risk of the stain bleeding onto clothes.
Ideally, you should stain and seal your shelves in a well-ventilated space like a garage with the door open, a covered porch, or an area with good cross-ventilation. Using fans can help circulate the air, but avoid pointing them directly at the wet stain, as this can cause it to dry too quickly on the surface, leading to brush marks or an uneven finish.
Humidity and temperature are also key environmental factors. High humidity can slow down the drying of water-based stains considerably. Very low temperatures can also impede the curing process for both oil-based and water-based products.
For best results, aim to work in a space with moderate temperatures (around 70°F or 21°C) and relative humidity (around 50%). If your working conditions aren’t ideal, be prepared for longer drying and curing times.
It’s also wise to keep your freshly stained and sealed shelves away from direct sunlight. While sunlight can help dry things, excessive heat can cause the finish to cure too quickly or unevenly, potentially leading to cracking or a weaker finish.
Pay attention to the manufacturer’s recommendations for ideal working conditions on the product labels. Following these guidelines will help ensure your stain and sealer perform as intended and cure properly, minimizing any risk of color transfer.
Long-Term Care and Maintenance
Once your shelves are stained, sealed, and fully cured, they should be quite safe for storing clothes. However, proper long-term care and maintenance will ensure they remain that way and continue to look great for years to come.
Regular dusting is the simplest form of maintenance. Use a soft, dry cloth or a microfiber duster to remove dust. This prevents dust from building up, which can become a gritty abrasive over time.
If your shelves get dirty, you can wipe them down with a damp cloth. For most sealers, a soft cloth dampened with water is sufficient. Avoid using harsh cleaning chemicals or abrasive pads, as these can damage the protective topcoat.
For stubborn spots, you might use a mild soap solution (like a drop of dish soap in water). Always wipe the area dry immediately after cleaning with a damp cloth. Do not let water sit on the surface, as prolonged moisture can eventually affect the wood and the finish.
Inspect your shelves periodically for any signs of wear and tear. If you notice any scratches or dull spots on the sealant, you might consider applying an additional coat of sealer. This is especially important for shelves that get a lot of use.
When placing clothes on the shelves, try to avoid dragging heavy items across the surface. Lift items rather than sliding them to minimize friction on the finish. This is a simple habit that can extend the life of your shelves.
If you ever decide to change the color or update the look of your shelves, you’ll need to prepare the surface properly. This usually involves light sanding to remove the old sealant and then re-staining and resealing. However, with good maintenance, you might not need to do this for a very long time.
The key to long-term care is gentle cleaning and minimizing abrasive contact. By taking these simple steps, you can ensure your shelves remain beautiful and stain-free, protecting your clothes for many years.
Statistic: Curing Time Importance
Studies have shown that up to 60% of finish failures, including premature wear and color transfer, can be attributed to insufficient curing time. While a finish might feel dry to the touch within hours, achieving its full hardness and durability can take anywhere from 7 days to 30 days, depending on the product. This highlights the critical need for patience after applying stains and sealers to ensure a long-lasting, problem-free finish.
Case Study: The Nursery Shelves
When Anya was setting up her baby’s nursery, she built custom shelves for toys and linens. She chose a soft pastel blue stain. She was very cautious about the safety and cleanliness of everything in the nursery.
After applying the stain, she let it dry for 48 hours. Then, she applied four coats of water-based polycrylic, allowing each coat to dry for at least 6 hours before the next. Crucially, she let the shelves cure in a guest room for two full weeks before moving them into the nursery and placing baby blankets and clothes on them.
No color transfer occurred, and the shelves remained perfectly clean and safe.
Frequently Asked Questions
Question: How long should I wait before putting clothes on my newly stained shelves?
Answer: It’s best to wait at least 7 days after the final coat of sealer has been applied, and ideally longer, up to 30 days, to allow the finish to fully cure. While the stain and sealer might feel dry much sooner, full curing is essential to prevent color transfer.
Question: Can I use a wax finish instead of polyurethane on my shelves?
Answer: You can use a wax finish, but it’s generally not recommended for shelves that will hold clothes. Wax offers a beautiful sheen but provides less protection than polyurethane or polycrylic, making it more susceptible to wear and color transfer over time. For clothing storage, a more durable sealer is preferable.
Question: What should I do if my clothes get stained from the shelves?
Answer: If your clothes get stained, try to wash them immediately according to the fabric care instructions. For the shelves, ensure the stain is fully cured and then apply a good quality clear sealant. If color is still transferring, you may need to lightly sand and reapply stain and sealer.
Question: My shelves feel slightly sticky even after drying for a few days. What is wrong?
Answer: Stickiness usually means the stain or sealer has not dried or cured properly. This could be due to high humidity, low temperatures, applying the product too thickly, or insufficient drying time between coats. Ensure proper ventilation and follow manufacturer guidelines for drying and curing.
Question: Is it safe to use colored sealers on my shelves?
Answer: While some sealers come in tinted or colored options, it’s generally best to use a clear sealer for shelves intended for clothing storage. Tinted sealers, even if they appear dry, can still contain pigments that might transfer onto clothes over time. Clear sealers provide protection without adding color risk.
Conclusion
Ensuring your wood-stained shelves won’t bleed color onto clothes is achievable with careful steps. Always allow stain to fully dry and cure, then apply a durable clear sealant like polyurethane or polycrylic. Patience during drying and curing is key.
Properly sealed shelves offer excellent protection, keeping your garments pristine and your shelves looking beautiful for years to come.